While I'm there, here are a few updates about the recent light improvements I've made.
A few months ago, I built a new front light system test prototype for the bike using a big 100W LED chip. (See
here if you don't know what I'm talking about).
I tested it over the past 5-6 months and everything is working well. The only remaining issue was the materials I used for it, since it was just a simple prototype I used PLA plastic, which usually starts deforming at about 50 degree C.
The LED does generate a lot of heat. The headsink and copper plate did a great job at pulling away most of it, but the plastic did deform over time even though I limited the LED power to only 30W.
So anyway, the plan has always been to replace them with metal versions at some point.
In order to do that, I'm using a somewhat unusual method: 3D printing + metal plating.
The process it the following:
-3D print the object. Here I use ASA plastic, which can handle high heat without deforming. I successfully used ASA to print components for my Honda motorcycle exhaust and the part survived very well so I know this plastic is pretty awesome. Also it doesn't degrade over time, it is intended for outside use.
-Step 2 is to paint the plastic part with a conductive paint. The paint I used contains very small copper flakes and its conductivity is excellent. This is necessary for the next step.
-Step 3 is to electroplate the part. Basically, you plunge the part in an acid solution, with a pure copper electrode on the positive side (cathode) and the part you just painted on the other side, acting like the anode. Then turn up the current (how much current depends on the parts surface area) then wait. The longer you wait, the thicker the copper layer will be.
There is a small caveat, which is that the longer it's being plated, the more irregularities and surface defects you're likely to get. So if you want a perfectly smooth result then you might have to build thickness in several passes and sand in between.
In my case, I've built a layer of copper of about 1mm all over the part in one single pass.
-Once you're satisfied with the copper plating results, you can proceed to the last step which in my case was nickel plating. The goal here is to protect the copper from oxydation. Here you don't build thickness, you just plate for a few minutes until the copper is protected (nickel electrodes are expensive)
I forgot to take pictures of the process, but here was the the result:

The part on the left has gone through all the steps so that's the final result.
The one on the right went though the copper plating and final sanding and was being prepped for the final nickel plating.
Finishing only depends on how much prep and sanding you're willing to do. For these parts I didn't need good appearance so I did the very bare minimum, but it's possible to get stunning results if you're willing to put some time in it.
The benefits of this method are the following:
-The parts are mechanically stronger. Obviously, the thicker the layer, the stronger it will be.
-The part feels and weights like an actual metal part. If done properly no one could guess it's been 3D printed in the first place. It is actually real, solid metal, only the core remains plastic.
-It can widstand a lot of heat. I once made a small test part, heat it until it was glowing red and it didn't deform or get damaged at all. The plastic inside might melt, but the outside metal shell won't
-It's possible to make electrically conductive paths, you can mask some zones and make copper traces if you need to give current to some device without using wires
-you're using chemicals of various colors (deep green and deep blue) which makes you look like a mad scientist.
The caveats:
-It's a bit work intensive if you need a nice finish.
-The process is intimidating and seems rather complicated the first time
-Copper and especially nickel electrodes can be expensive
-The parts are significantly heavier than regular plastic ones
-Electrodeposition is sometimes tricky, the metal can stick to some areas more than others
For example, I got a big defect on one of the parts, as you can see on this picture:

The copper plating on this part didn't go well in this area (this was my fault, I made a mistake during prep), so it ended up with lots of porosity and some of the copper didn't stick.
Here it really didn't matter for this particular application, so I didn't bother to fix it. I think this picture is interesting because it shows well the kind of thickness you can get from such a process. This was obtained after about 10 hours of plating (I left it overnight, basically). The other sides of this part are nice and smooth.
So, next I had to make a plate to hold the LED chip, this was made with an actual pure copper plate (4mm thick):

Finally, I assembled the parts together:


The only visible part of this assembly is at the front, so I only tried to get a good finish there.
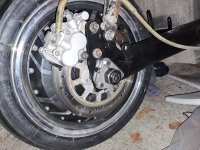
I then installed this into the bike together with the old prototype plastic one (I'm curently making a second unit to replace it asap).
Now that it is metal plated I can feed it with more power. So far it is set up to 50W per light and the results are impressive, it is extremely bright. It does heat a bit but so far it seems to be ok. I forgot to tke pictures, but there is a small fan blowing air onto the heatsink fins whenever the light is switched on.
Next step is to make the metal parts for the second light, then I need to find a good way to modulate the power. I'd like to use the starter lever to be able to set the light intensity, this way I can adapt it to the riding conditions and traffic anyway I want.


 )
)")


