Qulbix Raptor 140

Thanks offroader. Some really good advise as usual.

Now that I have to install the wheels and motors, would it be safe to work with a regular bike stand? What do you all use to jack this up? Any special dirtbike stands I need to order?
 
sonnetg said:
Thanks offroader. Some really good advise as usual.

Now that I have to install the wheels and motors, would it be safe to work with a regular bike stand? What do you all use to jack this up? Any special dirtbike stands I need to order?

I never used a stand but I must say that I wish I spent the time and actually built something. Take a look at my new seat for my Q76R. When I was building it and I dropped the bike into something.

You can get away with flipping the bike on the seat and haldlebars to do rear and front tire and brake work , just put something soft under the seat.

Another thing I recommend you do is buy some of this 3M scotchgard stuff and put it on the swingarm where the chain is, any parts where the brake lines will touch including the fork. Those brake lines will wear away paint very fast, even just a single ride.

I actually used almost a whole roll of this on my Q76R on a lot of different areas. I didn't use it on the very top and guess what, I accidentally hit it with a wrench the other day when unbolting my seat and wish I had.

Recommended to watch videos and make the spray solution of alcohol, Johnson baby soap, & water. I learned my lesson by not using this stuff on my raptor 165 and the brake lines wore the paint on my fork / front of the bike.

http://www.ebay.com/itm/151420139336?_trksid=p2057872.m2749.l2649&ssPageName=STRK%3AMEBIDX%3AIT


Oh sorry to see your new bike seat torn like this. Your bike probably weighs over 100 lbs. I can imagine how easily it could get damaged if dropped. I need to be very careful on handling this puppy.
And I haven't really thought on protecting the swingarm guard. Probably not a bad idea to tape it up to project it from chaffing. I will certainly invest in some scotchguard tape. Thanks for the tip.

I tried to test the motor today, but ran into some snafu with mismatched hall-sensor wires. Working with Kinaye support now. Barent has been very helpful with answering all my questions and support. Tomorrow should be fun getting the motor and disk rotors aligned.

I thought I had a nice stand, but it's too low for 19" wheels. I may need to use some wood blocks. If not, i can turn the bike upside down and work on it.

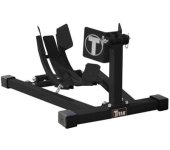
Here's the stand I had ordered for this, but it's too low:
 

Attachments

  • DirtBike_Stand.jpg
    DirtBike_Stand.jpg
    218.2 KB · Views: 2,814
You can easily do something like this with some wood. I did build a stand (but not like the one in the picture) when I was building my q76r, it was really useful.
It doesn't have to be pretty... Just get some wood, a drill and some big ass wood screws

Edit : as for bolts coming loose. I personally tend to use loctite on every metal to metal bolt. I had the same issue with my electric longboard and loctite solved everything. I don't even have to overtighten the bolts now.
My raptor is my first ebike so I don't have any experience with that and can't say it will hold. But I believe there's more vibrations in a longboard than in a properly suspended bike
 
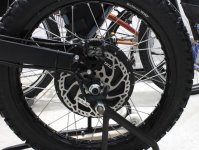
whew! Made more progress sooner than I anticipated. My biggest fear was with not being able to fit the rear Shimano Zee hydraulic brakes, but to my amazement, it was the easiest thing to do. All I had to use was use 12 mm worth axle spacers (6 mm each side), and it worked out of the box. The most difficult part was to get the moto tires on to the wheels without puncturing the tube. I had to retry a total of 5 times.. :shock: Other than that, it was actually much easier than I expected. Now I need a decent stand so that I can safely park it at home. The stand I am using seems a bit wobbly. Any recommendations on stands or wheel chocks for 19" moped wheels?

I also ran into an issue with seatpost clamp. The one I had ordered doesn't fit. Should I order a 34 mm seatpost clamp? Any links to it would be greatly appreciated. Thank you so much.

Cheers.

file.php


file.php
 

Attachments

  • IMG_1315.jpg
    IMG_1315.jpg
    208.1 KB · Views: 1,426
  • IMG_1312.jpg
    IMG_1312.jpg
    213 KB · Views: 1,426
Nice that it is coming along. Getting the tires on the rim is a big pain, most of the time they go on difficult, once in a while they go on easy, so it must all be in the technique.

Did you use rim protectors to not scratch the rim?

What do you think about this stand? It can hold a downhill bike, so I assume it should hold up our bikes.
What I like about this is you can work on the rear wheel and spin it, great for brake and tire work.
Only thing is you will have to lift the bike into it, not the biggest deal.
Gets great reviews like the following: it has a lot more weight to it than I was expecting. Feels beefy and indestructible.
I was expecting the tubing to be thin, but was pleasantly surprised that it was thick and heavy duty.


Will work with your zee crankset.

https://www.feedbacksports.com/shop/scorpion-tall-black/#prettyPhoto

IMG_20141118_114227.jpg
 
Offroader said:
Nice that it is coming along. Getting the tires on the rim is a big pain, most of the time they go on difficult, once in a while they go on easy, so it must all be in the technique.

Did you use rim protectors to not scratch the rim?

Oh man...i scracthed the heck out of the rim, but it's not as bad as it could have been. Now that you have mentioned it, I probably could have used an old tube or something. But are there any products out there to protect the rim?
Everytime I tried to put on the rear tire, i poked a hole in the tube. It does take a bit of practice. At the end, and after reviewing tons of youtube videos, I was able to figure it out. The trick was not to push the tire spoon too deep, which is easier said then done. I had to use my pinky finger a bit to push the tube out of the way while working the spoon, and I think that did the trick. The bike is really huge, and it seems much bigger than online images for some reason. Once I adjust the shocks/springs and sit on it, it should be fine though. Will visit the LBS tomorrow for a seat clamp. The next big hurdle will be the battery, but will take my time with it.

Thanks for the link for the stand. I am not sure how the bottom bracket will like it, but I am shopping around. I may visit the motosports store as well, as purchasing online is a hit or miss. For now, I have it leaning against the wall, which seems to work fine as long as no one touches it.. :)

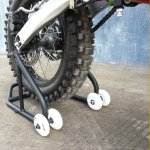
I am looking for a wheel chock/stand as the image below. Hopefully local stores should have these in stock.

Cheers.
 

Attachments

  • DirtBikeCradle-Chock.jpg
    DirtBikeCradle-Chock.jpg
    10.3 KB · Views: 2,747
Did you inflate the tube a little before inserting the tire irons? If you didn't, this is a guaranteed hole as I have learned.

Yes you need to use those blue rim protectors or you will scratch up the rim, use like 3 of them. They make it a harder to install the tire when using them but they do protect your rim.

I find the beat buddy helpful also.

I think I'm going to buy that stand I showed you. Inserting it into the crankset is no problem at all, the only issue is if the stand can support a 115 LBS ebike. I can't see why it wouldn't even though they rated it for 50 lbs. They said it was very sturdy and overbuilt so 115 lbs shouldn't be any issue. I like it because I can work on the rear wheel easily.
 
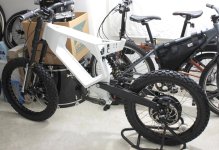
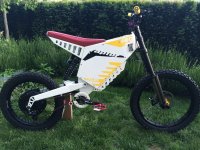
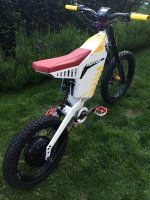
here is my bike completed without the controller. only found out controller was not working right before trying to fire up sucks. Will have to wait it comes back before I can start riding.
the frame is very well built, the feel of this bike is pretty much like a light dirt bike. I never heard anyone breaking a raptor frame anyway. Qulbix really done a good job on designing this frame.
planning to start another one with the q76 frame, just think 2 bikes is needed to overcome the downtime

140 2 resized.jpg
140 1 resized.jpg
 
BCTECH said:
here is my bike completed without the controller. only found out controller was not working right before trying to fire up sucks. Will have to wait it comes back before I can start riding.
the frame is very well built, the feel of this bike is pretty much like a light dirt bike. I never heard anyone breaking a raptor frame anyway. Qulbix really done a good job on designing this frame.
planning to start another one with the q76 frame, just think 2 bikes is needed to overcome the downtime

View attachment 2
[
[[/attachment]

Thats a cool build BCTech, when will you have everything running?
 
Rix said:
BCTECH said:
here is my bike completed without the controller. only found out controller was not working right before trying to fire up sucks. Will have to wait it comes back before I can start riding.
the frame is very well built, the feel of this bike is pretty much like a light dirt bike. I never heard anyone breaking a raptor frame anyway. Qulbix really done a good job on designing this frame.
planning to start another one with the q76 frame, just think 2 bikes is needed to overcome the downtime

View attachment 2
[
[[/attachment]

Thats a cool build BCTech, when will you have everything running?

thx Rix.
whenever my max e arrives back to me after fixing
I am totally up for running
 
BCTECH, looking good, what is that a red seat cover?

Why did you add the charge port to the side?
 
Offroader said:
BCTECH, looking good, what is that a red seat cover?

Why did you add the charge port to the side?

Thank you Offroader. Without your help I wouldn't be able to finish anything on this bike.
red seat was a custom order from Qulbix. I used the top holes for key switch and on/off button, so I had to make another hole for charging port. put it on the side trying to avoid water going in during the rain. I also was going to mount the display on the frame but gave up due to too much work
 
Wow...nice work BCTECH. Is that a QS motor? What is your battery configuration? Is that DIY as well?
 
sonnetg said:
Wow...nice work BCTECH. Is that a QS motor? What is your battery configuration? Is that DIY as well?

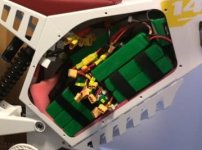
yes the qs205 v3. I am using multistar lipo 20s, fits perfectly 15pc and the max e inside
there is quite some space left that I can actually squeeze 5pc more if I need more range later on
batter miltstar.jpg
 
Are those lipos bulk charged? I still have a long way to go when it comes to the battery for my Raptor build. I am planning on building my own 18650 pack, but still trying to source a decent spot welder.

Anyways...hopefully you should receive you controller in no time. It sure is a bummer to have this happen, but such is any builds with any ebikes...you can always expected the unexpected to happen. :shock: :lol:

Cheers.
 
I personally wouldn't put the controller inside the battery compartment, you are going to have to make sure it doesn't overheat.

BCTECH, looking at the lipo packs, I would recommend that you use closed cell foam to stabilize those packs better. The outside cells will deform on the corners from the velcro.

I damaged so many lipo cells by not having them secured better. I didn't have the room to secure mine properly.

They won't get damaged instantly, but with time the outside cells of the pack, cell 1 and 4, will start having problems.

I am so happy with my current bike pack that is completely surrounded tightly by closed cell foam, and the side covers squeeze the pack from the side.
 
Offroader said:
I personally wouldn't put the controller inside the battery compartment, you are going to have to make sure it doesn't overheat.

BCTECH, looking at the lipo packs, I would recommend that you use closed cell foam to stabilize those packs better. The outside cells will deform on the corners from the velcro.

I damaged so many lipo cells by not having them secured better. I didn't have the room to secure mine properly.

They won't get damaged instantly, but with time the outside cells of the pack, cell 1 and 4, will start having problems.

I am so happy with my current bike pack that is completely surrounded tightly by closed cell foam, and the side covers squeeze the pack from the side.

yes will check the heat time by time, if it gets too warm then will mount to outside
did you also put the closed cell foam on the side covers? my lipo might still be moving if I only have one layer underneath. unless I make them to each layer or squeeze them very tight
 
Hi guys long time!!!! Stopped by to say hello and salivating on what some of you have done!!!
 
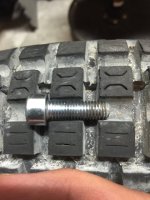
Went for a ride today and the bike felt wiggly. Turns out I stripped the swingarm bolt and it feels like the nut is stripped also. I haven't pulled the swingarm to check the welded nut but I fear the worst.

Solutions for a stripped nut?

Image1466395252.565355.jpg


Sent from my iPhone using Tapatalk
 
Mammalian04 said:
Went for a ride today and the bike felt wiggly. Turns out I stripped the swingarm bolt and it feels like the nut is stripped also. I haven't pulled the swingarm to check the welded nut but I fear the worst.

Solutions for a stripped nut?


Sent from my iPhone using Tapatalk

That really sucks. This is why I always recommend everyone to use nord lock washers on those swing arm bolts and to check them before every ride. Without nord lock washers they will eventually loosen, same goes with the axle nuts, nothing you can do about this.

I had one of those bolts loosen up on my raptor 165 and luckily I caught it early, but lots of metal dust came out when I unloosened the bolt to check it, but was still fine.

If you had the Q76R and stripped it you could easily just use a longer bolt and a nut, but I'm not sure how the Q140 is and if it is like the q165 you may not be able to do that as easily.

I would see if you can possibly use a longer bolt and try and drill and tap the hole deeper. Have you tried a different bolt, maybe the bolt is just stripped? The other option is to use a helicoil, and is probably the best option to fix it properly.

I would get rid of those aluminum washers Qulbix uses on the swingarm bolts and use nord lock washers. My axle nuts and swingarm bolts have not loosened yet on my Q76R when using nord lock washers, I still check them quickly before most rides.
 
Offroader said:
Update on the Nord Lock washers. These things work and are highly recommended. However they do take some minor care to make sure they work properly and you will still need to do torque checks every so often.....

Offroader (or anyone else), do you recall the pinch-bolt size? I am ordering up some Nordlock but I am not near the bike.

I am ordering:
M8 Nord-Lock, Large OD (16.6mm OD) for swingarm
M16 Nord-Lock, Large OD for Cromotor Axle
M?? Nord-Lock, Standard OD for Pinch Bolts - EDIT - I think these are M5 - Here is the LINK

Per Hyena's recommendation, I am going to try a longer swingarm bolt. Standard seems to be M8 x 1.25 x 25mm. I will give a M8 x 1.25 x 50mm a shot. I'm not really sure how much deeper the threads actually go but an allen wrench goes way inside.
Hyena said:
I had a swing arm bolt come loose and when you compressed the suspension you could see that whole side of the frame moving around. I wasn't able to tighten it back up as it seemed to have stripped the end few threads from the movement while loose. Getting a longer bolt was an easy fix - the thread is actually tapped a fair bit deeper than the standard bolt.
Jay, do you recall how long your new bolts are? I know it was a while back now...
 
Mammalian04 said:
Offroader said:
Update on the Nord Lock washers. These things work and are highly recommended. However they do take some minor care to make sure they work properly and you will still need to do torque checks every so often.....

Offroader, do you recall the pinch-bolt size? I am ordering up some Nordlock

I am ordering:
M8 Nord-Lock, Large OD (16.6mm OD) for swingarm
M16 Nord-Lock, Large OD for Cromotor Axle
M?? Nord-Lock, Standard OD for Pinch Bolts

Per Hyena's recommendation, I am going to try a longer swingarm bolt. Standard seems to be M8 x 1.25 x 25mm. I will give a M8 x 1.25 x 50mm a shot. I'm not really sure how much deeper the threads actually go but an allen wrench goes way inside.
Hyena said:
I had a swing arm bolt come loose and when you compressed the suspension you could see that whole side of the frame moving around. I wasn't able to tighten it back up as it seemed to have stripped the end few threads from the movement while loose. Getting a longer bolt was an easy fix - the thread is actually tapped a fair bit deeper than the standard bolt.
Jay, do you recall how long your new bolts are? I know it was a while back now...

on the 140 swingarm, it seems the space is very tight and will only enough to fit in the socket cap bolt head. I remember there's not enough space for nord nut on that area.

I wonder if we can thread the hole through and put a threaded rod with 2 nuts both ends?
 
BCTECH said:
on the 140 swingarm, it seems the space is very tight and will only enough to fit in the socket cap bolt head. I remember there's not enough space for nord nut on that area.

Are you sure? I will measure and post a picture when I get home but I think that space in there with the bearing is pretty big...

BCTECH said:
I wonder if we can thread the hole through and put a threaded rod with 2 nuts both ends?

I thought the same thing. It might be tricky to get it to stay in place when tightening the other side through.
 
Mammalian04 said:
BCTECH said:
on the 140 swingarm, it seems the space is very tight and will only enough to fit in the socket cap bolt head. I remember there's not enough space for nord nut on that area.

Are you sure? I will measure and post a picture when I get home but I think that space in there with the bearing is pretty big...

BCTECH said:
I wonder if we can thread the hole through and put a threaded rod with 2 nuts both ends?

I thought the same thing. It might be tricky to get it to stay in place when tightening the other side through.

are you planning to put the nord washer before or after the aluminum spacer? between the bolt and the spacer, pretty sure not enough space.

is there any place that can order a very long bolt that is long enough to go through both ends?
 
Back
Top