Radwagon 72v GMAC Phaserunner Build

My Mac 12t shows no sign of overheating, but I don't push it either. I bought it because it's top speed was rated at 20mph. I can count on one hand the number of times I might see that speed in a month, and can guarantee I wasn't pedaling at the time!

Point being, unless you know a lot more about how the bike is being used, I would NOT assume it's going to overheat because yours does.
 
Bullfrog - I don't think overheating the GMAC will be a significant issue for me. I am always pedaling and I'm not usually pushing the motor anywhere near its max power. If I'm doing over 25 mph, its usually only for short stretches. An example of this is one stretch on the way to taking my daughter to school. There is a light at a busy intersection that leads to a 1/2 mile stretch of road without bike lane. On that stretch it is safer for me to ride with traffic at 25-30mph before we get back to where the bike lane starts again and we slow down.

Normal riding for me is 20-23mph with me pedaling with decent effort and the motor doing 250-350 watts depending on terrain. At that level the motor is not getting to 50 degrees C. In hitting some of the bigger hills I normally ride (I haven't gotten to ride all of them yet with the new setup) max temp I've seen so far is 76 degrees with the motor putting out about 1000 watts for 3-4 minutes. I've got power rollback programmed to start at 110 degrees.

Ahicks - I suspect you are correct and the way I ride will just not be stressing the GMAC very much at all.
 
Perfect...sounds like you have it covered and with the temp monitor you'll always know exactly where you are as far as temps :D .

I have mine programmed the same way just to make sure I don't melt anything if I am not paying attention :lol: .

Just for those considering a MAC, sooo much depends on how much you pedal, if you ride hills...how steep and how long the hills are, and your tire diameter (the wheel the motor is in not the other one :D ) and of course how much you weigh and how much weight you add to the bike. I'll hit 110C after riding a little while with my 650B/27.5 wheel (722 mm OD) and I run around 100C over the same route with my 26" (689 mm OD) wheel. That is holding the throttle wide open and just commuting from A to B. I rarely pedal...just getting old :) . All of the above data is with the ambient temperature around 95F/35C.

IMO a MAC is the best motor available for riding on hard/paved roads because it provides more torque than a Direct Drive motor for the same amperage BUT because there is an air gap between the motor and the shell/housing, it can't reject the heat like a Direct Drive motor so a set up like you have with temp monitoring and power rollback are smart.

The Grin Tech Motor Simulator is a great tool for estimating how your bike is going to perform: https://www.ebikes.ca/tools/simulator.html AND I have to give a compliment to Justin and Grin Technologies for helping me and others, they are awesome so support them with your purchasing if possible :mrgreen: .
 
RSwannabe...it looks like you have done a great job with your build and I am very impressed with the level of detail you put into everything :D . When you have time, will you please post some comments on your opinion of how the following individual components and how they have performed for you, whether you would recommend them for others, and if you would select anything different if you were to do it all over again:

A. Grin Tech GMAC motor

B. Luna 72v battery

C. Maxxis Hookworm tire

I just bought a 24" and a 26" Hookworm, I am looking for a 72v battery, and one day I plan to buy another MAC motor :lol: .

Thank You Very Much for starting this thread and documenting everything you have done...IMO it will be super helpful to everyone interested in ebikes :D .
 
Bullfrog,

I don't even have 50 miles on the new components yet, but I'm happy to give my initial impressions and will follow up with more later:

A. The Grin GMAC motor. Initial impressions are build quality and design is excellent. The design of the torque arm seems well thought out and everything went together without issues. The regen torque is strong, much stronger than my previous direct drive motor. Acceleration is strong at 1500 watts, but frankly not as strong as I was expecting. I've read up on this and it seems to be a not uncommon feeling with Phaserunner controllers. They seems to just not give as good a perceived "hole shot" acceleration from a stop as some other controllers do. The Phaserunner/GMAC combo has far stronger acceleration than my old 750 watt DD Shengyi, but I guess I was (unreasonably?) expecting more. I am nonetheless very happy with it. The GMAC does feel like it has roughly 4x the torque of the stock Radwagon Shengyi direct drive motor (roughly 28nm vs 100nm) and I can now fly up hills that were a slow grind previously. The Grin simulator for the GMAC at 72v seems to have been right on the money from what I can tell so far. Expected speeds for given wattages and hills FEELS like they were accurate, as well as the 35 mph predicted top speed. I am completely satisfied with the GMAC so far.

B. Luna 72V 10ah "Fat Triangle" battery. Not a lot to say on this so far. It charges to 84v as it should (using the Luna Advanced Charger) and is performing well so far. I have not done a full run down of the battery to see total real world mileage for my use, but everything feels "right" so far. It seems like I'm seeing 4-6 volts of sag when pushing 1000-1500 watts, and I THINK that is normal for a 20S 3P cell configuration. I am frankly not used to tracking my battery by its voltage yet, as I was previously just using the 1-5 bars on the stock Radwagon screen. I think I would be seeing less voltage sag with more cells in parallel, but that's the tradeoff for running 72v in a relatively compact form factor that I am using.

C. I've been running the Maxxis Hookworm tires on my bike since before this recent rebuild, so I have more time and experience with them. I chose them as I wanted a slick tire for less rolling resistance compared to the stock Kenda K-Rad semi knobbies that came on the RW. I also wanted to go as wide as I thought would fit on the stock frame and under the stock fenders. The Hookworms come in 26" x 2.5" (as compared to 2.3" for the stock tires) and were the widest option I thought I could get to fit. They were a tight fit and I had to dial in the adjustment on the fenders, but they work well without any rubbing and I am VERY pleased with them. They have less rolling resistance than the Kendas, are quieter, and grip and corner far better on pavement, which is primarily what I ride with this bike. I also think they look a lot cooler too. I was talking to Mike Radenbaugh, the founder of Rad Power Bikes, the other day and he commented that the Hookworms were always his favorite tire for his personal ebike builds when it was just a hobby for him.

Hope this helps!
 
MAJOR CORRECTION ON THE GRAPH SHOWN BELOW...IGNORE THE SCALE ON THE VERTICAL AXIS AND IT IS FAIRLY CORRECT.

If you use the Grin Tech charge simulator for a 14s6p 25R cell battery from EM3ev, the change in voltage per cell between 80% and 40% is .36 volts. That would make the curve even flatter than it appears in the image. To get a .5 volt swing you have to go from 90% to 29% SOC .


Thanks RS...great info for me and everyone.

On your battery...you may know this already but the voltage isn't the best indicator of how much is left because with a Li battery there is a period of time where the voltage stays almost constant but the capacity varies from roughly 80% down to 40%, the graph below should help. Monitoring the Amp Hours or the Watt Hours used is the most accurate way to tell how much you have used and how much is left but you really need to experimentally verify the capacity of your battery and it drops as the battery gets older :lol: so it is always a moving target. If anyone is running a Cycle Analyst or can program the low voltage cut off...EM3ev recommends not going below 2.75v per cell...which would be 35.75v for 13s, 38.5v for 14s, and 55v for a 20s battery. RS...I am posting a lot of this stuff hopefully just to help newbies, I have a feeling you already know it :D . Now here is that graph I mentioned on constant voltage:


That is great to hear on the Hookworms :D . I went through every tire in the world (fairly true statement) and I found two 26" tires that I thought were pretty good...one is the Hookworm (of course) and the other is the Schwalbe Super Moto-X. The Super Moto-X is "ECE-R75" certified for ebike use at a continuous 50 kph (31 mph). Although the 26" version doesn't say so in the specs, I called Schwalbe and verified that is was certified. The 26" version is 62mm wide (max section width) when mounted on an Alex MD 35 rim (34mm internal width). I am actually going with 24" tires initially just to slow my top speed down and to have more acceleration off the line :D . I am waiting for EM3ev to come out with their 72v (20s6p) battery, I want to get one with LG HG2 cells...they said it is in the works but no date for availability as of this writing. The 24" tires I found in case anybody is interested are the Hookworm (it comes in 20", 24", 26", and 29") and the Schwalbe Crazy Bob 24x2.35". They both measure 60mm wide (max section width) on an Alex DM24 rim (24mm internal width).

A couple more questions for you:

A. What wind of the GMAC did you go with? Based on some runs I did with the Grin Tech Motor Simulator, I am guessing the 10T. If anyone has not used the Grin Tech Motor Simulator, it is an extremely useful tool. Here is a link to it: https://www.ebikes.ca/tools/simulator.html I played around with it for a while and went through every single motor listed in the drop down menu to find out the 12T MAC has the most acceleration of all the motors listed except the Bafang G60. AND I mean all of them because I clicked on the "show all" at the bottom of the drop down menu as opposed to "show active". The G60 is 170mm wide and won't fit in my frame...it also has smaller phase wires and isn't built to handle the abuse as much as a MAC/GMAC.

B. What battery and phase amperage settings are you using now? I have seen pics and read about the Phaserunner but no hands on experience yet. I am considering using one with my BBSHD when I go to 72v. I am currently running a 12 FET IRFB3077 (40A) Infineon Sensored Controller with the battery current set to 40A and the Phase amperage set to 112A...with my 12T MAC in a 24" DM24 rim and a Halo Contra 24x3.00" tire that has an OD of 652mm and it accelerates pretty good. The phaserunner may have a delay to protect your motor (and the electronics) when starting...knowing Justin (Grin Tech), it does. If you haven't already, may want to discuss the acceleration with Justin to see how changing the delay (if it exists), the battery amperage setting, and the phase amperage setting could affect your set up...OR just play with it and see what you get :lol: .

Thank You :D
 
Bullfrog - good info on the batteries a lot of which I didn't know. I'll try tracking AH or WH to see how that works for me. I've got low voltage cutoff set at 60v right now. As for the GMAC, I have the 10T winding. I wanted the higher torque for the loads and hills I deal with. I went for 72v to give me the 35 mph occasional use max speed even while running the 10T winding.

While I was expecting a stronger feel of acceleration what I am getting is far better than the old DD motor, and more than adequate for me. I've got the settings for the battery at 40a max and motor limited to 1500 watts right now. I could do quite a bit more wattage on the motor, but I don't think I really needs to for my use and I'm keeping things conservative while I get to know the setup better.
 
Thanks...I'll check back occasionally and I'll post if I get any useful data on my end.
 
Bullfrog said:
Now here is that graph I mentioned on constant voltage:

That is a **very** useful graphic to help noobs understand the impact of the curve slope on trying to guesstimate SoC via voltage only.

However, I've been crunching the actual numbers of that supposed LFP curve, and have concluded they are nothing close to reality.

The **principles** are true, the shape of the curve is valid at least for a "pretty low" C-rate maybe 0.2C, but I just want to prevent anyone putting faith in it at a quantified level of detail for the actual voltages listed on the Y axis.

If anyone wants to drill down on this specific issue, don't want to derail so maybe start a new thread.

 
And note, the curve for the LI chemistries used for bikes here is radically different - much steeper - from the LFP one shown.

Even more so than LFP's would be at a high C-rate of discharge, say 1-2C.

 
john61ct...perhaps, you were thinking the .5 volts on the graph was the battery "pack" voltage...it is the voltage for an individual cell. I don't want to be presumptuous, just trying to figure out how you came to your conclusions.

If you use the Grin Tech charge simulator for a 14s6p 25R cell battery from EM3ev, the change in voltage per cell between 80% and 40% is .36 volts. That would make the curve even flatter than it appears in the image. To get a .5 volt swing you have to go from 90% to 29% SOC .

Besides looking at the slope of the curve, one of the biggest things worth noting is that you don't get much more energy stored in your battery when charging from 90% to 100%. AND charging to 100% is hard on your battery...especially if you charge it to 100% and let it sit. I rarely charge above 90% which is 4.1 volts per cell/57.4 volts for the pack I mentioned above from EM3ev.

Here is a link to the Grin Tech Charge Simulator for anyone who wants to play with it: https://www.ebikes.ca/tools/charge-simulator.html?bat=cust_c7_s14_p6_l30&pct=29

Between the charge simulator and the motor simulator, you can figure out a lot about the performance of your ebike.

Here is a link to the motor simulator: https://www.ebikes.ca/tools/simulator.html

Both are under the "Tools" tab on the Grin Tech web site.
 
No, just the pack voltages on the left as I stated.

The supposed chemistry is LFP, but does not match up with 16S (nominal 48V) nor any other cell count.

The general "shape of the curve" does match LFP but as I said at very low sub-C rates, nothing to do with those used in propulsion use cases.

And your example of other LI chemistries like NMC yield radically different curve shapes as well as of course completely different voltages.

Coupled with very high discharge rates (certainly at 1C and above) the curve is just as steep as the one reresenting lead in that graphic.

Bullfrog said:
Besides looking at the slope of the curve, one of the biggest things worth noting is that you don't get much more energy stored in your battery when charging from 90% to 100%.

Your number's way off, much less capacity is sacrificed at even lower termination voltage than you think.

Once you get anywhere near the actual top of SoC - as measured by precisely timed CC discharge tests, not coulomb counting - lots / most of the energy pushed by the charger is not actually usefully stored, i.e. available for use as discharge.

And the specifics vary greatly by individual battery chemistry, and there are dozens in mainstream use just within the LI and LiPo families now.

Each needs its own V vs SoC mapping table, they vary greatly by current rate, temperature, age and the build-quality / chemical purity of the manufacturer.

TL;DR yes the "gist" of that discharge graphic is correct - for LFP at low current - but ignore its numbers. And not at all relevant for other LI chemistries, especially at propulsion rates.
 
Holy cow...I misread the graph.

I was looking at the .5v and not the left axis which is overall pack voltage.

The data would match if the change in voltage was roughly 5 volts as opposed to .5 volts...I agree the shape in general is correct.

Good catch and I stand corrected :) .

They either need to change the .5 to 5 or change the voltage on the vertical axis to volts per cell.

Just goes to show you can't believe everything you find on the internet :lol: .
 
Look at hundreds of such charts and you start to develop an understanding of the underlying realities.

Even with real-life accurate ones - usually more from individuals rather than companies - it just represents **that** chemistry, in **that** use case, at that C-rate, cycling age, temperature etc

So many variables too easy to over-generalise.
 
Wow. Truly amazing work! Love to see how far some folks are willing and able to take their projects.

I've been waffling for some time over whether to go mid-drive or some sort of hub motor for my cargo bike setup. From reading your first post, you seem to have similar constraints in hilly terrain, preference for torque sensing, and a cargo bike. Seems like the only torque sensing mid-drive (TSDZ2) gets mixed reviews in the reliability/durability department, but I really wanted to use an internal gear hub. But then the regen braking sounds amazingly helpful, and I certainly wouldn't mind limiting the wear/strain on the drivetrain. But I have some pretty steep hills (10-12%) in my daily riding to get the kids to/from school, so a mid-drive was my first thought. Ack! So much waffling...

What sort of gradients in % are the hills you have to contend with, and how has the experience been with a fully loaded bike? Has the regen going downhill been helpful in the braking department? Have you ridden any Bosch/Shimano/etc motors and if so, how does the Sempu experience compare? Looking forward to hearing your experience as you get more miles on the system.
 
Nightdiver - I looked at mid drives and test rode a bike with the tsdz2. In researching it I came to the conclusion it is not powerful or robust enough to deal with big loads or steep hills without overheating. I looked at the Bafang Max ultra, but it requires frame modification and fabrication beyond what I wanted to do. Also, a high power mid drive will destroy most internal geared hubs in short order. So I landed on the Gmac with torque sensing bottom bracket as my best option.

I have not ridden the Bosch or other TS mid drives to compare the Sempu. Sorry.

I ride hills in the 10-15% grade range regularly here and the gmac is doing great with 330-350 lb gross loads.

Hope this helps.
 
In my continuing effort to increase my visibility and safety on the bike, I asked for and received a Lumos Matrix helmet (https://lumoshelmet.co/pages/matrix) for Christmas. With the LED headlight, various rear light illumination options, and turn signals, I think this is another good addition to my visibility on the bike. I've got a big head and was worried the helmet, which only comes in one size, wouldn't fit well. However it fits fine, if not as comfortable as my previous Specialized helmet. While its a little heavier, and the dial-a-fit not quite as comfortable, it is not at all uncomfortable.

For initial trials, I've placed the wireless turn signal buttons onto the stem. I'll likely change this later as I get more use with it.
 

Attachments

  • IMG_0682.JPG
    IMG_0682.JPG
    40.9 KB · Views: 2,562
  • IMG_0683.JPG
    IMG_0683.JPG
    35.9 KB · Views: 2,562
  • IMG_0684.JPG
    IMG_0684.JPG
    42.7 KB · Views: 2,562
  • IMG_0686.JPG
    IMG_0686.JPG
    40.9 KB · Views: 2,562
While I was away from home for the holidays, the final new component for the bike arrived: the new crank set with a 50T narrow wide tooth profile for better chain retention. The cranks are Litepro square taper with a 130mm bcd (https://www.aliexpress.com/item/32838771125.html?spm=a2g0s.9042311.0.0.28254c4dtFITCS). The cranks seem to be nicely made and are relatively light. I've only one ride on them so far but seem to be pretty good. I'm actually running a narrower Q factor than my old setup by a few centimeters and the chain line is good.
 

Attachments

  • IMG_0687.JPG
    IMG_0687.JPG
    50.5 KB · Views: 2,561
  • IMG_0689.JPG
    IMG_0689.JPG
    56.6 KB · Views: 2,561
  • IMG_0688.JPG
    IMG_0688.JPG
    57.2 KB · Views: 2,561
One other update, I was flipping through the cycle analyst today and checking the stats. I'm averaging 17.7 WH per mile so far. If I maintain that average and I run the battery between 80% and 20% states of charge, I should see just about 25 miles of range. If I run the battery 90% to 10%, I should get about 32 miles of range. We'll see if this proves to be the case as I ride the bike more.
 
RSwannabe said:
I'm averaging 17.7 KWH per mile so far.

i'm just guessing, but that "k" probably doesnt' belong there. ;)


teh helmet lighitng looks interesting; do the turn signals just blink one half of the taillight area?

is the lighting area just on the surface of the styrofoam / etc padding, or is there anything under it that makes it nonsmooth, that could injure you in an impact in that area?


fwiw, if you want more lighting to make the bike itself more visible, you can use the stick on led strips that run on 12v (mine are run around 15-16v max on the sb cruiser trike). the stuff comes in rolls that can be cut into sections as small as 3 leds, in many colors.

i use white for front downlighting and a strip on the front of the canopy, and under the handlebars, red for tail and brake lights and marker/ turn lights on the sides of the rear half , and yellow / amber for turn signals front and rear, and more marker/turn lights on the sides of the front half.

examples in daylight (much more visible at night), the fork has strips for the length of the tubes (as well as mc style dot-rated turn signals)
file.php


along edges of the rear cargo/dog carrier
file.php


taillgiths and brake and right turn
file.php


tail lights near dark and after dark
file.php

file.php


front downlighting plus side downlighting on cargo pod visible
file.php

file.php


front canopy edge
file.php


and tail brake there too, plus on the top rail of the canopy/cargo rack
file.php
 
Amberwolf - yes, it should be 17.7wh per mile. I corrected my previous post. The lights on the helmet are fully integrated into the structure and everything is smooth inside and out. I don’t think they impact safety in the event of a crash in any way.

In regards to the led strips, great minds think alike. Go back to the previous page of this thread and you’ll see I already added front white and rear red leds to the bike as you suggest. I have already received multiple approving comments about my new light setup from drivers and people walking by.
 
ah, yes, i missed that somehow. :oops:
https://endless-sphere.com/forums/viewtopic.php?f=6&t=103634#p1514960


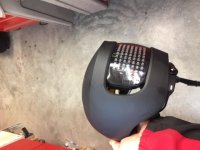
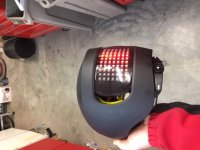
fwiw, side ligths, or at least downlights, can be a really good idea, because even as long as bikes like this are, people still don't "see" them very well for some reason. i had that problem on crazybike2 which is a simlar size to yours (very different frame/etc though).

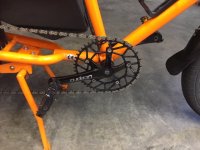
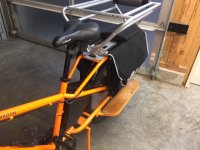
your taillgith strips give some downlighting behind you from the part on the lower area of the tubes, but i'd guess you don't have any lighting in the middle.

so you could add some red strips under the cargo sidebars so they shine on the ground itself, and the leds / strips would be just visible from the side at a diastance, as well.

then you can add some white strips under the downtube, and that will shine on the ground and forward.

appropriately-colored lights on the undersides of the toptube and seatstay/rack frame would ligth the bike itself from "inside", and make it much much more visible.

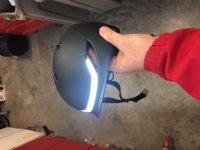
you don't have to run these lights at full brightness either; adding either diodes or resistors between the strips and the voltage source dim them. i did that with the strip on the front of the canopy, so it is more like "clearance lights" just to show the canopy is there, rather than like a headlight (which is what the front downtube lighting is more like)

i also added dimming between the top canopy tube rear strip and the power source, and the brake light switch bypasses that dimming to brighten it to full, along with the side tail lights, as well as turning on completely separate strips at right angles to the other ones, to make sure they can be seen day or night.

the turn signal strips are amber in parallel with the tail light strips in the rear, vertically, and if youw anted to do it you ahve room on your tubes on the outboard sides of the tail strips to do the same thing. similary you can do that on the fork tubes as well. i used a simple automotive flasher for led lights, and the turn signal switch built into one of the crappy ebike switch clusters that cmae with one of my kits. i htink it was supposed to be a 3speed switch for the kit, but it was marked as a turn signal with arrows, so it was handy. ;)
 
Amberwolf - My LED strips are visible from a full 90 degrees to the side, if not full brightness off axis like that. I might add some additional side/down lights as well per your suggestion. You cannot be too visible.

I had the chance to ride my bike up Queen Anne hill in Seattle today, which is not a small hill and has sections in excess of 18% grade. The bike did great. I was riding solo, with a gross weight of about 280 lbs, pedaling hard and using about 700 watts of assist from the motor. It took me about 5 minutes to hit the top of the hill and I was seeing just under 65 degrees C motor temp at the top. I could have been pushing the motor much harder if I wanted/needed to. Good to know it can tackle that hill and have plenty of power still in reserve if I need it. The very strong geared hub regen braking coming down the hill was also very nice. I could use regen for all the braking needed and not even have to use the disc brakes at all.
 
RSwannabe said:
Amberwolf - My LED strips are visible from a full 90 degrees to the side, if not full brightness off axis like that. I might add some additional side/down lights as well per your suggestion. You cannot be too visible.

i agree with that last, esepcially. :)


the reason i suggest them and use them is that the downlights light up the ground around you, making the moving spot on the road look much bigger than just a little bicycle. that generally makes drivers react in a different way than they would to a typically-lit bicycle.

the same is true of adding large-surface-area dot lighting, or evne non-dot-rated, that is at least as big as your outstrectched hand for each light (tail, brake, head, turn, etc)--they are larger single source lights, and make a bicycle look more like a car/etc., which make drivers tend to auto-react by going farther around than they would with a typically-lit biccyle.


a typical bicycle won't really hurt a driver's vehicle as they run it over.

but somthing large enough will, and anyone''s reactions are to avoid things that will hurt htem...and generally tend to ignore things that won't hurt them, if they are focused on other things.

so if you make it harder to ignore your presence, without endangering anyone, it's probably a good idea to do that. ;)


i base all the above on a lifetime of riding bicycles, mostly in traffic, and lots of experiements in visibilty and riding styles, etc. kinda wish i'd kept data charts and whatnot so i could write scientific papers on it. :lol: (though i doubt anyone would publish them since i don't have a useful degree in anything related).
 
Today I fit some new cargo bags to my bike. I wanted something with greater capacity then what I had (original versions of the Rad Ballard bags). I looked around the internet and checkout out a lot of options and finally landed on the Cargo Hold bags from Tern cycles (https://www.ternbicycles.com/gear/471/cargo-hold-panniers). They are intended for their GSD cargo bikes, but I thought I'd try fitting them to my Radwagon. They fold up quite flat when not in use to be nicely out of the way, which I really like. This is especially nice for my daughter when riding on the bike. When open they are pretty capacious. The top attachments use multilayer velcro straps and fasten securely to the Radwagon rack and they seem to be very well made. The lower attachments are not located properly to work with the Radwagon frame members. I'll ride the bike awhile without any lower connections. I've got a few options to secure the bottom of the bags if I feel I need to later. So far I really like these.
 

Attachments

  • IMG_0729.JPG
    IMG_0729.JPG
    53.3 KB · Views: 2,133
  • IMG_0731.JPG
    IMG_0731.JPG
    55.5 KB · Views: 2,133
  • IMG_0732.JPG
    IMG_0732.JPG
    57.1 KB · Views: 2,133
  • IMG_0734.JPG
    IMG_0734.JPG
    55.3 KB · Views: 2,133
  • IMG_0735.JPG
    IMG_0735.JPG
    52.6 KB · Views: 2,133
Back
Top