
Charging in series with a single balance charger.
Introduction
Hello folks. Been meaning to get around to making a newbie tutorial for 10S RC lipo charging for a while now. Here goes.
10S ( 36v/38v ) is very easy to live with on a day to day basis; there are a handful of RC chargers that are designed to do 10s, so finding the bits and pieces required is not too difficult. The 38v nominal voltage can easily provide 15-30mph speed on a hub motor ( depending on the motor ). And best of all, after everything is set up, the charging process is pretty braindead and hard to goof up!
I am going to assume that you have already bought the pieces needed to do this, however i am going to use the iCharger 1010b+ as the charger. Other RC balancing chargers work similarly, so forgive me if you have different charging equipment.
Ingredients list ( can substitute, but this is just what i am using)
+ Turnigy 20C, 5S, 5AH lipo packs
+ Radio Shack 15amp 13.8v power supply
+ Icharger 1010b+
+ 2x celllog 8s's
+ 10 gauge and 12 gauge copper wire
+ ProgressiveRC Balance extenders.
+ Hobbyking's 4mm bullet connectors ( they come stock on turnigy/zippy batteries, as of writing )
Before you start...
First, a note of caution about RC lipos.
RC lipo can be very hit or miss, quality wise. There is a good chance that out of many packs, you will eventually get a dud. So before putting your battery packs on eBike duty, it is best to test them out first to make sure you have good packs, to prevent major problems from occurring down the line.
Many balancing chargers have discharge functions that are useful here.
You can also use the bike to discharge obviously") , halogen lights, fans, or anything that will produce a significant load on the batteries will work too.
, halogen lights, fans, or anything that will produce a significant load on the batteries will work too.
( we will cover a few ways to discharge in detail at the end of this tutorial. )
But what's good and what isn't?...
First, let me tell you what a GOOD pack looks like:
1. When the pack is recieved, cell voltages do not differ between cells more than 0.1v. No cells are puffy; the pack is generally flat and straight. The stored voltage should be around 3.8-3.85v.
2. After a few balance charges, when the pack is fully discharged to 3.5v per cell average, there are no cells that are at 3.0v or below.
A graph of a good 10S pack looks like this on a balancing charger:
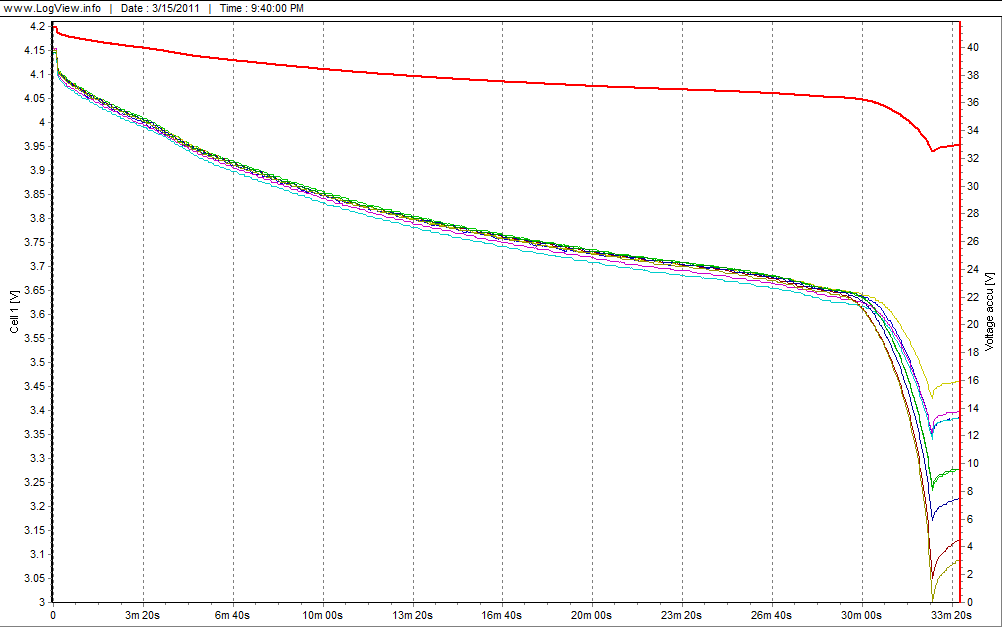
See how none of the cells are get close to 3.0v until about 3.3v average?
This is a reasonably good set of cells, and all the cells will spring back to 3.6v after a short amount of time on the charger.
A little variance at the end of the charge ( below 3.6v/cell ) is normal.
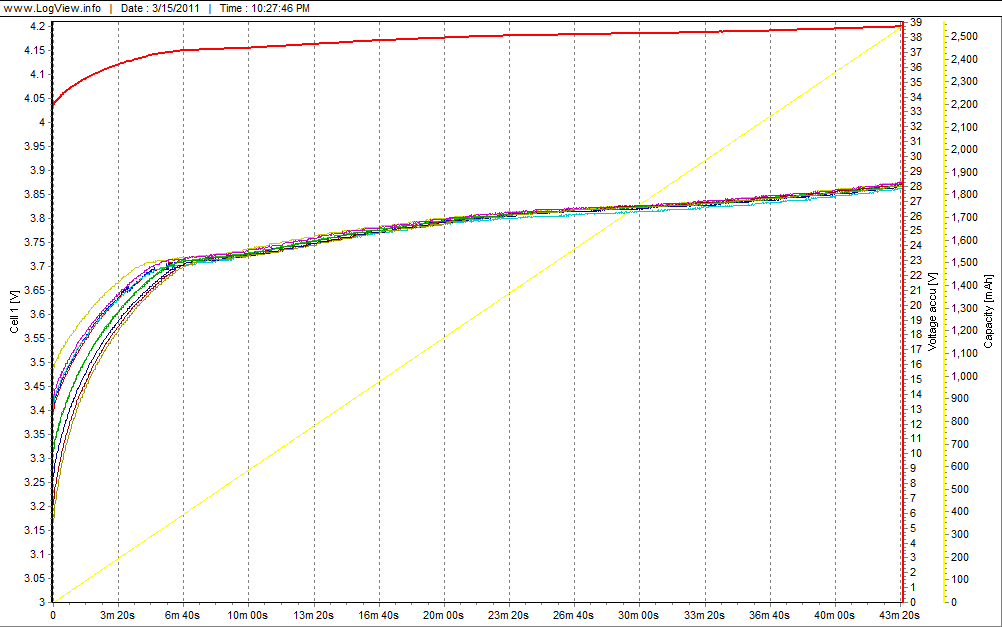
This is what the pack looks like while charging:
Now, let me tell you what a BAD pack looks like:
1. When you recieve the pack, there is more than a 0.1v difference between all the cells ... such as 4 cells at 3.85v and one cell at 3.75. This is a bad sign.
( this may be salvageable, give it a balanced charge and discharge first. )
2. The pack is visibly puffy on the outside.
( in this instance, do NOT use that pack, one of the cells either has reduced capacity, higher internal resistance, is a potential fireball, or all of the above! )
3. After pack has had a few balance charges, and one cell repeatedly go low far before the others; you've got a bad cell in there that will only get worse with time.
( if this cell repeatedly goes below 3.0v/cell, before the others hit 3.5v, this pack will be damaged eventually. Repeatedly discharging a RC Lipo cell to under it's minimum voltage could cause a fire ).
Here is what a 9 cell pack with 2 weak cells looks like while discharging and being monitored on a balancing charger:
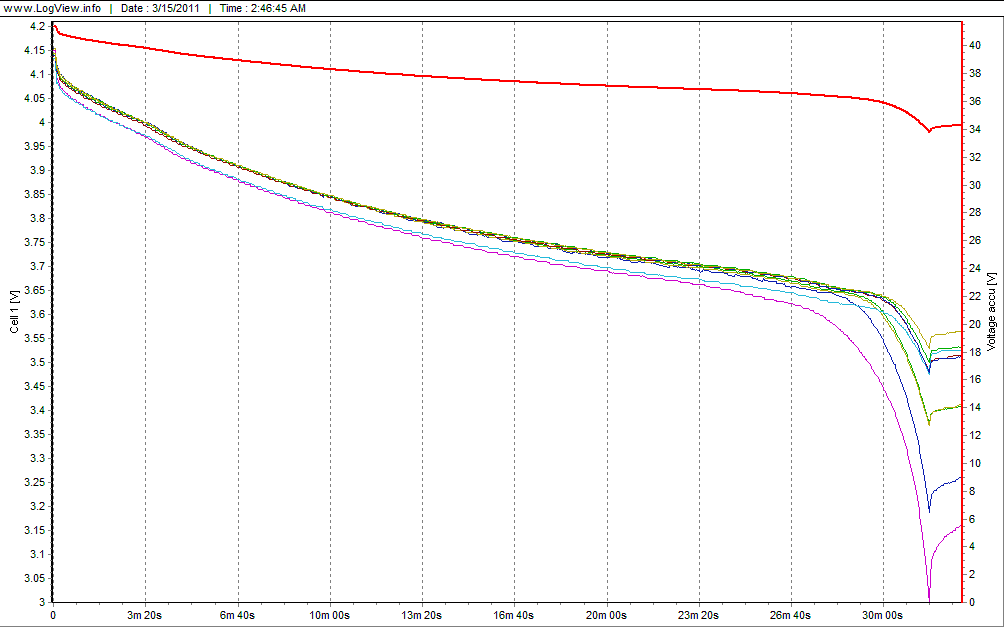
Two issues with this pack:
+ the blue cell has a good internal resistance, so it doesn't have voltage drop like the light blue and purple cells, but ultimately it is short on mAH, so it dive bombs for 0v as we near the end of the discharge for this pack.
+ The purple cell has less internal resistance than the others, AND is short on capacity(mAH), thus it will sag, and dive bomb for 3.0v when all the other cells are at 3.3-3.6v.
A pack like this will be eternally disbalanced and/or provide lower AH than rated. If the pack is acting this way after a few balance charges, it will only be trouble for you in the future..
Not all bad packs are useless. Keep one or two around just in case one of your packs experiences a cell death. If you have only puffing cell, remove it from the pack, discharge it, and send that cell to recyling.
( you can also use the packs with a bad cell or two for other purposes. Please see the end of this tutorial for more information. )
Please refer to your charger's manual on how to do use it's charge / discharge modes.
Getting started
OK, now that i'm done lecturing, let's get started.
Now the answer to the question you probably have in your mind is.. how do i hook these up?
Well, the first thing you need to do is make a serial harness.
This adds the voltage of pack #1 and pack #2 together..
It is exactly like running two 1.5 volt AA batteries together to get 3 volts.
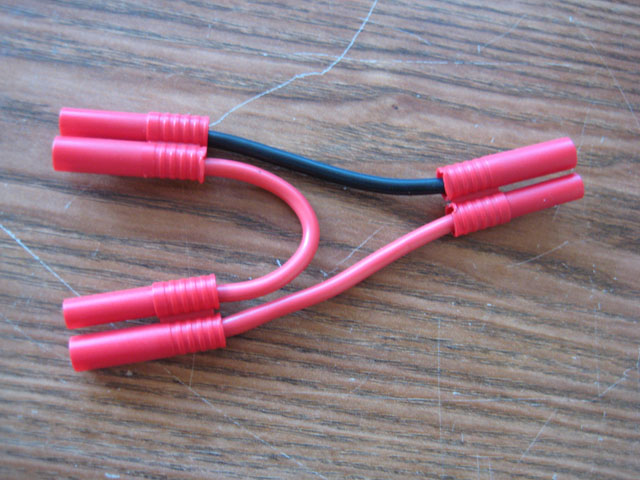
Note; you can use whichever connectors you like, i just chose hobbyking's 4mm bullets because they match what came on my lipo, are polarized, easy to solder, and dirt cheap.. some people prefer andersons.. or even larger RC connectors if they are drawing tons of amps.
( See the end of this tutorial for information on soldering these 4mm bullets, if you chose to go with this connector. )
In this example, i have used 12AWG wire because I am going to run this 10S serial pack in parallel with another 10S pack. If you are going to run only 5 amp hours, you should be using 10AWG or larger 8AWG wire.
So let's hook up our packs together now and make one big serial pack.
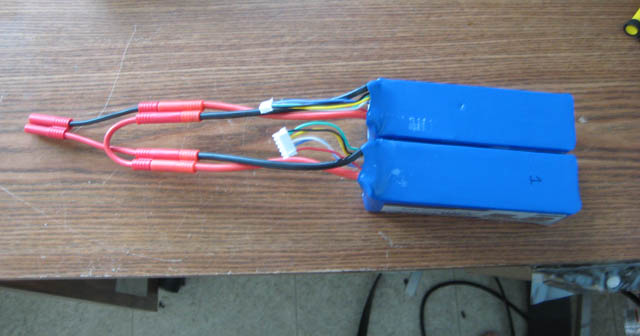
There it is, 10S.
Now you are probably wondering, which balance plug goes into which slot of my charger?
First you need to understand the cell order on your balance charger in order to find out what it expects from the battery. If connect it wrong, you will damage your lipo, your charger, your balance board, and/or your pride!
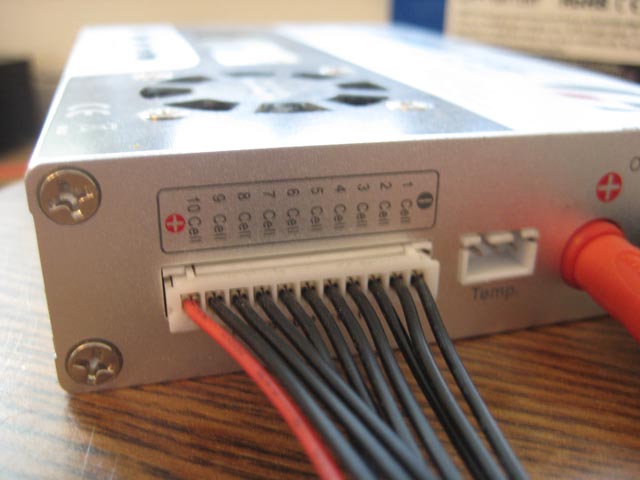
Note that on this charger, the 10th cell's positive lead is red. That's important to know. Let's look at the balance board now.
One thing to know is that the pins on the balancing charger's 5s ports correspond with the wires leading to the charger.
So in this instance, the left 5S connector is for cells 1-5, and the right is for cells 6-10.
Why are there 6 pins on each connector though? let me explain.
Pin 1=cell 1 negative.
Pin 2=cell 1 positive / cell 2 negative.
Pin 3=cell 2 positive / cell 3 negative.
Pin 4=cell 3 positive / cell 4 negative.
Pin 5=cell 4 positive / cell 5 negative.
Pin 6=cell 5 positive.
If you don't understand this, you can verify it with a multimeter.
For example, connect pins 3 and 4 to the multimeter. How many volts do you get? yep, the voltage of one cell.
Move over to pins 3 and 5, and you will get the voltage of two cells, namely cells 3 and 4.
If you connect pin 1 and pin 6 to the multimeter, you will get the total pack voltage.
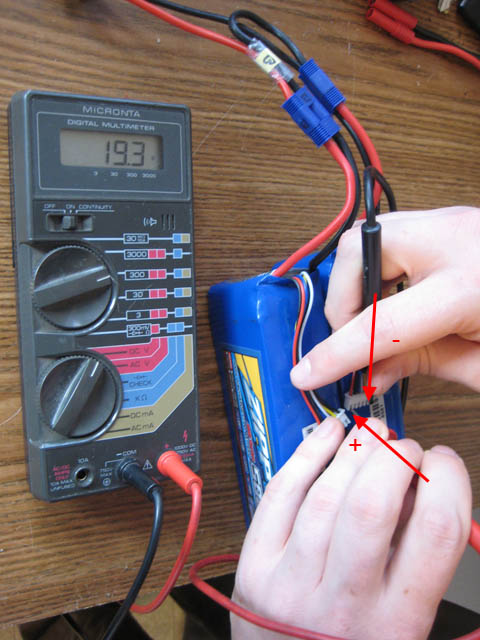
So test it now if you don't understand. The only precaution you need to take is.... don't short the multimeter leads together! O_O
Now, in series, there is an overlap in pins though, because pin #1 of the right connector is actualy pin #6 ( cell 5's positive )
This is abstract to think of at first, so let's bust out the multimeter and verify..
In this test, Pack #1 is the pack that has it's negative lead connected to the negative part of the serial harness. Pack #2 is the pack that has it's positive lead connected to the positive wire of the serial harness.
- Take the negative lead of the multimeter, and connect it to Pack #1's battery pack's negative lead.
- Move the positive lead up the cells, and when you get to pin #6, move on to the negative lead of pack #2... notice it is the same voltage?
Move up the cells of the other pack, to cell #10.
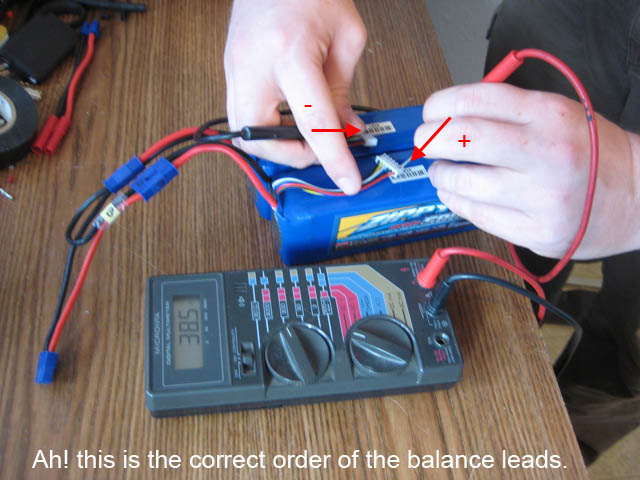
Does the cell order make sense now?
But here's the simple way to think of it.. cell 1 starts closest to the negative lead. Cell 6 starts closest to the positive lead.
Charging the lipos
Make sure the charger is connected to the power supply before you turn the power supply on. Hit the switch for the power supply, and we will be ready to rock.
Let's hook up the balance cables.
OK, now connect the main charge lead to the charger. It may pop; this is totally normal for a high voltage connection. It is essentially the iCharger's internal capacitors being flash-charged by the lipos you just connected to it. Same thing happens with an ebike controller, no dot fear.
Now, the first thing i recommend is charging to 4.15v ( or lower ) rather than 4.2v. You can skip the following steps if you want to charge to 4.2V anyway.
( I will explain why a slightly lower voltage is better near the end of this tutorial, but summary: longer lifespan, and good buffer against accidental overcharge )
To change the cell voltage to charge to from 4.2v to 4.15v:
-Click the right arrow until you find 'settings'.
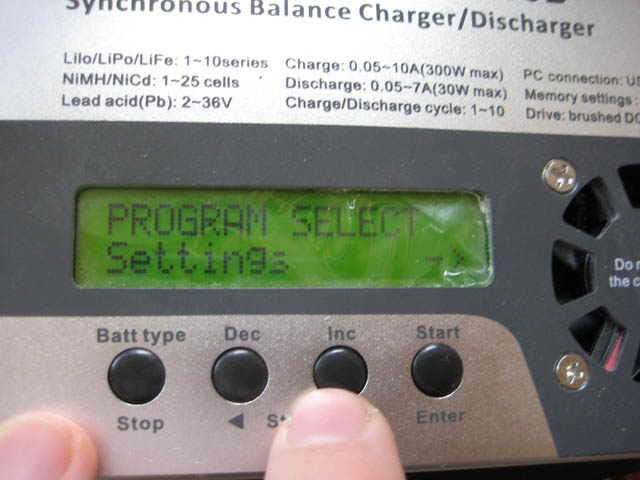
-Hit 'start', then keep hitting the right arrow until you find 'lipo termination voltage'.
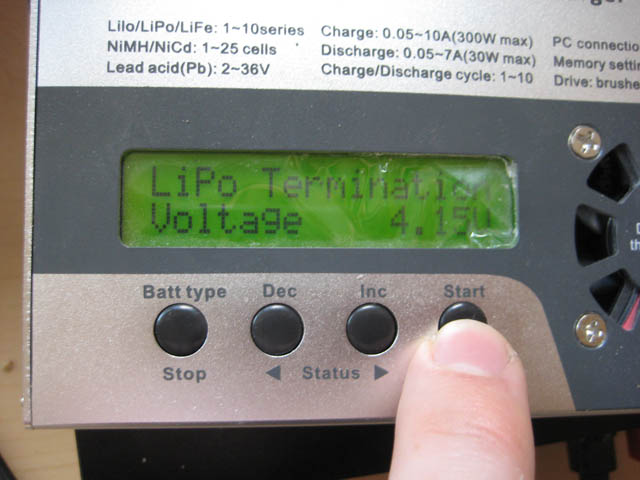
-Hold the start button until the voltage level readout starts blinking, then use the left arrow to decrease it. When it's set, hit 'start'.
-Hit 'stop'. Now let's charge! select the lithium option.
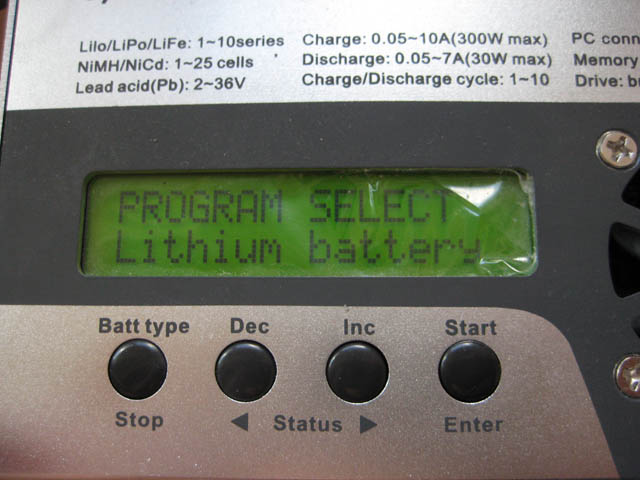
-Hit 'start', then arrow over to the 'lipo' setting.
OK, let's charge at a 1C rate or below.
If you don't understand the C rate, let me explain.
C rate is the amount of amps that a battery can charge or discharge, relative to it's size.
So for example, if you had a battery that was capable of discharging at a 5C rate, and contained 5 amp hours, it could discharge 5C x 5AH=25 amps!
Another example, let's say we have a 20C battery with 20 amp hours, it could then discharge at 20 X 20=400 amps.
This battery is rated for a 1C charge, and it's 5AH.. so 5AH x 1A=5 amps.
This is important to know when charging so that we don't stress a battery out during the charge process, and shorten it's life.
I recommend charging these lipos at 1C or below, just to be easy on them. Different lipos will vary on how much power they can take. But for now, let's take it easy with 3 amps, which would be less than 1C.

OK, now on this charger we hold the button down to initiate the charge, and it should beep at you and begin doing it's work.
Congratulations! you've started your first lipo charge.
Golden rules of living with lipo:
Wait, you are not off the hook yet. There are some things to know about lipo before you start using it.
+ First thing to know is that the formulations of RC Lipo currently on sale ( as of writing ) don't like going below 3.0v. I personally recommend that you stop discharging at 3.4v/cell at the absolute lowest, up to 3.55v to be safest, in order to prevent any errant cells from going into the below 3.0v zone.
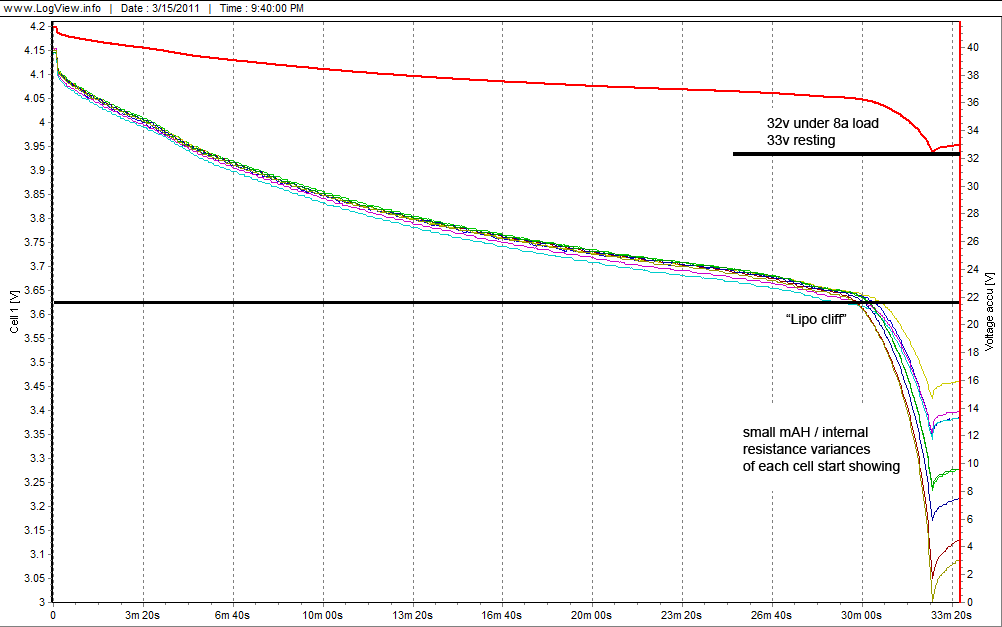
This is a plotted voltage graph ( from the iCharger ) showing a 10 cell pack discharging. Notice that after about 3.6v, the cells start getting rapidly disbalanced?
Well, the trick to managing lipo is to stop discharging early into that cliff.
This is just how RC lipos are; they generally vary a bit in their capacity from the factory. Near the end of the charge, that difference shows quite a bit!
That's why we need a buffer against those cells from going below 3.0v.
Besides, the capacity below 3.6v in each cell is very small anyhow.
That variance clears up as soon as you put it back onto the charger.
Cool, huh?
Now.... why do you absolutely not want any cells to go below 3.0v?
Well, if a lipo cell is overdischarged, for one, it will damage that cell.
For two, if the damage is severe, it could vent fire or smoke next time you go to charge it. ( go search for 'lipo fire' on google, there are many examples ) It will usually warn you by puffing first.
+ Never charge a cell over 4.2v.
This is one reason why i charge to 4.15v/cell actually, it gives me headroom against any cell going a bit over when doing unbalanced charges.
Now, there is a little leeway here; you could probably charge to 4.25v/cell and have no problems. But you will shorten the life of the pack if you go above 4.2v/cell, for sure. If you go far enough, like into the 5.0v/cell zone, you could also have a wicked lipo fire / smoke show on your hands.
+ Never discharge lipo at more than half it's rated C constant.. IE for a 20C pack, never run it higher than 10C constant. Lipos are often vastly overrated and will get hot over this level, potentially damaging the cells ( particularly the ones in the middle of the pack as they have the least amount of ability to shed heat. ) The performance will be poor ( lots of voltage sag ) as well. If you need to run a high C rate and have a very small pack, you need the right lipos for the job, IE 50-100C stuff. Otherwise, if you are bumping into this problem ( your cells are getting hot ), add some more amp hours to lower the ultimate C rate on the pack.
+ Never charge a pack at a higher C rate than it can handle. This just leads to damage over a long period of time. The cycle life will diminish from this kind of abuse. If you are using regenerative braking, it is also important to make a note of this - if your controller is putting 30A into your batteries which you normally charge at 10A, then that's definitely beating them up.
+ Never store a pack at 80%-100% charged for long. There is a reason why every RC Lipo charger has a 'storage' mode, and every RC lipo gets shipped at 50% charge, IE ~3.8v. RC Lipos will not live long sitting at their maximum storage voltage for long periods of time - they can get puffy and lose capacity in a short period of time. This is common knowledge amongst manufacturers / sellers of these packs, and people who have been flying RC planes forever. RC Lipos prefer to be stored at approx. 30-70%
If you follow these rules, your lipos will have a long productive life, and the chance having a fire or smoke show are roughly in-line with being struck twice by lightning or winng the lottery. This is how lipos are meant to be treated, but rarely are the proper practices followed.
Going further with bigger packs
OK, so you got your little 5ah pack going, and you want more range.
Well, you are going to have to run more packs in parallel.

To do this, we are going to need a parallel connection.
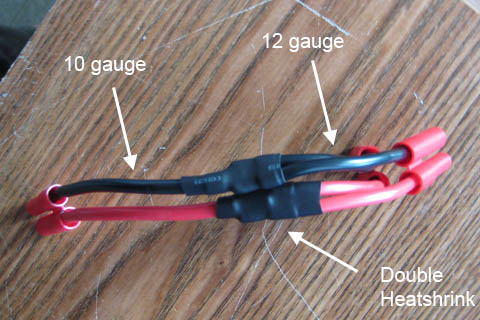
Notice that i have used a thicker wire on the output side of the harness? This is because each pack works half as hard, so you only need wires that are half as thick for each pack in this instance, as each pack will be providing half the current needed.
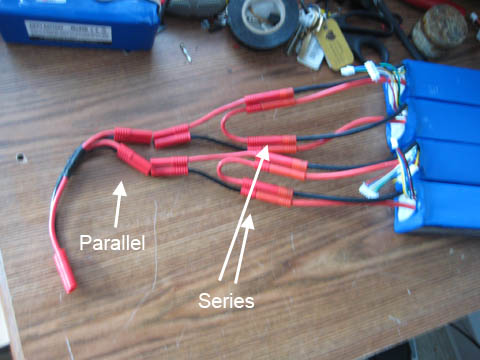
Hook up the pack as such, and viola, we've got a 10ah pack. We have doubled the range of our eBike
Now that we've got 10AH, a 1C rate would be 10 amps.. so you can technically charge the pack at that rate ( if you have a charger that is capable of doing so; the iCharger 1010b+ mentioned here can only do about 5-7 amps at 10S, but there are bigger, better chargers out there ).
Now, you might be wondering.. we have 4 balance lead connectors now.. so how is this 10ah pack balance charged?
The same parallel connection can be made on the balance leads, actually! the voltage of all the cells in the parallel group become equalized when you use a parallel balance cable, it's as if you have 1 pack full of 10AH cells instead of 2 packs full of 5AH cells, thus, you can charge all 4 lipo packs here as if they were two.
For this, we will need a parallel harness.
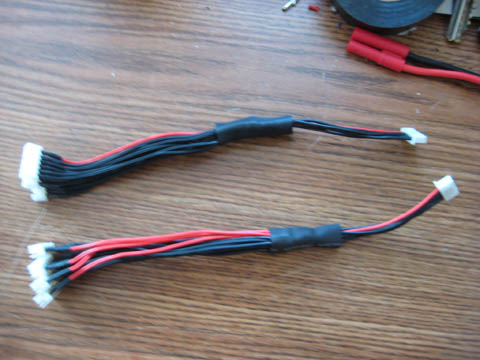
Pictured here is a 4 way parallel balance cable made by progressiveRC. ( Of course, you can make your own just the same. You can even hack up JST-HX balance lead extenders from a hobby shop to make these just as well. )
There are a couple things you need to know about using parallel balance cables, before we start:
Dangers:
+ The voltage of the cells in each pack must be roughly equal before connecting the parallel balance cable, differing no more than about 0.05v. The easy way to achieve this is to fully balance charge each pack seperately, THEN connect the balance cable between the parallel packs. The reason is that if you have a large difference in voltage, the cells will try to equalize voltages the instant you connect that parallel cable.
So for example, If you have one cell at 3.0v linking to another cell at 3.8v, as soon as you connect that parallel cable between the two, the 3.8v cell will try to move half of the difference in energy over to that cell in less than a second! That means that you could potentially kill either or both cells, or vaporize the tiny little 22-24AWG wire as the cell attempts to send hundreds or thousands of amps across the wire!!
+ If you have a bad cell paralleled to a good cell, the bad cell will drag it down and cause problems either immediately or down the road.
For example, if one of your cells has 4ah, and the cell paralleled to it has 5ah, then that cell group in your pack has 9ah whereas the other cells have 10ah. That cell group will hit 3.0v faster than all the other cell groups that have 10ah.. thus, you can easily kill the healthy 5ah cell as well as the 4ah cell. Dud cells in two lipo packs - that sucks!
So, before paralleling at the cell level, ALWAYS fully test and cycle the packs that are going into the parallel group.
Advantages:
+ Using a parallel balance lead simplifies balance charging greatly. It means that you'll never have to break apart your parallel group to balance it. The paralleled cells in the group will have the same voltage
+ You no longer need to worry about the balance of each pack. Like 'the borg' in Star Trek, all individual cells act as one. A very slightly weak cell can be propped up by a stronger than usual cell..
500+ cycles out of a RC lipo pack:
+ Don't keep the battery stored at over 60% charge for a long period of time. Storing these at 90%-100% is particularly detrimental; they do not cope with that well at all and could vent gas if charged to full and let sit for weeks. These batteries like hanging around mid-charge ( 3.8-3.85v/cell ) when they're not being used. Every decent RC Charger will warn you about this, and have a 'storage' mode that discharges to 3.7-3.9v/cell.
+ Don't ever let the cells go below 3.0v. Easiest way to prevent this from happening is to stop discharging at 3.5v/cell, where there is only ~5% of the storage left anyway.
+ Charge lower than 4.2v/cell; 4.15-4.10v is good, and won't sacrifice most of the charge, as there is little energy above 4.10v.
+ Charge at the low-spec C rate.. IE, if your batteries say they'll charge at 1C, or 2C MAX, charge at 1C.
+ Discharge at 1/3rd-1/4th the rated C. C rates on batteries are often exaggerated, and if you actually discharged at those rates, you will get massive voltage sag and your batteries will get quite hot. Even at half the C rate, a lot of batteries will turn some of the stored energy into waste heat. What you want ultimately, is a battery pack that never rises above ambient temperature, and doesn't sag more than say, 3 volts for a 36v pack - 6 volts for a 72v pack.
The good news here is that even 10ah of cheap 20C lipo at 5C will produce 50 amps constant without breaking a sweat.
Follow these tips and you get optimal life out of your RC lipo pack!
Introduction
Hello folks. Been meaning to get around to making a newbie tutorial for 10S RC lipo charging for a while now. Here goes.
10S ( 36v/38v ) is very easy to live with on a day to day basis; there are a handful of RC chargers that are designed to do 10s, so finding the bits and pieces required is not too difficult. The 38v nominal voltage can easily provide 15-30mph speed on a hub motor ( depending on the motor ). And best of all, after everything is set up, the charging process is pretty braindead and hard to goof up!
I am going to assume that you have already bought the pieces needed to do this, however i am going to use the iCharger 1010b+ as the charger. Other RC balancing chargers work similarly, so forgive me if you have different charging equipment.
Ingredients list ( can substitute, but this is just what i am using)
+ Turnigy 20C, 5S, 5AH lipo packs
+ Radio Shack 15amp 13.8v power supply
+ Icharger 1010b+
+ 2x celllog 8s's
+ 10 gauge and 12 gauge copper wire
+ ProgressiveRC Balance extenders.
+ Hobbyking's 4mm bullet connectors ( they come stock on turnigy/zippy batteries, as of writing )
Before you start...
First, a note of caution about RC lipos.
RC lipo can be very hit or miss, quality wise. There is a good chance that out of many packs, you will eventually get a dud. So before putting your battery packs on eBike duty, it is best to test them out first to make sure you have good packs, to prevent major problems from occurring down the line.
Many balancing chargers have discharge functions that are useful here.
You can also use the bike to discharge obviously
, halogen lights, fans, or anything that will produce a significant load on the batteries will work too. ( we will cover a few ways to discharge in detail at the end of this tutorial. )
But what's good and what isn't?...
First, let me tell you what a GOOD pack looks like:
1. When the pack is recieved, cell voltages do not differ between cells more than 0.1v. No cells are puffy; the pack is generally flat and straight. The stored voltage should be around 3.8-3.85v.
2. After a few balance charges, when the pack is fully discharged to 3.5v per cell average, there are no cells that are at 3.0v or below.
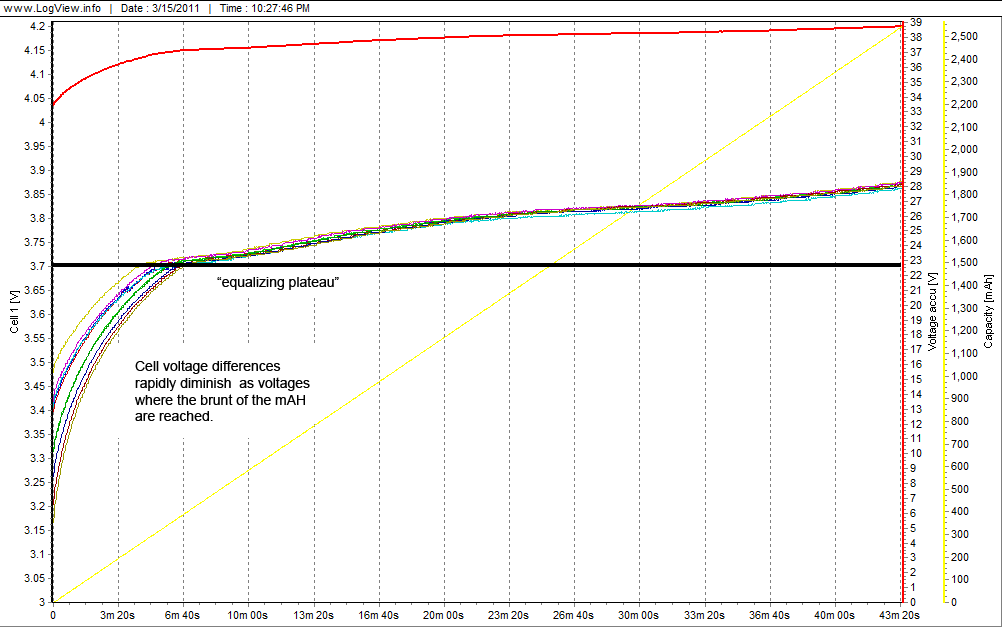
A graph of a good 10S pack looks like this on a balancing charger:
See how none of the cells are get close to 3.0v until about 3.3v average?
This is a reasonably good set of cells, and all the cells will spring back to 3.6v after a short amount of time on the charger.
A little variance at the end of the charge ( below 3.6v/cell ) is normal.
This is what the pack looks like while charging:
Now, let me tell you what a BAD pack looks like:
1. When you recieve the pack, there is more than a 0.1v difference between all the cells ... such as 4 cells at 3.85v and one cell at 3.75. This is a bad sign.
( this may be salvageable, give it a balanced charge and discharge first. )
2. The pack is visibly puffy on the outside.
( in this instance, do NOT use that pack, one of the cells either has reduced capacity, higher internal resistance, is a potential fireball, or all of the above! )
3. After pack has had a few balance charges, and one cell repeatedly go low far before the others; you've got a bad cell in there that will only get worse with time.
( if this cell repeatedly goes below 3.0v/cell, before the others hit 3.5v, this pack will be damaged eventually. Repeatedly discharging a RC Lipo cell to under it's minimum voltage could cause a fire ).
Here is what a 9 cell pack with 2 weak cells looks like while discharging and being monitored on a balancing charger:
Two issues with this pack:
+ the blue cell has a good internal resistance, so it doesn't have voltage drop like the light blue and purple cells, but ultimately it is short on mAH, so it dive bombs for 0v as we near the end of the discharge for this pack.
+ The purple cell has less internal resistance than the others, AND is short on capacity(mAH), thus it will sag, and dive bomb for 3.0v when all the other cells are at 3.3-3.6v.
A pack like this will be eternally disbalanced and/or provide lower AH than rated. If the pack is acting this way after a few balance charges, it will only be trouble for you in the future..
Not all bad packs are useless. Keep one or two around just in case one of your packs experiences a cell death. If you have only puffing cell, remove it from the pack, discharge it, and send that cell to recyling.
( you can also use the packs with a bad cell or two for other purposes. Please see the end of this tutorial for more information. )
Please refer to your charger's manual on how to do use it's charge / discharge modes.
Getting started
OK, now that i'm done lecturing, let's get started.
Now the answer to the question you probably have in your mind is.. how do i hook these up?
Well, the first thing you need to do is make a serial harness.
This adds the voltage of pack #1 and pack #2 together..
It is exactly like running two 1.5 volt AA batteries together to get 3 volts.
Note; you can use whichever connectors you like, i just chose hobbyking's 4mm bullets because they match what came on my lipo, are polarized, easy to solder, and dirt cheap.. some people prefer andersons.. or even larger RC connectors if they are drawing tons of amps.
( See the end of this tutorial for information on soldering these 4mm bullets, if you chose to go with this connector. )
In this example, i have used 12AWG wire because I am going to run this 10S serial pack in parallel with another 10S pack. If you are going to run only 5 amp hours, you should be using 10AWG or larger 8AWG wire.
So let's hook up our packs together now and make one big serial pack.
There it is, 10S.
Now you are probably wondering, which balance plug goes into which slot of my charger?
First you need to understand the cell order on your balance charger in order to find out what it expects from the battery. If connect it wrong, you will damage your lipo, your charger, your balance board, and/or your pride!
Note that on this charger, the 10th cell's positive lead is red. That's important to know. Let's look at the balance board now.
One thing to know is that the pins on the balancing charger's 5s ports correspond with the wires leading to the charger.
So in this instance, the left 5S connector is for cells 1-5, and the right is for cells 6-10.
Why are there 6 pins on each connector though? let me explain.
Pin 1=cell 1 negative.
Pin 2=cell 1 positive / cell 2 negative.
Pin 3=cell 2 positive / cell 3 negative.
Pin 4=cell 3 positive / cell 4 negative.
Pin 5=cell 4 positive / cell 5 negative.
Pin 6=cell 5 positive.
If you don't understand this, you can verify it with a multimeter.
For example, connect pins 3 and 4 to the multimeter. How many volts do you get? yep, the voltage of one cell.
Move over to pins 3 and 5, and you will get the voltage of two cells, namely cells 3 and 4.
If you connect pin 1 and pin 6 to the multimeter, you will get the total pack voltage.
So test it now if you don't understand. The only precaution you need to take is.... don't short the multimeter leads together! O_O
Now, in series, there is an overlap in pins though, because pin #1 of the right connector is actualy pin #6 ( cell 5's positive )
This is abstract to think of at first, so let's bust out the multimeter and verify..
In this test, Pack #1 is the pack that has it's negative lead connected to the negative part of the serial harness. Pack #2 is the pack that has it's positive lead connected to the positive wire of the serial harness.
- Take the negative lead of the multimeter, and connect it to Pack #1's battery pack's negative lead.
- Move the positive lead up the cells, and when you get to pin #6, move on to the negative lead of pack #2... notice it is the same voltage?
Move up the cells of the other pack, to cell #10.
Does the cell order make sense now?
But here's the simple way to think of it.. cell 1 starts closest to the negative lead. Cell 6 starts closest to the positive lead.
Charging the lipos
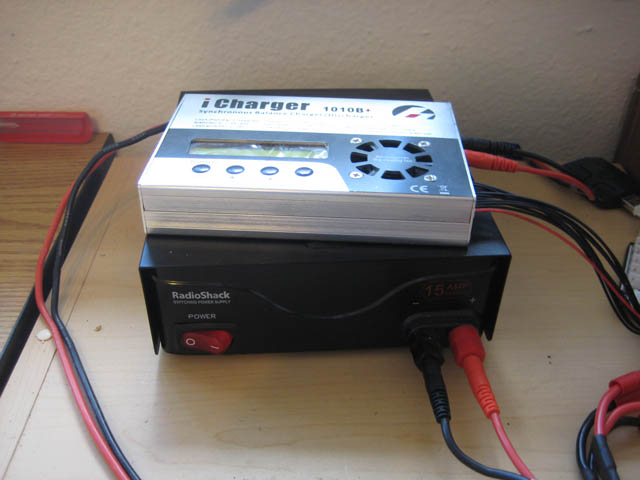
Make sure the charger is connected to the power supply before you turn the power supply on. Hit the switch for the power supply, and we will be ready to rock.
Let's hook up the balance cables.
OK, now connect the main charge lead to the charger. It may pop; this is totally normal for a high voltage connection. It is essentially the iCharger's internal capacitors being flash-charged by the lipos you just connected to it. Same thing happens with an ebike controller, no dot fear.
Now, the first thing i recommend is charging to 4.15v ( or lower ) rather than 4.2v. You can skip the following steps if you want to charge to 4.2V anyway.
( I will explain why a slightly lower voltage is better near the end of this tutorial, but summary: longer lifespan, and good buffer against accidental overcharge )
To change the cell voltage to charge to from 4.2v to 4.15v:
-Click the right arrow until you find 'settings'.
-Hit 'start', then keep hitting the right arrow until you find 'lipo termination voltage'.
-Hold the start button until the voltage level readout starts blinking, then use the left arrow to decrease it. When it's set, hit 'start'.
-Hit 'stop'. Now let's charge! select the lithium option.
-Hit 'start', then arrow over to the 'lipo' setting.
OK, let's charge at a 1C rate or below.
If you don't understand the C rate, let me explain.
C rate is the amount of amps that a battery can charge or discharge, relative to it's size.
So for example, if you had a battery that was capable of discharging at a 5C rate, and contained 5 amp hours, it could discharge 5C x 5AH=25 amps!
Another example, let's say we have a 20C battery with 20 amp hours, it could then discharge at 20 X 20=400 amps.
This battery is rated for a 1C charge, and it's 5AH.. so 5AH x 1A=5 amps.
This is important to know when charging so that we don't stress a battery out during the charge process, and shorten it's life.
I recommend charging these lipos at 1C or below, just to be easy on them. Different lipos will vary on how much power they can take. But for now, let's take it easy with 3 amps, which would be less than 1C.
OK, now on this charger we hold the button down to initiate the charge, and it should beep at you and begin doing it's work.
Congratulations! you've started your first lipo charge.
Golden rules of living with lipo:
Wait, you are not off the hook yet. There are some things to know about lipo before you start using it.
+ First thing to know is that the formulations of RC Lipo currently on sale ( as of writing ) don't like going below 3.0v. I personally recommend that you stop discharging at 3.4v/cell at the absolute lowest, up to 3.55v to be safest, in order to prevent any errant cells from going into the below 3.0v zone.
This is a plotted voltage graph ( from the iCharger ) showing a 10 cell pack discharging. Notice that after about 3.6v, the cells start getting rapidly disbalanced?
Well, the trick to managing lipo is to stop discharging early into that cliff.
This is just how RC lipos are; they generally vary a bit in their capacity from the factory. Near the end of the charge, that difference shows quite a bit!
That's why we need a buffer against those cells from going below 3.0v.
Besides, the capacity below 3.6v in each cell is very small anyhow.
That variance clears up as soon as you put it back onto the charger.
Cool, huh?
Now.... why do you absolutely not want any cells to go below 3.0v?
Well, if a lipo cell is overdischarged, for one, it will damage that cell.
For two, if the damage is severe, it could vent fire or smoke next time you go to charge it. ( go search for 'lipo fire' on google, there are many examples ) It will usually warn you by puffing first.
+ Never charge a cell over 4.2v.
This is one reason why i charge to 4.15v/cell actually, it gives me headroom against any cell going a bit over when doing unbalanced charges.
Now, there is a little leeway here; you could probably charge to 4.25v/cell and have no problems. But you will shorten the life of the pack if you go above 4.2v/cell, for sure. If you go far enough, like into the 5.0v/cell zone, you could also have a wicked lipo fire / smoke show on your hands.
+ Never discharge lipo at more than half it's rated C constant.. IE for a 20C pack, never run it higher than 10C constant. Lipos are often vastly overrated and will get hot over this level, potentially damaging the cells ( particularly the ones in the middle of the pack as they have the least amount of ability to shed heat. ) The performance will be poor ( lots of voltage sag ) as well. If you need to run a high C rate and have a very small pack, you need the right lipos for the job, IE 50-100C stuff. Otherwise, if you are bumping into this problem ( your cells are getting hot ), add some more amp hours to lower the ultimate C rate on the pack.
+ Never charge a pack at a higher C rate than it can handle. This just leads to damage over a long period of time. The cycle life will diminish from this kind of abuse. If you are using regenerative braking, it is also important to make a note of this - if your controller is putting 30A into your batteries which you normally charge at 10A, then that's definitely beating them up.
+ Never store a pack at 80%-100% charged for long. There is a reason why every RC Lipo charger has a 'storage' mode, and every RC lipo gets shipped at 50% charge, IE ~3.8v. RC Lipos will not live long sitting at their maximum storage voltage for long periods of time - they can get puffy and lose capacity in a short period of time. This is common knowledge amongst manufacturers / sellers of these packs, and people who have been flying RC planes forever. RC Lipos prefer to be stored at approx. 30-70%
If you follow these rules, your lipos will have a long productive life, and the chance having a fire or smoke show are roughly in-line with being struck twice by lightning or winng the lottery. This is how lipos are meant to be treated, but rarely are the proper practices followed.
Going further with bigger packs
OK, so you got your little 5ah pack going, and you want more range.
Well, you are going to have to run more packs in parallel.
To do this, we are going to need a parallel connection.
Notice that i have used a thicker wire on the output side of the harness? This is because each pack works half as hard, so you only need wires that are half as thick for each pack in this instance, as each pack will be providing half the current needed.
Hook up the pack as such, and viola, we've got a 10ah pack. We have doubled the range of our eBike
Now that we've got 10AH, a 1C rate would be 10 amps.. so you can technically charge the pack at that rate ( if you have a charger that is capable of doing so; the iCharger 1010b+ mentioned here can only do about 5-7 amps at 10S, but there are bigger, better chargers out there ).
Now, you might be wondering.. we have 4 balance lead connectors now.. so how is this 10ah pack balance charged?
The same parallel connection can be made on the balance leads, actually! the voltage of all the cells in the parallel group become equalized when you use a parallel balance cable, it's as if you have 1 pack full of 10AH cells instead of 2 packs full of 5AH cells, thus, you can charge all 4 lipo packs here as if they were two.
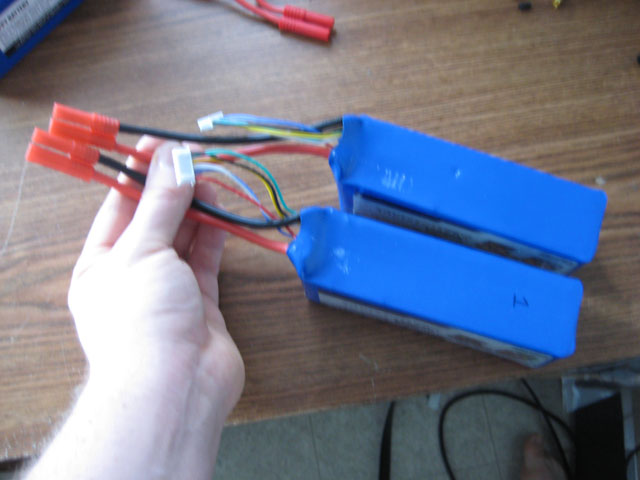
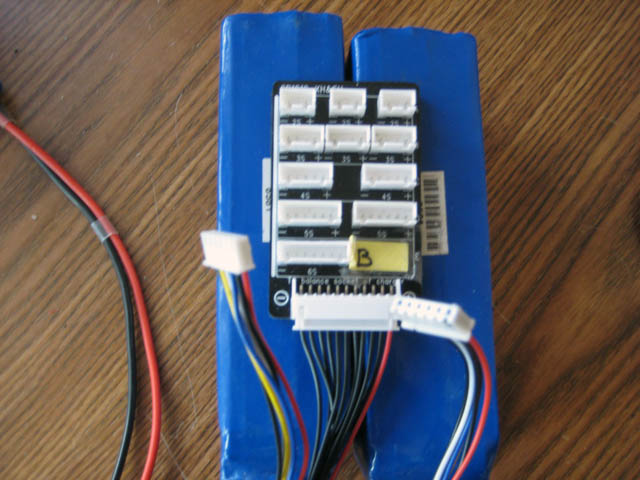
For this, we will need a parallel harness.
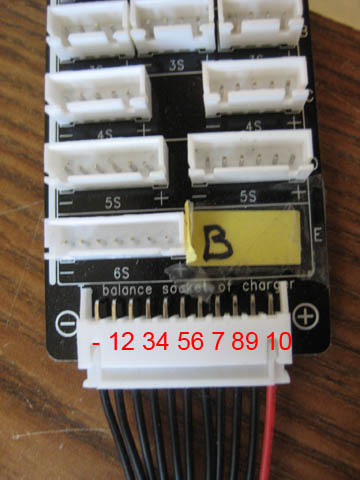
Pictured here is a 4 way parallel balance cable made by progressiveRC. ( Of course, you can make your own just the same. You can even hack up JST-HX balance lead extenders from a hobby shop to make these just as well. )
There are a couple things you need to know about using parallel balance cables, before we start:
Dangers:
+ The voltage of the cells in each pack must be roughly equal before connecting the parallel balance cable, differing no more than about 0.05v. The easy way to achieve this is to fully balance charge each pack seperately, THEN connect the balance cable between the parallel packs. The reason is that if you have a large difference in voltage, the cells will try to equalize voltages the instant you connect that parallel cable.
So for example, If you have one cell at 3.0v linking to another cell at 3.8v, as soon as you connect that parallel cable between the two, the 3.8v cell will try to move half of the difference in energy over to that cell in less than a second! That means that you could potentially kill either or both cells, or vaporize the tiny little 22-24AWG wire as the cell attempts to send hundreds or thousands of amps across the wire!!
+ If you have a bad cell paralleled to a good cell, the bad cell will drag it down and cause problems either immediately or down the road.
For example, if one of your cells has 4ah, and the cell paralleled to it has 5ah, then that cell group in your pack has 9ah whereas the other cells have 10ah. That cell group will hit 3.0v faster than all the other cell groups that have 10ah.. thus, you can easily kill the healthy 5ah cell as well as the 4ah cell. Dud cells in two lipo packs - that sucks!
So, before paralleling at the cell level, ALWAYS fully test and cycle the packs that are going into the parallel group.
Advantages:
+ Using a parallel balance lead simplifies balance charging greatly. It means that you'll never have to break apart your parallel group to balance it. The paralleled cells in the group will have the same voltage
+ You no longer need to worry about the balance of each pack. Like 'the borg' in Star Trek, all individual cells act as one. A very slightly weak cell can be propped up by a stronger than usual cell..
500+ cycles out of a RC lipo pack:
+ Don't keep the battery stored at over 60% charge for a long period of time. Storing these at 90%-100% is particularly detrimental; they do not cope with that well at all and could vent gas if charged to full and let sit for weeks. These batteries like hanging around mid-charge ( 3.8-3.85v/cell ) when they're not being used. Every decent RC Charger will warn you about this, and have a 'storage' mode that discharges to 3.7-3.9v/cell.
+ Don't ever let the cells go below 3.0v. Easiest way to prevent this from happening is to stop discharging at 3.5v/cell, where there is only ~5% of the storage left anyway.
+ Charge lower than 4.2v/cell; 4.15-4.10v is good, and won't sacrifice most of the charge, as there is little energy above 4.10v.
+ Charge at the low-spec C rate.. IE, if your batteries say they'll charge at 1C, or 2C MAX, charge at 1C.
+ Discharge at 1/3rd-1/4th the rated C. C rates on batteries are often exaggerated, and if you actually discharged at those rates, you will get massive voltage sag and your batteries will get quite hot. Even at half the C rate, a lot of batteries will turn some of the stored energy into waste heat. What you want ultimately, is a battery pack that never rises above ambient temperature, and doesn't sag more than say, 3 volts for a 36v pack - 6 volts for a 72v pack.
The good news here is that even 10ah of cheap 20C lipo at 5C will produce 50 amps constant without breaking a sweat.
Follow these tips and you get optimal life out of your RC lipo pack!