Stealthy commuter is finished!

molybdenum

1 kW
Joined
Feb 20, 2014
Messages
302
Location
Burnaby, BC, Canada
Hi all,

After gaining an interest in green technology and beginning the planning phase for an e-bike project, my research quickly led to endless sphere. Although I'm admittedly a total noob when it comes to e-bikes (never having touched one), I'm familiar with some of the technology that goes into making one and the rest I will learn as I go. I hope to have this all put together quickly, though I think that early May would be a realistic completion date given my busy schedule.

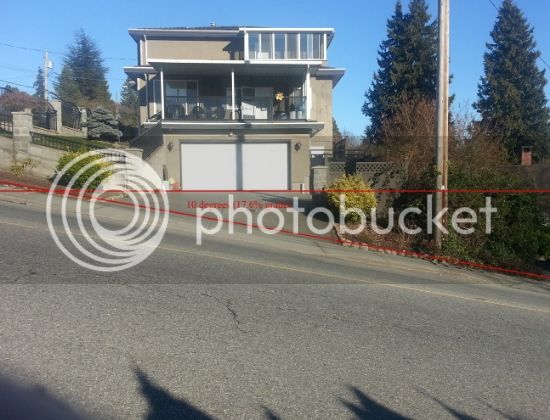
My commute, for which I currently use a non-electric hybrid, is just over 14 km each way. The least hilly and most direct route happens to be very dangerous for bicycles, so I take a longer route with several hills (maybe a couple short hills with 8 degree gradient and no steep hills longer than 500 m).

Ideally, my build should:
- Be water resilient (In the pacific northwest, you don’t ride if you don’t like rain)
- Have a top speed of 50 kph, and a range of at least 35 km at 35 kph without pedalling.
- Be stealthy in appearance (I would be riding at cruising speeds of 35-40 kph max with some pedalling and hopefully won’t be drawing too much attention).

In order to achieve this, I'm thinking of the following:
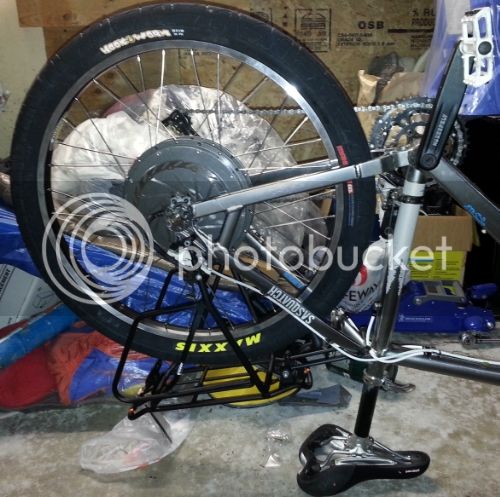
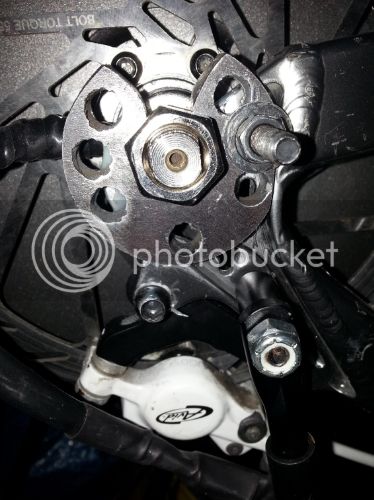
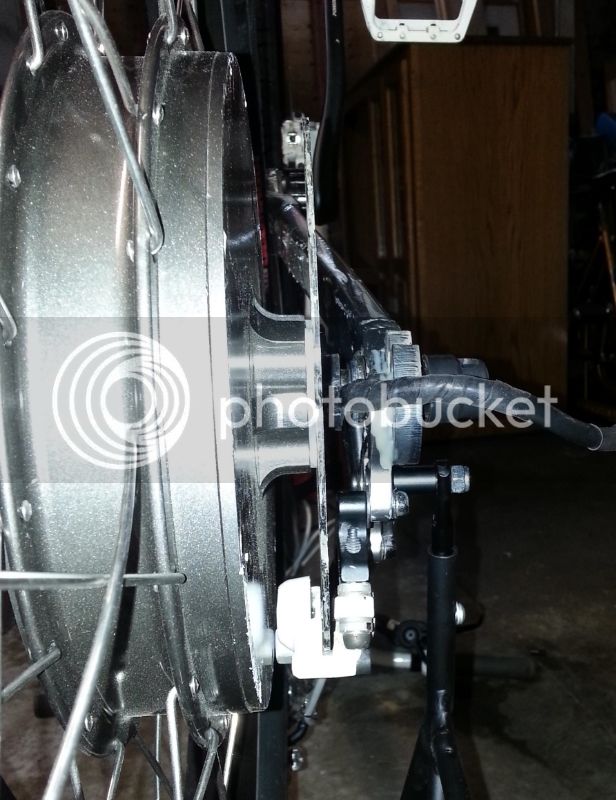
- Crystalyte HS3540 (rear).
- 35A 48-72 V controller.
- 66 V (nominal) 15 Ah high discharge battery (I might go to 20 Ah depending on the c rating of the available cells).

From running the simulations at ebikes.ca (at 66 v,15 Ah), I realize that the clyte motor would burn in 22-30 min if I held WOT on a full charge but I think some common sense and good old fashioned restraint should get me by. I’ll definitely consider a Cycle Analyst and a temp sensor. Just going to 80% throttle on the flats would be sufficient to prevent burnout. My target speed of 35-40 kph would be achieved at 50-60% throttle and the range should be between 67 and 50 km at these speeds.

My main concern with the HS3540 is that it is not a good hill climber. There are a couple hills nearby (not on my work commute) which, according to the simulator, would fry the motor in just 10 minutes at 50% throttle (23 kph). The other options would be to either install a planetary gear motor (not as fast) or a mid-drive (not very stealthy + need a different frame). I guess you can’t have your cake and eat it too; I’ll probably just rely on careful route planning and monitor temperatures as need be.

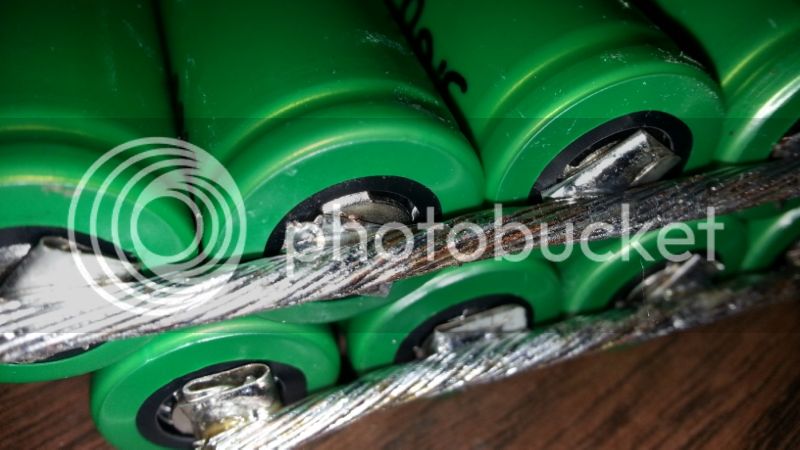
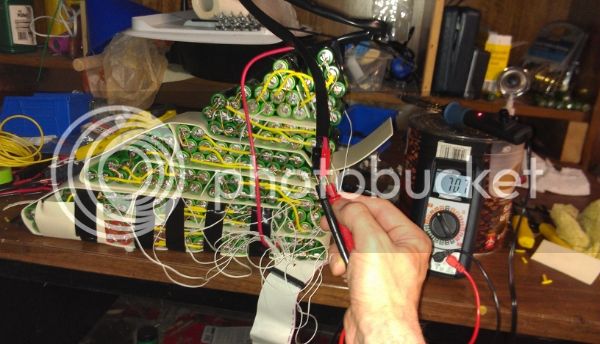
For the battery, I'm thinking that 66 V seems a good compromise between good power/speed and what the motor can tolerate. I'm not committed to any particular brand or chemistry. I’d like to avoid HK Lipo as even the best managed packs carry some inherent risk and my only good charging place – the fireplace - is in the family room. I’d like to avoid LiFePO4 because it won’t provide the amps at 20 Ah that I require without sag and the power density is lower than those of other chemistries. I'm leaning toward Panasonic NCR18650 PF or Sony 18650V/VTC4. I'm comfortable with making my own pack, as this should be an interesting project and it will cut costs significantly (if I can get my hands on some cells).

So here’s where it gets ugly. I'm on a bit of a budget and the best thing I have to say about this bike is it didn't cost me anything - but it should do the job until I find something better:


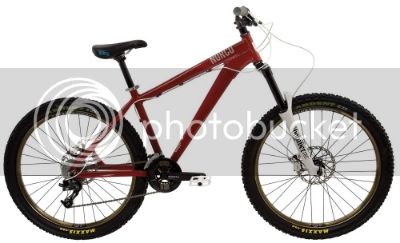
A 2000 vintage Norco NX 1500 in good condition :roll:
- Dual suspension 19” 6061 aluminum frame with 24” wheels.
- 135 mm dropouts
- 8 spd rear cassette

Edit: Thoroughly sheepish for thinking this would be a suitable frame, I have removed the picture; no one needs to see this crap anyway. If you're curious, here's the link: http://i1324.photobucket.com/albums/u614/Molybdenite/20140219_155356_zpsa5f4b033.jpg


Oddly, I can find lots of info about the 2000-2001 NX1000 and NX2000 but it is as if the NX1500 never existed. Since they look alike, I suspect it is like the NX2000 but with crappier components and no disc brakes (has mounts). If I put the seat high enough, it has a similar rider profile as my hybrid commuter and seems quite comfy.

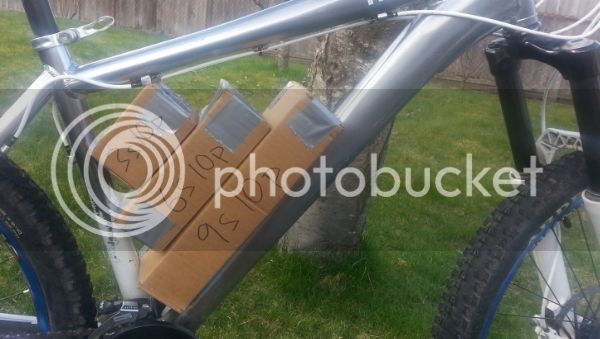
The bar between the head tube and the seat post is for my hitch mounted bike carrier. I'd probably split the pack and mount the batteries on either side of the top tube balanced and centred at the head tube. If the bike handles well, I'll try to mount a rack and hide the motor behind panniers. Of course I'll always be on the lookout for a better donor bike.

Ideas and opinions would be appreciated. I also give a big thanks to all those who have shared information and know-how on endless-sphere; this is truly an amazing resource for the community.
 
Hmm, starting with the big problem first. Find 50 to100 bucks in the budget for a "better" piece of shit bike.

That one is a no go. Mostly because you need a 26" wheel. If you go 24" now, it will bite you later when you have the wrong size motor wheel.

Then, carrying a battery on that bike will be a bitch. Find a bike just as old and cheap, but without rear suspension. Then you will have a triangle space you can use to carry the battery. A hardtail mtb, or even a beach cruiser if it has a 7 speed freewheel in the back will do fine for the first try.

The rest of your plan is rock solid. Yes, you will need to do some basic waterproofing of stuff, maybe build a vented dry box to mount the controller. But the motor will be fine. If you charge them at full speed, your motor will survive the hills you describe. Then once over the hill, cruising at 40 kph will NEVER melt your motor on a slight uphill grade or flats. 60 kph will start heating er up, as will the hills, but you call the hills short, so I see no problems.

To keep the motor dry, drill just a couple vent holes in the covers. One approach is to drill two 1/4 inch holes, then tape them up. Once in a while, on a dry day, untape the holes and let the motor dry itself running. Another approach is to have permanently open vent holes. They can be many very small holes, too small to let in rocks. While the motor is open, you could also spray the stator with high temp epoxy if you wish. The main thing is to let water out of the hub motor once in a while somehow. Eventually, hubmotors that are sealed will still accumulate vapor, which then condenses inside when you park the bike.
 
Looks like a good plan. An alternative would be to use the HT3525 motor. it's top speed is 47kph with that 66v batter, close to your 50kph goal. However it doesn't overheat on flat ground with a 40 amp controller by the Ebikes.ca simulator, and can handle climbing hills much better.

As for that bike... forget it. Norco is a respected name now, but the NX line was crap. They are known for being unstable even on flat ground, and the suspension componants are just total crap. The rear has no true shock, that's just a pogo-stick like spring, and the front RST fork is abysmal at best. Norco has come a long way since 2001.

To be honest, you'll be better off with no rear suspension than to try to use that pogo stick. the ride may be a little rough, but you'll have better controll, especialy at higher speeds and with the added power of a motor.
I see on craigslist there are a few good bikes in your area that may work better. looked like there was even a Norco Rampage for $150, if you want to stay with the brand.

Start with a good bike. it's the foundation of your build, and a crappy bike will make a crappy ebike, no matter how good the rest of the cpomponants are.
 
the 66V lifepo4 pack will be pretty big too. it will be 22S and there are no 22S BMS available so you will need to use a 24S and leave the top two channels vacant.

i am building a 22S now and it charges to 80V for balancing so you will need 100V caps in the controller and mosfets capable of handling the 80V.
 
After reading the original post I was going to suggest the HT3525 motor, I see Drunkskunk has also! if you can achieve your desired speed at 50-60% throttle with the 3540 then I think the 3525 at higher throttle will be more efficient and less prone to over heat with much better hill climbing abilities.
Being new to ebikes you are probably thinking of not wanting to ride full throttle because you are relating to the experience of driving a car or motorcycle and think this would be less efficient, but in reality electric motors that are lugged around at lower speeds can be less efficient and turn more power into heat when used this way.
 
Thanks for the wisdom on the bike frame

dogman said:
Hmm, starting with the big problem first. Find 50 to100 bucks in the budget for a "better" piece of shit bike.

I'm not too knowledgeable about frames, but this one looked like it's MRP was around $750 in 2000 so I thought it might be decent; I guess it a slight step up from the walmart pogo but still utter crap. I'll keep looking for a better frame; I'd like a really nice frame but my wife will kill me if I spend a king's ransom on an e-bike build :)

Drunkskunk said:
As for that bike... forget it. Norco is a respected name now, but the NX line was crap. They are known for being unstable even on flat ground, and the suspension componants are just total crap. The rear has no true shock, that's just a pogo-stick like spring, and the front RST fork is abysmal at best. Norco has come a long way since 2001.

I appreciate hearing this before I ended up needing to swap everything to another frame and re-lacing the hub! The idea of a full suspension frame sounds nice for a plush ride but as a commuter, I've never liked riding even quality FS frames as I'm always feeling that slight loss of energy into the shocks.

dogman said:
To keep the motor dry, drill just a couple vent holes in the covers. One approach is to drill two 1/4 inch holes, then tape them up. Once in a while, on a dry day, untape the holes and let the motor dry itself running. Another approach is to have permanently open vent holes. They can be many very small holes, too small to let in rocks. While the motor is open, you could also spray the stator with high temp epoxy if you wish. The main thing is to let water out of the hub motor once in a while somehow. Eventually, hubmotors that are sealed will still accumulate vapor, which then condenses inside when you park the bike.

Looking into your suggestion for waterproofing, I found Justin's VEVA Presentation about Ebike Hub Motors: (http://www.youtube.com/watch?v=gwlbAJLzI_w)

which explains all this pretty nicely. He determined pressure changes due to heat/cooling cycles could draw water into a hub both through the wires and through the axle seal. Water was even getting sucked through the copper of a 24 Ga wire (who would have thought this possible)! I noticed he was drilling quite a few large holes into the side of the hub.

I also found the epoxy hub refubishing by doctorbass and Kingfish - Awesome work!

Respective links are:
http://endless-sphere.com/forums/viewtopic.php?f=2&t=16776&hilit=bionx+epoxy

http://endless-sphere.com/forums/viewtopic.php?f=30&t=34135

I think it makes good sense to apply the epoxy to a new motor, where it will only need a degreasing. Has anyone noticed a change in power from applying epoxy? I'm guessing the coating would have little effect on magnetic fields.

Also, has anyone opened up one of these epoxy coated motors a year + later to see how the treatment stood the rigours of water influx and time?

I'm thinking I will epoxy treat the stator and magnets + drill holes and keep them open all the time but get the bike under cover while the motor is still hot. After building the battery, I'll try to ferret out some heatshrink bags that are sealed on all but one end. Maybe some thick heat shrink tubing for the wires with injected sealant prior to shrinking about the bag and wire bundles will seal everything up nicely.

Drunkskunk said:
Looks like a good plan. An alternative would be to use the HT3525 motor. it's top speed is 47kph with that 66v batter, close to your 50kph goal. However it doesn't overheat on flat ground with a 40 amp controller by the Ebikes.ca simulator, and can handle climbing hills much better.

I ran the HS3525 through the simulator and it is much better on the more modest 8 degree hills on my commute. It is marginally better on the long 8 to 14 degree bike killers I'll be trying to avoid by every means. I'll definitely take this into consideration.

Tench said:
Being new to ebikes you are probably thinking of not wanting to ride full throttle because you are relating to the experience of driving a car or motorcycle and think this would be less efficient, but in reality electric motors that are lugged around at lower speeds can be less efficient and turn more power into heat when used this way.

You hit that nail right on the head. My 4 banger honda accord will do 180 kph but I drive it at 90 for best fuel efficiency. According to the simulations:

the HS3540 at 56% throttle will do 39 kph. Power peaks at 1300 W, settles to around 600 W, 80% efficiency. 18.2 Wh/km, 54 km range.
The HS3525 at 80% throttle will do 39 kph. Power peaks at 1400 W, settles to around 600 W, 83% efficiency, 17.9 Wh/km, 55km range.

That being said, these are only simulations and I've heard all over the sphere that best efficiencies are to be had near max throttle (old habits are hard to break).
But if I'm overvolting the system to 66V, would I would see max efficiencies at lower throttle settings on a motor intended for 48 V?

Thanks for all your excellent suggestions.
 
Thanks dnmun! Agreed! The 66V LiFePO4 would be huge.

dnmun said:
the 66V lifepo4 pack will be pretty big too. it will be 22S and there are no 22S BMS available so you will need to use a 24S and leave the top two channels vacant.

i am building a 22S now and it charges to 80V for balancing so you will need 100V caps in the controller and mosfets capable of handling the 80V.

I'm leaning toward making the battery from 18650 cells (Panasonic pd or Sony konion). I was thinking of possibly splitting the packs in order to mount them about the top tube for a stealthier appearance. In that case, I'd have the option of (preferably) making them 33V each with series connection or 66V each with parallel connections. Getting two 24s BMS units could get a little pricey so 2 x 66V is unlikely; being my first batt build, I may opt for a single battery for build and charging simplicity.

I could make a 16s 12p (or two 8s 12p in series) Konion pack that would be just under 60V at 18Ah (224 cells, 11 kg, still pretty big) The Konions are considered to be less prone to becoming unbalanced than other chemistries. I understand there are conflicting opinions on whether or not to BMS, but it might be safer overall to install a BMS.

If I opted for the Panasonic NCR18650 PF (3.7 V nominal, 2750 Ah at a higher C discharge), I could build a pack at 18s6p for 66 V nominal and 16.5 Ah (108 batts and much lighter at 5.6Kg). If I split the two packs at 9s6p for 33 V, 16.5 Ah, a series connection would achieve 66 V. I'd need to charge the packs separately, which is kind of a pain. I'm guessing that slitting the packs and installing a 10s BMS to each batt to bulk charge would be OK with a downstream series connection?

Getting the cells is another story (playing the slots at alibaba?) though I kind of like the idea of a 6 kg 66 V 16.5 Ah pack and I'd still probably get 600 cycles out of the pack if treated nicely.

So many options

I'll definitely make sure the controller has caps and mosfets rated for an 80 V application. I think the C7240-NC at ebikes.ca would fit the bill but I'd need to limit the amps to under 35 with a clyte motor.
 
Seems I'm still in need of a decent frame. My budget has increased from 0 to $300 for a donor bike as I recognize that a good e-bike should have good bones.


Edit:too small at 17", so I've removed the img but kept the link:

http://i1324.photobucket.com/albums/u614/Molybdenite/sphrdrkprd09_zps9faa574a.jpg

It's a 2009 specialized hardrock pro disc excellent condition. Would I be able to increase the size of the crankset from 44t?

I've posted an alternate choice below:)
 
molybdenum said:
Thanks dnmun! Agreed! The 66V LiFePO4 would be huge.

dnmun said:
the 66V lifepo4 pack will be pretty big too. it will be 22S and there are no 22S BMS available so you will need to use a 24S and leave the top two channels vacant.

i am building a 22S now and it charges to 80V for balancing so you will need 100V caps in the controller and mosfets capable of handling the 80V.

I'm leaning toward making the battery from 18650 cells (Panasonic pd or Sony konion). I was thinking of possibly splitting the packs in order to mount them about the top tube for a stealthier appearance. In that case, I'd have the option of (preferably) making them 33V each with series connection or 66V each with parallel connections. Getting two 24s BMS units could get a little pricey so 2 x 66V is unlikely; being my first batt build, I may opt for a single battery for build and charging simplicity.

I could make a 16s 12p (or two 8s 12p in series) Konion pack that would be just under 60V at 18Ah (224 cells, 11 kg, still pretty big) The Konions are considered to be less prone to becoming unbalanced than other chemistries. I understand there are conflicting opinions on whether or not to BMS, but it might be safer overall to install a BMS.

If I opted for the Panasonic NCR18650 PF (3.7 V nominal, 2750 Ah at a higher C discharge), I could build a pack at 18s6p for 66 V nominal and 16.5 Ah (108 batts and much lighter at 5.6Kg). If I split the two packs at 9s6p for 33 V, 16.5 Ah, a series connection would achieve 66 V. I'd need to charge the packs separately, which is kind of a pain. I'm guessing that slitting the packs and installing a 10s BMS to each batt to bulk charge would be OK with a downstream series connection?

Getting the cells is another story (playing the slots at alibaba?) though I kind of like the idea of a 6 kg 66 V 16.5 Ah pack and I'd still probably get 600 cycles out of the pack if treated nicely.

So many options

I'll definitely make sure the controller has caps and mosfets rated for an 80 V application. I think the C7240-NC at ebikes.ca would fit the bill but I'd need to limit the amps to under 35 with a clyte motor.

if you are using the canned lipo or konion then the full charge voltage is 4.2V/cell and not 3.7V/cell. so 16S of lipo is gonna be 67.2V.
 
The Specialized will be great, get some 2.3" tyres on it to cushion the ride a little more though.

The voltages your are thinking of will all be ok, I ran my last 3540 on 18s 75v and my current build with the 3525 is going on 20s 84v. The 3525 has the advantage of more copper too, the 9x7 windings have 5% more copper (63 turns per tooth) against the 12x5 3540 (60 turns) this maybe where the slightly better efficiency comes from? speed can be made up for by running an higher voltage to increase rpm's. so you can have your cake and eat it!

The 7240 controller your thinking off using from Justin at Grin ebikes.CA is great for these motors, I have used a couple of them with no problem running 40A 75v for 3000W.
 
Tench said:
The Specialized will be great, get some 2.3" tyres on it to cushion the ride a little more though.

Turns out this one was a no go (too small at 17", I'm 5'10" and 175lb). I have a 2010 Norco Sasquatch Bomber SRAM X7 in a 19" frame set aside for me: Is this one any good?

e3ebe87a-f9e5-47c0-b574-b1bb3323eb3f_zpsf304b962.jpg


I'm just not sure if the crank size can be increased. Nothing worse than pedalling like a kid on a BMX. Unfortunately, it comes with a 9 speed, so I'll have to do some mods.

Tench said:
The voltages your are thinking of will all be ok, I ran my last 3540 on 18s 75v and my current build with the 3525 is going on 20s 84v. The 3525 has the advantage of more copper too, the 9x7 windings have 5% more copper (63 turns per tooth) against the 12x5 3540 (60 turns) this maybe where the slightly better efficiency comes from? speed can be made up for by running an higher voltage to increase rpm's. so you can have your cake and eat it!

Nice to know, I've run lots of simulations. I'm strongly considering the 3525, as it seems that much more robust and the terrain around Vancouver is quite hilly (and ebikes.ca is just down the street!).
 
dnmun said:
if you are using the canned lipo or konion then the full charge voltage is 4.2V/cell and not 3.7V/cell. so 16S of lipo is gonna be 67.2V.

Thanks for the heads up!

Although I'm basing my calculations off nominal voltage, I'm also running the simulations using the "hot off the charger voltages" of 4.2 V per cell (67.2 V for Konion at 16s, 75.6 V at 18s for the panasonics.

I will also need to be mindful the controller caps and mosfets can handle these hot off the charger voltages. I'd build a pack of lesser voltage if I used Konions because they are quite heavy for a given watt hour compared with the panasonic NCR18650 PF and I'd like to limit pack weight to 10 kg at 60 V, 15 Ah.
 
That frame should work ok, but it will need to have mods to the shifters, 9 speed is not compatible with the 7 speed, mostly in shifter indexing being different.

Kind of the ideal no fuss bike choice is the steel or aluminum frame 21 speed. It might be a cheap bike still, but no issues with 9 speeds, they tend to fit at least a 48 tooth crank, and have frame space. Trek 820 is just one brand and model that is the type. All the big bike brands tend to have one. Oddly, the cheap steel frame often works best, since you can tack whatever you want onto it with a welder.

In general, they will come with fairly poor forks, but as long as they are 1 1/8 headset you can always upgrade the fork later.

Big flat space around the rear dropout solves a lot of problems that can crop up when working out your torque plates.

Are your hills really 8 degrees? That's damn steep for paved roads. Sure you don't mean 8%? If they are 8 degrees, you can still charge up them on momentum and power if they are short. Then the motor can cool some till the next hill.
 
dogman said:
That frame should work ok, but it will need to have mods to the shifters, 9 speed is not compatible with the 7 speed, mostly in shifter indexing being different.

I totally get what you say about the cheap steel 21 speed frame and I’ll keep my eyes out for such a gem! I may yet opt for the Sasquatch. I tried it out and liked it; the price is right and it’s from a reliable source. It comes with 2.4” tires, which is kind of nice, though I’ll want something less knobby. Changing the freewheel and shifter is a pain but I see what you mean about indexing - having different distances between each cog on the freewheel.

dogman said:
Are your hills really 8 degrees?

I wish I were mistaken.

Royal Oak and Nelson Ave, Burnaby BC both have a rise of around 80 m (near sea level at the Fraser River to around 90 m (300’) at the top of the south slope), with most of it (estimate 60 m or 200’) over a distance of 400 m (1300’). This works out to ~7-8 degrees average (or 14% grade), and oddly, these hills aren’t even posted with warnings. On the lower (steepest) part of Royal Oak, they've even put deep ladder like grooves in the sidewalk cement for pedestrians to climb it like a staircase. There are a few places I will not be able to go if I avoid these steep hills, but avoid them I will.

As for my commute, only 1 of the hills is very steep but it is very short (less than 30 m or 100’). Unfortunately, I have to turn from a busy street to climb it and getting a good run at it is impossible. I pedal up it every day, so with a heavier bike and a lower gear, I'll just grunt it. Another 400 m long hill on my commute is probably (I don’t have elevation data) 4-5 degrees (7% grade) over a 400 m (1300’) distance but I can weave through side streets and take it in stages or I can get a good run at it.

Most of my commute is on gently rolling terrain, either going either up or down, with an overall change in elevation from 95 m (310’) where I live to 60 m (200’) where I work but going as low as 30m (100’) over a distance of just over 14 km (9 miles). I’m riding a non-electric hybrid for my commute and it always takes me 5+ minutes longer on the return trip.

I don’t think I’d ever end up doing this, but it would be nice to have two throttles with a MAC 12t on the front for clawing up hills and a DD hub on the rear for speed (and hit both of them for wicked acceleration :twisted: ). I'll likely heed the other forum members' advice and go with a HS3525 and sacrifice a little speed for better hill climbing.
 
molybdenum said:
I wish I were mistaken.

Royal Oak and Nelson Ave, Burnaby BC both have a rise of around 80 m (near sea level at the Fraser River to around 90 m (300’) at the top of the south slope), with most of it (estimate 60 m or 200’) over a distance of 400 m (1300’). This works out to ~7-8 degrees average (or 14% grade), and oddly, these hills aren’t even posted with warnings. On the lower (steepest) part of Royal Oak, they've even put deep ladder like grooves in the sidewalk cement for pedestrians to climb it like a staircase. There are a few places I will not be able to go if I avoid these steep hills, but avoid them I will.

On the note of steep hills, I decided to see if my top map based interpretation of the slope was in the ballpark, so here's the results.

Lower section of Royal Oak Ave, Burnaby, BC (south slope). I suspect this would kill a lot of ebikes, especially since the hill can only be approached by a right or left turn and cannot be approached with speed:

a4f27a46-7293-4928-8ed1-a7ccd836dce0_zps6ecad462.jpg


Edited image with more accurate lines (changed estimate from 11 degrees to 10 degrees).
 
Here’s a progress update:

I’m leaning toward this Norco Sasquatch as the donor for my project. Although it’s a hardtail, the bomber forks and the 2.35” tires should cushion the ride.

Although I could cram up to 220 18655 cells in this triangle non-stacked, the battery build would be greatly simplified if I were to make three separate packs in 10p (2x5 arrangement) and connect them in series, such that the width of the packs across the frame are 9cm rather than 6.8cm.

ad2db93b-c65c-4e87-b8ac-d0aef886c020_zps2825549c.jpg


I’ll need plenty of insulation between the packs to ensure the ends do not short against each other. I've drawn two wires for each pos-neg series connections to achieve a more balanced current flow through the system.

31cceefb-da46-45a2-a05d-053f9944088e_zpsca6c95fb.jpg


As you see from the image, I’ll need to make the bottom pack a slightly longer 10s and the top pack 2s. The battery, consisting of 180 Sony 18650V cells, is expected to weigh 9kg and will be 66V nominal (75.6V charged) and 15 Ah. According to the simulator, I should have a range of 39 km at 50 kph and a range of 59 km at a more modest 40 kph.

I was planning to bulk charge it and monitor the voltage through balance leads without BMS, but now that I have to build it in 3 parts connected in series by longer wires; I’m thinking I may need a BMS to achieve the proper balance and still allow plug and play charging of the unit as an 18s whole.

This BMS seems to fulfil the criteria: the HCX-D166 from Bestech Power, (40A, 18s) http://www.bestechpower.com/666v18spcmbmspcbforli-ionli-polymerbatterypack/PCB-D166.html

I’ll need a decent bulk charger, so I’m thinking about getting the KP-F (900W) charger from evassemble: http://www.evassemble.com/index.php?main_page=product_info&cPath=3&products_id=8

I’ve talked to the folks at ebikes.ca and they can lace the clyte into my rear wheel, as it has the 32 holes needed to accommodate the motor. This will provide matching rims without the need to replace the front rim and their lacing job will be much better than what I'd get from the factory. EDIT: I need a 36H rim for the clyte motor!!!

As for waterproofing the battery, I’m thinking of using the same fiberglass cloth and epoxy I use to fix holes in cars to construct a hard fiberglass shell to contain the battery. I’d make the mould out of Styrofoam, which would be removed after everything hardens.
 
I haven't looked here lately, looks like you are making good progress sorting out the problems.

I was hoping your hills were 8%. You will definitely need a slower wind, like the HT or a 12T mac to get up long 14% grades. But if the hills are not too long, you can punish the motor pretty hard if it gets recovery time to cool before the next one. Vent holes will help a motor cool off faster.

Another motor that will get up 14% is a mac in the 10t winding. EM3ev has those too. For really crazy steep, I use a similar motor in 12 turn winding. It will climb 15 degrees, for awhile. Long enough hills still melt one though.

Just get a motor slower winding than the HS, and I think you will make it up your hills, with brisk pedaling to keep your speed up to 12 -15 mph.
 
Looking into the hill problem, I'm thinking with a couple km detour, I can circumvent the worst of the hills, so I will probably opt for something which wouldn't handle that 500m lomg 17% grade hill I might travel monthly. My daily commute fortunately has only one hill like that but I can take a detour and avoid the worst of it.

I'm still waiting on my batts but I've been playing around with trying to fit them all into the smallish triangle of the Norco Sasquatch. Right now, I'm planning a 17s12P battery for 62.9V nominal, 71.4V fully charged, 18Ah. This is because the excess voltage does me little good for the clyte motor I plan to employ.

11345269-f161-4b6f-a63d-008166ea6ba0_zpsdcbcade5.jpg


The diagram taped to the cardboard model is exactly to scale and represents where the 18650 batteries will be positioned. It will be a tight fit but I think I can cram 206 batts into the triangle and I'll ahve to move a few around still.

for a stealthier appearance, I've also found this mesh cable sleeve in 1/2" and 2/3" which expands up to 150% from MRO electronics: http://www.mroelectronics.com/mro/category.php?id_category=50&p=2

cablesleeve_zps69535962.jpg


It's available in all sorts of funky colors.

Otherwise, I've ordered misc items such as an inline blade fuse holder (ebay), Li ion 18650 i4 intellicharger (ebay) for battery build, 71.4 Li ion bulk charger (EM3EV). I've sourced the fiberglass and epoxy for the triangle battery from a local shop: http://www.fibertek.co/

Certainly one of the hardest parts (yet fun) about planning the ebike build is researching, locating and purchasing the myriad components from many different suppliers.

I was wrong about the 32H rim for the clyte mount (edited post accordingly). I need a 36H rim and will be looking at replacing my rear 32H rim when I get the motor.
 
I haven't posted here in a while. Not much time to work on the bike with the competing demands of a full time job and the kids. Since things are progressing, I thought now would be a good time to share my progress.


I Replaced the bashguard with a Truativ 44t chainring and installed a 7 speed freewheel to the motor along with a fresh 7-8spd chain. The knobby tires were replaced with Maxxis Hookworms. I installed a bike rack for panniers, which should at least partially hide the hubmotor. I also have a set of Cruiser balloon tire aluminium fenders which fit well and will be mounted after everything is finished.

20140613_095512_zpsf91fc8a3.jpg

Please ignore the mess


Doctorbass torque arms were installed on both sides with DP420 and a bolt. The surfaces were sanded to fresh metal and cleaned with acetone before applying the DP420. The aluminum dropouts were further sanded with DP420 on the sandpaper to prevent oxidation of the aluminum and weakening of the bond.

I have the option of installing a second bolt two holes below the bolt shown in the pic, but this will involve drilling about 3mm of the aluminum dropouts to widen the existing hole; I'm not sure I want to do this.

20140613_095123_zps489283fd.jpg

I used the white DP420 as this was all I could find. Interestingly, the white DP420 seems vastly superior in resistance to salt water according to the specsheet.


Complications arose trying to fit the motor and 180mm disc rotor to the caliper. I needed to add a disc rotor spacer between the motor and disc. I had to add a couple thin spacer washers to bring the caliper in line with the disc rotor. Right now, I have 0.2mm clearance between the caliper and the motor, and the wheel spins without rubbing. I may file down the caliper housing for a little extra clearance.

20140613_095036_zpse2cb20b6.jpg

It doesn't get any closer than this


As for the battery, I have about 200 good (initial voltage tested between 3 and 4) Sony 18650V cells (3.7V nominal, 4.2V charged) to build a 17s10p triangle battery. My original plans were for a 17s12p battery but I thought it would be too tight to fit the triangle after building the model (image in an earlier post). At least this way, there will be a little extra room for insulating layers and lots of padding.

Each cell was charged to 4.2V and allowed to sit for a couple weeks before rechecking the voltage. I'm about half way through the soldering and from the 100 cells I've tested, most had settled at 4.15-4.17V but 4 were discarded as they had dropped in voltage.

The cells will be connected in parallel with stripped and twisted 10Ga automotive wire. I will have 3 series connections between each parallel group using 14Ga automotive wire. I'll insulate between the 10p groups with a few layers of the underpad stuff for laminate floors. For now, I'm installing balance leads to monitor the pack health but if I can ever get my hands on a decent BMS, I'll retrofit it.

Pre-tinning the nickel strips and the 10Ga wire with a 60W blunt tip soldering iron seems to do the trick. When soldering the wire to the battery, It takes about 2 seconds for the solder on the wire and nickel strip to melt. During and after soldering, I hold the wire firmly with a metal rod and quickly cool it with a cloth moistened with distilled water to prevent heat damage to the cells. Each connection is checked for solder joint strength and resistance.

I'm finding that each parallel group of 5 is taking me about 20 minutes to solder (stripping wire, pre-tinning and soldering), so it is slow going. I've received an EM3EV triangle bag and a 71.5V Li ion bulk charger. The plan is to charge to 4.1V and discharge to 3.2 volts in the hopes of extending pack life. Looking at the discharge curves, I'm only losing an amp hour by doing this and should have sufficient range for my 26km commute even at inefficient speeds of 55kph (35mph).

20140613_095343_zps1dc15c94.jpg

I haven't burned myself yet


The final steps will be to finish the battery (much more work than anticipated), mount the fenders, a 40A Grinfineon controller, throttle and CA V3. This is a noob build, so please feel free to comment with your suggestions.

Thanks,
M
 
For added security, I would like to install a second bolt to my torque arms in the bottom hole (Image taken with bike upside down). Presently, they are held in place by DP420 and one bolt. Note that I had to hack off the right side of the torque plates to fit them to the dropouts.

20140613_095123_zps489283fd.jpg


I would need to drill about 3 mm of aluminium to widen the existing hole in the dropout to add the second bolt. My dropouts are fairly thick (~8mm) but not that wide and the torque arm hangs over the rear.

Edit: I've added a pic of the original dropout before adding the torque arm:

0e6e6ad7-385a-4d5c-a8c0-112308afd4bf_zps4d60ac0b.jpg


Will drilling out the aluminium to add the second bolt compromise the strength of my dropouts?
 
no need to worry about pack life now since you soldered them. you do not need large conductors for the parallel connectors.

you should build the battery by making the serial connection first using the large conductor and the parallel conductor can be almost nothing and do that when the entire pack is assembled. i use 26AWG speaker wire for the parallel connections.

i estimated that the full current capability of those little cans can be conducted by a small 1mm thick x 4 mm wide copper strip.

so that would cover the serial connections, and then go back with some tiny bus wire soldered in between the cans.
 
Steady progress:

I finished the Battery, which was encased in duct tape and placed in a triangle bag.

IMAG0055_zpsf4420f98.jpg


IMAG0056_zpsc134fe45.jpg


All systems appear to be operating normally. Programmed the CA.

IMAG0075_zpsf762aedb.jpg


Mounted the fenders and tidied up the wiring:

IMAG0073_zps786580bc.jpg


My first noob build is now ready to ride! I still need to waterproof the connections with dielectric grease and silicone tape. I'll also install a 40A fuse tonight before the maiden voyage.

If only it would stop raining...
 
It finally stopped raining, so I went for a 5km test drive (my first time on an ebike :D ). I definitely got the grin going and was easily able to attain 55 kph 8) The front shocks and 2.5" underinflated hookworms did an excellent job of giving a cushy ride even at high speed on bumpy roads. Initial efficiency was 26.0Wh/km (driven hard and fast up and down a 6% grade but with regen at 10%), which should provide a range of about 38km.

So here's the final build; maybe not so stealthy...

2012 Norco Sasquatch
Clyte HS3540 with 10K thermistor
40A 72V Grinfineon controller
Cycle Analyst 3.0
DIY 17s10p Sony 18650V battery 62.9V nominal, 71.5V hot, 16Ah, 10c max discharge.

I have a set of pannier bags to help hide the motor for a stealthier appearance.


The one problem I have to overcome is the loosening of the axle nuts :eek: I tightened them as tight as I dared as I've heard stories about the soft steel that goes into clyte axles. Fortunately, I installed overkill Doctorbass torque plates on both sides, and the axel fits snugly. I could lose both nuts on the road and as long as I don't jump, the wheel should stay on.

I own a torque wrench and could tighten them to x Nm if I knew the correct figure. Perhaps I should order Nordloc washers?
 
The threads on both sides of my 9C are a bit cactus- one side is just adequate and the other side is smooth... but I use clamping dropouts either side which as bolted to the swingarm so it's not coming out!

So don't stress too much if you lose a thread- convert your dropouts to clamping style and you'll be fine. Nice job by the way!
 
Back
Top