Suzuki RMZ 250 EV Restomod

Finally, another update!

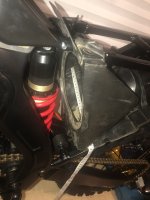
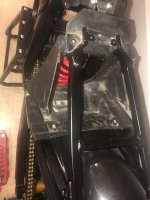
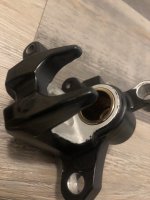
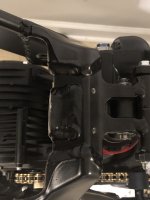
Ended up cutting the main top motor mount to make room for the battery. Not worried about the powder coat, this part will be covered with rubber.

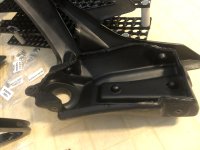
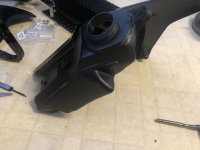
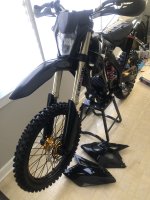
Gutted the bottom side of the gas tank to allow for the battery to fit. The battery shape/cell holder seems to fit nicely with the fuel tank. As of now 300 cells, 20s 15p = 63 amp hours. The original thought was 340 cells 20s 17p, but we’ll see I’m still working on the battery configuration. Was considering 26s or 28s but would rather have more groups of parallel for range. Really don’t need any more than 50 mph with this build since this is strictly for technical trails, Enduro and or hard Enduro.

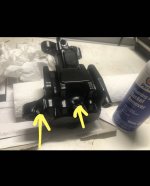
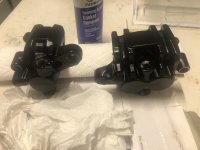
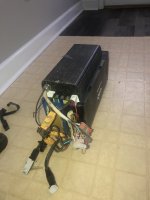
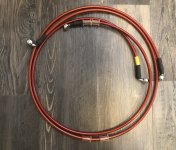
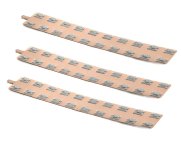
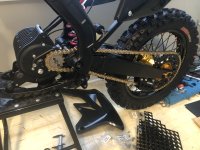
Controller as of now will be FarDriver ND72850. This will give me 450 battery amps, I’ll just use that much if I’m drag racing a buddy or somthing. I guesstimate to only be pulling about 250-ish DC amps maybe 450-ish phase for trail riding but we’ll see once I get to test it in the real world. With only pulling 250-ish dc amps and having at least 15 groups parallel should give me great efficiency, and not much heat buildup. 15p would technically give me a discharge of 675amps. Will be using 1.0 mm copper busbars and the spot weld will be with nickel .15mm, see image below… The 1.0 mm copper busbar’s are probably overkill, but it will just help add with efficiency.

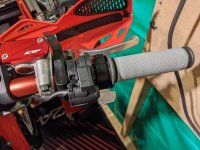
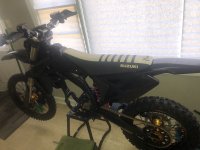
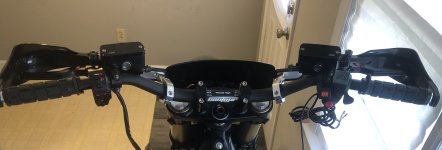
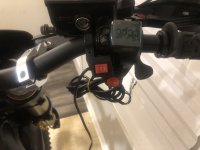
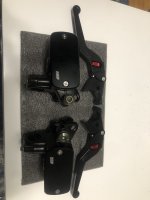
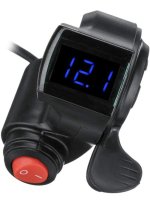
Got the handlebar accessories/cockpit sorted out. Left side - headlight control, regen which is the horn button/momentary switch. Then the turn signals switches will be used for the forward, neutral and reverse.
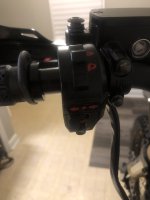
Right side - 3 speed switch. Thumb throttle assembly- which includes the voltage reading, power button for the controller and of course the throttle. Same throttle assembly I use on my Enduro clone build. I love the throttle control with this particular thumb throttle compared to all the other ones I’ve tried. I always keep an extra throttle assembly with me in case the plastic thumb lever snaps off, which I’ve done before in the middle of a hill climb 😅
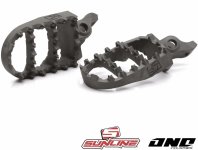
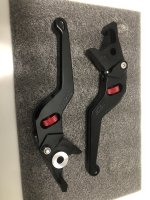
No footbrake with this build, rear brake will be left hand brake, right brake lever front brake.
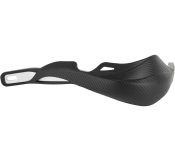
Went with Rogue ATV handlebar grips as it has a notch that works with a thumb throttle. Also easier to reach the regen button.
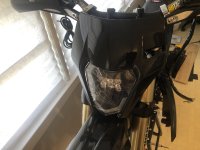
Handlebars - Pro Taper woods high, Contur oversized. Picked up a cheap headlight off Amazon, looks great!

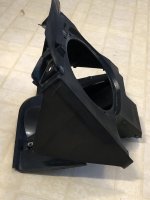
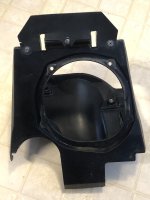
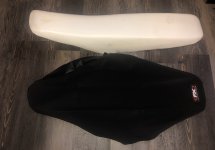
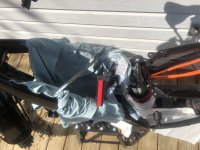
For the seat, got a new seat cover and new foam. I had purchased a seat off eBay that was listed for my model and had finished recovering but realized it didn’t fit once I bought the gas tank. So anyways, got another seat ordered and will recover. In the picture below, it’s just the seat cover and foam it’s not attached to the seat pan yet. Ordered an air intake airbox which will be modified to fit the controller with the subframe. The airbox fills in the gaps for the side plastics.

Thanks to member rivvs with supplying the contact for the custom busbars!! Thank you sir 🫡


AEE0A7BF-1845-4071-8357-EEC9B0AC1826.jpeg
 

Attachments

  • 80C346E2-A99C-4653-B313-E06C40847ECB.jpeg
    80C346E2-A99C-4653-B313-E06C40847ECB.jpeg
    3 MB · Views: 25
  • 36BF8F4B-68D9-4F8A-852A-B09C2B85835F.jpeg
    36BF8F4B-68D9-4F8A-852A-B09C2B85835F.jpeg
    2.8 MB · Views: 24
  • 3BD3286E-581A-4563-9C0F-23B0DFA84EFF.jpeg
    3BD3286E-581A-4563-9C0F-23B0DFA84EFF.jpeg
    1.1 MB · Views: 23
  • 1DC65BBE-9181-4D7A-9AA9-FA39CDDAA2C3.jpeg
    1DC65BBE-9181-4D7A-9AA9-FA39CDDAA2C3.jpeg
    2.6 MB · Views: 22
  • 301D0AC4-B76C-4540-B882-31158F04853B.jpeg
    301D0AC4-B76C-4540-B882-31158F04853B.jpeg
    1 MB · Views: 23
  • E01FA5F3-FE5C-4CE0-82E6-33C71D3C51DD.jpeg
    E01FA5F3-FE5C-4CE0-82E6-33C71D3C51DD.jpeg
    2.5 MB · Views: 21
  • 325C063A-C1CD-4234-9BC1-F8B2E35B4777.jpeg
    325C063A-C1CD-4234-9BC1-F8B2E35B4777.jpeg
    1.1 MB · Views: 19
  • 2D006D67-C20D-494C-8131-95D592AF9FF1.jpeg
    2D006D67-C20D-494C-8131-95D592AF9FF1.jpeg
    1.1 MB · Views: 20
  • CDC6B0A4-92B0-447E-A6D4-5D948F311F7E.jpeg
    CDC6B0A4-92B0-447E-A6D4-5D948F311F7E.jpeg
    1.1 MB · Views: 22
Last edited:
The update above ☝️👆☝️
few more pic
 

Attachments

  • 2DFBC18E-2EBE-430C-8298-4141C372D142.jpeg
    2DFBC18E-2EBE-430C-8298-4141C372D142.jpeg
    159.5 KB · Views: 30
  • 30637CE4-24B8-49D4-A01C-B582F136B0E7.jpeg
    30637CE4-24B8-49D4-A01C-B582F136B0E7.jpeg
    1.3 MB · Views: 28
  • 8301434E-8BE6-41EB-BCA1-94E377EA769B.jpeg
    8301434E-8BE6-41EB-BCA1-94E377EA769B.jpeg
    2.1 MB · Views: 23
  • 3F862D10-7B07-403A-B559-B9157EBE75D3.jpeg
    3F862D10-7B07-403A-B559-B9157EBE75D3.jpeg
    240.2 KB · Views: 30
  • 241EEAFD-1C1C-4E9C-A183-01D83C387682.jpeg
    241EEAFD-1C1C-4E9C-A183-01D83C387682.jpeg
    1.3 MB · Views: 33
  • 1BB5A57C-4704-4134-9D2E-551181396C75.jpeg
    1BB5A57C-4704-4134-9D2E-551181396C75.jpeg
    1.3 MB · Views: 29
  • A25B7B24-6C95-4D14-AD0E-125AEB670772.jpeg
    A25B7B24-6C95-4D14-AD0E-125AEB670772.jpeg
    2.8 MB · Views: 26
  • C57473DD-39A7-46C6-8B63-15C0960C320B.jpeg
    C57473DD-39A7-46C6-8B63-15C0960C320B.jpeg
    79.9 KB · Views: 30
Last edited:
Progress! Where did you get your brake masters/levers from? I was going to try get a 2nd hand set off of a ktm and use the clutch master for the rear brake.

These pics make me want to start my build thread but any time outside of work or sleep is working on the bike, no time for uploads 🙃
 
Progress! Where did you get your brake masters/levers from? I was going to try get a 2nd hand set off of a ktm and use the clutch master for the rear brake.

These pics make me want to start my build thread but any time outside of work or sleep is working on the bike, no time for uploads 🙃
Got the brake lever set off Amazon. There’s tons of these Chinese brake sets you can buy, but most of them are really cheap quality and can’t support the piston size of motorcycle brakes. This set seems to be higher Quality of the “cheaper Chinese brake levers/master cylinders”. I searched for months and months trying to find some quality brake levers with master cylinders, and this is what I end up going with. You could also consider brake levers from ATVs since some don’t have clutches, and they have handbrakes for both front and rear.

Looks like the levers are out of stock, but maybe you could find them somewhere else.
MZS 7/8 Levers | Hydraulic Brake
 
Definitely add a kill pull cord fella.If you fall off the side on a slow technical trail(we all do it) and the throttle snags something on the ground you are f.cked if you fall in/on that back wheel🤦🏼‍♂️
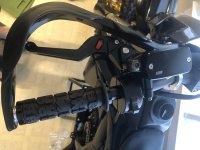
Sounds silly but are bikes don't stall obviously and that is bloody dangerous,ask me how I know lol.I actually add mine to the brake switch.Im not a fan of that throttle or 3speed switch as they often after getting wet from a wash hold water,I've used both and won't again tbh.I went with the Domino handle bar switch gear that worked very well in wet weather and after jet washing.Just trying to give you the heads up👍
 
Definitely add a kill pull cord fella.
“Possibly” would add a pull cord although it’s kind of hard to snag this particular throttle because it doesn’t stick out much. Also, considering the power button drops down to the left side, which protects the throttle from getting snagged. I mean, technically something could snag it from the far right side.

Now, considering the thumb throttle I’ve seen on your bike, which sticks out a great deal. I would definitely have a pull cord, because that could get snagged on something very easily. So I think it’s quite subjective, depending on which thumb throttle is used. If I was using a twist throttle, I would definitely have a pull cord as we all know twist throttles get snagged when dropping the bike.


Im not a fan of that throttle or 3speed switch as they often after getting wet from a wash hold water

I figured someone would say something about my cheap throttle 😂
Well, as the saying goes, “don’t fix it, if it’s not broke” I’ve used that 3 speed switch and thumb throttle on my enduro clone build for about two years and have never had issues with holding water. Although I never spray directly on electronic controls in general, definitely not power washing or even the pressure from a hose pipe, I just wipe off with a damp rag on any electronics, waterproof or not. So that being said, I think it could be prevented for sure. Also, could consider drilling a small hole in the very bottom to allow water to drain if water would ever accumulate inside the throttle assembly or three speed switch.

Then, like I mentioned in the update, I really love the control of that particular thumb throttle compared to the 10+ throttle assemblies I’ve tried. Most of them are on and off switches but with this one, I can modulate the throttle, even when riding through mud without getting tire spin.
 
This was a great thumb throttle I came up with if you like that style of throttle.I did find I got less thumb ache after my current throttle style though on track or woods riding and kept my hands in a better position for riding.Either way the build is looking good and moving in the right direction 😉
 

Attachments

  • PXL_20220822_120144817.jpg
    PXL_20220822_120144817.jpg
    2.4 MB · Views: 27
Got my air-box/intake assembly in today. At first didn’t plan on ordering that part, obviously don’t need air in take for electric but but it was more so for the mudflap portion, and it helps fill in the gaps of the side fairings.

The great thing is, the far driver 72850 will fit perfectly inside the airbox with no modifications! Basically, just bolt the controller inside the air box. The other great thing is the controller inside the airbox will have actual airflow because there’s a huge hole in the front of the air-box, pic below.

But the seat saga continues for this bike lol. As I mentioned in the recent update, I purchased a seat that was labeled for the 07, but it was actually for the 06 which is a different size/shape. So, then last Sunday I ordered another seat that fits my model and last night the seller randomly canceled my order lol
But anyways got another seat/3rd attempt on order.

Up Next, I will order foot pegs then rebuild the calipers that I had powder coated a while back. Will order custom brake lines for front and rear, since the rear is a hand brake and have no choice. Might as well order a matching front steel braided brake line. The bike itself will be finished after that.

I figured once I get the controller mounted, could do some test riding with using the battery that’s in my Enduro clone build since it’s 72v. Obviously won’t be able to use the power the controller is able to provide but at least test the bike mechanically speaking. Hopefully will be able to order the controller in the next few weeks.

Today I’ve been working on the brake calipers, getting off the overspray that got into the threads of the caliper. That gasket remover works great for removing powder coat but you have to let it sit for many hours and then the powder coat scrapes off. Will order OEM replacement parts for the calipers and rebuild those soon.
 

Attachments

  • 0069F9F2-3759-4312-8E73-49A0F23DCDAA.jpeg
    0069F9F2-3759-4312-8E73-49A0F23DCDAA.jpeg
    230.5 KB · Views: 21
  • 13A5EECC-6F70-4A4B-85B4-55D60CFB6B76.jpeg
    13A5EECC-6F70-4A4B-85B4-55D60CFB6B76.jpeg
    1.8 MB · Views: 21
  • D230A34E-69FC-4BB6-9A90-5FDCAF49F56E.jpeg
    D230A34E-69FC-4BB6-9A90-5FDCAF49F56E.jpeg
    1.2 MB · Views: 20
  • 063B4616-6911-4C53-A60D-18149FE5C790.jpeg
    063B4616-6911-4C53-A60D-18149FE5C790.jpeg
    1.1 MB · Views: 21
Last edited:
Got the powder-coat overspray cleaned off the calipers treads and mating surfaces for the hardware. Decided to just reuse all of the hardware for the calipers and cleaned that up as well. Will order new pistons and seals for the brake calibers… oem parts.

Also cleaned up that used airbox I got yesterday.
 

Attachments

  • 10026B71-5DFF-4DA8-9EBD-0CCCC8841FB5.jpeg
    10026B71-5DFF-4DA8-9EBD-0CCCC8841FB5.jpeg
    921.7 KB · Views: 11
  • C5CD0D31-AB12-4BE1-A8C0-79D4A5A46580.jpeg
    C5CD0D31-AB12-4BE1-A8C0-79D4A5A46580.jpeg
    1.6 MB · Views: 11
  • CD4C4251-6C80-40F5-A14D-0EDD596C1D3C.jpeg
    CD4C4251-6C80-40F5-A14D-0EDD596C1D3C.jpeg
    2.1 MB · Views: 12
  • C254411A-E5DF-4AB6-9370-7AF40AAD4D2E.jpeg
    C254411A-E5DF-4AB6-9370-7AF40AAD4D2E.jpeg
    851.3 KB · Views: 13
  • 4E18A14E-DDB0-4E44-82A5-76FCB9D6437F.jpeg
    4E18A14E-DDB0-4E44-82A5-76FCB9D6437F.jpeg
    849.3 KB · Views: 10
Last edited:
Finally, got a used seat that fits the bike after 3 attempts!
Will recover the seat soon with this new foam and seat cover from “Factory Effex Gripper”
 

Attachments

  • 43B19D06-A205-418A-910F-DD126021A00C.jpeg
    43B19D06-A205-418A-910F-DD126021A00C.jpeg
    2.5 MB · Views: 20
  • 5631FB32-F25D-4162-BDA9-A3E1D9AEAAB1.jpeg
    5631FB32-F25D-4162-BDA9-A3E1D9AEAAB1.jpeg
    3.3 MB · Views: 20
Eastwood,
Which seat worked for you? looks comfy.

the gold hub against all black stands out well.

When you get a min , can you weight the bike as is pls
 
Eastwood,
Which seat worked for you? looks comfy.

Actually, it’s just the oem seat for 07-09 Rmz
, 250-450.
The first seat I received was labeled for an 07, but was actually for an 06 RMZ, which has a slightly different frame and sub frame.
Then the second seat I ordered, the sketchy eBay seller just randomly canceled my order.
3rd seat works 😅

the gold hub against all black stands out well.

Thanks! The original plan was to have the decals, black and yellow with the matching gold hubs, but the gold hubs have more of a orange/gold color which clashes bad with the yellow decals, so I’ll just keep the bike mainly black. I’m considering doing some red decals, but not all of the plastics maybe just some accents. There’s already a few small red accents on the bike like the rear spring.
When you get a min , can you weight the bike as is pls

Sure! But need to wait until I get at least the rear brake installed, so I can get the bike up on the back wheel to roll onto the scale. I’m also curious of the bike weight!

Here’s the foot pegs I ordered, got a super great deal!
$40 with free shipping from the UK.
Other sellers on eBay and websites were selling these for $150. I’m guessing the seller has lots of these pegs and there’s not many people buying foot pegs for an 07 Rmz, so he must want to get rid of them.

They’re stainless steel with an arched design, which gives you better grip when climbing or descending, allowing the boots to roll. I don’t really have confidence in aluminum pegs for a full-size dirtbike, so I went with “heavy” steel pegs. Hopefully the shipping doesn’t take too long, it would be nice to sit on this bike for the first time!
 

Attachments

  • 0A66DD7C-6405-46AE-AEBC-B41D4E5A1DA0.jpeg
    0A66DD7C-6405-46AE-AEBC-B41D4E5A1DA0.jpeg
    133.1 KB · Views: 6
  • 8D6471F9-1D39-4CEF-8598-C0BE316A70BB.jpeg
    8D6471F9-1D39-4CEF-8598-C0BE316A70BB.jpeg
    739 KB · Views: 6
Got the used seat striped down and cleaned up.
Looks like the seat pan has been recovered/reupholstered several times based on the staple holes. Will recover the seat tomorrow.

C16ABD49-BE51-43FA-9E3A-B1501DC89E9A.jpeg
DB7AAA0C-B480-4C89-AA7F-A2DCBEAFF468.jpeg

Look how many staple holes 😳👇


7C619792-EED1-4D15-86D7-0178751CD8B2.jpeg

Will use this 3M spray to glue the new seat foam to the seat pan. This stuff works great, I’ve used it before.

FDE4E88D-D90D-417C-A55D-0E608D9FA490.jpeg
 
Received the front rotor protector today, looks great! The faux carbon fiber look matches the hand guards.
E59EE5D3-AEBE-48E6-90B4-F2DF63EE861A.jpeg
But yeah, of course it doesn’t fit exactly because of the "aftermarket hubs". Will have to machine about 7mm off the wheel spacer on the rotor side. Nothing is ever plug and play 😅
I was supposed to be working on that seat, but I’ve been messing with this rotor guard.
 
Cut 7.1mm off the wheel spacers and now it fits just right 👍.. Used a glass mirror and a flat piece of wood with a fresh hacksaw blade to cut the spacer symmetrical. I sanded the cut edge against the mirror and it measures perfect on all sides. 41F988D6-09A5-4B05-894F-2296570D6322.jpegDE2A17E2-28A6-4797-8A2B-2D139C4D366D.jpeg9C2EA25C-AD3F-4E94-9E42-83CAE78B94E2.jpeg

Now I need to trim the actual rotor protector because the "aftermarket” fork protectors are in the way 😅

Yeah no biggie, it’s the cost of using aftermarket parts. This rotor protector was for an 07 Rmz, but with the aftermarket parts it didn’t fit.
 
Very creative way to cut the spacer straight that way!:bigthumb:
Thanks! I only had one shot to do this right as that’s the wheel spacer that came with my new hubs 😅
The wheel spacer that came with the rotor protector kit didn’t fit, so I had no choice. Thankfully, it worked out! 😌
 
Finally got to sit on the bike for the first time today, now that I have a seat/saddle 👍

The bike has a nice upright seating position which I much prefer over leaning forward. I heard the Rmz frame has a comfortable seating positions, so that’s one of the reasons I chose this frame as a base. The seat feels nice and comfy. I like the density of the new foam from “Factory Effex”…

9B4D604F-7196-4E7A-B936-AC825CD205E7.jpeg14379534-C4EC-426C-9978-E0A1DE2A4A9C.jpegA62BAFBD-422A-4CF5-8673-23C883DEC5C5.jpeg

Still waiting on the foot pegs and all of the new parts for the brake calibers - New seals, pistons, rubber boots. I received the steel braided brake line today. Went with red brake lines, got the front and rear custom brake lines for 30 bucks total, can’t beat that! Got some Maxima dot 4 racing brake fluid. It’s supposedly has zero brake fade and it wasn’t that much more than the regular dot 4.

E21D999C-64E1-486B-9F30-A51331F54ED8.jpeg

Should be able to order the far driver (ND72850) next week, gotta let the wallet heal first lol. Think I mentioned before but once I get the controller installed, I will throw my 72v battery that’s in my stealth bomber build in this bike for testing. So getting closer and closer to a test ride, Can’t wait!
Plus by using that battery for testing (mechanics of the bike)., I’ll be able to take my sweet time on building the custom Molicel pack.
 

Attachments

  • 987B762E-4B7D-4A7D-8053-82B1BC0794CB.jpeg
    987B762E-4B7D-4A7D-8053-82B1BC0794CB.jpeg
    1.2 MB · Views: 5
Last edited:
Test rode the bike today! Used my sabvoton 200a unlocked controller and the batteries from my stealth bomber clone build. Will do more testing tomorrow! throttle regen is my only breaks right now 😅..
my brake/caliber parts are supposed to be here this coming Tuesday.

047A1557-EAE4-422F-8A8B-CD4428CBF9BD.jpegEE20D536-16BA-453E-BE20-907D77B70234.jpeg
 

Attachments

  • 8F25C141-896B-4254-AEF0-778B68A0B7AB.jpeg
    8F25C141-896B-4254-AEF0-778B68A0B7AB.jpeg
    1 MB · Views: 19
Final pieces of the puzzle, Hopefully!
All these parts are mainly for the brake calipers. The foot pegs should arrive this week.
 

Attachments

  • 1520DB36-FDDE-48E4-AB3B-CA39895ED4BE.jpeg
    1520DB36-FDDE-48E4-AB3B-CA39895ED4BE.jpeg
    3 MB · Views: 6
  • 619C947D-3269-4958-BE5B-06A5981A7CEF.jpeg
    619C947D-3269-4958-BE5B-06A5981A7CEF.jpeg
    3.8 MB · Views: 6
Got both calipers rebuilt and installed the “front caliper” this evening. The front break bites real hard with the steel braided brake line. I happy with the Master cylinder levers I purchased from Amazon. These master cylinders have no issue moving the dual pistons.
I would install the rear caliper but I’m waiting on the dang brake clamp, which I need to install the break hose through the clamp before I can connect the rear caliper, bleed the brake etc.

7E3AF092-E76D-4F9A-A034-531759B39E59.jpeg
6D6A96EC-27ED-4634-8242-500DE63A186E.jpeg

Also picked up the this 6.1N spring for the rear shock. The stock spring is 56N and is WAY to soft for my weight and the weight of the bike! Also, considering once I build the battery for this bike, it’ll be even heavier.

5D746DAA-8FB8-4D77-98C2-7FDFAE3DAC6A.jpeg


The guy I got the spring from didn’t even make me pay for the spring yet and told me to test it out and just pay him once I figure out which spring rate I need. Super nice guy! This spring originally came from the race team from Suzuki motocross, he had about 50 springs in stock.
Anybody needing parts for Suzuki Rmz check this guy out, he has tons of OEM parts in stock from frames to miscellaneous bolts etc.. He also makes graphics for bikes.
His eBay store.,
https://www.ebay.com/itm/225363494980?

Finally made the decision and pulled the trigger on a controller! Ordered the 3Shul controller CL1000.. Change my mind on the battery configurations once again lol, I’ll be going with 30s 11p Molicel p42a.

In the meantime, I’ll just use the Sabvoton controller and 72v battery, as mentioned it came out of my Enduro clone build. The top speed is only 43 mph so that’s why I’m going with the 30s, plus I can use less amps with the higher voltage.
 

Attachments

  • 212669AA-A1E9-423A-AB70-2E0F6FFF4DF0.jpeg
    212669AA-A1E9-423A-AB70-2E0F6FFF4DF0.jpeg
    1.4 MB · Views: 5
  • DA4C1A6C-3B7D-457F-BC0A-8BC6A573BC09.jpeg
    DA4C1A6C-3B7D-457F-BC0A-8BC6A573BC09.jpeg
    1.1 MB · Views: 5
  • F968041A-ECDB-4DB9-A03B-0B73D2B903AF.jpeg
    F968041A-ECDB-4DB9-A03B-0B73D2B903AF.jpeg
    1.8 MB · Views: 4
Got the rear brake installed today, both brakes working now 👍 Did my my first test ride off-road today, 10 miles. The bike rides nice and rips even at only 11kw. When the battery was fully charged, I had the DC amps briefly at 150 = 12.600kw. Can only imagine what this bike will do once I have the real battery built and the 3Shul controller. I meant to record more footage, but was too busy riding 😅.., Will record more videos soon. here’s a short clip,

 
Hi Eastwood

Wow cool and a 3Shul controler at 30S will be the best fit for your projet in my opinion. There's allot and allot of work enginering and thinking into this project but the result is blowing away and really amazing one of the beautiful i have seen here.
 
Hi Eastwood

Wow cool and a 3Shul controler at 30S will be the best fit for your projet in my opinion. There's allot and allot of work enginering and thinking into this project but the result is blowing away and really amazing one of the beautiful i have seen here.

Hi Ariane 👋

Thank you for your kind words 😀
It’s been a lot of work but glad to finally test ride the bike, very satisfying.
 
Back
Top