VTAllen
1 mW
CYC Photon Mid-Drive Conversion of 1999 Santana Sovereign Tandem
I previously tried a Falco direct drive rear hub motor on this bike and found it completely inadequate for Vermont terrain. It just didn’t have the low end torque needed for the long, steep hills that are everywhere in Vermont. I needed a motor that could use the bike’s gears for climbing. I have had good results on my single bike with a TSDZ2, but I don’t think that motor would hold up to the demands of the tandem. Our tandem plus riders weight is over 400 lbs. I decided to try the Photon, which, among other things, has an internal temp sensor, so I will know if I am overheating it.
The bike: An aluminum frame road tandem with an Ultegra 3X9 drive train, left sided timing chain, v-brakes and drop bars, and bar end shifters. 73mm bottom bracket shells, BSA threading in rear and an eccentric in the front bottom bracket shell that is also BSA threaded.
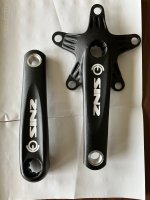
Challenges unique to this build: The tandem requires a timing chain, usually on the left, and I could not find a left ISIS crank arm with a spider. Also, my wife has arthritis in her hips and knees, and even with the seat all the way down, can no longer use the stock 170mm crank arms. We had solved this by adding crank arm shorteners. I found a set of 145mm ISIS crank arms with a right side spider on ebay, and installed them swapping right and left, and putting the pedals in with generous blue thread locker. The pedals did not loosen in the one 19 mile ride, but she could not tolerate the 145mm, she needed the 135mm the shorteners gave her. So, I found a set of 170mm ISIS cranks with a right side spider and put them on, swapping right and left, and added the shorteners. This works for her, even though the Q is pretty extreme. The shorteners do not use the crank arm pedal threads, so the right/left does not matter.
General build solutions:
1. Battery placement: This went on the bottom tube (the tube between the two bottom brackets), which on a Santana is oval shaped. I put in 4 rivnuts and attached a Grin triple bob, then added three big zip ties because I don’t know how far to trust a rivnut in a thin wall aluminum tube. The battery cradle screws to the triple bob and feels solid.
2. Gearing: I had to give up my triple, which had a low gear of .667 (24t chainring to 36t cog). I wanted gearing for our gravel roads, which routinely have grades of 15% and worse. So, I went with the 38t chainring on the Photon, and put a Box Two-e 9 speed on the back, with a 12-50t range. That gives me a .76 low gear ration. It works. On steep hills in level one assist we can climb at 4-5 mph with a good pedal cadence. The display says we are contributing about 250 watts, and the motor only heated up to 126F/52C on a 75F day. With this gearing our pedal cadence tops out at about 20mph. This is fine for our local riding. If were go on a tour in the flatlands I might swap out for a 50t chainring.
3. Handlebars: The Shimano Dura Ace 9speed bar end shifters, in friction mode, only pull enough cable to traverse 8 of the Box Two cogs. The Box Two shifter won’t go on drop bars. I needed to change to upright bars anyway, due to neck issues, so I changed to a Nitto Albatross bar, and changed brake levers and all that stuff. The drum drag brake works off the bar end shift lever on the left. The Box Two shifter works OK, but it is really hard to push.
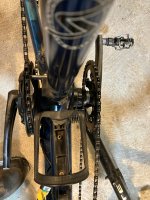
4. Chainlines: Timing Chain: The rear chainring for the timing chain, mounted on the motor spline, is 2cm outboard of the front timing chainring, mounted on the original Shimano octalink bottom bracket. I used narrow/wide chainrings because of this and so far have not had any trouble.
Drive chain chainline: By putting one of the spacers provided on the right side of the Photon install, the drive chainline is straight when in the 5th (middle) cog. I guess that is good as you can get with a 1X.
5. Control placement: Currently, these are all on the rear handlebars because that is where the wires reach, and my wife runs that stuff. It works like an old steamship, with the bridge calling down instructions to the engine room. I have extenders ordered for the wiring and hope to have that sorted soon.
Performance and range: Using Level One assist I think the 52v 14 amp hour battery will give us about a 30 mile range. With Level One assist and using the gear range for spinning, not speed, we can ride Vermont gravel without undue stress on old knees, and based on the motor temperature, I don’t think we are putting undue stress on the motor. More experience is needed.


I previously tried a Falco direct drive rear hub motor on this bike and found it completely inadequate for Vermont terrain. It just didn’t have the low end torque needed for the long, steep hills that are everywhere in Vermont. I needed a motor that could use the bike’s gears for climbing. I have had good results on my single bike with a TSDZ2, but I don’t think that motor would hold up to the demands of the tandem. Our tandem plus riders weight is over 400 lbs. I decided to try the Photon, which, among other things, has an internal temp sensor, so I will know if I am overheating it.
The bike: An aluminum frame road tandem with an Ultegra 3X9 drive train, left sided timing chain, v-brakes and drop bars, and bar end shifters. 73mm bottom bracket shells, BSA threading in rear and an eccentric in the front bottom bracket shell that is also BSA threaded.
Challenges unique to this build: The tandem requires a timing chain, usually on the left, and I could not find a left ISIS crank arm with a spider. Also, my wife has arthritis in her hips and knees, and even with the seat all the way down, can no longer use the stock 170mm crank arms. We had solved this by adding crank arm shorteners. I found a set of 145mm ISIS crank arms with a right side spider on ebay, and installed them swapping right and left, and putting the pedals in with generous blue thread locker. The pedals did not loosen in the one 19 mile ride, but she could not tolerate the 145mm, she needed the 135mm the shorteners gave her. So, I found a set of 170mm ISIS cranks with a right side spider and put them on, swapping right and left, and added the shorteners. This works for her, even though the Q is pretty extreme. The shorteners do not use the crank arm pedal threads, so the right/left does not matter.
General build solutions:
1. Battery placement: This went on the bottom tube (the tube between the two bottom brackets), which on a Santana is oval shaped. I put in 4 rivnuts and attached a Grin triple bob, then added three big zip ties because I don’t know how far to trust a rivnut in a thin wall aluminum tube. The battery cradle screws to the triple bob and feels solid.
2. Gearing: I had to give up my triple, which had a low gear of .667 (24t chainring to 36t cog). I wanted gearing for our gravel roads, which routinely have grades of 15% and worse. So, I went with the 38t chainring on the Photon, and put a Box Two-e 9 speed on the back, with a 12-50t range. That gives me a .76 low gear ration. It works. On steep hills in level one assist we can climb at 4-5 mph with a good pedal cadence. The display says we are contributing about 250 watts, and the motor only heated up to 126F/52C on a 75F day. With this gearing our pedal cadence tops out at about 20mph. This is fine for our local riding. If were go on a tour in the flatlands I might swap out for a 50t chainring.
3. Handlebars: The Shimano Dura Ace 9speed bar end shifters, in friction mode, only pull enough cable to traverse 8 of the Box Two cogs. The Box Two shifter won’t go on drop bars. I needed to change to upright bars anyway, due to neck issues, so I changed to a Nitto Albatross bar, and changed brake levers and all that stuff. The drum drag brake works off the bar end shift lever on the left. The Box Two shifter works OK, but it is really hard to push.
4. Chainlines: Timing Chain: The rear chainring for the timing chain, mounted on the motor spline, is 2cm outboard of the front timing chainring, mounted on the original Shimano octalink bottom bracket. I used narrow/wide chainrings because of this and so far have not had any trouble.
Drive chain chainline: By putting one of the spacers provided on the right side of the Photon install, the drive chainline is straight when in the 5th (middle) cog. I guess that is good as you can get with a 1X.
5. Control placement: Currently, these are all on the rear handlebars because that is where the wires reach, and my wife runs that stuff. It works like an old steamship, with the bridge calling down instructions to the engine room. I have extenders ordered for the wiring and hope to have that sorted soon.
Performance and range: Using Level One assist I think the 52v 14 amp hour battery will give us about a 30 mile range. With Level One assist and using the gear range for spinning, not speed, we can ride Vermont gravel without undue stress on old knees, and based on the motor temperature, I don’t think we are putting undue stress on the motor. More experience is needed.
 )
)