
You are using an out of date browser. It may not display this or other websites correctly.
You should upgrade or use an alternative browser.
You should upgrade or use an alternative browser.
The first and BEST Qulbix Raptor mid-drive build!
- Thread starter recumpence
- Start date
Hillhater
100 TW
I guess that is the outer bearing suport for the idler ?recumpence said:. ..., left side chain guard/idler stiftening plate in carbon, . ...
Matt
Much as i like carbon, and respect your experience on these builds,....if it were me, i would be thinking of a tough milled billet Al bearing support bracket for the load you will be putting on that idler !
Very nice project .

recumpence
1 GW
Hillhater said:I guess that is the outer bearing suport for the idler ?recumpence said:. ..., left side chain guard/idler stiftening plate in carbon, . ...
Matt
Much as i like carbon, and respect your experience on these builds,....if it were me, i would be thinking of a tough milled billet Al bearing support bracket for the load you will be putting on that idler !
Very nice project .
I have worked with carbon for years. I have CNC cut upwards of 20,000 RC helicopter parts from carbon. This stuff is amazing. I am using 3mm thick carbon. This stuff is 4 times stronger than steel. No worries. :wink:
Matt
recumpence
1 GW
Emoto said:Hi Matt
Im not a fan of this dog leg droup-out design especially for a big hub as its a bit of a leaver , care to guess a max safe toque rating.
I have no idea. But, as a mid drive, I have pulling load not rotational torque on the dropouts. So, no worries for me.
Matt
recumpence
1 GW
Parts are beginning to trickle in.
This weekend I plan to mount the drive unit and begin the lower drive unit guard.
Matt
This weekend I plan to mount the drive unit and begin the lower drive unit guard.
Matt
ElectricGod
10 MW
recumpence said:Parts are beginning to trickle in.
This weekend I plan to mount the drive unit and begin the lower drive unit guard.
Matt
Pictures please!!!
recumpence
1 GW
I ordered twelve 6S 16ah packs. That week give me 12s, 64ah. Hobby King would not ship packs to me (even one at a time). So, I found a couple ebay sellers who stock these packs at a very reasonable price.
I also did some work on the idler assembly and I built the front wheel. I will post pictures tomorrow.
Matt
I also did some work on the idler assembly and I built the front wheel. I will post pictures tomorrow.
Matt
recumpence
1 GW
bionicon said:Hey Matt, will these 12x 6S packs fit in the batterycase?
I hope so. I measured everything and it looks ok. However, that was before I cut into the box to alter it for the chain line.
Oh, also, I have to correct a statement I made. I ordered twelve 4s packs, not 6s. 12 4s packs gives 12s at 64ah.
Matt
recumpence
1 GW
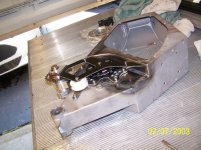
Here is some progress for you.
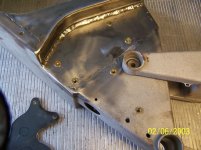
I decided not to mount the idler wheel spindles directly to the frame because any changes or repairs to that idler assembly after welding and powder-coating would be a nightmare. Also, the frame thickness in that area is not enough to support the idler wheels. So, I fabricated a plate and back welded the idler wheel spindles to that removeable plate. To fasten the plate to the frame I drilled and installed threaded inserts (Riv-Nuts). These inserts are the BOMB! I love these things! The plate weighed a ton. So, I drilled it out. I also took this oopportunity to reweld a couple seams that were pitted. I had the gas flow rate on the TIG turned up too high. This pitted the weld. So, I turned the flow rate down and made another pass with the TIG over the pitted frame welds. Done.....
Next I will be mounting the drive and fabricating the carbon fiber idler support plate. It will fasten to the frame box and support the idler shafts on the outside. The frame will be yellow with carbon side panels and a carbon idler outer support. It will look phenomenal!
I also built my front wheel. I will post pictures of that soon.
On that subject, I ordered a 1.75 inch wide rear rim and received a 1.25 inch rim. So, that is one area I am being slowed down at this point. Another wrong part shipped was my black USD8 fork. It arrived in gold. I specifically asked the seller what color it was and was assured it was black. I am NOT a happy camper. I am forcing him to pay return shipping and expedite shipping the new fork.
Oh, the white idler wheel will be replaced with a black one.
Matt
Attachments

recumpence
1 GW
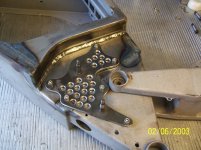
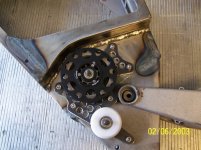
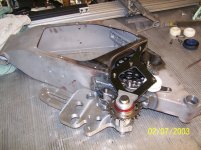
I installed the drive unit today and added the carbon fiber brace. You can see the brace ties the idlers into the drive unit jackshaft. This adds tremendous strength to the whole assembly.
It does not look like it, but, I have about 8 hours of work in the bike this weekend.
Matt
It does not look like it, but, I have about 8 hours of work in the bike this weekend.
Matt
Attachments
Rube
100 W
Thanks for posting, is the frame receptive to welding? Welding to date looks very neat and straight forward for a MIG? I like the addition of lightness (speed-holes).
recumpence
1 GW
Yes, the frame welds very easily. I enjoy working with steel. It is more forgiving in many ways than aluminum. But, steel is heavier. It is a trade off.
Matt
Matt
LI-ghtcycle
10 MW
Great Stuff! I enjoy seeing anything with the "Recumpence" touch, you and King Midas seem to have much in common. :wink:
Those Raptors are BEAUTIFUL frames to begin with, nice to see a custom build using one, and you fearlessly mod it right off!
Those Raptors are BEAUTIFUL frames to begin with, nice to see a custom build using one, and you fearlessly mod it right off!
ElectricGod
10 MW
Thanks for posting pictures. Did you notice that your camera date is a smidge off? One might think you went back in time to 2003, did a bunch of work and then returned to the present to post your work.
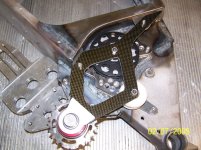
In the large aluminum bracket there are 3 holes in an arc. The two outside holes have 4 small holes around them that look like the same spacing as the holes on a 3220 motor. I'm guessing that's where the motors will mount. There's the center hole however that does not have the 4 smaller holes around it. Is this for mounting a 3rd 3220 motor possibly? What's the long oval slot with the two narrow slots on either side of it for? It looks to be similarly spaced for possibly mounting a 3220 or two there as well.
In the large aluminum bracket there are 3 holes in an arc. The two outside holes have 4 small holes around them that look like the same spacing as the holes on a 3220 motor. I'm guessing that's where the motors will mount. There's the center hole however that does not have the 4 smaller holes around it. Is this for mounting a 3rd 3220 motor possibly? What's the long oval slot with the two narrow slots on either side of it for? It looks to be similarly spaced for possibly mounting a 3220 or two there as well.
recumpence
1 GW
ElectricGod said:Thanks for posting pictures. Did you notice that your camera date is a smidge off? One might think you went back in time to 2003, did a bunch of work and then returned to the present to post your work.
In the large aluminum bracket there are 3 holes in an arc. The two outside holes have 4 small holes around them that look like the same spacing as the holes on a 3220 motor. I'm guessing that's where the motors will mount. There's the center hole however that does not have the 4 smaller holes around it. Is this for mounting a 3rd 3220 motor possibly? What's the long oval slot with the two narrow slots on either side of it for? It looks to be similarly spaced for possibly mounting a 3220 or two there as well.
Every time I charge the battery, the date rests on the camera. I have given up resetting it constantly.
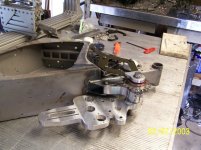
That is a triple motor drive unit. Most likely I will only use two motors. Three is just too much. Trust me, the power is unuseable, and it just adds weight and decreases efficiency. I will be using the slotted holes and the center hole without the four small screw holes to mount the motors. I will drill the four small holes for that motor. I am just out of stock on my standard twin motor drive units. So, I will modify this motor plate.
Most of my battery packs have arrived. All 12S, 64AH will fit just fine in the frame. Actually, I am half way tempted to try cramming in three more 4S packs to make it an even 80AH. I am not 100% sure that many pack will fit, however, It looks like they may. But, I need to so some fiddling around to make sure. The 64AH pack will weigh in at 32 pounds. 80AH would be 41 pounds. Man, can you imagine the range with that pack?!
Matt
Daim11
100 mW
I can't imagine the range with 64AH - How are the 3220 motors compared to a traditional hub motor as far as efficiency? Do they drink more juice or are they pretty efficient? You will be able to ride to the next state before a charge Matt!
recumpence
1 GW
I can tell you the bikes I have built previously with twin 3220s generally see around 36 to 40wh per mile of normal street riding. So, 64ah should be good for over 60 miles if ridden cautiously.Daim11 said:I can't imagine the range with 64AH - How are the 3220 motors compared to a traditional hub motor as far as efficiency? Do they drink more juice or are they pretty efficient? You will be able to ride to the next state before a charge Matt!
Think about it, this pack will discharge 2,000 watts for well over an hour straight. 80ah would give 90 minutes shutout a problem. That would be 40mph for a couple hours, or full throttle in deep snow for 30 to 45 minutes.
Matt
recumpence
1 GW
I found a way to fit 80ah in the frame! There is even a little room to spare. So, as soon as I have some more money, I will order the remaining packs.
Matt
Matt
Daim11
100 mW
Oh my goodness 80AH! That's Fantastic. I can't wait too see this beauty come together. You've been making some good headway so far.
Thanks for taking the time to share this one Matt!
Thanks for taking the time to share this one Matt!
ElectricGod
10 MW
Yeah...I'm a little jealous...80ah is a lot! I bet my 52Kw costs less than yours does. I scrounge laptop batteries and use the good cells in the packs to run my rides. My batteries cost me nothing but time and some electricity. However brand new LIPOs are likely to have a longer run time than my used laptop cells will get me.
This build is looking great so far.
This build is looking great so far.
recumpence
1 GW
ElectricGod said:Yeah...I'm a little jealous...80ah is a lot! I bet my 52Kw costs less than yours does. I scrounge laptop batteries and use the good cells in the packs to run my rides. My batteries cost me nothing but time and some electricity. However brand new LIPOs are likely to have a longer run time than my used laptop cells will get me.
This build is looking great so far.
Funny thing is, the 64ah pack on my Motoped cosy me $2,100. However, 80ah on this bike will end up costing me $1,300.
DanGT86
100 kW
Great work so far. Good idea loading it up with tons of battery. Its amazing how quickly it goes when you have a lot of power on tap. Regarding the chainline, would it have been possible to put a motor/drive inside the frame and run the chain through a small slot cut in the back of the battery compartment? What kind of bracing is back there?
recumpence
1 GW
The drive would have taken up 90% of the interior capacity of the frame. I checked.DanGT86 said:Great work so far. Good idea loading it up with tons of battery. Its amazing how quickly it goes when you have a lot of power on tap. Regarding the chainline, would it have been possible to put a motor/drive inside the frame and run the chain through a small slot cut in the back of the battery compartment? What kind of bracing is back there?
Similar threads
- Replies
- 2
- Views
- 267
- Replies
- 18
- Views
- 445
- Replies
- 5
- Views
- 842