
crossbreak
1 MW
want to built a dyno...hope this thread is not dead :x I found this document http://www.engr.sjsu.edu/bjfurman/courses/ME106/ME106pdf/electronic_scale_arduino.doc
maybe i'll buy a scale from the same vendor I use the magic pie2 as a brake and an ebike as a load.
got 11 Fets from a brunded 12-fet controller (TO-220) to drive the bulbs. Got 12atm, will be 4x10 in the end, I use 50W ones, 2000W total.
How do you drive your bulbs? are you also using FETs? I think of using a TC4420 gate driver for one FET and drive the 12Fets by it. So a cascade of arduino->4420 Fet driver-> 1Fet->12Fets-> 40x50W bulbs. Dont know if it works, i'll try. Have to lower PWN frequency to ~1kHz i guess.
Have a 6 step plan:
1. Built a 600Wmax load for testing battery/BMS, using 12 Fets, 12bulbs, a DIY gate driver + FET +PWM of Arduino may work like this one:
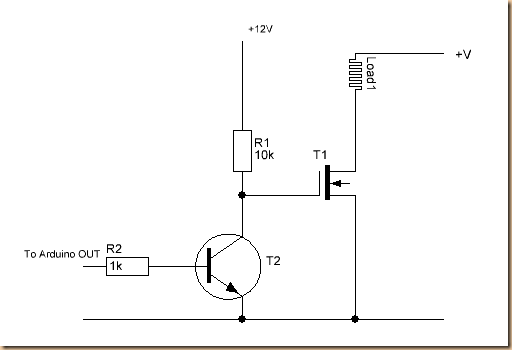 from here http://arduinodiy.wordpress.com/2012/05/02/using-mosfets-with-ttl-levels/
then, I can test my BMS wihtout sparks ->great advantage
2. connect the MP2 generator to this, using some flat bar as a mount on a box for the MP2, will use a 20" tire as a roller dyno, use 3-phase AC to drive the bulbs
3. wire the whole thing so i can measure AC voltage and current of the MagicPie2 motor as a brake, place my bike on it, use PID feedback control for bulb power
4. measure dyno speed, using the internal hall sensors of the MagicPie2
5. measure torque using a load cell, use ball bearings for a torque-free mount, connect a torque arm to the load cell
6. make a virtual drive cycle, test the whole stuff
7 wire some better ADCs for more accuracy: got a 12-bit STM32 Hantek Oszi that is perfect for this purpose
Use the arduino leonardo/micro/labview software to measure the force/troque in the first place. Leonardo/micro has built in 100x op-amp/gain factor for the load cell, shunt etc.

You cannot control torque that is a great drawback. How can we manipulate the controller so it has variable regen? maybe feed a "self desigend" shunt voltage to the regen controller, using an µC like arduino leonardo? This could make your controller use "variable regen" by PID control of the Arduino
My approach, a DIY 3-phase PWM (all 3 phases conduct at the same time, no determination) with just some bulbs, but variable regen would help us with ebikes regen, too, just as load cells for pedal torque measurement
maybe i'll buy a scale from the same vendor
I use the magic pie2 as a brake and an ebike as a load.got 11 Fets from a brunded 12-fet controller (TO-220) to drive the bulbs. Got 12atm, will be 4x10 in the end, I use 50W ones, 2000W total.
How do you drive your bulbs? are you also using FETs? I think of using a TC4420 gate driver for one FET and drive the 12Fets by it. So a cascade of arduino->4420 Fet driver-> 1Fet->12Fets-> 40x50W bulbs. Dont know if it works, i'll try. Have to lower PWN frequency to ~1kHz i guess.
Have a 6 step plan:
1. Built a 600Wmax load for testing battery/BMS, using 12 Fets, 12bulbs, a DIY gate driver + FET +PWM of Arduino may work like this one:
then, I can test my BMS wihtout sparks
->great advantage2. connect the MP2 generator to this, using some flat bar as a mount on a box for the MP2, will use a 20" tire as a roller dyno, use 3-phase AC to drive the bulbs
3. wire the whole thing so i can measure AC voltage and current of the MagicPie2 motor as a brake, place my bike on it, use PID feedback control for bulb power
4. measure dyno speed, using the internal hall sensors of the MagicPie2
5. measure torque using a load cell, use ball bearings for a torque-free mount, connect a torque arm to the load cell
6. make a virtual drive cycle, test the whole stuff
7 wire some better ADCs for more accuracy: got a 12-bit STM32 Hantek Oszi that is perfect for this purpose
Use the arduino leonardo/micro/labview software to measure the force/troque in the first place. Leonardo/micro has built in 100x op-amp/gain factor for the load cell, shunt etc.
maybe this is not so clever...just use the torque value of the load cell for feed back loop PID control...I should really make my own thread, but got inspired so much from yours3. wire the whole thing so i can measure AC voltage and current of the MagicPie2 motor as a brake, place my bike on it, use PID feedback control for bulb power
Regen Brake Load
Quick update of the variation in load I am able to apply via a simple coupling to a motor using regen.
Setup
Regen Motor: C8085-250kv
Regen Controller: EB306 Sensorless
Drive Motor: SK3 6364-190kv
Drive ESC: Tz85A
Power Supply Voltage: 22.2v
RPM prior to braking: ~4260rpm
RPM under regen: ~4000rpm
Results:
Drive Motor Power / Regen Power
46w / 0w - Free spinning motor
170w / 0w - Coupled to load motor, no regen
297w / 87w - "Slip Throttle" regen, when applying a tiny amount of throttle on the regen controller, I see some load
480w / 257w - Regen (EBS Level = Unlimited)
550w / 315w - Regen (EBS Level = Moderate)
610w / 350w - Regen (EBS Level = Strong)
Summary:
This gives me various loads up to 1.35 Nm with this load motor.
Might be interesting to try with a lower kV regen motor to get a higher load.
You cannot control torque
that is a great drawback. How can we manipulate the controller so it has variable regen? maybe feed a "self desigend" shunt voltage to the regen controller, using an µC like arduino leonardo? This could make your controller use "variable regen" by PID control of the ArduinoMy approach, a DIY 3-phase PWM (all 3 phases conduct at the same time, no determination) with just some bulbs, but variable regen would help us with ebikes regen, too, just as load cells for pedal torque measurement