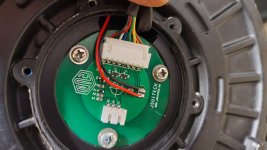
Yamaha YZ250F

Yesterdays tuning:

Bpp9X9K.jpg


I can log this, but I dont really know how to use the log.
I can press "Log Viever: Open sheet" in the lower right corner, but it only opens open office on the computer.
Then I can find the log file and open it, but I only get a screen full of numbers. Probably mostly a competence problem with the user :oops:

However, I noticed I can also press the second button in the top, left corner and get this:

iAqv3Oi.jpg


And I can zoom:

CCqm4fu.jpg


Another try:

eStHxou.jpg


Well, that dosent look very good I think?

I tried changing Ke and ki a little:

xLOE1pJ.jpg


xLOE1pJ.jpg


Bj9jui7.jpg


AvV2nii.jpg


sNZXwQv.jpg


wrs0scm.jpg


I dont really know what I am doing, but it looks a lot better.
Im not sure I did the same thing every time, especially from the first to the later tests.
On the later ones I fist hold the wheel with the brake so it dosent move.
Then I try again but let the wheel slip on the brake. It is when it slips that the regulation gets busy :wink:
 
j bjork said:
It cant have something to do with that it measures in rms?

The kV formula is also for rms so no, i don’t think that this is the issue.. but obviously result is totally wrong since max speed is 1200 or thereabouts. I wonder if Ke means something else in sevconish :wink:

Calculating from the numbers shown in the program and from the true kV might be an option:
Vrms/krpm should be 17.2 when calculated from the Ke parameter so maybe you could change that until you get that calculated by the program.

So if 0.165 Ke in v/(rad/s) gave calculated Ke in v/krpm at 69.11 then the correct input Ke would be 0.165*17.2/69.11=0.041

It could be worth trying.

If it fails then i don’t know.. the only realistic way of interpreting program and getting forward is to base the settings on real numbers but if it doesn’t give the correct output in the program… maybe then could be looked at if there’s likely conversion factors in the difference like 1.41 if there’s a peak to rms difference, 0.5 if it’s half the phase that’s specified etc.
 
I got replys from Mattias, they are in Swedish. But it is mostly formulas anyway:

Sevcon verkar åsyfta RMS-värdet, dvs du måste isf justera med en faktor sqrt(2).

kv = rpm / Vpeak = rpm/sqrt(2) / Vpeak/sqrt(2) = rpm/sqrt(2) / Vrms

= (rpm*2pi/60)/sqrt(2) / Vrms*(2pi/60) = rad/s/sqrt(2) / Vrms*(2pi/60)

Alltså, Vrms/rad/s = kv/2pi*60/sqrt(2)

I ditt fall: kv 58 => 0.11642021329618 Vrms/rad/s

So far on the same track, but with some adjustments. Then he says he found that they think e-RPM, I have to divide with pole pairs. 0.116/4= 0.029
 
Ahem, i see my mistake, the calculation in Kv takes RMS and translates it to peak so there's the 1.41 factor there.

How would then anyone figure out that it’s erpms.. there must be a manual out there. Question is who has it! For APT96600 controller i asked APT and got at least a simple manual describing the parameters (not really how to set them).
Maybe Sevcon or a Sevcon distributor can share the same.
 
Yes, he found it in a manual. I dont know witch one, but I havent seen it in any of mine.
He had some manual from a few years back I think, so it might be an older version than mine.

There are manuals, I have "Gen4 applications reference manual rev. 3.4" It is a little thing with (if I remember correct) 115 pages.
Then there is " DVT applications reference manual, V1.3" for the computer program, 79 pages.

Then I have a few extra documents, instructions written by other people etc. All this is free to download, but there is still a lot of instructions missing.

I found this spec. sheet for the motenergy me1507:

TWZ2p72.jpg


It seems like the same resistance if it is one winding (I had 5mOhm phase to phase, 2 windings with wye connection)
And possibly the same or higher inductance.
From what I have read that should be very similar to the zero motor, but that has 30uH?
 
Interesting thread with a motenergy me 1304 and sevcon on the dyno, but interesting discussion about other motors too:
https://endless-sphere.com/forums/viewtopic.php?f=30&t=94143


I have been messing with the kp ki values a bit more, it seems a kp between about 0,75 to 2,5 or so seem to work :?
I dont really know how big changes are reasonable, and in what direction I want to go.
But maybe I can get a chance to test some different settings this weekend, and see if I notice a difference.
 
Noticed this in a Facebook group that might interest you
https://www.facebook.com/groups/electricmotorcyclebuilds/permalink/2426364704167553/

cheers
Tyler

 
Tyler, looks interesting but it is always hopeless to see anything in these facebook groups..

To bad he went with single stage reduction on the 138 90h, I wonder if a 138 70h v3 wouldn't be better where he could get lower gearing.

Not to much has happened lately, I did the covid thing last week instead of something useful :roll:

I have done this at least:

tzf8NqM.jpg


I actually has been able to do a 3d cad drawing myself, and print the damn thing :wink:
Something went wrong though:

fvfKy6c.jpg


GuJApPw.jpg


The thing is the drawing is 260mm, and the printer is supposed to take 250mm.
However, I have tried it and seen that it should be able to do 260mm without mechanically hit something.
Then I have changed the max in cura to 260mm, but still it obviously stopped at 250mm and just kept printing at that height :?

Took the bike apart again to start finishing small things here and there:

s50Zezq.jpg


Like this cutout for the motor:

zaGv7u3.jpg


1qvm4xQ.jpg
 
I have been working on the second battery a bit more lately:

vElpc0B.jpg


It will be a little different from the first, mainly because the half module is mirrored as it is the other half :wink:
The left over bus bars is different too, I think I am using up all of them.
Here I have welded one:

GbD8lLs.jpg


I got the mid section back, it has been away for machining the bearing races (I think that is the right term in English):

Ju8ZGz7.jpg


It was a bit tight, now it is a bit loose.. At least there are no play, so I hope it will be fine with a little locktight.
Starting the final assembly (I hope) :)
 
So, after assembling a lot of stuff I realize the silicone doesn't cure:

jSH8HBZ.jpg


Luckily it was still possible to take it apart without taking it all apart..

0W4A1EE.jpg


Shaft in place with seal and everything.

aB7HVVb.jpg


The long tooth on the motorsprocket was a problem it seems.
I took it down a little in the lathe.

d89c8VR.jpg


In place, now with a drain plug too :wink:

GJcpMrQ.jpg


A little lazy install of the return spring for the brake pedal..
Maybe I should have made some advanced looking bracket or something :lol:

AiKIQa4.jpg


Ventilation for the reduction.
I planned to use a 6mm tube, but then realized I only had short peaces. I had 5mm tube, but not the right fitting.
I ended up with 4mm, I hope it will be enough.
 
Wow great progress [emoji16]

Yes Facebook is not practical for actually documenting your project.

Just looking at your fill plug for the reduction drive, I'd recommend testing different oil levels as the driven sprocket is already in the oil less than half filled and too much oil could either cause unnecessary drag or froth up and stop being good oil at high rpm. Just a consideration. The weight of oil is important also, motorcycle engine oil appeals to me the most. Or something crazy like a bottle of chain oil like Scottoiler stuff but that is too sticky I believe.

Really coming together well though, nice work sir!

cheers
Tyler

 
I finally got the plates I draw for the wire cover on the motor:

GSluIVE.jpg


I think I draw them in November, but I am not sure..

I planned to just do some spotwelds and try it, but it didnt go as plan:

q49tD3Q.jpg


That was to bad, I realize I have to do some changes :roll:

BCJ1Z5h.jpg


The plan was to 3d print a wire separator and shield to put in the end, but it is to bulky and sticks out to much.
It has to be like this in the middle, but it sure can be narrower at the ends.
 
This is really cool, will be following. Interested in seeing the results you get with this motor and the sevcon. I almost bit the bullet with a sevcon but ended up just using the paired 96800 which still produces a good kick.

Id recommend using shielded cable for the mag encoder and popping the cover off the back of the motor and either directly soldering the wires to the encoder pcb or using neutral cure silicone to strain relief the white connector in there. After a couple of hrs riding mine became intermittant causing the motor to cut out.

Doug
 

Attachments

  • 20220317_203028.jpg
    20220317_203028.jpg
    1.2 MB · Views: 1,108
tylerwatts said:
Wow great progress [emoji16]

Yes Facebook is not practical for actually documenting your project.

Just looking at your fill plug for the reduction drive, I'd recommend testing different oil levels as the driven sprocket is already in the oil less than half filled and too much oil could either cause unnecessary drag or froth up and stop being good oil at high rpm. Just a consideration. The weight of oil is important also, motorcycle engine oil appeals to me the most. Or something crazy like a bottle of chain oil like Scottoiler stuff but that is too sticky I believe.

Really coming together well though, nice work sir!

cheers
Tyler

Thanks
For now I filled up with (manual) transmission oil.
Im not sure if I want to go thicker or thinner, but I can always try different oils.

I dont think much oil is needed for the lubrication, but I worry about heat transfer if using too little.

dougf said:
This is really cool, will be following. Interested in seeing the results you get with this motor and the sevcon. I almost bit the bullet with a sevcon but ended up just using the paired 96800 which still produces a good kick.

Id recommend using shielded cable for the mag encoder and popping the cover off the back of the motor and either directly soldering the wires to the encoder pcb or using neutral cure silicone to strain relief the white connector in there. After a couple of hrs riding mine became intermittant causing the motor to cut out.

Doug

Do you have a sin cosine encoder?
I have U V W digital

I will try with the unshielded wire first, if it is a problem I will probably put a shield over it.
But changing it for one with one wire more would be a good thing. Now the ground for hall sensors and temp sensor is the same, but sevcon wants separate.
I am using the hall sensor ground for both, as I am more concerned about their signal. But that means my temp sensor is off by 10 degrees or so.
 
Its a quadrature encoder with single ended A, B and Z signals. It also has a pwm output. The duty cycle of the pwm seems to corrolate to the absolute position.
My bike was unridable before i ran shielded cable. Would stutter with any power applied. The Sevcon might be a bit more immune to the noise.
I believe the red and black wires soldered to the pcb in my pic are the temp sensor NTC. You could desolder and run seperate as needed.

Doug
 
Oh, so all digital signals?
I think I read in the sevcon manual that A B signal was unsuitable for pmac and was more for induction.
But maybe that extra z signal changes things?
How many wires do you have coming out from the motor? (except the phase wires)

I think the wire cover is finished now:

noSo8Ak.jpg


I also changed it in the bottom a little:

50X6Yze.jpg


I have gotten a bit further on the second battery:

v4untXj.jpg


Unsoldered the shunts from the bms.

5z2wfDc.jpg


And put them on the wire instead.

u4gonP3.jpg


On the other one I have a problem that the bms reads that the battery is being charged with 0,7A all the time when there is no current flowing.
I did it a little different now, with the shunt closer to the bms and twisted sense wires as long as possible.
It will be interesting to see it this makes a difference.
I think I will try to twist the wires on the other one in that case, and see if that helps.

0,7A dosent sound like a big deal, but the problem is when the bms is on for a longer time it will show the as fully charged :?
 
Yes, digital. Has the A, B and Z signals, the pwm signal, temp, ground and +5v. The z signal is mandatory to accurately tell the controller where the motor is rotated to. I believe the way it works is the pwm output tells the controller roughly where the motor is rotated to, close enough to spin it. When it gets a z pulse it then knows exactly where it is. Does lead to some undesirable behaviour when first turned on like the motor trying to spin backwards. I usually wheel the bike forward a meter or so before riding for the first time. Anyway, might all be moot if your sevcon just works.

Anyway, looks awesome mate, very keen to see how the sevcon goes with this motor. Mine peaks out at 31kw and tapers off. Really good power for a dirt bike, a bit meh for a road bike.

Doug
 
dougf said:
Anyway, looks awesome mate, very keen to see how the sevcon goes with this motor. Mine peaks out at 31kw and tapers off. Really good power for a dirt bike, a bit meh for a road bike.

Doug

Is the 31kw a limit of the controller? I think max battery A is 300 or maybe 350 on that controller right?
Is it 31kw to the motor, or is it output on a dyno?

I am a little worried as it seems to be around that I am limited so far :wink:
I hope some more tuning will make it better.

Anyway, finished my charger:

k1W4Tj8.jpg


I had already modified one of the psu:s used for it, but wasn't able to program it at first.
The usual stuff where I get stuck, I think this had most of them. First unable to install programs.
Then unable to get connection to the device. Then unable to read files etc.
Finally I was able to get it to work, and modified the other one as well:

glW29lm.jpg


A cut trace to allow the psu to go to a higher voltage.
There is one on the top too, where I add the pot to adjust voltage.

fph5SAN.jpg


I drill holes, put the wires through and solder on both sides. I think it is unlikely that I will rip off the trace from the pcb then..
It also distribute the load (A)on both traces.
Here is also the pot where I can adjust up the set voltage about 15-20V
It seems like it was all the pictures I got, I thought I took more..
There probably are some earlier in the thread when I did the first one.
 
The 31kW Im referring to is the power coming out of the battery. Will be less at the wheel. I believe it is the max these controllers can handle.

Doug
 
Battery 2 all wired up and test charged:

fOxEHqd.jpg


It looks very good, the bms reads 0A when there is no draw and shows 15-15,1A when charging.
The other bms showed about 14,1A I think, and my multimeter too.
But the charger is programmed for 15A, so I cant really say witch is most correct.

Now I have another problem, after pairing with the "new" bms I cant connect to the "old" one any more.
In the device list there is only one ANT 32S bms, and it just flicker between "connected" and "not connected" if I try to connect the old one :?
 
It seems like I can get the bms:es to work with some help from google.
I found that I should change the bluetooth MAC address here:

mSYmebw.jpg


That should make it another device. I wasn't able to change it, but it seems it was enough to try.
Now that bms is called "BMS 32c-535" or something like that.

I also found this little interesting button:

UYexegC.jpg


"currentclear" in the bottom right corner. Clicking it sure zeroed the current at no load. I had been looking after that in the settings page all the time, and missed it right under my nose :roll:
After that it read a little low when I tried the charger, but that could be calibrated wit a setting on the settings screen :wink:
 
Moving on with a battery. I decided to try to get it air/watertight and not have any small drain holes.
But I will need some ventilation to even out the pressure, I finally fount this:

naeKjJi.jpg


First I thought I should mount it at the highest point, so that it could vent out some moister.
But didnt really find any good spot, and as there wont be any circulation of air I dont think it will make much difference.
So I mounted it low instead.

HhRxWFC.jpg


8MXN7LC.jpg


UIheCYa.jpg


Trying to seal everything. There is a lot of holes, I wonder if this will work..

I got tired of the stiff and slightly short phase wires:

FO1inJB.jpg


1n4fHcj.jpg


I cut them off and spliced in some 35mm2 more flexible wire.
 
Back
Top