
You are using an out of date browser. It may not display this or other websites correctly.
You should upgrade or use an alternative browser.
You should upgrade or use an alternative browser.
2 speed transmision evolution----
- Thread starter Thud
- Start date
AussieJester
1 TW
With regard to chain sprockets freewheel setup etc, i know
Thud prefers kart chain over bicycle chain due to the strength and availability
of more sprockets all well and good, but with regard to rear mounted freewheels on the drive train, i have both, the front mounted freewheel setup on the 2 speed is FAR superior than rear wheel freewheel setup on the drive train. I made a thread about this months ago, the front freewheel setup has less "delay" when powering on after coasting, maybe non issue to some but it royally annoyed me, the front freewheel setup is near instant drive when powering on, no large delay waiting for the freewheel to engage and drive...I run same freewheels White Industry ENOs on both setups, i run half link BMX chain and have yet to stretch it a millimeter its strong as hell compared to those flimsy chains on multi speed bicycles... Just my 2 cents")
KiM
Thud prefers kart chain over bicycle chain due to the strength and availability
of more sprockets all well and good, but with regard to rear mounted freewheels on the drive train, i have both, the front mounted freewheel setup on the 2 speed is FAR superior than rear wheel freewheel setup on the drive train. I made a thread about this months ago, the front freewheel setup has less "delay" when powering on after coasting, maybe non issue to some but it royally annoyed me, the front freewheel setup is near instant drive when powering on, no large delay waiting for the freewheel to engage and drive...I run same freewheels White Industry ENOs on both setups, i run half link BMX chain and have yet to stretch it a millimeter its strong as hell compared to those flimsy chains on multi speed bicycles... Just my 2 cents
KiM
RWP
1 kW


Thud
1 MW
Roy,
Is that one of your projects? or a sale item some where?
& boy do i feel dumb, i never looked for 219 0-ring....kinda pricy for my bicycle builds but a nice option for something a little heavyer duty.
Kim is correct about the lag of the engadgment on the freewheeling rear sprocket....it is amplified by a larger sprocket. The only set ups I found it distracting on were the monster sprockets.
RWP
1 kW
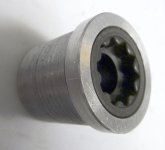
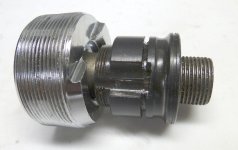
It's the first thread I cut on a lathe project.
I took a freehub apart and then it's clear how to shape the inside of the aluminum piece.
Getting the length of the inside, not sure what to call it, cylinder that the freehub mounting part clamps too is a bit tricky because that part has a race as the tightening face...you have to hold the parts in your hand to get this.
My only concern is the friction fit with red loctite of the steel inside part of the freehub and the aluminum threaded part is strong enough for the alu part not to slip on the steel part...
RWP
1 kW
Thud
1 MW
thanks for the info.
I am looking for a cost effective way for dual freewheeels on thefree hubs. We can broach the White freewheels easy enough...but it is chunck of change for a collage kid to shell out.
I built a tiny internal grinder to cut splines into hardend steel freewheels (chepo dictas) but that set up needs de-buging.
we'll keep experimenting & see if i stumble onto something easy & strong enough to suffice.
T
I built a tiny internal grinder to cut splines into hardend steel freewheels
Thud, I recall the ENOs could be broached because the inners were not hardened (soft steel). A high-quality product for certain, but I agree on the high price vs mass market. I have not tackled attaching hardened freewheels to a freehub yet, but...I think I would try just using a file to cut two slots in the freewheel ID for a keyway. IMHO easy to re-slot a replacement FW when the first one wore out.
The only hard part would be cutting matching slots into the freehub OD. A small diameter grinding wheel of the correct width could only cut from the outer edge to about 80% in, but...that might be enough. A jig could easily be made, and I have been able to achieve surprisingly accurate results with some very ghetto-looking jigs. Here's the shaft slotter I made (driven by my cordless drill)
I'm not trying to change your mind, I actually want to see anything that you come up with, and I'm glad you are working on this...


etard
100 kW
I would be interested in what the weight savings is on those wiener boxes, nice work indeed!
Roy,
Very cool design, I have always been intimidated by the math of cuttin threads, I am impressed with your freehub! Now, that is a viable alternative if Thud's grinder doesn't hold up.
Thud,
When are you step up and put a real clutch on this thing and just make it right side drive? :lol:
If nobody else does it, I will... Does nobody else see the advantage of being able to "feather" the power?? Maybe I've been riding my motorcycle too much lately.
The CSK35 on my Moulton is doing fine but, it's not a Chinese cheapo and the Moulton has 20" wheels... The Chinese ones seem to be failing on freewheeling crank set-ups and it's not clear whether this is because of a lack of bearing support for angular forces, or not. Using a sprague clutch would avoid the pick-up lag and they're easy enough to fit to a standard cassette driver using the methods I posted before. One drawback to using them is the weight - 300g for a CSK35; 180g for a lightweight ratchet freewheel.mdd0127 said:About the rear freewheel, I really like CSK35PP's for this, or a csk25 it it's at the reduction output. On my current build, the freewheel is in the reduction output so the chain always moves but it really doesn't add much drag or noise....not enough to bother me anyway. I'd still rather have the freewheel in the rear so I've been mulling around the idea of making a csk35 to 44mm disc adapter setup.
Thud
1 MW
Etard-
In my practice, the only time I reach for the clutch is to "slip it" to allow the engine to get back into the tourque producing part of the powerband. Typicly coming off the line or out of a slow corner in a high gear. The ellectrics don't suffer from the narrow powerband of a race engine, we just need more power to pull the gearing we want.
I though about centrufigal clutches for a while just to get the motors out of a stalled condition at start up. still do from time to time.
The more time I spend riding ellectrics the more I realize the limitiations & apreciate the current level of engine development we enjoy on our motocycles. I realise what we consider "normal riding" on an old motocross bike is pure abuse on an ellectric bicycle.
interesting question.Does nobody else see the advantage of being able to "feather" the power??
In my practice, the only time I reach for the clutch is to "slip it" to allow the engine to get back into the tourque producing part of the powerband. Typicly coming off the line or out of a slow corner in a high gear. The ellectrics don't suffer from the narrow powerband of a race engine, we just need more power to pull the gearing we want.
I though about centrufigal clutches for a while just to get the motors out of a stalled condition at start up. still do from time to time.
The more time I spend riding ellectrics the more I realize the limitiations & apreciate the current level of engine development we enjoy on our motocycles. I realise what we consider "normal riding" on an old motocross bike is pure abuse on an ellectric bicycle.
RWP
1 kW
Miles could you let us know where this is posted. Thanks.Miles said:... Using a sprague clutch would avoid the pick-up lag and they're easy enough to fit to a standard cassette driver using the methods I posted before. ...
I use this method for securing freewheels (the type with recesses for the removal tool) and also the CSK35.RWP said:Miles could you let us know where this is posted. Thanks.
http://www.endless-sphere.com/forums/viewtopic.php?t=12449&p=185383#p185383 (only one lug needed for the CSK35).
The other method is to modify a normal key to fit the wide slot (adjacent to the narrow alignment spline) on the driver - then bond it into the keyway of the CSK35.

Thud
1 MW
Miles, I have 4 of those on the bench as of last night.
(I had more but Etard has a pr now also)
Here's what it would look like:Miles said:The pockets on the above are pretty much the same width as the wide slot on the cassette driver. Perhaps we could get away with a single key fixed into one of the pockets?
Attachments

etard
100 kW
Miles,
I'm assuming you intend to turn down the inside of the freewheel on the lathe for this to work?
Taking this concept one step further, how about threading the "teeth" on the cassette driver, thread on first freewheel, jam the key in that motor drive freewheel and then just thread on the pedal freewheel and jam another key into that, or just go without. Who really pedals with over 5KW on tap anyway?? :wink:
Is that how you were planning to do it Miles?

Thud
1 MW
I edited the first post with photos of the 1st production unit delivering this week.
here we go:
an eccentric stop for a positive spring loaded shift to low gear...& yes I defaulted to Low & the shift will go to high for the masses....(since i am allways in high & low is the exception i set my personal unites oposite)

a close look at the dog clutch, this unit is going on a trike & has 4 threaded anchor points in the bottom of the case

a pocket machined out for the astroflight motor that will power this unit.

The majority of the units will have a simple clamp for positive mounting. here is a lightweight unit for your viewing pleasure


the assembled unit above weighs 3.5 #s without the primary reduction chain & sprockets. I will be curious to weigh the weenie & see what the differance really is.
Here is a link to another crappy un-edited video
video
to the 1st recipient, look for an e-mail...a little polish & re-assembly with lube & locktight & its in the mail.
here we go:
an eccentric stop for a positive spring loaded shift to low gear...& yes I defaulted to Low & the shift will go to high for the masses....(since i am allways in high & low is the exception i set my personal unites oposite)
a close look at the dog clutch, this unit is going on a trike & has 4 threaded anchor points in the bottom of the case
a pocket machined out for the astroflight motor that will power this unit.
The majority of the units will have a simple clamp for positive mounting. here is a lightweight unit for your viewing pleasure
the assembled unit above weighs 3.5 #s without the primary reduction chain & sprockets. I will be curious to weigh the weenie & see what the differance really is.
Here is a link to another crappy un-edited video
video
to the 1st recipient, look for an e-mail...a little polish & re-assembly with lube & locktight & its in the mail.
Danny Mayes
1 kW
More 2 speeds! Yaaaay! This is a very good thing.
They look awesome Thud.
D
They look awesome Thud.
D
Similar threads
- Replies
- 3
- Views
- 860
- Replies
- 17
- Views
- 2,729
- Replies
- 4
- Views
- 1,143
- Replies
- 36
- Views
- 4,376