Backyard-Millyard ebike.

Hey Jay,
Thanks for the reply and photo....I will get you to do a suitable package for my bike when I'm ready...like I said I need to build up the piggy bank again....I've got some good rims and a spare front hub, need to get some fat spokes, got to have good wheels to take your power package..

I'll PM you in the next few days with measurements of the battery space so that you can work out a pack that fits and we'll take it from there...
 
Jay, I reckon you could start a production company "Pimp My Ride" :D

tri-lobe, you can buy with confidence from Jay, he'll set you straight (and I'm speaking from experience) 8) When I first saw your mockup frame I immediately thought "broomsticks", and IMO the end result looks better than the Millyard. Congratulations
 
tri-lobe said:
got to have good wheels to take your power package..
Actually even crappy wheels hold up reasonly well if you're going going to be bashing it around like an expensive DH bike. It's more the drop outs that need to be beefy to take the torque of the motor.

I'll PM you in the next few days with measurements of the battery space so that you can work out a pack that fits and we'll take it from there...
No dramas, you should be able to fit a nice stealthy pack in the "hollow" section of the frame.

gtadmin said:
Jay, I reckon you could start a production company "Pimp My Ride" :D
Funny you should say that, I made this video many years ago when I was young and silly(er) and pimp my ride had just come out
(warning, contains footage of us intentionally being douchebags in an attempt at satire)
http://www.youtube.com/watch?v=wNJITI8k1xQ
 
From one Newcastleite to another ... that's a cracking build tri-lobe!

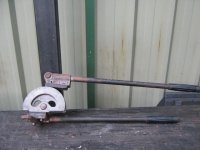
Can you tell me the wall thickness of the CroMo tube and what equipment you used to bend it? The bend radius at the steering tube looks pretty tight.

Cheers
Malcolm
 
.....and pimp my ride had just come out
(warning, contains footage of us intentionally being douchebags in an attempt at satire)
http://www.youtube.com/watch?v=wNJITI8k1xQ[/quote]

intentional satire my a$$ jay. be honest, you were hoping to be cool enough to roll with mr X to the Z. :p

getting back ot, can you post some closeups of your rear linkage tri? where the swing arm meets the frame? from what i can make out it looks like your swingarm is mounted to your frame, and the pedal axle is mounted to the swing arm a few cm further down?
 
Hey sc,
It's exactly the same set up as a huffy style dual suspension affair...the bb is part of the frame, just lower than the swingarm pivot...I did it this way to keep things simple...I'll do a photo tomorrow,that should make things clear...


Hey Malcolm
Back at cha matey...wow I've met 2 newcastle EV members, though one is along way away, this is great :wink:
I'll take a photo of the bender for you...
 
sn0wchyld said:
tri-lobe said:
Hello sc,
I used a CIG gassless welder...a lot of guys on this site use them...check out Aussie Jesster's builds...his builds sold me on the gassless path...hey I only wanted to make one frame...and it worked fine...

I had to get a few shaft mounted grinding stones, a few 20mm dia flapper wheels,...I finnished all the welds with a 19/20mm dia round bastard file....
There was a lot of cleaning up to do...but it was worth the time and effort...

is CIG just the brand of welder? like this
http://cgi.ebay.com.au/100-amp-CIG-gasless-mig-welder-/140534075140#ht_500wt_1146 :?:
I have the Transmig 135 which is just fine (with practice). I would get the next model up though if I was in the market for another (and I think that's the one AJ eventually got). Use 0.9mm gasless CIGWELD wire, which I get from SuperCheapAuto sometimes for about $15, mostly about $22. You could try Gasweld at Pooraka for the welder.

GT
 
Hello sc,
I have to apologise, I gave you a bum steer with my verbal description last night of the bb set-up. photo should make this clear.....
 
Hello Malcolm
One photo of the bender that I used.....I to hold bender in a solid vise and use apiece of pipe as an extentsion handle to bend tube.....
 

Attachments

  • IMG_0024.JPG
    IMG_0024.JPG
    39.5 KB · Views: 2,068
Thanks for the pic tri-lobe. I've been looking at buying a tube bender for a while and seen a few of those for sale. It's good to know they're up to the task. Do you get any kinking on the inside of the bend?
 
gtadmin said:
(and I think that's the one AJ eventually got).

actually AJ went for a Token Tools200amp inverter welder in the end...

http://www.tokentools.com.au/category14_1.htm

I was amazed the first time i used this welder, near zero spatter
still using gasless, i was going to get a bottle but now forget it, this thing
is soooo nice to weld with. Bonus, does TIG and ArC and one can also
fit a spool gun for ali welding if one likes ;) I did have to have a 15amp
plug and heavy duty cable fitted to my workshop that cost
200 bucks, once you try an inverter you wont go back to transformer MiGs well
i know i won't...

KiM
 
gtadmin said:
Shit AJ, that's what I paid for my Transmig :twisted: (Was it you brother that had the Transmig then?)

Cheers,
GT

Correct, and in comparison to the Tokken tools well, really is no comparison the Token Tools is
a far better welder IMHO had trouble welding 6mm solid bar with the bros welder, the Token Tools
inverter welder pisses it in i think 10mm would even be doable...My theory was by a welder
that was higher specked than i would ever need in the hope welding the thin stuff i regularly weld
wouldn't tax the welder thus might lasting longer aaand if i do need a lil extra power for heavier jobs i know i have the capability to tackle them...only time will tell i guess either way though i HIGHLY recommend
Token Tools very friendly (on the phone) service also, great to know if i ever have an issue...

KiM
 
I would be interested in seeing you welding bloke's jig setups for frame building. I see a lot of chatter about welders but obviously thats only part of the story. Also how you cut the mating ends of the tubes - in Luke's race bike thread he is using a hole saw on a mill....what about you lot?
 
jonathanm said:
...what about you lot?

'Freehand' just an angle grinder and my eye, takes a lil practice and a lot of f*ck ups
but now i can look at the frame cut the angle with cut off disk in the 6in angle grinder
then use the grinding disk to profile the end of the tube, i can do it pretty
quickly now including beveling the edge of the tubing ready for welding, i would think quicker than
it would take you to clamp it in a vice and use a machine to cut it.... Check my
worklogs examples of my handy work with my angle grinder in there ;)

For those not as confident, there is free only 'template' software simple pop in tube size angle and it spits out
a printable template you can wrap around the tube and use as a guide, i tried these on my first
trike initially before tossing it and going 'freehand'

KiM

p.s ALWAYS, ALWAYS use safety equipment
when using ANY dangerous machinery, no excuse ALWAYS!!
or tools
GOOD QUALITY eye protection, ear protection and if cutting or
grinding materials that produce alot of dust, use a dust mask, you only get one set
of eyes, ears and lungs fellas look after them!
 
AussieJester said:
... the Token Tools is
a far better welder IMHO had trouble welding 6mm solid bar with the bros welder, the Token Tools
inverter welder pisses it in i think 10mm would even be doable...My theory was by a welder
that was higher specked than i would ever need in the hope welding the thin stuff i regularly weld
wouldn't tax the welder thus might lasting longer aaand if i do need a lil extra power for heavier jobs i know i have the capability to tackle them...only time will tell i guess either way though i HIGHLY recommend
...
Yes, I think it would be as it's amperage looks to be infinitely variable, whereas mine has 4 steps only.

jonathanm said:
I would be interested in seeing you welding bloke's jig setups for frame building. I see a lot of chatter about welders but obviously thats only part of the story. Also how you cut the mating ends of the tubes - in Luke's race bike thread he is using a hole saw on a mill....what about you lot?
Only a rudimentary jig, but if (when?) I build another I will set a jig similar to what AJ's got. As far as mating the ends, I don't have anything stable enough to use a hole saw so it's disk grinder and then file to fit (which you have to do anyway for weld-prep) Edit: I see AJ pipped me

Cheers,
GT
 
ok, that's interesting....there are other things I do by eye or ear), but I never thought I would build a bike frame like that.....what about symmetry with the seat/chain stays - do you do this by eye with a grinder as well? If so I am even more impressed than I was already..... which was quite a lot impressed....:D

AJ, your style of bike doesn't really interest me, but I'm gonna take a good look through your logs cos it's clear from the finished articles that you have some serious skills....

Thanks :)
 
tri-lobe - what about jigs? how did you get your angles right? what about making sure your parallel tubes stayed parallel?

edit: this may seem like stupid questions to you guys, but I've only done a tiny bit of welding, and my biggest issue was keeping things lined up and not warping/moving once the amps started to flow...
 
jonathanm said:
...what about symmetry with the seat/chain stays - do you do this by eye with a grinder as well...
Yes
tri-lobe said:
Hey Guys,
I used my 20mm round bastard file to fish mouth all my tube ends...worked like a treat and was quick and easy....
Yes, that works well for you, all your tubes are 19mm :lol:
 
jonathanm said:
AJ, your style of bike doesn't really interest me, but I'm gonna take a good look through your logs cos it's clear from the finished articles that you have some serious skills....


Nor me but unfortunately that's all i can ride now, i would MUCH prefer a full
blown custom built downhill mountain bike just like the one in this thread
but i couldnt ride one :-(

I also use a Jig to hold all tubing in place after its been cut. Chain and seat stays are all bent
and cut by hand and aligned by eye in the jig...

KiM
 
Hello jonathanm,
With me, because I didn't know about frame making....I went to a couple of frame makeing sites and had a good look at both professional and homemade jigs.....The 1st thing I noticed was the aluminium cones that the pro's were useing for the headstock,bb and seat post....so I made up 3 sets of cones....now alot of non pro builders were useing timber for their jigs which is fine for one offs...so I copied them...

I'll take a photo of my jig tomorrow for you....that will give you a better idea of what's going on...I sort of built the frame in two stages....1st stage was headstock...4 downtubes...swingarm pivot...I made up timber blocks to act as spacers to keep every thing square,parallel and true......2nd stage was seatpost and other pieces......always measuring to make shore things were sweet useing a stringline down the center from front to rear......
 
jonathanm said:
...edit: this may seem like stupid questions to you guys, but I've only done a tiny bit of welding, and my biggest issue was keeping things lined up and not warping/moving once the amps started to flow...
Not stupid if you've never done it before. The process I used was: tack everything together*, then fully weld (swapping sides to even the forces out, like torquing a cylinder head on a car), then stress relieve with an oxy torch (if available, I used an air/LPG torch though)

* Doesn't have to be the whole frame at once, but if you make a proper jig it'll make it easier

GT
 
Thanks again tri-lobe. I'll keep an eye out for something similar

Hi J

There's stacks of information and ideas on this framebuilding thread at Pinkbike: http://www.pinkbike.com/forum/listcomments/?threadid=39840. Still wading through it myself. Some of the jigs look as if they take longer to build than the bikes...
I've only built one frame myself (a trike), but that was mostly done by eyeballing things. If you fishmouth the tube accurately in the first place, then tack the frame together it becomes self-jigging. Make a couple of tacks, check alignment, adjust with a few taps of the hammer and make another tack to lock in place. Welding sequence is important like GT says, you need to balance the stresses to avoid distortion. A good straightedge, spirit level and set square are great for checking alignment. If you get it wrong it's not the end of the world, the grinder is your best friend. :)
 
Back
Top