Custom Cruiser II

Congratulations on the engagement !

Nice looking build.

Good work going with the clamping t/arms, I've seen a 20mm thick unclamped t/a forced open before and it waz ugly !

Matt
 
Front wheel = Pro-wheels 19" x 1.4" rim, Holmes Hobbies 13 ga. spokes & nipples (with washers) laced 3-cross to a Sturmey-Archer XL-FD 90mm drum brake hub, surrounded by a Vee Rubber 19 x 2.25 tire.

Rpyv5JEdBGUjrpO58deAxWSu1Z84knJaxEkGoeFUlEA=s640-no

bO6zE91K5dPSjw2VYlO9XQdeeuFOgsp2tpKEDdmube8=s640-no

lPuOjdtrRN69SsGNBG5Exd7-Sb9bXgfMfSl6K-JKHo8=s640-no

2014-10-23.jpg
 
Cut the excess Top Tube and capped.
Yes, you can cut 1.5" x 0.065" chromoly with a displacement cut tube cutter, you just have to be patient. Apply only a small amount of pressure and do several rotations. If it is hard to turn, you've applied too much pressure. Keep extra cutting wheels on hand. It makes for a nice and square end. Be sure to deburr if you're going to leave it open as this method leave a small but very sharp edge.

I tacked a bolt through a washer in case I ever want to attach anything back there like a light, reflector, fender rack or whatever. Welded it to the end of the TT and cleaned it up.

2014-10-28.jpg

2014-10-28.jpg


2014-10-28.jpg

2014-10-28.jpg
 
Screen Shot 2014-10-28 at 11.06.23 AM.jpg

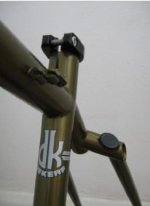
Hey the frame work is looking real nice. Way to go! The photo attached is from the old school frames Chris Dekerf used to make. I used to have one of his first full suspension bikes in the early days. It cost 5k new and was not a very good bike but the welding was beautiful. I think he was the first frame builder I saw doing the seat stays the way he did.Your drill throughs on the tubing reminded me of his methods for his seat stay fabrication. It was his signature for many years and he made very nice bike frames with this brazing of his on mostly renolds tubing I think.

I hope the rest of the build goes smooth for you.....wayne
 
Mock-up. Just to check that I'm not totally off the mark with my measurements:

2014-10-30.jpg

2014-10-30.jpg
2014-10-30.jpg


The seat tube will be cut shorter, giving a 22" effective seat tube measurement (front BB to top of seat tube). Wheelbase works to 53" as expected. Head tube angle is very close to 30. Bottom Bracket height is 11". Axle-to-crown 20 or 21".

The swingarm is not laterally stable. [Fixed in next post] I didn't do a great job of fabricating the pivot point. I'm planning to make a new swingarm inspired by this thread started by stonezone: http://endless-sphere.com/forums/viewtopic.php?f=3&t=63877 In trying to answer his question, I was struck with an idea. I'll use the rear bottom bracket as the pivot point and recycle the dropouts and shock mounts. Should be a more precise fitment. From that thread:

SkyknightJohn said:
Your question got me thinking... and so I had to try it. I already had the bearing & cup set, I just added a 5/8" bolt. Probably not the best grade to use or anything, just a cheap one from the hardware store. But then, at 5/8", how tough would it need to be? Finer threads would be nice, and a nylon or other locking nut, too. There are probably bearings in this OD (1-3/8") with a smaller ID, if that would be better or more available.

2014-10-25.jpg

2014-10-25.jpg
 
Or not... I used a set of the Raleigh bearings' bushings on the inside of the frame part of the pivot mount. Solid as a rock now. I mean, I engineered it that way, on purpose, to use those bushings there. Yeah, that's it. :mrgreen:

2014-10-31.jpg

2014-10-31.jpg

2014-10-31.jpg
 
Waiting on a seat tube reamer to arrive, and a few other minor details to work out, so I fabricated a quick and dirty mod to ye olde Farfle swingarm (which has seen many mod experiments) to fit through the rear BB as a pivot point, while still clearing the original pivot point. I'll need to move the shock mounts, and use a different length of shock, but it might be interesting to compare how each handles. With the modded Farfle the wheelbase is a little shorter as well.
2014-11-12.jpg

2014-11-12.jpg

2014-11-12.jpg

2014-11-12.jpg

2014-11-12.jpg
 
Finally had another work day...
Reamed out seat tube. I bought the Cyclus seat tube reamer and handle from Wiggle.com. It worked easily and well. In the first pic you can see the distortions introduced from welding. The second is after reaming.
2014-11-18.jpg
2014-11-18.jpg


Seat post slides right in now...
2014-11-18.jpg

... slides in deep.
2014-11-18.jpg


Also welded up a stylish and functional gusset.
2014-11-18.jpg
 
Not a lot of progress lately, I've been busy with other projects in my free time, including the MAC hall replacement thread in my signature line. :)
I've done small things here and there, and some frame cleanup. I should be heading to paint before long and then swapping the bike parts over to this frame. For now, here is a comparison to my first cruiser, with the head tubes and axle heights lined up.
2015-01-18.jpg
 
Headset cups pressed and fork installed. Moving forward in time for good weather. Lots of small things to get riding, but having it on two wheels is a good point.
15%2B-%2B1
 
That bottom swingarm pivot will be taking alot of stress im assuming? can you run 2 rails on each side of the bolt from the empty hole before the seat tube to the outer races? i doubt you can figure out what im getting at :lol: but keepin an eye on this post. lookin good so far.liking the front frame upper and lower brace.
 
I guess the swingarm pivot will take a bit of stress, but no more than any other swingarm pivot I reckon. Of course, I'll test slow and inspect often in the beginning for any signs of failure. The fat parts of the pivot bolt contact both the swingarm 'bearing cups' and the frame tube 'bearing receiver'. Force pushing the bike forward should be OK. The pivot action happens around the inserts (bushings?) along with grease. Like this:
2014-10-31.jpg

beast775 said:
can you run 2 rails on each side of the bolt from the empty hole before the seat tube to the outer races? i doubt you can figure out what im getting at
No, I'm not sure what you're getting at. In the previous post/pic, Along the bottom, from left to right (front to rear) the first bottom bracket is for pedals, the second (under the seat tube) is because I'm still playing with the idea of a Giant Stiletto style jackshaft to run a mid-drive, the third hole is just a tube to be a receiver for the Raleigh Pivot bolts to attach to.
In future builds, I will likely fab the swingarm pivot like the pic below, using a bolt through a bottom bracket and cups/bearings. This design provides a wider pivot bolt for more lateral stability and uses actual bearings vs. bushings. It is also much easier to make. Why am I not using this modified Farfle swingarm on this bike then? Because I'm using it on a full-suspension recumbent, and I'm still playing with the idea of a Giant Stiletto style jackshaft to run a mid-drive for this frame. CC3 is also in progress and will get this style pivot and a new swingarm.
2014-11-12.jpg
 
Great build.
Harley Davidson used to build swing arms like that. The slightest wear was amplified by the close together bearings.
It made the frame feel like rubber when cornering.
For what it's worth, I'd be going with bearings spaced further apart even though it does not look as cool.
 
Went for a pedal test ride and all went well.
Disassembled it again for some work on the battery box.
I used 3-5/8" metal stud track from the hardware store, $3.97 for 10 feet. Idea from the homemade battery box thread http://endless-sphere.com/forums/viewtopic.php?f=3&t=12847&hilit=battery+box, pg.6 by GCinDC. I tack welded it, then added epoxy. It hangs from U-bolts through the top with 1x4 planks in the top sections to distribute the weight. I'll cover it with a lightweight panel of some sort, and line the inside with rubber matting. Pictured is my old trusty Cell_Man 12s5p a123 pack, still going strong, and controller, with plenty of room. There is enough room for one of his newer 48v rectangle packs & controller, should I need the space sometime soon. :D
2015-04-15.jpg

2015-04-15.jpg

2015-04-15.jpg

2015-04-15.jpg

2015-04-15.jpg
 
Battery frame is the cats meow! lots of room for high density foam etc for battery bedding. :lol:
 
Thanks beast.
Here's some more work. I used these little threaded weld tabs on the inside, but just epoxied them in. I have an oak panel I'll cut & stain/clearcoat to go over it all. Finish the box, and I think I'm ready to ride. :D ... Then take it all apart again to paint. :lol:
2015-04-17.jpg

2015-04-17.jpg

2015-04-17.jpg
 
Sort of finished the box. I still need to sand it down along the edges and finish it. I mounted it and reassembled the bike for a powered ride. I didn't bother with the chain. Or the rear brake, for that matter, 'cause I need a new cable. The 90mm Sturmey-Archer drum brake works quite well, and with the cruiser configuration going over the handlebars isn't much of a concern. I managed 29mph, slightly downhill. The bike feels stable and comfy at speed.


Coming up next: dis-assembly and paint, make a charging lead port/door, finish out the battery box/paint, new cables for rear brake and shifter.
Probably more small stuff. Always lots of details it seems. And repeated assembly/dis-assembly. Hopefully just once more... :)

2015-04-23.jpg

2015-04-23.jpg

2015-04-23.jpg
 
A few more pics of progress. Been awhile, mostly painting and waiting. I've learned it's just going to be better in the future to pay for powder coating. This color is what I call "Satin Chrome." It's what happens when the self-etching primer has a weird interaction with the chrome paint, and so you cover it with satin clear to fog it up a bit, then let it set for two weeks to cure but it is still too soft and gets marred up the first time you put it in a stand. :roll: I'll ride for awhile, then providing everything is good, do the dis-assembly dance again and send the frame to professionals.

I've taken a couple of pedal-only shake-down rides and things are mostly good. I have some chain rub on the rear shock mount in the smallest two cogs... need to work on that. I can add some spacers to move the wheel, but then I would likely lose the larger cogs, which are nice to have to get this beast moving. Still putting the finishing touches on the battery box... shouldn't be long.
Anyway...
Jv9WLiuAd91jZSRUICW0Nqi2y8ABxlLL8PmPFob4ZNo=w1034-h775-no
YQmdYkiqPMBjeuzN64qVkUeZv5k-R4K92sVIKnO0thE=w1034-h775-no

ruyBIdJi5vIYrZMm7x9XinwvUM4KF3IOx3Z8GxKNMD4=w1034-h775-no


S-A 90mm front drum brake hub.... I like it!
UnMdlRJZsMwEYzgjJrLNGzyWM-cUP0JI5uMtbbFb7qU=w1034-h775-no


Upside-down 7 speed shifter on the left, since there's no room on the right. Works well. That ghetto grip will need to be replaced eventually.
g2OXC19L20n9ayZ7Bc4pzOMXMe2JzWTFcMfl96xbMDw=w1034-h775-no

kgNPuUSyQmRHPOaQSlnK4H7w93njPSScXOxVhZXGS3A=w1034-h775-no


Dual rear suspension: seat and shocks.
6y2ybn2fs9yXmjK1CsRAIuwBM69Vyiv-VJO5eCdyTmw=w582-h775-no


Front suspension: Suntour Double Down fork, same one from my first cruiser.
HxS9-uIg2d0xSmrh7jlFTgYV6-f2_VXISmBNqTwLZ6o=w675-h900-no
 
That is looking great. Really great. That framework is looking to be a sweet ride.
 
I have built a few wheels with the Sturmey drum brake. I have only ever used them on pedal bikes.
If you are used to discs the drum will probably disappoint. They are very progressive and don't lock up easily which is great for a regular bicycle but I don't know how they will go hauling up a heavy ebike like that. I'd take it pretty easy for the first few k's.
They do look good and the build quality is superb I use them when ever I can.
 
Modbikemax, I've used this wheelset on my green cruiser for awhile, and I agree the S-A is not as "immediate" as disc, but it just took some getting used to. This is the larger 90mm hub which is suggested for use on pedicabs and cargo trikes, and it seems to be holding up well to my heavy e-bike use. Granted, I max out at 25mph, YMMV. Also, I do use a rear disc, which helps for sure. Above I mentioned a test ride where I didn't have a rear brake hooked up due to cable issues, but that was a short ride with calculated risk. I wouldn't rely on one brake alone for normal commuting.

Here are some shots of the battery box progress. I covered the metal stud track with a carbon-fiber sticky sheet material from the auto parts store, so as to not have to paint it and for abrasion protection between the box and the bike frame. Half-inch puzzle mat pieces will go above and below the battery, thinner rubber mat will separate the battery and the sides of the box, and the cables will enter through the hold in the bottom. The controller will be placed in the front of the box, either against the metal or I might make some vent holes for cooling. I still have to make some extensions for cables and a few other minor details before I'm all done.

2015-06-26.jpg

2015-06-26.jpg

2015-06-26.jpg
 
Where did you get the 90mm drum brake from? I didn't even notice the size in the pictures.
I have a project in mind where this would come in handy and I don't like discs much.
 
Modbikemax said:
Where did you get the 90mm drum brake from?

It's the XL-FD model (Extra Large-Front Drum) $81 at Universal Cycles. https://www.universalcycles.com/shopping/product_details.php?id=42788
They of course carry most other models as well.
 
A couple of rides in, still need to work the chain rub issue and improve the fit and finish. As it seems it will never stop raining in the midwest, it needs fenders for sure. The wood panels are still raw and need covering of sorts, maybe just a clear/stain.

Here's a pic of my brother just before he took it out for some miles. The good news is that the seat adjusts to fit his short self (5'6"), which was a goal. (The green cruiser was for the 6'+ crowd only.) The bad news, as you can imagine from the pic, pedal strike is a concern, due to my tire selection on the moped rims working out to be 24" in combination with 175mm cranks. I'm looking into shorter cranks, though the easiest method may be bigger tires.
2015-07-10.jpg
 
Back
Top