72V 40AH, 150 amp capable battery build

From-A-To-B

100 W
Joined
Aug 11, 2021
Messages
211
Location
Longmont, Colorado
I've learned so much about battery construction from seeing others' battery builds on ES and reading the resulting back-and-forth about what works and what needs worked on. I wanted to share my own handiwork so that other folks may learn from my experiences as well as any resulting commentary about how things could be done better next time.

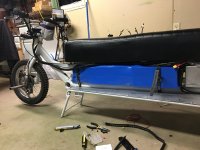
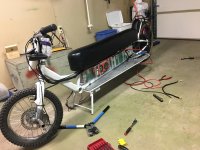
Someone commissioned me to build a 72V 40AH battery for their homemade electric ride. The vehicle is running a 3KW rear wheel from an 80amp sinewave controller in a custom frame. The bike was being powered by a handful of e-scoot packs, wired in series and parallel, and this battery needs to fit space under the bench. The battery was built to sustain 80amps continuously, and 150amps in a burst (which is overkill for the machine, but this should favor less-stress on the pack and greater longevity.)

I started with 200 Samsung 40T cells and a few extras. (I've learned to always order a few extra cells! Helpful for testing spot welds before diving in, or for having in the event of mishaps.) I selected the 40T cells over P42As because of how they performed near end of life during Pajda's cycle life tests. (That thread is such a gift!) The rest of the components include: a 150A Daly bluetooth BMS
6AWG wire and matching lugs, 200A ANL fuse.

The pack was built into 4 modules of 5s 10P for ease of handling.
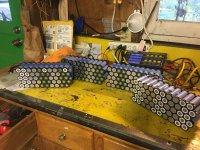
IMG_0808 2.JPG

Cutting copper sheet to make the serial connections. I used 0.1mm copper sheet. The sheets, together, provided 80mm of copper in width, which I calculated was adequate for about 130amps with Matador's wonderful ampacity chart. What a gift. (10mm of 0.1 copper is good for 16 amps, X 8 = 128A.
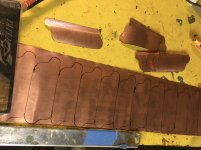
IMG_0807 2.jpg

Building the modules. The cells that received only 1 copper strip were attached to a double strip on the back side. The nickle-sandwich strips were mostly 5mm x .1mm nickle plated steel. These also served as the parallel strips. It took 107J on my KWeld to get excellent welds with the nickel plated steel strip. Copper was cleaned with isopropyl alcohol on both sides to remove fingerprints and other residue.
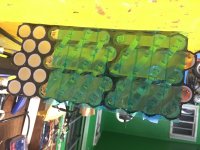
IMG_0813 2.JPG

To jump between a pair of modules that were not in line, I used 12AWG stranded wire. I soldered onto the copper beforee spot welding the sheet in place. Doing "blind" spot welding, with cells entirely hidden under the sheet, was a real chore. This is why I used the "three strips" method for most of the build.
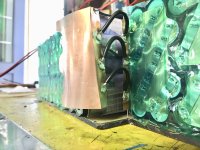
IMG_0832.jpg

4 small lengths of 14AWG wire were used to make the final postitive and negative connections. These were crimped into the large 6awg wire with hefty butt connectors.
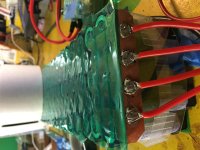
IMG_0823.JPG

The pack coming together and BMS installation...
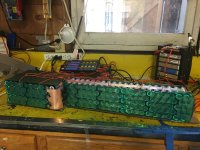
IMG_0828.JPG
IMG_0837.JPG

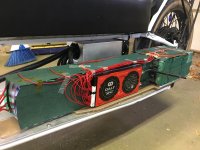
Ultimately, I wrapped the battery in fish paper, built an acrylic box around it for knock protection, and shrunk it all down. Sometimes it feels like a shame to hide all the work -- I wish I could find large-width clear shrink wrap. The project was installed on the customer's bike -- a beautiful creation of their own! Rumor has it, they've managed to ride with 6 people on the bench.

This was the first time I used a DALY smart BMS, and will add that I much prefer the user experience I've had on the Xiaoxiang app for the JBD BMS's that I typically employ.
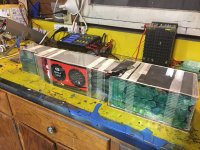
IMG_0844.JPGIMG_0850.JPGIMG_0851.JPG

I'm open to constructive feedback so others can learn best practices and so my builds can improve going forward. The customer is happy with the battery, noting little voltage sag and great full-throttle performance even at low SOC. The biggest change I would have made was to use 8AWG wire, rather than 6WAG, for the main runs. I think it would have been fine at 100A capacity, and these large capacity cables can be inconvenient to use. It's my opinion that the whole thing was a notch overbuilt, electrically speaking -- but I hope that lends itself to a happy life for the battery.

Thank you, ES, for all I've learned on this site. It feels good to make a contribution.
 
What spotwelder did you use ? Do you insulate between the series groups ?
Interesting bike. I would love to see it or even ride it. Where does it live ?
 
999zip999 said:
What spotwelder did you use ? Do you insulate between the series groups ?
Interesting bike. I would love to see it or even ride it. Where does it live ?

Hi Zip - I used the KWeld powered by a 3s4p stack of SPIM08HP cells. I built with cell holders and insulated between the two folded-over modules with fish paper and a rigid plastic sheet. The bike is not mine, I just built the battery for it, but it lives in the Boulder, CO area.
 
Warren said:
From-A-To-B said:
The project was installed on the customer's bike -- a beautiful creation of their own!

Very nice battery build. This bike sooo wants to be a recumbent. As it is, it is good for Shriner parades.

Thanks much, Warren! The bike was a very cool project. I don't know everything about it, but it's running a proper motorcycle tire in the back, and the front end is borrowed from a small dirtbike.
 
3s4p spim08 pack that's a spot welders pack. I thought a 3s1p could handle your needs.
But 4p or 800 amps no wonder you can weld
Copper. I would think you'd want to coat the copper afterwards to protect from electrolysis.? As I live near the beach.
 
999zip999 said:
3s4p spim08 pack that's a spot welders pack. I thought a 3s1p could handle your needs.
But 4p or 800 amps no wonder you can weld
Copper. I would think you'd want to coat the copper afterwards to protect from electrolysis.? As I live near the beach.

3s1P may have gotten the job done, but I already had those cells laying around so I employed all of them. 1000A bursts take a toll on small batteries in my experience.

I did not weld straight copper; I used the standard copper sandwich technique with nickel-plated steel as the welding facilitator and parallel bussing. This battery will live in the relative dryness of Colorado. I haven't seen others coating their copper sheet at the end of a build - if you have a link or reference to this I'm interested!
 
What was the cost to build roughly? from Pagosa
Don’t recall, exactly, but I’d put the over/under at $1400-1500. Obviously, the bulk of the cost was 200 cells, but the odds and ends add up when one is trying to facilitate 100-odd amps. The whole project came together in 30-40 hours on the bench.

Are you working on a project right now? If so, please share about it!
 
Last edited:
How do you like the Daly BMS as I have the jbd BMS now ? I have no complaints. Any updates on the battery. And I got a 72v24ah pack of Samsung 40t 20s6p and only gotten 19ah as I had bicycle motor works make the battery as it was a tight fit triangle. Only use at 80 amps tops.
That looks like a burning Man bike but as in burning man if you get off it someone else just might get on it and go.
Looking at it the girlfriend or wife would seat against the Sissy bar and only on a good mood would she come up and wrap her arms around you. And if arguing you wouldn't have to hear each other
Some good points.
It is different. I would have to see in person.
 
Last edited:
I've learned so much about battery construction from seeing others' battery builds on ES and reading the resulting back-and-forth about what works and what needs worked on. I wanted to share my own handiwork so that other folks may learn from my experiences as well as any resulting commentary about how things could be done better next time.

Someone commissioned me to build a 72V 40AH battery for their homemade electric ride. The vehicle is running a 3KW rear wheel from an 80amp sinewave controller in a custom frame. The bike was being powered by a handful of e-scoot packs, wired in series and parallel, and this battery needs to fit space under the bench. The battery was built to sustain 80amps continuously, and 150amps in a burst (which is overkill for the machine, but this should favor less-stress on the pack and greater longevity.)

components include: a 150A Daly bluetooth BMS

Hi there, I see your battery was designed to 80A continuously/ 150A burst.. and a d*ly bms..
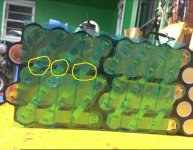
butt, U are doin serial connections w only 3 nickels.. limiting factor. imagine if U draw 100A from battery , those 100A will pass on those 3 nickels links..
maybe those 3 nickels link is good for just 30A continuously.. maybe you need more links?.. just saying :unsure:

anyway, very nice electric veicule and battery design!

battery limitant factor.jpg
 
How do you like the Daly BMS as I have the jbd BMS now ? I have no complaints. Any updates on the battery. And I got a 72v24ah pack of Samsung 40t 20s6p and only gotten 19ah as I had bicycle motor works make the battery as it was a tight fit triangle. Only use at 80 amps tops.
That looks like a burning Man bike but as in burning man if you get off it someone else just might get on it and go.
Looking at it the girlfriend or wife would seat against the Sissy bar and only on a good mood would she come up and wrap her arms around you. And if arguing you wouldn't have to hear each other
Some good points.
It is different. I would have to see in person.

Hi Zip - I have no updates on the battery because it was built for someone else to use. Similar to some others on this forum who do the occasional hired contract job, I do wonder where my batteries wind up and how they're performing. The packs I've built for myself, my partner, and my good friends are all troopers, but I haven't kept in touch with many others who I've built packs for.

As far as the BMS goes, I've used DALY's Smart BMS's on 3 builds, now -- using models between 100 and 150 amps. I like them about as much as JBD BMSs. The aluminum cases are nicer and they're easier to mount because they've got mounting points for screws or bolts. Their Bluetooth modules are sleeker and more finished than JBD products. But the JBD apps for iPhone are nicer, IMO, and I've found the digital off / on buttons for charge / discharge to be finicky on DALY models. Most of these points are aesthetics - in terms of function, I've never had a DALY BMS break on me, but the Methods threads on DALY BMS failures and design flaws are concerning. IDK whether the same junk design and components are used in the Smart BMS products, but any company that's willing to put out junk alongside of good products has not won my confidence. I'll stick with JBD whenever possible, and always try to over-spec BMS's by 50%.

Hi there, I see your battery was designed to 80A continuously/ 150A burst.. and a d*ly bms..
butt, U are doin serial connections w only 3 nickels.. limiting factor. imagine if U draw 100A from battery , those 100A will pass on those 3 nickels links..
maybe those 3 nickels link is good for just 30A continuously.. maybe you need more links?.. just saying :unsure:

anyway, very nice electric veicule and battery design!

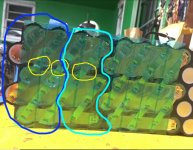
Battery Gold, my friend, you have it backward. The Copper bussing provides for the serial connections and those little nickel strips complete the parallel.

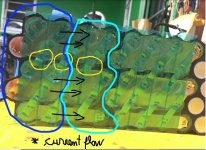
I've circled the two different groups with two separate colors. If you look, you can see the + and - ends of the battery poking out under the copper. It looks confusing because I used three different copper strips for the connections so I could always see the cell ends caps to make spot welding easier.

battery limitant factor.jpg
 
My concern is how well the Samsung 40t cell is working out. As my Samsung 40t 20s 6p is slowly losing capacity. Maybe counterfeit. Sad.
 
My concern is how well the Samsung 40t cell is working out. As my Samsung 40t 20s 6p is slowly losing capacity. Maybe counterfeit. Sad.
Ah, yes - I can't answer that, either. Sorry to hear about your battery losing capacity. I've always had a great time ordering through 18650batterystore.com - where did you get the 40Ts you used for your project?
 
I had the pack made at bicycle motor works by Matt Bruza he got a large shipment of Samsung 40t cells as a tight triangle fit of 120 cells. I wanted someone with experience with spotweldering. So many others must have same problem.
That's why I wonder what the longevity of Samsung 40t cells as on paper sounds good.
Pajda's work on cycle testing is an incredible asset to the community - I'm very grateful for their effort and sharing. In Pajda's tests, the Samsung 40T3 performed well - it delivered 78% of its original capacity in a 5C test after 1000 cycles.


Do you know which model of Samsung 40T cell you have in your pack? I recall that the Samsung 40T1 cells had a lower cycle life rating. The 40T1 cells and 40T3 cells perform very similarly, except the Samsung 40T3s have a significantly slower degradation as the cell cycles.

Comparative datasheet - see page 8: https://cdn.shopify.com/s/files/1/0...g_Introduction_of_New_40T_v3.pdf?v=1612843210
 
As I have only gotten 3ah out of his cells. They must be counterfeit. As it would only charge to81.3v. So I sent it back.He replace a parallel group and BT BMS. And only got 18ah. Should be somewhat closer to 24ah as 6p.
So there are counterfeit or defective Samsung 40t cells out there. I hope I didn't muck up your thread.

Can't tell which cells I actually have. Yet.
Looks great on that chart.
Like to be updated on your pack.
 
Last edited:
Where did you get those honeycomb style 21700 cell spacers from?
 
As I have only gotten 3ah out of his cells. They must be counterfeit.

If you want 40Ah and 150A, it seems to me a total no brainer to use cells bigger than 5Ah. Like, maybe 40Ah?
 
Chalo Samsung 40t cell should be 4ah 30amp so 6p should be 180amp I'm using at 80amp max .Many 50amp. And 6p as 24ah minus a little for BMS HVAC and lvc. My first using new 21700 format. I had good luck with pouch style cell.
Aside from that I scrolled through your pictures again and again and the pictorial was very informative. Starting to see more improvements with this new E.S. format
 
Last edited:
Chalo Samsung 40t cell should be 4ah 30amp so 6p should be 180amp I'm using at 80amp max .Many 50amp. And 6p as 24ah minus a little for BMS HVAC and lvc. My first using new 21700 format. I had good luck with pouch style cell.

I hope your project battery pack works out for you. Bummer that the cells you got are underperforming.

My main issue with 21700 cells is the same as with 18650 cells. If you have to massively parallel them to get relevant capacity (and we do), you limit the cells to the capacity of the interconnects, and you multiply the opportunities to have a fault or failure somewhere.

I have never seen a nickel strip that was good for 30 amps. Though such a thing is clearly plausible, I don't think many of us could weld one without harming the cell we're welding to.

Using cells sized for pocket devices to power traction motors is a little like using Bird scooters to carry heavy freight. I mean, yeah sure, you could hypothetically gang up a bunch of them on some kind of common frame that can handle the load, but wouldn't it be more expedient to use a truck? Even if there are so many Bird scooters lying around that we're literally tripping over them?
 
I like 20ah pouch cells for a 20ah pack as fewer interactions. But the question will it fit in a triangle.
So Chalo how would you get 72v, 20-24ah battery @ 80amps in a large mtb triangle.
 
Last edited:
I know it's not your point, but there is a positive if you were to use that many scooters framed together--it'd be hard for a flat to stop you or even slow you down. :lol:

(this doesn't analogize to a multicell pack, in that a flat cell does drag down the others with it and potentially destroy the pack depending on other factors).
 
Back
Top