Adding halls to BLDC motors

jk1 said:
by ElectricGod » Thu Feb 23, 2017 12:16 pm

Ecyclist wrote:
tangentdave wrote:
Is something out there that is similar in size and performance to Astros but less than $200?


You gotta pay to play. Let us know if you find a $200 94% efficient motor that can handle 10kW in 2kg, I'd be all over that.

-dave


I'm realistic and understand that high quality motor like Astro will cost $500 or more. But something that is one notch lower in performance can be had for much less, I hope. Here is a good example that could use halls and it is $170.
http://www.etotheipiplusone.net/?p=4187
I'm not sure that this motor is any good, but it might be.
Hopefully, someone came across something interesting. I'm trying to avoid buying bunch of Chinese chainsaws and lawnmowers and tearing them down.
Help please.


This is off topic. the thread is about adding halls to motors. Next time start a new thread or make sure you are posting in an appropriate thread.

A good, strong motor that costs a lot less than a 3220 (assuming you want an inrunner) is the big block that LightningRods sells. Tell him I sent you his way. I own 2 of those motors. Look up my kick scooter project. I get almost 50mph on level ground out of it. The other one will go in my E-Bike XB502 conversion project. It will run at 136 volts so top speed will be a good bit more than 50mph for about the same sized EV. Anyway, Michael is a good guy, easy to work with and he makes or carries lots of parts that will help you get going.
My kick scooter project

Ecyclist , The closest motor to an Astro 3220 is the cyclone 1680w run at 72v 5kw like AFT does, best thing is they are an IPM motor design like the 2017 ZERO motor, it was discussed in this motor comparison thread here at how close the efficiency is to an Astro , weight is also very similar 2kg vs astro 3220 1.8kg and its 100 USD for a bare motor from Cyclone and comes with hall sensors already as you wanted. The LR motors are a lot bigger heavier and less efficient as well as they are not IPM design.

:


https://endless-sphere.com/forums/viewtopic.php?f=30&t=65757&start=325
Re: Motor comparison spreadsheet
Postby Nathan » Mon Nov 30, 2015 7:36 pm

Not sure how to use your sheet their is so many columns :p which one shows the voltage you are running the motor at and the gear reduction ? and is their 2 voltage and speed options to compare 48v and 72v ? some of the columns are not labelled.

So on column R i can see the cyclone motor efficiency peaks at 89.95% and peak power at this efficiency is 5980w, is that running 72v ? wow thats a lot of power from such a small motor! and the efficiency is very similar to the ASTRO motors of 3210 8t has 93% efficient but at a low lower power of 1219 W and the 3220 4t has 93% efficiency but at low peak power of 2830w is that true ?

But also if you factor in the ASTRO motors have a higher 169 KV they will probably be running higher RPM and hence you would need more reduction and maybe another reduction stage which adds weight and hence the efficiency looses would be worse compared to the cyclone 122 kv. As others have said this can be 5 to 10% losses per reduction stage, so when used as a mid drive or direct to the rear wheel with one stage reduction the cyclone motor may have overall higher efficiency possible than these 2 common Astro motors if you add the gear reduction losses ?

I want to say only one thing...

"The closest motor to an Astro 3220 is the cyclone 1680w run at 72v 5kw like AFT does, best thing is they are an IPM motor design like the 2017 ZERO motor, it was discussed in this motor comparison thread here at how close the efficiency is to an Astro , weight is also very similar 2kg vs astro 3220 1.8kg and its 100 USD for a bare motor from Cyclone and comes with hall sensors already as you wanted. The LR motors are a lot bigger heavier and less efficient as well as they are not IPM design."

This is hilariously ridiculous. OK yes the cyclone motor has halls, but it also has planets and is noisy and in no way close to the 3220 in performance, quality or reliability. I'll take a 3220 or small block or big block over a POS cyclone motor every day of the year. I guarantee you the cyclone will burn up on 5Kw while the 3220, small/big blocks will be rocking along just fine. It's pure nonsense to put the cyclone crap in the same category as these motors. This is if anything a really bad comparison.

Cyclone motors = pure SHIT
3220 = awesome motor, but geez they cost a lot
small block/big block = reasonably priced and good solid motors

ALSO...this is a thread for adding halls to motors. NOT a motor A vs motor B thread so take this elsewhere. Thanks.
 
Postby LightningRods » Fri Mar 03, 2017 1:13 pm

The 1680w Cyclone is in no way comparable to the Astro 3220. I don't know how people get this kind of nonsense started and get other people to agree to it. Since the 1680 is at best a 30a motor, how much voltage are you going to put to it to get 5000 watts?

it is when you compare continuous duty cycle rating, so you think it was magic that Chupa can run the 1680w motor with active cooling at 4kw continuous or you chose to ignore it ? this is backed up by the motor comparison sheet that shows at peak power it has very close efficiency to an Astro 3220. Astro have very high effficeny at LOW Power at high power the eff drops off. The Astro 3220 motor in sealed from is only rated for 3500w continuous. Forced air cooled motors continuous power level runs very close to its peak power level unlike sealed motors like the Astro can peak at what 10kw ? but it can only do 3500w when sealed.
 
Cyclone motors = pure SHIT
3220 = awesome motor, but geez they cost a lot
small block/big block = reasonably priced and good solid motors

ALSO...this is a thread for adding halls to motors. NOT a motor A vs motor B thread so take this elsewhere. Thanks.


Can you explain your reason and logic step by step on the motor comparison sheet ? i.e we don't want opinions here just facts, is the efficiency or the weight or what makes these motors magically better ? sure the 3220 is a few % eff better but is it 5x the cost better? The other motors are just cheap low efficiency Chinese motors. the final most important metric which this opp has clicked onto is Dollars per Watt/Dollars per efficiency and weight, which is exactly what the opp wanted a cheaper option vs the Astro.

With the 500 usd you save on the cyclone motor vs an Astro 3220 you can buy a cooling system and better bike that weighs a lot less then the 200 grams lighter than the 3220 astro is vs the 1680w and have the same 4kw continuous duty cycle as Chupa showed.
 
Hi Everyone,

Originally I added halls to my 3220 on top of the stator teeth. This was incorrect. They should have been on top of the gaps between 2 stator teeth. A couple of days ago I finally got around to taking the motor apart and redoing the halls correctly. Before this, the motor would run rough on some controllers and not at all on others since phase detection was always wrong. Anyway, that's all fixed and the motor runs great even on my picky controllers now.

3220%20new%20halls_zps52sfjyxf.jpg
 
I also added halls to my Turnigy CA80-160KV outrunner. It's not a great motor and it has an undersized shaft, but now that I have added halls and reiforced the shaft to bell joint, it ought to be usable for a small EV.

I took the motor all apart, pulled off the bell, pulled the shaft, etc so that I could get at the stator to add halls and do the other mods.

The halls are epoxied in place at the bottom of the stators and in between the teeth since it has an even number of stator teeth. I have the 3 halls 120 degrees apart. I arbitrarily picked a color for each hall and then used those hall colors to determine the phase wire colors. I've tried that exact set up on 2 controllers now and it works immediately. I'd say that was a good method for defining the hall/phase color combination!

This is a few pictures of the halls in the motor.

Halls%201_zps5o6whu6r.jpg

Halls%202_zpskit04iom.jpg

Halls%203_zpsvwlmfsvo.jpg

Halls%204_zpsm5uch8qd.jpg


This is the motor shaft mod. The shaft has small indentions drilled into it at the places where set screws clamp on the shaft to increase grip between the screws and the shaft. I have M5 set screws coming and then those 2 allen head screws will get replaced and 4 more set screws will go around the prop adapter area as well. Running off the shaft out the bottom of the motor maximizes bearing support and minimizes bearing and metal stresses. I had sealed ceramic bearings in the sizes that the top and bottom of the shaft use so I replaced the shielded bearings that were in those spots as well. skirt bearings are bit harder to get in sealed and ceramic versions so I guess that one will have to wait until it fails. The motor mounts to the base via 5 M2 screws that are 1/2" long. Lame and way too small. I replaced them with M5 screws that are 3/4" long...MUCH better!

Repositioned%20shaft%201_zpsh8mylylh.jpg

Shaft%20reinforcement_zpsqvcvk94s.jpg
 
I pulled apart my 18kw 12090 outrunner a few days ago. The factory halls don't seem to work very well so I added new ones to the bottoms of the stator. I suppose I could have replaced the halls on the board, but now I have 2 sets of halls. Once I had the motor all assembled again, I tried it on my Sabvoton controller where the factory halls always failed the hall test. The motor passed the hall test the first try on the new halls. Success! I used SS41F halls. The hall board has 44E halls.

Since I had 2 sets of halls in the motor now, I thought trying both sets out could be interesting. I had no idea it would be this dramatically different. Here's an uploaded video of the halls running the motor.

https://youtu.be/V3RXV6oZoDg


This is the new halls in place. I cut off the ends of a few q-tips to act as a backer for the hall to hold them forward and into the gap between the stator teeth. Then I glued them in with super glue and saturated the q-tip ends in glue too. Finally, just to be sure the halls were not ever going anywhere, they are buried in JB weld epoxy. I used the exact same positions as the factory hall board, but any 3 gaps that are electrically 120 degrees apart would have worked.

This is a hall held in place by the q-tip end and just had superglue added to it.

Halls%201_zpsw0n3xnwu.jpg

Halls%202_zpsxlclclro.jpg


This is the hall after embedded in JB weld.

Halls%203_zpscehno6nt.jpg


This is the final results. The skirt bearing sits pretty close to the bottom of the stator so I zipped tied the hall wires quite a lot to keep them from rubbing on the skirt. All the wires are teflon which is hi temp stuff. You can put direct flame to it and it won't melt.

Halls%204_zpswak2uwj8.jpg

Halls%205_zpskl1upt5f.jpg

Halls%206_zpstzcokbjs.jpg


The top hall board didn't change any, but I took a pic of it so here it is.

Halls%20board_zpsirvvvmgo.jpg
 
Ecyclist said:
Very nice. Do I assume correctly that this is an APS 12090/S motor?


I don't know what the "S" designation is, but this is an Alien Power 12090 outrunner at 50kv. Exactly like the title for the post says.
 
Can you post the circuit that you used with SS41F halls?
I'm thinking about doing the same thing with 8085 not sensored motor. It is "only" 6000W but only 3.3lb and under $200. Plenty of power for an e-bike IMHO.
 
Ecyclist said:
Can you post the circuit that you used with SS41F halls?
I'm thinking about doing the same thing with 8085 not sensored motor. It is "only" 6000W but only 3.3lb and under $200. Plenty of power for an e-bike IMHO.

Your motor is stronger than my Turnigy CA80-160KV. I'd say adding halls to your motor is worth while AND AP motors are pretty well made. AP made them EV capable. They still need the shaft to bell union to be better. Those 2 tiny set screws won't hold much torque if you intend to drive from the shaft. 100% of the time I drive from the shaft so I'm always reinforcing it with something like this. This is a C80100 I have. I'll be adding a second set of halls to it soon. It's exactly like your 8085 with a slightly taller stator. Yours is 80x85mm and mine is 80x100mm.

Motor%20shaft%20reinforcement_zpsfkaqtejo.jpg


Somewhere further up in this thread is a diagram of proper hall placement. IE: Even numbers of stator teeth need the halls between the teeth and odd number of stators need the halls in the middle of a tooth. If you look at a lot of motors that come with halls, the stator is probably made with a notch in it for halls to fit into. This isn't necessary. you also don't need the hall flush with the surface of the stator. On any motor I've ever added halls to, my halls are always behind the stator a little, but still in the gap between the teeth. For odd numbered stators, I add the hall on top of the stator tooth. Look at my 3220. The halls are not directly in front of the magnets. All that really matters is that the hall can detect the transition between north and south poles of the armature.

Wiring up halls isn't rocket science. They have a +v, gnd and signal pin on them. Google for the SS41F hall data sheet so that you know which pin is which. Also, I don't trust that halls from ebay or digikey or Arrow or where ever are going to be good. I always test them before they ever go in a motor. Others have had better luck than me with halls, but I see halls doing all sorts of weird things. The 41F is supposed to be magnetic north detecting, but I've received some that were south detecting and others that just didn't work reliably at all. TEST, retest and TEST again and then put them in a motor.

Here's my hall testing thread. The pictures are messed up right now. I reorganized my photobucket stuff and all the old links are invalid now. I had no expectation that would happen. I've been going through my various threads and been getting them fixed, but hadn't gotten to this one yet.

https://endless-sphere.com/forums/viewtopic.php?f=2&t=83802

Halls are easy to wire. +v and gnd are common to all 3 halls. That leaves just the 3 signals. Solder a green, yellow and blue wire to them. I put heat shrink on the halls legs before I mount them in the motor and leave the last 1/8" exposed. This way the halls legs can't short to anything and they can be partly buried in epoxy. The color order connected to the halls is purely arbitrary since your motor doesn't use color coding for anything right now. Once the halls are in place and the motor is assembled, then you can put the motor on a controller that uses halls. Assume that the hall colors are correct and wire them to the same colors on the controller. Motor phases at this point are arbitrary. Just plug them in. If the motor runs, you have already found the correct colors for the phases. If it doesn't run, swap phase wires until it does. Now label or heat shrink the motor phase wires with the colors on the controller wires. You've discovered the paired hall and phase wires. At companies that put halls in their motors, they at some point did essentially the same thing to discover the correct hall and phase colors that match up.

Note: all BLDC motors have 4 phase combinations that will run the motor. 2 run it forward and 2 run it backward. One forward and one backward combination run the motor at much more phase current than the other 2. You will see this on your watt meter as more current draw. You want the phase pairs that do not draw more current. IE: Just because the motor runs doesn't mean you found the correct phase pairing. Look at the amperage used on your watt meter. Most motors if they are just spinning themselves need 2-5 amps at most to run. If your watt meter reads 10 amps and the motor is not loaded, then you have very likely found a high phase current combination.
 
ElectricGod said:
The pictures are messed up right now. I reorganized my photobucket stuff and all the old links are invalid now. I had no expectation that would happen. I've been going through my various threads and been getting them fixed, but hadn't gotten to this one yet.
If you simply attach them directly to the post instead, you'd never have to deal with that.
 
amberwolf said:
ElectricGod said:
The pictures are messed up right now. I reorganized my photobucket stuff and all the old links are invalid now. I had no expectation that would happen. I've been going through my various threads and been getting them fixed, but hadn't gotten to this one yet.
If you simply attach them directly to the post instead, you'd never have to deal with that.

How do I do that? I have 4 link options to choose from in photobucket. I use Direct.


Email & IM
Direct
HTML
IMG
 
You don't use an external site at all. You upload them from your computer to the ES server using the Browse button below the text entry box and option checkboxes area when creating or editing a post.

However, if yoru browser supports it, then instead of actually browsing to the file on your computer, you just click the Browse button and in the filename part of the window that comes up you paste the image URL, like this one I copied off a post of yours above:
http://i1055.photobucket.com/albums/s515/rkenders/EV%20Stuff/Brushless%20motors/AstroFlight%203220/Astro%20Flight%203220%20halls%201_zpsudtmojyz.jpg
and then press Enter or click OK or Open or whatever button your browser's Browse dialog gives you. Then if your Browser supports it it'll just download the file to your temporary internet files / cache folder and put that file location into the Filename slot on the posting page.

Then you just click teh Add the file button.

I resize everything before I upload it using the free AT32resizer on the whole folder of new pics for a particular post or day's worth of pics, so that they're all no wider than 600pixels, to be sure they fit on most everybody's screens (the forum will display wider ones, don't recall the actual limit if there is one). Usually this, plus the image quality at 90%, will make any pic the right file size to upload.

When I need a higher res/size pic like for a circuit board or whatever, I just make sure it's no larger than the file size limit (500kb? don't remember, I don't do it often), attach it, then use the tags (above the text entry box) using the actual file link (below the browse/attach button area) to display the full-size image instead of the thumbnail or link the forum normally displays for larger stuff.
[img]https://endless-sphere.com/forums/download/file.php?id=220806

There's a thread called Adding Pictures at the top of every forum in the sticky section with more details in some of the posts there.
 

Attachments

  • Astro%20Flight%203220%20halls%201_zpsudtmojyz[1].jpg
    Astro%20Flight%203220%20halls%201_zpsudtmojyz[1].jpg
    105.9 KB · Views: 4,379
Eh! I guess I must be going blind. I never noticed the upload attachment option at the bottom. Oh well...the reorg is done and most of my threads have been put back together again.

What?! Read the manual? Naw... that stuff aint fer me! hahaha
 
ElectricGod said:
Ecyclist said:
Can you post the circuit that you used with SS41F halls?
I'm thinking about doing the same thing with 8085 not sensored motor. It is "only" 6000W but only 3.3lb and under $200. Plenty of power for an e-bike IMHO.

Your motor is stronger than my Turnigy CA80-160KV. I'd say adding halls to your motor is worth while AND AP motors are pretty well made. AP made them EV capable. They still need the shaft to bell union to be better. Those 2 tiny set screws won't hold much torque of you intend to drive from the shaft. 100% of the time I drive from the shaft so I'm always reinforcing it with something like this. This is a C80100 I have. I'll be adding a second set of halls to it soon. It's exactly like your 8085 with a slightly taller stator. Yours is 80x85mm and mine is 80x100mm.

Motor%20shaft%20reinforcement_zpsfkaqtejo.jpg


Somewhere further up in this thread is a diagram of proper hall placement. IE: Even numbers of stator teeth need the halls between the teeth and odd number of stators need the halls in the middle of a tooth. If you look at a lot of motors that come with halls, the stator is probably made with a notch in it for halls to fit into. This isn't necessary. you also don't need the hall flush with the surface of the stator. On any motor I've ever added halls to, my halls are always behind the stator a little, but still in the gap between the teeth. For odd numbered stators, I add the hall on top of the stator tooth. Look at my 3220. The halls are not directly in front of the magnets. All that really matters is that the hall can detect the transition between north and south poles of the armature.

Wiring up halls isn't rocket science. They have a +v, gnd and signal pin on them. Google for the SS41F hall data sheet so that you know which pin is which. Also, I don't trust that halls from ebay or digikey or Arrow or where ever are going to be good. I always test them before they ever go in a motor. Others have had better luck than me with halls, but I see halls doing all sorts of weird things. The 41F is supposed to be magnetic north detecting, but I've received some that were south detecting and others that just didn't work reliably at all. TEST, retest and TEST again and then put them in a motor.

Here's my hall testing thread. The pictures are messed up right now. I reorganized my photobucket stuff and all the old links are invalid now. I had no expectation that would happen. I've been going through my various threads and been getting them fixed, but hadn't gotten to this one yet.

https://endless-sphere.com/forums/viewtopic.php?f=2&t=83802

Halls are easy to wire. +v and gnd are common to all 3 halls. That leaves just the 3 signals. Solder a green, yellow and blue wire to them. I put heat shrink on the halls legs before I mount them in the motor and leave the last 1/8" exposed. This way the halls legs can't short to anything and they can be partly buried in epoxy. The color order connected to the halls is purely arbitrary since your motor doesn't use color coding for anything right now. Once the halls are in place and the motor is assembled, then you can put the motor on a controller that uses halls. Assume that the hall colors are correct and wire them to the same colors on the controller. Motor phases at this point are arbitrary. Just plug them in. If the motor runs, you have already found the correct colors for the phases. If it doesn't run, swap phase wires until it does. Now label or heat shrink the motor phase wires with the colors on the controller wires. You've discovered the paired hall and phase wires. At companies that put halls in their motors, they at some point did essentially the same thing to discover the correct hall and phase colors that match up.

Note: all BLDC motors have 4 phase combinations that will run the motor. 2 run it forward and 2 run it backward. One forward and one backward combination run the motor at much more phase current than the other 2. You will see this on your watt meter as more current draw. You want the phase pairs that do not draw more current. IE: Just because the motor runs doesn't mean you found the correct phase pairing. Look at the amperage used on your watt meter. Most motors if they are just spinning themselves need 2-5 amps at most to run. If your watt meter reads 10 amps and the motor is not loaded, then you have very likely found a high phase current combination.
Thank you for quick reply.
I didn't think about checking hall sensors before assembly. Once you pointed it out, it all makes sense. Everything made in China should be double checked.
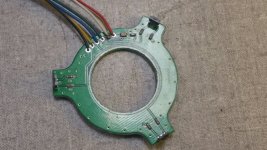
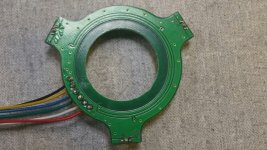
I asked about the circuit because APS hall boards with 3 halls have 7 resistors and 1 capacitor.

Now I assume that you connected your halls without any extra stuff.
Do you know why APS boards come with 7 resistors and a capacitor? It would be nice to know.
 

Attachments

  • APS Hall board.JPG
    APS Hall board.JPG
    65.2 KB · Views: 4,805
  • APS Hall board 2.JPG
    APS Hall board 2.JPG
    67.7 KB · Views: 4,805
I don't know what resistors would do, but if they are caps on the signal lines then they are there to soak up high frequency and short lived spikes. It is fairly common for the motor to induce noise onto the hall signals. A small cap .1uf or so from the hall signal to ground makes a nice ground path for higher frequency junk so that the actual hall signal is nice square waves. I suppose the resistors may be used to pull the hall signal to 5 volts, but all controllers do that internally so there is no need to do it at the hall. The cap by the red wire most likely goes between 5v and ground to help keep power to the halls clean.

Looking at those tiny parts, they are greyish, not black. I bet they are caps. SMT resistors are usually black. Also, looking at the board and where the caps are connecting, There is one on each signal line and on the +v line at the halls. It appears that in either case the cap goes to the ground plane. I bet they are there for filtering purposes and are NOT resistors.

In this blown up image you can see black components and greyish components. This is from a BMS of mine. I know for a fact that the black components are resistors and the greyish parts are caps.

2017-08-31%2012_23_36-12-20S%2080amp%20BMS%201.jpg%20-%20Windows%20Photo%20Viewer_zpsoi5qgx8s.png


Extra stuff...LOL!
I assume you mean like the parts on that hall board? No I don't. If you look at just about any motor that includes halls, there is never "extra stuff". Pull up is done inside the controller and power going to the halls is filtered inside the controller. Catching short duration spikes ought to be done inside the controller too, but often times isn't and that leads to glitchy motor operation if the hall signals are noisy.

Starting with known good halls that you have tested before ever using them IMHO is the first step in adding or replacing halls in a motor. I've purchased "name brand" halls from Arrow and Digikey and they were no better than the 20 cent halls from China as found on ebay. In either case I still had to test all of them and still found ones that didn't work right. It's my opinion that buying halls for a few dollars a piece is not compelling when the results are not different from buying Chinese halls. I've been getting all my halls from ebay and pay like $4 for 20 of them for a long while now. I then test them all and toss the crappy ones. I expect to have 20-30% not work right. Still, the cost savings is significant and the results are the same...bad halls from either source. $20 for 4 halls or $4 for 20 halls. At that sort of price savings, I'll choose the Chinese halls every day even with a slightly higher DOA hall rate. It's still so much less money that I simply don't care. Any Chinese hall that I have personally tested and found to be good has lasted for years. Any hall I've used in the past 2 years has been a pretested Chinese hall and they work just fine. TEST all halls before ever using them regardless of who you got them from!!!

Back to the stuff on that hall board...

FOC controllers need better motor timing than do trapezoidal controllers. As a result, the need to detect exactly when a magnet passes in front of a hall. This requires detecting the leading edge of the south face of a magnet. As a result FOC controllers are looking for when 5 volts drops to 0 volts. This is when a hall is forced low or into a current sink state and pulls the hall signal from the controller down to ground. FOC controllers are looking for the transition or the edge of the square wave. Trapezoidal controllers and just about anything older don't need tight motor timing so they look at the hall signal level. In other words, they wait a little bit of time and then read the voltage level of he hall signal. This means they essentially miss the leading edge of the transition. No one cares since timing isn't as critical.

OK...all of that to say this. Typically trapezoidal controllers or anything older are too slow to detect intermittent short lived spikes. Also since they key off the hall signal level, they are effectively immune to a very short lived spike. They simply can't see it. FOC controllers on the other hand have to be fast enough to detect the leading edge of the hall signal. The problem is that a short duration spike looks exactly like a rising or falling of a legitimate hall signal. FOC controllers have trouble distinguishing a spike from the real edge signal. Those tiny caps on that hall board help FOC controllers get a clean hall signal without the short duration spikes that occur that mess with them.
 
Note about hall physical orientation...

All halls have a face that senses and a face that does not. If you look at a typical TO-92 flat package, they have a flat face and the opposite side that has 2 angled small sides and then a smaller flat face. Like in the below picture. This face is the sensing face of the hall. It usually has the part number for the device on it too. If you look at the first pic that I did of my 3220 that has a close-up of the halls you can see the labeled/angled face of the halls facing the magnets. On my Turnigy CA80-160KV for whatever dumb reason, I installed the halls with the flat face towards the magnets and the motor still runs great. You can't see it in any of the pictures, but I know what I did. I was looking at specs on the SS41F the other day and was looking at the package orientation and had a "doh!" moment. I've done some experimenting with halls while testing them and they are quite permissive of where the magnetic field is coming from. The hall turns on as long as it has a north facing magnet near any of it's sides. However, don't let that become a point to be careless about. You should always orient your halls correctly for best results. The angled face should always face whatever it is you are attempting to detect.

TO-92%20package_zpsbc2cgyhp.jpg


The reason why orienting the hall backwards worked is thanks to how magnets work. Either pole of a magnet has a "bubble" or magnetic field lines of north or south magnetism around it. All that the hall has to do is get inside that bubble of magnetic polarity to detect it. It looks pretty much like this. I suppose if you do one hall backwards, you should probably do all 3 backwards, but better to orient them correctly!

magnet%20feild%20lines_zpszj5s1kij.png
 
Hi everyone,

I'm helping a noobie pull apart a 12090 outrunner so he can add halls. I thought since I was telling him all of this that it was a good time to post up how I remove motor bells from outrunners and armatures from inrunners so that I can get at the halls or to add them.

OUTRUNNERS:

If your outrunner has a bell top and your shaft doesn't extend out the bottom of the motor, you will need to remove the bell top so you can pull the armature/bell from the top of the motor. If your outrunner has already been modded, like all of mine are, so the shaft extends out the bottom of the motor, then you can push the shaft and bell off from the bottom of the motor. My Alien Power C80100 is currently in parts on my bench so I can add new halls to the bottom of the stators. I'll post some pictures later of how I pushed off the armature when I do that actual post for adding halls to it.

Follow one of these 2 sets of steps to get the armature/bell off the stators on an outrunner.

Note about pulling motor bells:
The cylinder portion of the bell can be quite difficult to pull off the stator because the magnets are strongly attracted to the stator. They are N35 or stronger so they are going to pull quite hard on the stator. Just about any 80mm stator is going to be strong enough to get away from you and possibly cause magnet damage, but they can be pulled off with muscle strength alone. I strongly recommend NOT doing that. A 120mm stator and magnets is so strong that I recommend NOT using brute strength...NOT EVER. I always use a puller to remove the motor bell and to put it back on.

*** Using a 3 jawed puller to remove the motor bell keeps everything moving slowly and in 100% control. There is virtually no chance of losing control of the motor bell and accidentally damaging the magnets.

1. If your motor shaft does not stick out the bottom of the motor sufficiently to be used to push the bell off the stator, then do this.

a. Remove the bell top from the motor. Outrunners are made where the bell top is a separate part from the cylinder. They are usually held together via small screws and then the two parts of the bell need to be separated at the joint between them. I use an old kitchen knife and tap on the back edge of the knife to wedge it into the crack between the two parts of the bell. Usually it take 5 or 6 spots around the bell to get the top to start seperating from the bottom part that holds the magnets. I then move on to using a screw driver in the gap to widen it further. On my AP 12090, the top is inserted into the bottom by about 1/2", but by about 3/16" it will come off in my hand.

b. if the shaft is still in the motor, push it out down or remove it so it is out of the way of the top of the motor.

c. Remove any screws that hold the skirt bearing to the bell

d. You want to protect the top shaft bearing and the motor windings. The shaft bearings are not designed to take anything other than radial stresses so pushing laterally on the bearing is probably going to do damage. I use a thick washer on top of the bearing to take the load. A piece of plywood or a thick metal disk would work too. The bearing never sees any lateral loading and is protected from damage. A little tape over the tops of the windings keeps them safe from damage.

e. Pullers all have a center screw and 2 or 3 jaws typically. The screw can impact the magnets so I wrap a few layers of tape around it's diameter down by the end of the screw. This provides a cushion between the steel screw and the magnets to help prevent chipping or breaking a magnet.

f. Put the puller jaws around the motor bell. Most larger outrunners have vent holes above the skirt bearing. That's a good place to seat the jaws. The bottom of the bell works to.

g. Tighten the puller screw until it's snug and centered over the top bearing. If the puller jaws won't stay seated around the motor, wrap a few layers of tape tightly around them and the bell.

h. For a typical 80mm stator, I can turn the screw by hand and pull the bell off. For my 12090 and it's 120mm stator, I need light help from a wrench to get the bell moving. If you need more than light pressure on the screw then something is binding up or you forgot to undo something.

I. If your motor has a skirt bearing, it might want to stay in the bottom of the bell and possibly impact the bottoms of the windings. Pry at it as needed to keep it coming out of the bell.

j. Keep turning the puller screw until the magnets clear the stator teeth by about 1/4". At this point, you can probably pull the bell off with your hands easily. I say clear the magnets from the stator because it is possible you might slip or who knows what and if they are not 100% separated, you may impact a magnet on a stator tooth and chip the magnet.

k. Set the motor bell aside where it can't attract metal objects and get to adding halls to your motor. Leave the puller exactly where it is. You will want it there when you put the bell back on the motor.

l. Later reinstalling the bell is the exact opposite process of pulling it off. Use the puller to slowly lower the bell back onto the stators.


2. If your outrunner is like all of mine, then the first thing I do is modify the shaft. I add more support between the bell top and the shaft. I push the shaft down so it's flush with the top of the bell and is protruding out the bottom of the motor. This makes removing the bell later super easy. SO...do this if your outrunners have the shaft protruding out the bottom of the motor.

a. Undo any screws that hold the skirt bearing to the bell.

b. Place the jaws of the puller in the gap between the bell and the motor base.

c. Run the puller screw down until it's snug with the end of the motor shaft.

d. Start turning the screw. For 80mm or smaller motors, hand strength on the screw is probably enough to separate the bell from the stator. For larger motors, you may need light help from a wrench. At no time should you EVER need to crank on that screw with more than light force. If you do, something is binding up or isn't removed yet. That might be a circlip on the shaft or a screw in the skirt bearing.

e. The skirt bearing may want to stay in the bottom of the bell. It is possible it will ride up and impact the bottoms of the windings. Pry at it as needed so it comes out the bottom of the bell.

f. Turn the puller screw until the magnets clear the stators by about 1/4" and then pull it off the rest of the way by hand. You are pushing against the motor shaft which is attached to the bell and pushing the whole thing off as a single unit.

g. Set the bell aside where it can't attract metal objects.

h. Later reinstalling the bell is the exact opposite process of pulling it off. Use the puller to slowly lower the bell back onto the stators.

INRUNNERS:
I use a puller or possibly I put the motor shaft in a bench vice and then pull on the motor can to separate the armature from the stators. Both will work. Most inrunners have fairly large can diameters so you need really large pullers to get around the can and then to push on the motor shaft to slowly eject the armature. If your inrunner has vent holes, they can be used to attach to the motor shell so the puller screw can push on the shaft. Most inrunners have removable end plates that are held on with screws. Sometimes those screws can be partly loosened and the end plate is separated from the motor can enough to get the puller into the gap. Some end plates have threaded holes for mounting the motor. I've used them and made up an aluminum plate that matches those holes and then screwed the plate to the motor. This provided the purchase needed for the puller jaws. Sometimes there are no options like this and then I take the end plates off and put the motor shaft in my bench vice and just pull the armature out. I can't be as methodical with inrunners as I can be with outrunners, but also the chances of magnet damage are less too.

Regarding pullers...
1. 3 jaw pullers are more stable and less likely to fall off or shift than are 2 jaw pullers. I prefer 3 jaw pullers for this reason.
2. They can be found at most automotive parts stores, hardware stores, amazon, ebay, etc.
3. They come in different sizes. I have 3. The smallest one is perfect for 80mm motors. It's a 3" puller. The next one has only 2 jaws and if it had 3 jaws wouldn't fit on my 12090 outrunner. It is categorically a 4" puller. For 120mm motors, get a 5" 3 jaw puller. Anything smaller is going to be too small to get around the motor bell. My big one is 6" and I've only every used it when working on cars.


Other things to consider while you have the motor apart...

1. This is a perfect time to go find sealed ceramic bearings that fit your motor. Don't bother with fully ceramic bearings. They cost a fortune and are only slightly better than bearings with ceramic balls only. All ceramic bearings have about half the internal friction than do all steel bearings that typically come one everything. They are SEALED and probably the bearings that came on your motor are not. Sealed bearings keep dirt and water out. Shielded bearings like your motor has do not and so they will fail prematurely from road grit, water and loss of lubrication.

2. Add a second set of halls.

3. Add a temperature sensor. They are super cheap and can be purchased on ebay, any electronics parts stores or scrounged from your kitchen digital thermometer. I get cheap Chinese digital temperature gauges that I put on my EV's. I get them on ebay for $2-3 each. They include a sensor. I cut off the wire that goes to the sensor long enough to be the same length as my hall wires coming out of the motor. The sensor gets mounted in the windings some place convenient. Use the cheap meter or something else.

4. If it's an outrunner, just about all of them have inadequate support between the bell and the shaft. If you intend running from the shaft and I recommend doing so, then reinforce the shaft to bell union. This is my thread on that subject. https://endless-sphere.com/forums/viewtopic.php?f=30&t=90264


A few notes about magnets...
1. All magnets including ceramic ones are brittle and chip easily.
2. Neodymium and samarium cobalt magnets are REALY UBER brittle. They chip super easily and break easily too.
3. A chipped magnet will still work, but is less effective than a whole magnet and your motor is a little out of balanced now too.
4. Neodymium is usually coated in nickle or copper. This coating is to protect the magnetic material from corrosion. Neodymium rusts and oxidizes very easily and quickly. I have a small neo I use for testing halls. Some time ago, I decided to peel off the chrome coating. Mys kin oils were enough to immediately corrode the neo material a little. In a motor exposed to weather, rain, whatever, this process would be more significant.
5. Neo magnets are the most commonly used magnet type in BLDC motors. There is a very high chance that 100% of your motors have neo magnets. They are strong and attract ferrous objects with lots of force. When a magnet starts pulling on something. The acceleration is very fast. There is little chance you will stop the metal object from impacting with a magnet. Most likely the magnet will get chipped or broken. Don't let this happen. Keep your motors magnets away from loose metal objects!
 
Thank you for the in depth explanation. I really appreciate it.
I assumed, and we know what that means, that if components on a board are named from R1 to R7 then they must be resistors and single one at red +5V is named C1 presumably capacitor. You live and learn.
 
Ecyclist said:
Thank you for the in depth explanation. I really appreciate it.
I assumed, and we know what that means, that if components on a board are named from R1 to R7 then they must be resistors and single one at red +5V is named C1 presumably capacitor. You live and learn.

And they do say R1 to R7 on them, but I'm not convinced they are resistors. The things they connect together isn't logical for resistors, but is for capacitors and they look like capacitors, not resistors. I think that board was made with an itty bitty mistake times 7 on it and no one bothered to correct the silk screening. If you have the board in your possession, it is easy to test those parts to confirm what they are. Set your DMM to measure resistance and place it's test leads across those tiny grey parts. Do you read something like 1k or 470 ohms or 4.7k or close to those values. Those are my guesses if they are resistors. If they are caps like I think, then you won't measure a resistance across them or if you do it will be very high...like several meg ohms and those resistance values would not be used on a hall board IMHO. They would be ineffective.
 
Over the last couple of nights I have been working towards adding new halls to my C80100 outrunner. 2 nights ago I got the motor apart.

I used a 3 jaw puller to pull the bell off. I had already pushed the shaft down and reinforced the union between the shaft and the bell some time back. This made pushing off the shaft and bell via the bottom of the motor pretty straight forward. I was able to turn the screw on the puller with finger strength only to extract the bell. Everything comes apart slowly and easily and 100% under control. There is no way to accidentally loose control and have the bell come slamming back onto the stator. When I was done with adding halls, I put the bell back on the same way I took it off. I used the puller to slowly lower it back onto the stator. The puller jaws are around the base of the motor and the screw is pushing on the motor shaft and that is locked to the bell so it all comes off in one piece. All I had to do was remove the 4 screws that attach the skirt bearing to the bottom of the bell.

C80100%20bell%20-%20puller_zpsewq8ux31.jpg

C80100%20inside%20bell%202_zps7jutvqoy.jpg


Then I started adding the halls...
The first thing I did was add some hot glue into the gap in the windings behind where the halls would sit and then shoved a q-tip into that. This provides a stable backer for the hall until the JB weld gets applied. The q-tip end gets a nice soaking with super glue before hand to make it semipermeable and yet solid. Then I put a dot of super glue on it and stuck down the 3 halls.

C80100%20new%20hall_zpsvdpt6gzx.jpg


Once the super glue had firmed up, I added short lengths of color coded pre-shrunk heat shrink to each leg. It makes knowing what pin is which easy and I also already knew which hall paired with which phase so I color coded that leg too. This is obviously the blue hall. I want the last 1/8" of the halls legs exposed for soldering. The rest gets covered up.

C80100%20blue%20hall_zpsprpkdhfy.jpg


I prepared teflon wires for soldering to the halls. I make single continuous power wires that go to all 3 halls. At the correct length I remove the insulation on a 1/4" section, bend it in half and then tin that section for soldering to the hall later. This is my power wires. I make the sections a bit longer than needed so that I'm not pulling on one hall to make up the connection at the next hall. I was asked by someone why I don't use cut sections of wire and then solder 2 sections to the hall pin. It can be done, but holding 2 small wires to a hall leg and then soldering them to the leg while keeping the solder connection small and tight is not easy. Stripping the insulation off, bending the bared part in half and then soldering that to the hall leg is sooooo much easier to do. Everything is held together for me already. All my solder locations on any wire are pretinned before they ever get soldered to anything. I dip the bare wire in flux and I always have a blob of used solder sitting on my bench. I melt the solder blob and then dip the wire in the blob. Solder flows into the bare wire end and it is tinned. I do this for any sized wires. There is nothing wrong with used solder. I melt my various drops of solder together into a bigger blob and reuse it for tinning wire ends. Anyone who solders a lot (me) has lots of waste solder. I melt it off old boards, wires, over flow from my current work...whatever and reuse it. A small tub of solder flux makes cleaning it up easy and of course any wire gets dipped in flux before it is dipped in the solder blob anyway. The solder blob stays pretty clean.

C80100%20hall%20power%20wires_zpszpeoddex.jpg


There's always a hall that's farthest away from the exit point for the hall wires. I start there. This blue hall is further away from the exit hole than is the other hall nearest to the the exit hole. That decided it was the starting spot. As you can see my solder connections are very small and clean. No limps or grunge in my connections. Since my wires are already pretinned and my soldering iron is clean and just barely wet with solder, heating the connection flows solder over the connection very nicely. The second picture is zoomed in so you can see the solder connection much better. If you solder, strive to make your connections look like this. You can't see it in the picture, but I precut sections of color coded heat shrink that are already on the wires. Once the solder connections are done, the heat shrink goes over the exposed connection.

C80100%20blue%20hall%20wired_zpsyboemysp.jpg

Hall%20solder%20connection%20close-up_zps03xgirwi.png


This is the second hall and is directly opposite from the exit hole. It has the first bent over section in the power wires. I use slightly larger diameter heat shrink to get around the 2 thicknesses of wire.

C80100%20yellow%20hall%20wired_zpsktkicpw5.jpg


and the third hall...

C80100%20green%20hall%20wired_zpsiddaqnak.jpg


This is what a hall looks like after the heat shrink is applied. There's very little chance the halls legs or solder connection will ever touch anything they shouldn't.

C80100%20green%20hall%20closed%20up_zps43uushzm.jpg


Next I apply some JB weld on top of the hall and around it so that it is buried under epoxy and won't ever come loose.

C80100%20hall%20epoxied%20in%20place_zpsamfcsfrd.jpg


Next comes securing and routing the wires. Since they are very close to the skirt bearing, it is important to keep them from rubbing on anything that moves and to keep them from moving or vibrating. Movement in the wires allows for them to slowly break or to stress the halls legs until they break off. I don't want that to ever happen so it all gets buried in more epoxy.

C80100%20epoxied%20wires_zpspvwesvlk.jpg

C80100%20epoxied%20wires%202_zpsbvotese7.jpg


Since I had the motor apart, this is the factory hall board. BUT the important thing is that I had sealed ceramic bearings in the size this motor uses. Of course I replaced the shielded steel bearings with the much smoother, sealed and lower friction ceramics!

C80100%20ceramic%20bearing_zpsa9qojzut.jpg


Finally it was time to put the motor back together again. I put the new hall wires in their own heat shrink tube and then routed that through the heat shrink that held everything else, installed the skirt bearing over all of that, reattached the motor bottom bracket and then proceeded to lower the bell back onto the stator in reverse of how I took it off. Easy peazy...nice, slow and controlled.

C80100%20bell%20-%20puller%202_zpsptisxam4.jpg


I hand turned the motor feeling for any roughness where something might be touching or scraping and listened for any odd sounds. I looked in the vent holes too and everything was good to go. Tonight, I'll connect up an IP68 connector to the end of the hall wires and then I can try out the new halls.
 
Ecyclist said:
Nice work!!!
I still have the board with R1-R7 markings. I will test it with meter and report back.

What size is your hall board? Possibly interested in selling it?
 
Back
Top