
John Bozi
100 kW
If I had known this I would have requested 73mm as Pendragon said earlier that they will stretch and I dont want them puncturing the tubes.The spoke cutter measures to the nearest mm so I've cut just shy of 74mm and with the longer threads as requested.
anyway way,
the hookworms look expensive in the above link when you factor shipping. I got 3 a while back when they were on sale for about $100 I think(I think pushys) waiting for sales or just buying in advance is cheaper but at the same time you change your preference...
This place has got highrollers for $30 24" http://www.velogear.com.au/bike-parts/bike-tyres-bicycle-tubes/tyres/24-tyres/maxxis-holy-roller-24.html
thanks drew - but recording this way is a huge pain, takes the fun out of it when you got to stop set up fly by go back and get the camera...
Cheese:
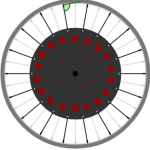
Until I know what exactly the inside of the cover looks like I plan to do a hole between each imagined line from each spoke end toward the axle. This rudimentary image is just a quick sketch. The inner holes will be about half the size and go every second space between the imagined holes.
If there is a fin or skeletal line I wont being drilling that out but will opt to do more holes either side of it.


 sick off set backs - 4 free days for building so far to just get the motor and bearings apart.
