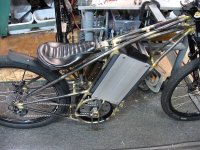
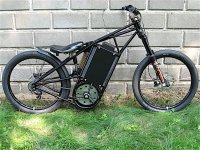
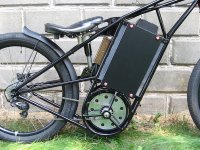
APL's V4 Cruiser Build.

Thanks mxiemming, your frankness is refreshing, and I appreciate it! Youre right about most of that, the blue batteries
are hard to see around and I'll be hiding them soon,.. and some black paint will go a long way in toning the bike down.

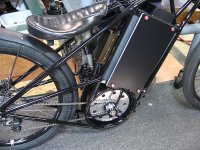
I'm still struggling with the shock set up, and it needs to be changed at some point,.. theres too much front to back
hole options on the bottom mount, and it needs more vertical options in order to get the length adjustments needed.
I would rather the shock be parallel to the battery box, but that would take a cam. Well, baby steps I guess,.. just glad
that the 'action' is working well at the moment.

Yea, the controller box is a bit large. I had visions of putting the dash and controller all in one box, but that fissil'd out.
I'm going to put a smaller box on top of the batteries for the dash/switches, and the controller down low to keep the phase
wires short. The search continues for the right controller, but I'll be starting out with the little 40 amp Cryt. to get it on the
road.

What I really like is the simpleness that I had when it was in this stage, (photoshopped), to me it says 'muscle bike', but
I'll wait to see how this turns out first. Sometimes one simple change will make the difference, just have to wait and see.
Up on two wheels. copy 2.jpg
 
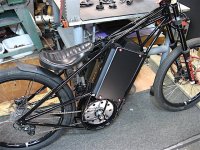
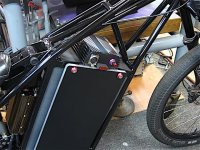
I have one side plate fitted, and it came out nice and tight. The 1/2" post's take the lateral stress, and some 1/4" caps
will just hold them down. The aluminum color doesn't help visualize, but the plate's will be black, and I think once the
whole bike is black, it's badness will emerge.

Plastic sheet and foam behind the plates will squeeze the batteries a bit. Maybe some milling on the covers later on to
help with the looks, I have a few ideas for them yet, but for now a few stickers will help.

Side plate..jpg

Still trying out different arrangements of parts, but I think the controller will go behind the batteries and out of the muck
for now, and I'll just put a long plastic splash guard up front. The switch box will go up top, so it's close to the battery
wires, and use large thumb screws for access on the road.
 
That's already a lot better.

I read some of your motor build last night (60 pages so I've basically excused myself from that thread to date...) And was surprised you're only feeding it less than 1kW.

With this in mind, I think you could actually power it from a credit card sized fsesc 4.2 and make the controller actually disappear.
 
I'm feeling better about it, and anxious to see all this hard work pay off and not fall short like the DIY motor project did.
I'll return to that this winter probably, for another round of abuse. The plan is still to run a DIY motor in this bike, but
It might take a while.

1kW was the first goal, but I'd like to get a lot more than that of course. Abominable axial gap flex was spanking me hard,
and frankly I'm seriously considering a radial design for the next attempt.

Radials are a bit boring compared to axial's, and it's easier just to buy one off the shelf,.. but theres something to be said
for the DIY aspect, and having no gap flex would be like a breath of fresh air. Radials have their own set of problems
though. Six of one - half dozen of another.
 
Now that I have a better idea of how the wiring is going to go, I can order up the switches & parts I'll need, and get
the final finishing done.

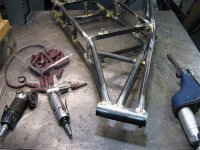
The three air tools I like to use are the 2" angle grinder, a right angle with a spiral wrap, and the legendary Dyna-file.
Belts and spirals are 40 grit, and the brass is falling like snow!

V4 finishing.jpg

After a dip in the phosphate tank to clean and prep it, I can finally get the paint gun out. :wink:
 
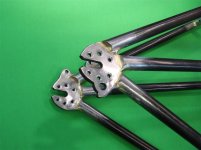
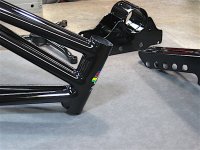
The frame build started with the dropouts, and it ends with the dropouts. Super-stout drops are all dressed and blended.

Super Stout dropouts..jpg

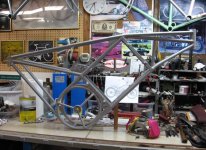
Had to break out the color paper for this occasion,.. the frame is done and it's time to paint! :thumb:
 
After a dip in a diluted phosphate solution to clean out the inside of the tubes, and prep the metal for paint, I gave it
a good coat of two part primer. Next will be some spot putty in the rough areas, a little sanding, and some more primer
to touch it up.

Hard to see with all the junk in the background, but it's finally all one color.

V4 Primered.jpg

After that, some rattle-can flat black primer for the color, and then a few heavy coats of 2K urethane clear. This is one
of the hardest frames I've ever painted because of all the tubes and hard to reach areas.

Clearing it won't be any fun, but it's a cruiser so it can have a little less spit and polished than road bikes needs to have.
 
For sure. I weighed it in at 21 lbs! I could probably slip a Harley motor in there. :)

Next one will be simplified and lighter. Now that I can see what I have in 3D, it's easy to see what needs to change.
I'm thinking I can see about five tubes that don't really need to be there.
 
Finally got it cleared, Darth Vader black! Tried out some NAPA Finish-1 and really liked it. Missed a lot of spots though
because this thing is such a whale, but it's shinny where it counts, so it's off to the build. 8)

Vader black..jpg

I put some temporary stick-vinyl on the plate to tone it down for the photo, but the look is starting to grow on me,.. sort
of brutalist-tech. I think some fake carbon fiber strips on the plastic sheet behind the plate will finish it.

She's look'n good in black!

Paint and parts.jpg

Next up is a flurry of things to do,.. build and wire up the controls box and controller, Put on the rest of the parts & front
drive, rear fender mount, threaded pivot pins, axle caps, motor shroud, and on and on...

V4 fender.jpg

I'm also working on stronger rear wheel with a fatty rim that should put some badness into it. The Velocity 35mm rim just
doesn't look right. At the moment, the Origin8 65mm rim looks like one of my 'few' choices,.. a good 1000g rim where
most are less than 500g. I'd rather have closer to 50mm, but it depends on what the tire looks like on it when it gets here I
guess.

Well, as things would have it, I'm off to my annual home family visit for the 4th next week, so the build will have to wait for
a bit,.. both happy and sad. :D :cry:
 
You got it! :bigthumb:

CF 1.jpg

V4 Center-fold.jpg

CF 2.jpg

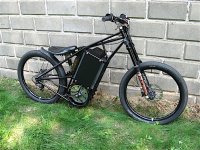
Needs a kickstand... parts are just propped up and taped for the photo,.. and I can't wait to get going on it!

:pancake: :pancake: :pancake: :pancake: :pancake: :pancake: :pancake: :pancake:
 
Thanks E-HP!

Plenty of pedal clearance in front with the 'shorty' cranks, I'll have to ride it for a while and see if I can get away with
some longer cranks. I still have the option of moving the BB placement around a bit with the bolt-on bracket by making
different ones yet.

I've made the wheelbase a little longer each time, but I'm limited by the 'seat to bar' distance in front, and don't want to
sacrifice body position for looks, like some cruises do.

On the next one I'll probably shorten the rear end an inch or two, lean the B-box back and up a tad, shorten the seat
bracket and move it down. A lot of little tweaks,.. but they can make all the difference.
I'll know a lot more by summers end.

Can't wait get it done too! Throttle hands getting real twitchy,.. really want to twist that thing back! :bolt:
 
Changed the name to "Dreadnought Cruiser" .. thought it fit the bike well. Refers to the oversize battery box, and the
overall strength of the frame. :wink:
 
Great looking bike really stylish retro look with the mid mount hub motor bet rides good too 8) am a big fan brass brazing looks awesome , would have been tempted to polish and clear coat , then I saw the black, for sure best choice is classy ,thought was powder coated so good job with the rattle cans,
know what you mean painting tubeing, lots of spraying not lot of surface area for it land on :roll: , will be cool with wider rear wheel for sure,
you and illegalbike killing it in the self built frame game for sure, gonna have work on my fabrication skills :mrgreen:
 
Thanks Greendog, I don't know what the style is, thought maybe electro-punk. :wink: I just had to try the ring look.
Started out as a Moto-dirt-cruiser look, then switched to a pure muscle-bike somewhere in the middle of the build. :confused:

Victim of the 70's,.. hard tail choppers, Harley's and Triumph's. Everything I build will eventually wind up looking like a
chopper, even if I don't want it to. :lol:

I had contemplated just clearing it out,..but I had to have faith in the black. :thumb: It's got to look bad to be a muscle bike.
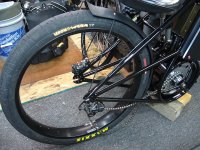
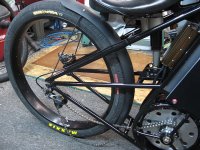
We're in luck on the fatty wheel though,.. the rim came in today and I stretched the tire on it pronto! Propped it up in the
bike, and took some pic's.

Orign8 x 2.5.jpg

Maxxis 2.5 x 65mm.jpg

Maxis is on steroids! But now it has the proper beef. It only grew 1/4" wider, so.. 1/8" per side. I might just be able to pull
this off! Chain clearance is going to be tight though,..I need more time to mess with it. (Hit'n the highway tomorrow.)
(2.5" tire 65mm rim.)
 
Congrats, beautiful work as always! :) It looks absolutely stunning, maybe hard to see when you've been looking at since it was a pile of tubes but no-one would doubt that came out of a professional design house. Hadn't been following this thread, yesterday was the first look and the first thing that came to mind was "speedway bike", that no-nonsense, sleek and low slung look. Keep up the good work, looking forward to seeing your own motor in there! :bigthumb:
 
Looking so much better.

The remaining ugly (s) are around the shock.

1) Seriously... Try a different controller. That gold box is ugly.

2) Does the shock compress enough that the seat hits the tyre?

3) The shock is still ugly... And I actually wonder if a coil spring would suit your bike better aesthetically.

Not really digging the new name tbh. The dreadnaughts were symbols of gunship diplomacy and aggression, that crawled around slowly belching out black coal smoke. Hopefully nothing like your cruiser.
 
Back home again, and ready to get working on the cruiser build at last!  Sorry about the no-response, but I forgot to bring
any passwords and couldn't get on the ES. :roll:

Ayway, WOW!, thanks for all the thumbs up!  And thanks Ron, for including my ride in the Electric Bike 12 midrive hub
motor line up! :shock: Truly an honor to grace those pages!  And here I thought this build was going to fall on its face for a
while there!

Well, the bike is about 3/4's done,.. next up is the batteries and wiring, switches, fuses, and the control box on top, and
also the rear wheel build.

I was going to just switch out the rims, but now I think it will be better to just build a new wheel. That way I can keep
going on the project and have a back up wheel when it's done. I'm trying to find a bulletproof cassette hub at the moment,
(if there is such a thing), but don't want to spend a fortune on it either.

Thanks for the suggestions mxiemming, the seat shock/suspension system is still in limbo and will be changing as time
goes on,.. also, I have a complete re-design on that whole system, with a different pivot point that puts the shock parallel
with the battery box, but it probably won't happen until the next frame build, because I would have to re-do too much
stuff on this one.

For now it's working, and I need to work on the other things so I can wrestle this thing out onto the road and get rolling.
Summer's half over and I still don't have an ebike to ride!  Agh!!!  

Give me a few days to get settled in and I'll have some new progress to report, with lots of hot glossy photos! :)
 
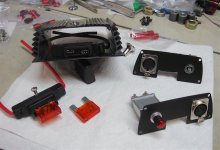
Started on the control box with some 75 amp push-pull switches, and some Maxi fuse holders with some heavy 10g wires.
(keeping with the bullet proof theme) Battery, fuse, switch direct,.. theres two systems on each side of the box, so I can
choose either one or both.

Maxi Fuse Holder.jpg

I had to mod some new switch knobs,.. the 60's style they came with is rude. I wanted the fuses to be totally accessible,
but the massive fuse holders were a bit hard to place. These things are huge!
Heavy metal charge ports, suffice to say, she's heavy duty! :wink:

Still need to instal the 'on' indicator lights, make the top hold-down panels, and solder in the XT plugs, but it's getting
there.

Controll box.jpg

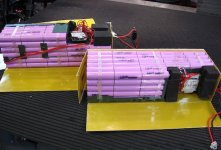
Also started going through some batteries. 13S-10P 48v 26AH. The plan is to install new 35A BMS's and solder in a little
bigger wires, along with some XT-90's,.. heat shrink them back up, and chuck them in the hold. Just cheap BMS's to start.

Open batteries.jpg

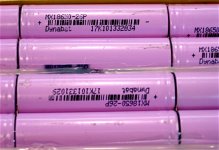
These two packs show 51v, so it seems like they are in pretty good shape. Cells are unknown, but suppose to be 2600mah.
Who knows,.. theres 130 of them in each pack, and room for 40 more, (if the BMS was external),.. so that would be 300
cells possible.

26mah Cells.jpg

In parallel, I should get about 50 ah, and around 70 amps from the BMS's.
 
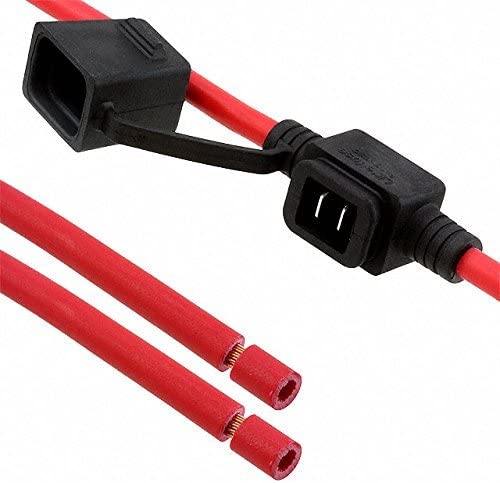
I have the same Maxi fuse on my bike. I had to use this Jcase fuse on my wife's bike due to limited space. The fuses are made in short or tall versions. This rubber cover is for the tall, so I cut it off to save more space.

519Sb194uyL._AC_.jpg
 
Thanks thundercamel, I didn't see those before, but now I see that they're pretty common. I like the looks and size of the
J-case fuse better than the Maxi's, and they look like a better fit in the control box. Well, I could do a remake, or maybe on
the next bike... :thumb:

At the moment I'm still trying to get all the stuff together to finish the wiring, (shipping woes),.. the loss of Radio Shack
was a hard hit, this town is devoid of any electronic hardware except for basic home and automotive. Crazy. :roll:
 
Back
Top