Best way to connect a 2nd battery ?

Joined
Sep 28, 2023
Messages
12
Location
boulder, co
I am looking for solutions not criticism or coulda shoulda ....
- The bike has a 48V 10Ah battery that connect with a 4 pin connector .
- I bought a rear rack with a 48V 20Ah battery.
- My idea was to connect them in parallel , yes, i know they will discharge disproportionally
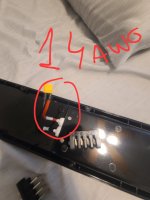
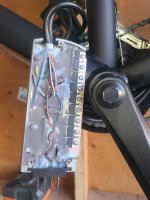
- The problem is the battery connector is potted in so i cannot connect right into it
== ANY Random ideas on how to connect the 2nd "rack" battery are appreciated ?
Thank you
20230928_133155.jpg
 
Yeah, I’d leave the controller terminals and potting alone.

It’ll be easier to solder directly to the 10Ah BMS terminals.

Ideally you’d install a recessed socket (with rubber cover or faux plug) in the 10Ah battery to plug the 20Ah into. There ought to be room somewhere in the case to accommodate it.

Be sure to use a polarised plug/socket system that prevents reverse polarity connection.

And be wary of using prewired charge leads or ports - the wire will be too thin for the 20 or so amps you draw with that controller.

With that downtube battery setup it’d be impractical to switch between the two batteries.

But you might want to consider having the 2nd battery charge the 10Ah battery instead of supplying the controller directly*. It would depend on your usage patterns as to whether this implementation makes sense. If you’re a low power consumer the 10Ah might remain topped up over the course of a ride.

* It would be better with the 10Ah charging the 20Ah, but impractical in your case.

Hhmmmm i did not think about plugging the 20Ah battery in the 10Ah battery to charge it ... that seems to be ok right ? And yes, i am using thicker gauge wires ... i think i bought 12 awg ....
 
The batteries will discharge proportionally when paralleled since they are at the same voltage. At the cell level they should be equivalent from full to empty assuming they are healthy cells and start out balanced. If it were me, I’d remove the potting near the 4 battery connector blades and solder in the parallel wires and connector. You should be able to scrape it off without damaging the controller. By paralleling you also get the benefit of high current supplying capability too.
 
Hhmmmm i did not think about plugging the 20Ah battery in the 10Ah battery to charge it ... that seems to be ok right ? And yes, i am using thicker gauge wires ... i think i bought 12 awg ....
It’s not something I’ve really looked into, but yes, others (brainy ones) do it. A search on the forum should turn up examples.
 
The batteries will discharge proportionally when paralleled since they are at the same voltage.
Proportionally (proportionately?), yes, but to their resistance and that of the wiring between them and the controller, I would think.

I don’t know how significant or temporary any imbalance would be … probably nothing to worry about.
 
Kind of matters if the BMS is common port or separate port. If you plug a range extender battery into the charge port of a common port BMS battery, you are actually putting the batteries in parallel. Like said, the charging wire is likely too thin for that to be a great situation. Will heat up and maybe melt when discharging a lot of amps.

If the BMS is separate port, the charging connector and discharging connector do go to separate pads on the BMS, at least, and the range extender battery would indeed only be capable of charging the other. That would only exceed the current limits if the batteries were too different in voltage at any time and the BMS was too slow to block the resulting high charging current.
 
Yeah, I’d leave the controller terminals and potting alone.

It’ll be easier to solder directly to the 10Ah BMS terminals.

Ideally you’d install a recessed socket (with rubber cover or faux plug) in the 10Ah battery to plug the 20Ah into. There ought to be room somewhere in the case to accommodate it.

Be sure to use a polarised plug/socket system that prevents reverse polarity connection.

And be wary of using prewired charge leads or ports - the wire will be too thin for the 20 or so amps you draw with that controller.

With that downtube battery setup it’d be impractical to switch between the two batteries.

But you might want to consider having the 2nd battery charge the 10Ah battery instead of supplying the controller directly*. It would depend on your usage patterns as to whether this implementation makes sense. If you’re a low power consumer the 10Ah might remain topped up over the course of a ride.

* It would be better with the 10Ah charging the 20Ah, but impractical in your case.
Is there a reason why I could not use the charging port of the 10Ah battery.... and plug the 20Ah battery into that outlet?
 
Inanek covered that. You should defer to his wisdom. He has first hand experience, and probably an engineering drgree to go with it. You’ll need to inspect the 10Ah BMS wiring.
 
Additionally, if you plug a battery that is more charged (higher voltage) into the charge port of a less charged (lower voltage) battery, there is no current control or limiting, so whatever the maximum current from the difference in voltage vs the resistance of everything in the path (not much) is will flow.

If that's only the few amps that your battery normally charges at, that's ok, but it's possible (even likely) that the current will be much higher than it is designed for, and if the BMS doesn't turn off the charging port to protect against it, it can damage the wiring, BMS, and worse, the cells. If the BMS does not stop a high current, it can heat up your cells enough to damage them, and damage can lead to a fire, sooner or later (if it doens't happen immediately from a very high current).

If both batteries are at the same voltage when you plug the one into the other's charge port, then this damage is avoided, but there is still no current limiting there, so if your system draws enough current to cause high enough current thru this connection to overheat wiring or connectors or BMS FETs, etc., damage can still happen, and that damage could lead to a fire in some cases.


Your best bet to use a second battery in a system like this is to just stop and unplug the first battery, then slide the new one into place and startup again. That requires a battery of the same casing/connector type as your existing one.

Your next best bet is going to require cutting into that silicone (or hot glue) at the battery end of the controller, but this has a risk of shorting or damaging things and making your system not work at all, potentially requiring a new controller (possibly the specific one from the bike manufacturer).

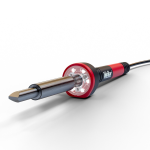
If you do want to do this, you'll need a big soldering iron, something like this 80w weller with a big fat finger-sized tip
1695955929795.png
to hold enough heat to properly solder to those terminals without melting things. (sounds backwards, but this is how it works--apply large heat very short time = less risk of damage than small heat very long time). You will also want to practice soldering big wires to big terminals like this using junk electronics you don't care about, such as old chargers, power supplies, etc., before you try this on your controller--you only want to have to do this once, and correctly, and you don't want to damage the controller or terminals, and you don't want to insufficiently solder the wires to the terminals or they may fall off and short and damage things or start a fire.

There are professional tutorials and guides out there on exactly how to solder the wires to the terminals for proper connection (you do not want to have the solder be the conductor, it is only there to "seal" the connnection, so you have to first connect the wire securely to the terminal before you solder it).


Then you'll have to clean the silicone/etc from around the terminals that you need to solder to. First test your main battery to find out which is + and which is -, and mark those on those terminals on the controller. You only need to unpot the ones actually being used.

Then you'll need to get the right connector for your new battery, and thick enough wires to carry the current from that connector to this point, that are long enough to reach the place you will mount the new battery and run safely along the frame, etc. If possible use wires that are in an enclosing jacket or shroud, like electrical cords are in, so that the actual wires are not exposed outside of the connector and the terminals you're soldering to.

before you actually connect these wires to your terminals, you will need to connect your new battery to the connector with the wires on it, and test with your multimeter which one is + and which is -, and mark them so they cannot be confused or miswired, then remove the new battery from the connector, and the old battery from the terminals, and only then solder the wires to the terminals.
 
I want to summarize so far
==================
-1-removing the putty and soldering those thick terminals is an option but the soldering thick metal can heat up and damage other things in the controller ( the wires in the controller are VERY thin). Then i would need a specific controller from China
-2-charging the 10Ah battery from the 20Ah battery seems possible but the existing female charging plug on on the 10Ah battery only supports up to 5Amps. The 20Ah battery could dump more than that because there is no current limiting on it.
-3-connect 20Ah battery into the female charging for 10Ah IF i can put a 4-5Amp current limiter in between WITHOUT dropping voltage. Not sure how to do this or if it is easy
4-install a second female charging port on the 10Ah battery , port rated for 20Amps for which i'd use 12awg wires to connect into the 10Ah battery directly. If possible ... if enough room ... gotta inspect this option
-5-disconnect the existing battery and plug in the 20Ah battery in the 4 pin connector... one issue with this is the 4 pin connector is that the 4 pins will be exposed and any splash of water , rain ... will EASILY short it. A 2nd issue is that i need to remove the 10Ah battery and put it somewhere on the bike
 
When I run 2 batteries, I just use an XT60 splitter cable which has 2 male and one female connectors, and plug both batteries into it.

First I make sure both batteries are charged up to exactly the same voltage so I don't have one trying to charge the other at a great current causing damage.

When they are flat I disconnect them from the splitter cable and charge each one separately. Keep it simple


Of course if you don't use XT60 then get the appropriate splitter cable for your connectors.
 
There is no splitter for the connectors; the connectors are the blades on the controlelr taht is installed in the battery holder itself, which you can see in the OP's posted image.
 
Your next best bet is going to require cutting into that silicone (or hot glue) at the battery end of the controller, but this has a risk of shorting or damaging things and making your system not work at all, potentially requiring a new controller (possibly the specific one from the bike manufacturer).
Another option is to check if the controller case has continuity with the ground wire (or their pins). If so, to avoid the silicone thing, scrape through the insulation of the fat red wire sticking out of the potting, enough to solder the parallel positive conductor. Assuming routing would follow the other cable exiting the controller, pick up the ground connection at one of the screws holding down the wire harness.
I'd further split that set of parallel conductors, and use the second set for bulk charging the two packs through the discharge port to 90%. Once or twice a year, remove the parallel connection in order to charge each battery separately if you ever want to balance.
 
It's safer to do it at the controller, with no battery connected.

Doing it at the battery means live electrical connections being connected to other live electrical connections....

For someone experienced at this stuff that's not such a big deal, but for the inexperienced it is hazardous, and there is a potential for damage or accidental connections that can lead to a fire.


Always suggest the safer method when helping someone who you do not know the capabilites and conscientiousness of. ;)
 
There is no splitter for the connectors; the connectors are the blades on the controlelr taht is installed in the battery holder itself, which you can see in the OP's posted image.
Leave the controller alone!
Open up the batteries and solder on some connectors you can attach to a splitter.

Remember to charge the batteries separately whilst disconnected from each other, else you risk cell imbalance.
 
Doing it at the battery means live electrical connections being connected to other live electrical connections....
So, remove the battery fuse prior to undertaking modifications, and modify downstream from the fuse. I.e. splice/solder on, or in the vicinity of, the female portion of the terminals inside the battery case.

Crimps are likely better for a beginner.

Utilising the prewired charge port should also remain on the table. Yes, only 5A, but nothing a <5A fuse can’t solve.

Hacking the controller makes me uncomfortable, and I’m not prone to squeamishness about these matters. I know the work will be invisible, but the memory of the ugliness lying beneath will always remain.
 
Buy another Hailong pack with the cradle. That will keep it snug on your rack, and you swap batteries when needed. You don't need to buy a cradle with the controller inside either. Trouble is there are so many different Hailongs and it's easy to buy the wrong model.

A two foot long cable from the rack battery to the downtube cradle isn't really good. I could envision opening the downtube battery and tapping into the wires coming off the blade connector, but there is not a lot of room inside a 10AH Hailong case. It's also hard to solder to that connector and the plastic can melt. You would want to tap into the wires. I'd mount thw connector on the case too. Then you have the usual risks of running parallel and making a dumb user error.

I think going thru the charging port is a poor option as it aggravates the potential for user error,
 
I have a bunch of those four blade connectors and sockets laying around here from buying batteries and getting given various discharge adapter plates. They are easy to buy on AliExpress too.

If I really wanted to wire that controller into two parallel batteries, I'd probably just connect my own four blade connector into the original battery instead of connecting the controller package's four blade connector to the battery. Then I'd have pigtails coming off my four blade connector and could make a y adapter there to wire in the second battery in parallel. Then I could add a four blade socket to the y adapter and plug the original controller package into that.
 
I actually bought some 4 pin connectors to try and do that... if I connect my own 4 blade into the original battery.... then I cannot slide the battery in place on the frame
.
.
I have a bunch of those four blade connectors and sockets laying around here from buying batteries and getting given various discharge adapter plates. They are easy to buy on AliExpress too.

If I really wanted to wire that controller into two parallel batteries, I'd probably just connect my own four blade connector into the original battery instead of connecting the controller package's four blade connector to the battery. Then I'd have pigtails coming off my four blade connector and could make a y adapter there to wire in the second battery in parallel. Then I could add a four blade socket to the y adapter and plug the original controller package into that
 
ANY Random ideas on how to connect the 2nd "rack" battery are appreciated ?
Use one battery at a time, takes but a second to unplug old battery and plug in the new battery.
Using two batteries will make things easier, not as much demand on both then one at a time.
 
More good options.

I like doc’s hailong swap system one the best.
- No rewiring required
- No danger from non-aligned pack voltages
- Retains the option of joining the packs in any way you see fit in the future

I thought you’d already ordered the rack battery though.

Anyway, I think you’ve got an almost exhaustive range of options now. Good luck choosing.
 
Use one battery at a time, takes but a second to unplug old battery and plug in the new battery.
Using two batteries will make things easier, not as much demand on both then one at a time.
You wont get the same range as using 2 batteries in parallel. The faster you discharge a battery, the lower percentage of it's rated capacity you can get from it. Putting the 2 batteries in parallel halves the discharge rate. Many batteries have their capacities rated at a 10hr discharge, so if you discharge them in a shorter period of time you don't get the rated capacity.
The choice is yours, convenience vs capacity and battery life.

Here are some comparison charts on discharge rates
 
Last edited:
@lnanek

.
PLEASE CORRECT ME IF I AM WRONG
.
-1- It seems like the 10Ah battery has 14Awg wires inside so i cannot connect into those wires directly
.
-2- Solution A - I can replace the wires inside the 10 Awg battery and replace the 4 blade, with 12Awg and a new 4blade, and create a Y with X60 connector and plug in the batteries in parallel ... DOWNSIDE they have to be charged similarly , very close 48volts
.
-3-Solution B - remove the 10Ah battery from the frame and move it in the rack, and plug in directly the 20Ah battery into the 4 blade ...DOWNSIDE the 4blade polarity is easy to mess up and i need to carry the 10Ah battery in the back rack somewhere
.
THOUGHTS ????????????????????
.
 

Attachments

  • 20230930_155106.jpg
    20230930_155106.jpg
    2.1 MB · Views: 4
Back
Top