This is for a Dapu front geared hubmotor on a Pedego latch 2016, but it should work for any hubmotor whose sidecover as a whole unscrews (is not bolted on), and has the same ~70mm diameter spacing of the four tool notches on the non-brake side.

I was going to make a tool, but Cvin found an existing tool that works perfectly for it, for about $20, a GearWrench 4-wheel-drive spindle wrench, which uses a regular 1/2" drive socket wrench:

The only modification I would recommend is cutting a large notch halfway between two of the drive tips, to allow the motor cable to fit in it and not be damaged (in case you're opening the motor for some other reason than replacing that cable).
It's easier to use if you have a drive wrench on a T-bar, but any will do if you can apply enough vertical force on the tool to keep it in the cover notches while turning, and the wrench is long enough to give enough leverage. (I used one over a foot long) I recommend placing the whole wheel on a bucket, and leaning against the tire while hugging it to keep the rest of the wheel and motor case from turning while you unscrew the cover plate.

First you have to remove the lockring

then use the spindle wrench to turn it clockwise to unscrew it.

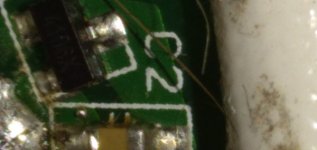
Broken cable (speed sensor wire), the reason for doing all this

and the extension cable i'll use to replace the cable with since the original is too short to pull thru the axle and splice, and the break is *at* the axle

Magnets in cover; there is only one in the six slots, so this is a 1-pole sensor system (rather than the six that are used on other such motors)

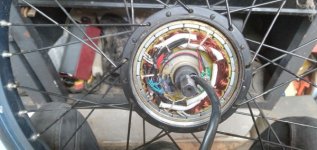
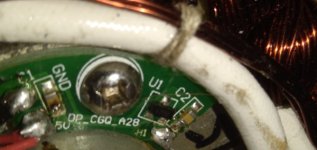
this is the sensor inside the motor

This all started because Cvin had a Pedego bike that was to be repaired by the local service center; the previous owner broke the system's speed sensor wire in the motor cable when taking the wheel off and putting it back on so it didn't read speed and thus wouldn't operate on PAS for more than a few seconds (throttle worked fine).
The repair center misdiagnosed the problem as the controller and so couldn't fix it, because they were trying to but unable to locate a controller (which wouldn't have fixed it) for a year.
It was very fast and easy for me to diagnose that it was the hubmotor, not the controller, simply by hooking up another Pedego hubmotor (from a second bike) with the same standard Julet connector, whcih then made this bike work, and then verifying the other was bad by hooking it up to the other working bike.... AFAIK they knew that the motor cable was damaged, but they didn't apparently realize that this is what broke the speed sensor.
I was going to make a tool, but Cvin found an existing tool that works perfectly for it, for about $20, a GearWrench 4-wheel-drive spindle wrench, which uses a regular 1/2" drive socket wrench:
The only modification I would recommend is cutting a large notch halfway between two of the drive tips, to allow the motor cable to fit in it and not be damaged (in case you're opening the motor for some other reason than replacing that cable).
It's easier to use if you have a drive wrench on a T-bar, but any will do if you can apply enough vertical force on the tool to keep it in the cover notches while turning, and the wrench is long enough to give enough leverage. (I used one over a foot long) I recommend placing the whole wheel on a bucket, and leaning against the tire while hugging it to keep the rest of the wheel and motor case from turning while you unscrew the cover plate.
First you have to remove the lockring
then use the spindle wrench to turn it clockwise to unscrew it.
Broken cable (speed sensor wire), the reason for doing all this
and the extension cable i'll use to replace the cable with since the original is too short to pull thru the axle and splice, and the break is *at* the axle
Magnets in cover; there is only one in the six slots, so this is a 1-pole sensor system (rather than the six that are used on other such motors)
this is the sensor inside the motor
This all started because Cvin had a Pedego bike that was to be repaired by the local service center; the previous owner broke the system's speed sensor wire in the motor cable when taking the wheel off and putting it back on so it didn't read speed and thus wouldn't operate on PAS for more than a few seconds (throttle worked fine).
The repair center misdiagnosed the problem as the controller and so couldn't fix it, because they were trying to but unable to locate a controller (which wouldn't have fixed it) for a year.
It was very fast and easy for me to diagnose that it was the hubmotor, not the controller, simply by hooking up another Pedego hubmotor (from a second bike) with the same standard Julet connector, whcih then made this bike work, and then verifying the other was bad by hooking it up to the other working bike.... AFAIK they knew that the motor cable was damaged, but they didn't apparently realize that this is what broke the speed sensor.
Last edited: