Donor for tall guys

e-beach said:
Sanding. Give it several coats, let it dry completely. Give a light sanding with a fine grit sandpaper to smooth it out. It will dull but will get shiny again when you give it a gloss coat. The gloss coat is where you will need the super fine sand paper to smooth it out while still polishing it to a glass like shine.

I tried this technique on my test pipe. Hit the paint with wet sanding 400-800-1000-1200-1500 and it did exactly what you said. Smoother but dull. Just hit it with some clear coat to see how it comes out, but it already looks better.

When you say several coats, Ive been wondering. Is it better to hit it completely within the 1 hour time frame, or after 48 hours as suggested on the can?

Should I bother sanding between coats of paint?
 
giving a light sanding before adding a coat gives the new coat something to bit into. I have done both paint, wait an hour and paint some more without sanding, and I have painted, waited a couple of days and painted and waited and painted again. I found the results to be about the same. You really want to get enough paint on the bike to be able to sand out any perfections without sanding to the primer. However, if you sand down to the primer repaint again.
 
I figured out that I wasn't using enough paint. I was way too conservative and not getting that glossy 'wet' look while painting. It's a fine line though between that and overcoating where you risk runs. I was able to get a nice shiny coat on the frame with minimal orange peel. Will hit it and the forks with another coat tomorrow. This 48hr wait time between coats is dragging this out more than I like however. I was kind of hoping to have the frame ready when the battery gets here, but I may still be doing clear coats at that time.
 
Yea, good home paint jobs take time. Unless you have a bank of heat lamps. The paint and clear coat really need to be dry enough to sand down leaving powder behind, not clumps in the grit of the sandpaper. If you want a super shiny clear coat, you will need to do the same thing, several coats, then medium to ultra fine sand paper to polishing compound to wax if you want it.

:D :bolt:
 
DIY paint jobs give you a unique opportunity to enhance the security of your bike. Paint with a brush/mop/soup ladle to decrease the likelihood of theft, or use wet sanding and clearcoat to increase your chances of getting a bike ripped off.

I'm usually cool with whatever raggedy paint my bike's long life in the world has left behind. That provides enough protection for a bike that's used and maintained regularly and stored inside.
 
Haven't updated in a while since I was waiting for some parts.

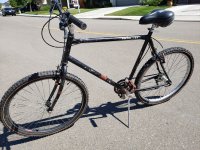
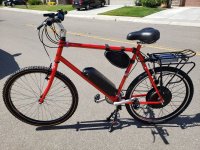
The paint job did not come out as I hoped, but it's much better than how it looked before, and I'm still very happy with it. I tested the clear coat wet sanding and polishing on my test piece, which came out great. The area of my forks that I tried it on, did not. Really needed some better clear coat and several more layers at that. I reglossed the forks and left the frame as is with the slight orange peel and all. I figured it would be covered with so much stuff it wont make a difference.

The rest of my parts came in, as did my battery, so I went straight to work a few days ago on it all. I still have some adjusting to do on the brakes and derailers, and need to tidy up the wiring, but I wanted to take it for a test drive and make sure everything was working properly. I used an XT60 connector for the battery connection to the controller. I forgot to put the damn PAS on the crank before installing, so it will have to wait for another day if I ever even decide to use it.

Some of the additional parts I ordered are:

I replaced the old caliper brakes on with a set of Shimano BT-T4000 V brakes:
https://www.amazon.com/gp/product/B00MWHDNT4/ref=ppx_yo_dt_b_asin_title_o02_s00?ie=UTF8&psc=1

Replaced the worn out pads on the other stock V brakes with a set of Kool-Stop pads:
https://www.amazon.com/gp/product/B001CLSWKQ/ref=ppx_yo_dt_b_asin_title_o01_s00?ie=UTF8&psc=1

Grabbed a center adjustable kickstand (Lumintrail centermount):
https://www.amazon.com/gp/product/B01M1DUBM6/ref=ppx_yo_dt_b_asin_title_o01_s00?ie=UTF8&psc=1

....and and ibera bike rack for the controller and future basket/saddle bags:
https://www.amazon.com/gp/product/B002T5H8MW/ref=ppx_yo_dt_b_asin_title_o01_s01?ie=UTF8&psc=1

I still need to look up how to use the LCD since there's really no information on how to configure the damn thing or what the settings mean.

Anyhow, below are the before and after pics.

I believe the breakdown of was cost about:

Bike $30.00
Conversion kit $210.90
Battery $453.00
Kickstand $18.99
Brake pads $13.42
Rack $33.49
V Brakes $15.73
Paint supplies: $40
TOTAL: $815.53

Not too far over budget. The battery is what really cost more than I was expecting, but I did splurge on a more expensive and higher capacity pack than I was planning.
 

Attachments

  • bike-before.jpg
    bike-before.jpg
    376.3 KB · Views: 1,376
  • bike-after.jpg
    bike-after.jpg
    372.7 KB · Views: 1,376
Came out nice! Good example for the before and after pics thread:

https://endless-sphere.com/forums/viewtopic.php?f=6&t=235&start=1800
 
Looks good, but you don't say how it rides/works? Hopefully you are pleased.

Here's a link to a PDF that gives instructions for the LCD/controller setup.

https://download.elecycles.com/manual/Display-Manual/LCD5-display.pdf

It seems like the money you saved on the bike purchase went a little bit toward new brakes and other misc. and perhaps a bit toward the battery. We were pretty sure that the $700 budget would be tough to hit, but $800 and change isn't too far off.

I think you still want to get a torque arm of some kind installed - even though you have steel dropouts. Also, that controller will disappear a bit visually if you paint it with semi-gloss black paint to match the rack. And the more you ride/commute, the more you'll probably want fenders.
 
It looks good. FWIW, I don't think you would have come out ahead trading IT work for a powder coat. Once they have your number, most small businesses want hours of free phone support. But if they are friends, then they probably already have your number.
 
RunForTheHills said:
It looks good. FWIW, I don't think you would have come out ahead trading IT work for a powder coat. Once they have your number, most small businesses want hours of free phone support. But if they are friends, then they probably already have your number.

Set boundaries and give them the idea that your time is valuable and you'll be ok :)
I love trading work for work, since no capital gets exchanged. You just have to be professional and treat them like any other customer. Mark your hours down, set a rate, etc.
 
Looking good! You did a nice job. Defiantly a candidate for the before and after thread. A couple of thoughts..... That front tire is not the one for best traction, hopefully you have plans for that. Also, controllers are water resistant, not water proof. So, if you are going to keep a controller there, think about fenders.

:D :bolt:
 
e-beach said:
Looking good! You did a nice job. Defiantly a candidate for the before and after thread. A couple of thoughts..... That front tire is not the one for best traction, hopefully you have plans for that. Also, controllers are water resistant, not water proof. So, if you are going to keep a controller there, think about fenders.

:D :bolt:

Oh, and be sure to let security know that the black box on the down tube is a battery so they don't worry about calling the bomb disposal team. :wink: :lol:
 
wturber said:
Looks good, but you don't say how it rides/works? Hopefully you are pleased.

I didn't really have time for more than a 1/2 block run before I had to run errands with the family, so I didn't have a good sample when I posted. Just got back and took it a few blocks more.

First impressions: The motor makes a slight whine when first starting out, but is as smooth as butter afterwards. Not sure if that's normal or not. Perhaps I have the controller on the wrong setting. I'll check out that link you posted and get educated on it. Other than that, the ride is solid. It gets up to speed smoothly. I got it up to ~25mph and backed off. Lots of fun!! :D

wturber said:
I think you still want to get a torque arm of some kind installed - even though you have steel dropouts.

I'll add it to my list. Need to order a bike cover as well. My torque wrench is not reliable, so I hit the right side bolt with my cordless 18V impact wrench for the time being. The left side, where the motor wires exit, had to be done box wrench style.

wturber said:
Also, that controller will disappear a bit visually if you paint it with semi-gloss black paint to match the rack.

I almost did that since I had semi gloss black I used on the pedals and such, but was concerned about weakening the thermal effectiveness of the heat sink case by insulating it with black paint. Since it's exposed to the air, and I've seen folks bury theirs in bags, I imagine it shouldn't run that hot. Especially for the short trips I'll be taking. It's only zip-tied on, so I need to make get a more permanent solution for mounting anyways with a trip to the hardware store, so I will probably paint it when I take it out.

wturber said:
And the more you ride/commute, the more you'll probably want fenders.

I thought about this when I realized how exposed the controller was to the rear wheel path. I'll have to put it on my list as well down the road.
 
RunForTheHills said:
It looks good. FWIW, I don't think you would have come out ahead trading IT work for a powder coat. Once they have your number, most small businesses want hours of free phone support. But if they are friends, then they probably already have your number.

They have my number, but I'm not cheap. $100/hr usually keeps most 'friends' at bay. I do so hate doing side IT work regardless as there is no time frame that stops the work you did from being the source of a problem weeks down the road. :roll:
 
e-beach said:
Looking good! You did a nice job. Defiantly a candidate for the before and after thread. A couple of thoughts..... That front tire is not the one for best traction, hopefully you have plans for that. Also, controllers are water resistant, not water proof. So, if you are going to keep a controller there, think about fenders.

:D :bolt:

I know nothing about bike tires. What would be a good replacement (budgeting)?
 
Cool. Sounds like it is running just fine. You'll probably find yourself making excuses to use it for more traveling.

The growling is normal at low RPM. At higher RPM you will notice a sort of ringing noise when power is applied to the motor. This is all due to the square wave impulses being fed to the motor and is normal. My understanding is that a sine wave controller will get you pretty much silent operation. I start out in low gears to help the motor out a bit when starting. It probably isn't necessary to do that though.

I don't think painting the controller black will insulate it in any significant way. In fact, it may improve black body heat radiation. That said, the main cooling is convection so decent airflow is all you need. Also, if you intend to add pannier/saddlebags, then there's no point painting. I painted mine in order to disappear it, but when I added battery cases on the side it became pretty much completely blocked. I live in Fountain Hills, AZ with 100+ degree summers. My controller doesn't have any heat problems being painted black.

The more water you encounter, the sooner you'll want the fenders. In the meantime, a bit of silicone sealant at the cable entrance to the controller will probably prevent any real problems for you. Even though I live in a relatively dry climate, I'm pretty convinced that fenders are important for a utility commuter bicycle. So I'd add them regardless of the controller's exposure.

Looking forward to hearing how the bike works in its intended use.
 
I am another vote for fenders. They are not just useful for riding in the rain. After the rain or even from sprinklers or water leaks, there will be a lot of puddles that you can just ride through with fenders and not get wet.

neptronix said:
Set boundaries and give them the idea that your time is valuable and you'll be ok :)
I love trading work for work, since no capital gets exchanged. You just have to be professional and treat them like any other customer. Mark your hours down, set a rate, etc.

Yes, that is the way to handle it. There are exceptions, but I have found that small companies (<10 employees) will try to milk you for free support. Fortunately, I don't have to deal with small companies anymore. The industry has moved to managed services for that type of customer anyway.

rootshell said:
They have my number, but I'm not cheap. $100/hr usually keeps most 'friends' at bay. I do so hate doing side IT work regardless as there is no time frame that stops the work you did from being the source of a problem weeks down the road. :roll:

Yeah, that is the problem with side work.
 
Painted the controller matte black and cleaned up all the wiring. Looks much better now. I discovered that I had the tires underinflated, but don't have a presta adapter for the front, so I'll have to pick one up tomorrow.

I am having problems though with the controller/LCD, which sucks since I painted it and siliconed the output, so a return/exchange is probably out of the question. If I leave the battery plugged in, eventually it will not power on properly. After I first plug the battery in, the LCD powers up and everything works as expected. When I come back to the bike after an hour or two, and press the power button on the LCD, it lights up briefly and then goes out. The only way to get it back to normal functionality is to unplug the power to the controller and back in.

I've sent an email to the ebay seller, so we'll see if I get some support from them.
 
If you don't get help from the seller you could put a toggle switch or normally-closed momentary button on the power lead of the LCD.

As for tires, depends on your roads and riding conditions. Is your facility is mostly paved, or dirt roads, etc. The types of things that might puncture your tires should be considered. There are no really-good tires ones out there. All of the seem to puncture. The back tire seems to get it more often. People around here like Schwalbe Marathon although they are not a budget tire. I used to use Bontrager H2 Hard-Case tires. (Also not a budget tire) They would last about 4000 to 4500 miles with few punctures. Now I just run inexpensive Vee-Rubber tires with thorn resistant tubes and have had about the same luck as far as punctures as the expensive tires.

I stopped using Slime puncture sealant because it didn't work for me as advertised. It only made a mess when I got a flat. I also stopped using Slime tire liners because they would slice the tubes open.

My preference is for 1.5 inch tires because they seem to be more nimble with just as much traction as 2 inch tires.

I would also recommend an extra tire and tube on the shelf for easy access if needed.
 
rootshell said:
Painted the controller matte black and cleaned up all the wiring. Looks much better now. I discovered that I had the tires underinflated, but don't have a presta adapter for the front, so I'll have to pick one up tomorrow.

I am having problems though with the controller/LCD, which sucks since I painted it and siliconed the output, so a return/exchange is probably out of the question. If I leave the battery plugged in, eventually it will not power on properly. After I first plug the battery in, the LCD powers up and everything works as expected. When I come back to the bike after an hour or two, and press the power button on the LCD, it lights up briefly and then goes out. The only way to get it back to normal functionality is to unplug the power to the controller and back in.

I've sent an email to the ebay seller, so we'll see if I get some support from them.

Maybe a memory leak? Is there a firmware update available for it?

MTA: It looks like you have the KT LCD5 display, so maybe the open source firmware would solve your problem.
https://endless-sphere.com/forums/viewtopic.php?t=87870
 
rootshell said:
I am having problems though with the controller/LCD, which sucks since I painted it and siliconed the output, so a return/exchange is probably out of the question. If I leave the battery plugged in, eventually it will not power on properly. After I first plug the battery in, the LCD powers up and everything works as expected. When I come back to the bike after an hour or two, and press the power button on the LCD, it lights up briefly and then goes out. The only way to get it back to normal functionality is to unplug the power to the controller and back in.

I think it is possible that the issue is with the battery, not the controller and LCD. I suspect that the battery is shutting off power.

I have an LCD5 like yours and I went out and did this simple test. Put power to the controller, powered on the LCD, waited a few seconds and powered the LCD off (long-press on middle button). I then unplugged the battery power. With the battery unplugged, I long-pressed the middle button to power the system on. The LCD energized. The backlight came on, and then everything went dark. Apparently there is enough residual power in the system to do this. This seems like the same behavior that you are seeing.

So I would confirm power from the battery before suspecting/investigating the LCD/controller. Perhaps the battery is protecting itself from a low ma trickle drain?

BTW, I don't think it is such a bad idea to have a disconnect between the battery and the rest of the system. I use a spark suppression XT90 connector for this and as my main power "switch". I disconnect the battery any time that I don't plan on riding within the next 24 hours.
 
wturber said:
I think it is possible that the issue is with the battery, not the controller and LCD. I suspect that the battery is shutting off power.

Winner, winner. :D

It is indeed the battery disconnecting. I would agree that it's probably to prevent parasitic drain. I don't need to reconnect the battery to re-initiate the connection either, or wire in a momentary disconnect switch. The EM3EV battery unit has a power button on the side which I mistook for a charge level indicator button, since it lights the LED"s correspondingly based on charge.
 
Cool. Glad that there isn't anything defective. Especially since I suggested painting the controller. :^)
 
Just an follow-up after my first month with my bike.

It's most convenient, more-so than I anticipated. The ability to get to and from my car at my own pace based on my schedule is exactly what I was looking for. This thing is great.

It's a lot of fun to ride. It's hard not to abuse the fact that I can get everywhere without even using the chain. I've found that after the first week of 'range' testing, I pedal most of the way if I'm not in a hurry. It's a good way to get the blood flowing after sitting in my car for an hour after my commute.

Speed: I've had it up to 29mph on level ground. Not too bad with the weight of the bike and myself.

Range: I'm not sure when the thing goes dead after hitting 'empty', but believe I got about 12 miles out of it in the first week with NO pedaling before the battery icon went blank. After the first week, I began mixing my own effort in and got about 23 miles before deciding it would be good to recharge the battery.

About the only thing I would do differently on the next build would be suspension. Regardless of the road, you still feel a lot of it with this steel frame.
 
Back
Top