dogman dan
1 PW
This is a rewiew of the 36v front hub kit from E-BikeKit. The kit was offered to me free in exchange for a detailed and honest review. Those who know Jason won't be suprised that he offered the kit to me free, and those who are familiar with my reviews of other motor kits will know that I will not sugar coat anything to get a free motor. I will ride this kit hard for at least 500 miles and try my best to break it, and then tell all about it here, good bad or ugly. If I really like it, I'll advise many to buy one too.
The smiley ratings is for those who don't want to read every word.
 = It does function or was not entirely satisfactory.
= Its okay, or average.
= It meets my best expectations, very good.
or more= Very happy with it, or beyond expectations. Very very good.
Starting with first impressions, once the deal was struck, the motor was shipped within 24 hours. That's very nice, but shipping within 72 hours would be fine by me. Taking a week , or a month would be unacceptable.
The box.
When the motor kit arrived the box was in very good condition, and had an interesting design that made it two layers thick on the sides where axles like to poke through. Nice. Opening the box, we see excellent packing, with the foam blocks to keep the rim centered and foam donuts on the axles. First class packing makes it unlikely that the rim will arrive bent, or the threads stripped on the axle.
Instructions book.
Well written instructions, with pictures, clearly not translated from chinese. What an idea!
The rim and hub.
The rim is a good one, not a brand I recognize, but a good quality double wall rim. It arrived in good straight condition. Black and silver just like the one on the rear of the bike I'll put it on, so that was nice even if purely by chance. The hub is a bit larger than others I've tested, approx 9.5 inches diameter, painted black. It has one nice feature, a protector for the wires coming out the axle. The wires go through a hollow axle which protects them a bit better in case of spinout, and also allows more of the threads to contact the nut. Others have a slot milled down the side of the axle which can make it easier to screw up and strip a nut. A last nice touch is an arrow stuck to the motor indicating which way it turns when it runs. One of the nice features of this motor is that it has a rubber seal to keep water out of the hub. It just makes it that much easier to get it right on the first try when you put the motor on the bike.

Controller
The controller looks good, Like I could tell the difference. I'm the take it out and try to break it tester, not the electronics genius. Only two smiles for the controller because I like an on- off switch. If you buy the battey with the kit, there is an on off switch on the battery box.I also like some kind of led to tell me the power is on. The throtte doesn't have lights for good reasons, but the controller could have a led to let me know the power is getting through from the battery. It just makes it easier to troubleshoot if you can say, Yup the controller is definitely powered up. But there are nice features on the controller too. It's well waterproofed, with nice gaskets for the wires to come out, and looking inside, I see 63v caps. So it appears 48v capable. It's small enough to be easy to find a mounting place for it. On the back, the spec sticker says 22 amp, 36volt. the wiring has some chafe protection on it which helps in the rough ol real world out there. Anderson connectors on the battery wires and the motor power wires makes those critical connections solid for 30 amps. There is a jumper wire with a lable on it that when connected, will limit the wattage for those in places where 200 watts is the legal maximum.


Throttle.
My kit came with all three kinds of throttle so I could evaluate each one. The kit can be ordered with thumb throttle, half twist, and full twist grips. All come with both handgrips, even the thumb throttle. There is not battery lights on the throttle because they can cause a short when a throttle gets wet, resulting in a stuck on throttle condition. With todays lithium batteries, the low battery lights on typical 4 wire throttles are useless except to tell you the battery is connected. I missed taking a pic of the throttles but I'll get one later.
Ebrakes.
The handles look like good quality units, all metal which I prefer on an ebike. Shaving a few ounces with plastic is not needed on an ebike. Opinions vary on the need for ebrakes, but they can make the bike safer if the throttle sticks in the on position. If a kit provides em I usually use em. The motor kit works fine without them if you just hate having the extra wires on the bike.
Torque arm
This is the first kit that came with a torque arm I've recieved. It's a very nice one with adjustable angle to fit most bikes. At 3/16 thick it looks beefy enough to stop a spinout if your axle nuts get loose. Allways a good idea, especially with front hubs. Many feel they are mandatory, but I'm one of the few that thinks not, at least at 36v anyway. Just my opinon, what's mandatory is properly installing the motor on good forks for a motor. As I said, allways a good idea, like using the seat belt in a car with air bags. So why not include the torqe arm in the kit?

Other goodies
Jason did a great job trying to make the kit really complete. He provides a spoke wrench, zip ties, allen wrench, a battery connector wire with andersons, and a nice T shirt with the E-BikeKit logo. A few other tools are needed to complete the install, but nothing most people don't have. You'll need a wrench for the axle nuts, tools to put a tire on the rim, and maybe you'll need to adjust your brake shoes. I liked the inclusion of the allen wrench. I never lose those little things in the garage so it's great they put one for the throttle in the box, along with the zip ties needed to wire the frame.
Installing the kit I just maxed out on adding pictures to this post, so scroll down and I'll post some pictures in another post of the installation.
Installing the hub on the forks is easy, and I had no issues since this particular bike has had two other front hub kits on it. So I know from the start I will have no problems with getting the axle into the dropouts. My commuter bike is a cheap Mongoose mountain bike with full suspension. Many modifications have been made to it, for my comfort, to support heavy batteries, to have higher gears, etc. But the front forks need no modification for installing this motor.
The bike has suspension forks, but they are the all steel, pinched tube type. The dropouts are very thick and strong on this type of fork. The motor has lots of clearance so installing on these forks is no problem. As the instructions emphatically state, DO NOT use aluminum alloy forks with a front hub motor, EVER. Pay close attention to getting the washers right. I installed the wheel with the washers exactly as they were when they arrived, in place , on the axles. The inner washer goes between the hub and the dropout, then the tourque washer with the tab on it goes outside the dropouts. The tab goes into the dr
opouts facing down, so it fits into the dropouts. There is not one thing more important than getting this right. The washers need to make full contact with the metal, and not be spanning any gaps from "lawyer lips" on the forks. Quick release hubs often have a smaller cup for the QR axles that leaves a gap under the washer. If that gap is covered by the washer, it can later cause the nuts to loosen, or cause a force that spreads the dropouts. So get that washer to fit perfect, or look for other forks. I like to tighten up the nuts gradually on the first install, giving time for the washers to settle in, and then tightening some more later. I use a short handled wrench, a small crescent, so I don't over tighten and strip a nut. Don't rush this, just tighten some, then work on the controller or wiring, and then tighten a fraction more. If the axle wants to squirm out of the dropouts, this is a BIG RED FLAG that your dropouts don't fit the washers. Never file anything more than excess paint off your dropouts.
The torque arm. I installed the torque arm on the side with no wires, and after emailing Jason, I'm told to put the arm behind the fork if possible, but it will work on the front if it fits better that way.
The motor wires are all bundled in one protective cover, so the wiring is pretty easy. This kit has the only connector back at the controller. There is a good reason for this, making it easier to waterproof the whole system. The controller can be located in a protected area, and then there is no vulnerable connector down on the forks. But this does make it a tad more difficult if you have a flat tire, and need to remove the wheel. My personal solution to this, is to use small velcro strips instead of zip ties to secure that wiring to the bike frame and forks. Twice now I've had a wire get into the tire and rub a hole in the insulation, so pay particular attention to wiring the forks so they can't squirm around. With suspension forks you get some extra movement that tends to cause this to happen.
Installing the controller.
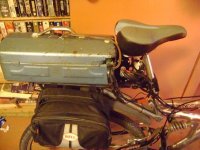
There is plenty of wire to install the controller just about anywhere on the bike. Several kits I have recieved have had just about 6 inche less wire than I'd like to have. One of my bikes is a semi longtail cruiser, so for that bike I need the extra six inches. On this commuter mtb, there is plenty of wire to reach my favorite location, and if I liked, I could install it further back on the rear rack. I carry my battery in a steel toolbox on the rear rack, and I like to locate the controller on the front of it, screwed to the toolbox. This gives the controller lots of cooling air, but makes it easy to cover with a trash bag if the bike is parked in the rain.
Installing the throttle.
Easy as pie, unless you can't get the old grips off. I use windex and tweak the rubber with a screwdriver to get the windex in there. Since you get new grips in the kit, you could just cut off the old ones with a razor knife. There is enough extra wire on the throttle to accomodate big beach cruiser handlebars. Leave lots of slack for the front wheel to turn. I chose to try the half twist first, it's my preference of throttle types.
Connecting the wiring.
It's allways something eh? This should have been super easy, but I managed to screw it up. The connectors are obvious which goes where so you can't mix em up. The battery connections are andersons, so they match what I have on my battery. If not, the kit comes with a bit of wire with the andersons you need on it. When I plugged it up everything seemed ok, but then the motor wouldn't run. :x By now I can troubleshoot wiring pretty good, but a noob would not be so calm. Right away I see one of the big wires to the motor is not connected. A factory defect, the wire has come out of the anderson contact. The power wires are not 12 guage, so crimping them properly is a bit harder for the technician that does it. A quick fix for me, since I have contacts and a cheapie crimper. All fixed, I turn the trottle again, and it runs. But what? It stutters like heck, and shuts down after rolling about 3 feet. :x
  Doncha love this when you are raring to go for the first ride? Looking again, I see that one of the halls wires has come out of the plug. This one is super easy to fix, the contact is fine, it just didn't click into the housing quite right, and shoved out when I plugged it in. I suppose a little bit of paying attention to what I'm doing would help eh? My fault for not noticing it, I'm just old and going blind. Just one of those stuff happens deals. At least it shows that Jason didn't send me a throughly pre tested kit, but just pulled one off the stack. No product is 100% perfect, and I bet only one in hundreds of kits would have either of these problems. The E-BikeKit customer service would have easily helped a noob deal with these problems I encountered. Try that with the Ebay guy from China!
One extra connector is left after everything is hooked up. It's labled and engages and disengages a speed limiter. So if you live in a place with a strict watt limit, leaving it connected gives you a legal bike in those places. But off road, where watts aren't limited, simply disconnect the jumper and have the full watts. On another kit, I found using the low watt setting was a great way to get extended range if you need it. It can be hard to ride with very low throttle settings all day and using the low watt setting makes it easier to ride slow when you want to.
First Ride
How can you give enough smileys to that first ride down the block with a new ebike? The EV grin never goes away for me. It can be hard to really tell without scientific instruments how a motor compared to others, but this one seems to have a nice pull on the first few feet. It just feels good and seems a tad quicker off the line than other motors I've used. I expect that it has slightly better torque at the same wattage than smaller diameter direct drive motors. In this review I intend to only discuss this particular motor kit. Comparisons naming other motors will be made in other threads that discuss that topic. My battery is a 36v 20 ah version 1 pingbattery with 4500 miles on it. It seems to have little voltage sag, and never has a resting voltage under 40V. With this battery, 26" wheel, 60 psi, and a bike with a very upright non aerodynamic riding position I found the top speed to be 21.5 mph on my calibrated speedometer. I just took a 4 mile test run before dark, and found performance to be about what I expected. The motor is slightly noisy, but not loud. Just a slightly audible clicking sound as the rotor passed the magnets. Under a heavy load, you hear the usual brushless motor grunting, but again not loud. It seems to climb a hill fine, but a really steep grade can stall the motor. I'll be doing a better test of hill performance later today. As testing continues I'll add data to this post, keeping the findings easy to locate and look back up later on.
Hill climbing performance , no pedaling torture test.
The motor did very well on this test, noticeably outperforming another 36v motor I have. The test is 1.5 miles long, starting at 5% grade and then steepening to 7% halfway. Starting from a dead stop and not pedaling at all, the motor reached 15 mph on the 5% section, and 13-13.5 mph on the 7%. Stopping and restarting on the 7% part did not lower the top speed up the grade. Temperature was 69F, wind 3mph from behind. Rider weight 180, and the bike with all the stuff on it weighs about 85 pounds. A commuter, it has bags with tools and water etc all over it so it's on the heavy side. 36v 20 ah pingbattery at full charge. The motor did get hot by the top of the hill, but did not get seriously overheated. A second run went slower, with the battery at half discharged, and at the top the second time, the motor was definitely hot. How hot is hard to say, since I have not thermometer installed inside this time, but it was time to rest the motor by the second time up the hill.
I cannot recomend riding steep hills this way (no pedaling), especially in hot weather. It is done only to get data on the climbing ability of the motor. The best way to get up a short hill is to keep the speed above 15 mph by pedaling hard in the proper gear. A really long climb should be done in the lowest gear, using the lowest possibe throttle to keep the load on the motor low. Rest the motor every 3 miles at least if the grade is 7% or steeper. A short stop beats melting a motor when it's 95 F out there.
In normal riding, usually up and down shorter hills, this mortor will be very nice on the uphills, and moderate pedaling should get you up hills nicely. It definitely climbs steep hills at least 2 mph faster than other 36v direct drive motors I've had. Like all moderate wattage direct drive motors, it will struggle a lot more on hills over 7%. More testing later will be done on hills to see how to climb best with this motor.
48v
I just aquired a 48v 15 ah pingbattery, and the controller runs on it fine. It has 63v caps after all, and the battery is 60v. Speed and hill climbing performance are excellent at 48v . 27 mph top speed, and on 7% grade can maintain 17-18 mph for at least a mile without pedaling. Sweet! At 48v you get all the torque with no sacrifice on the speed end either.
Efficiency
I measure power used by Ebikes crudely, by using a killawatt meter on the charger. Assuming that my 20 ah battery delivers 19 ah, I divide the kwh it takes to charge by .042 to get the amp hours used for that ride. The amp hour number may be off a tad, but comparing two motors this way still gives good data on which uses more juice, and the effect of riding on hills, in wind, or at different speeds. Mabye this year santa will bring me a CA, but for now, this will do.
The motor is very efficient, and should be since it does not take the bike to 30 mph at 36v. The 21 mph top speed keeps wind resistance down, which results in a good efficiency number. The normal commute route including a detour took 12.14 amp hours to travel 15.5 miles. One mile of riding is taking .78 amp hours. Range on the whole 20 ah pack should be 25 miles. Bear in mind that this route includes at least 1000 vertical feet of hill climb and there was a slight headwind on the ride! On flat ground with few stops and no headwind, 27-30 miles should be possible with my 20 ah battery.
This is just one ride, and more data will be posted here as it comes in. This motor seems to equal the efficiency of my Fusin 350 watt gearmotor, but climbs hills under 7% much better. The geared motor can climb steeper hills, but with only 350 watts, it climbs all hills pretty slow. the E-BikeKit motor scampers up the 5 and 6% hill on my commute faster than either the Fusin or the Aotema. At the same speed the E-BikeKit motor is close to the same efficency as the Aotema. The Aotema will use more power if ridden faster though.
Full range ride test------------30.6 miles at full throttle on a 36v 20 ah pingbattery. The range test is part of how I track how my pingbattery is doing, so I do a very standardized route. It climbs 400 vertical feet and back down. It's a big square, so I get to ride up, down, and level. I also get to ride in all 4 compass directions about the same distance so results aren't skewed by wind. Temperature affects battery performance so I try to do this on at least a 70F day. Todays test was done at 80F in 7 mph wind.
Range nearly doubles if you slow down to 13-14 mph, so I could very likely ride 45-50 miles if I rode slow.
First ride home------ .51 kwh
second ride-----------.49 kwh
Ride to work, downhill leg, .35 kwh
First ride home on my commute route.
My route home from work is 14.5 miles mostly on back streets, bike path, or road with bike lane. Near the start I climb about 250 vertical feet at about 4%, then on the bike trail there is lots of ups and downs mostly 4% or so, but no permanent vertical gain. 6 miles from home is the big hill, about 400 feet of vertical over a mile and a half. 5% grade with a few spots of 6% and 7%, along with a few flat spots. It's a pretty killer hill, but not super steep. Just long enough to bog down a weak motor or battery. The last 5 miles are false flat, a long slow grade climbing another 150 feet of vertical.
The ride home went just fine, with plenty of speed up the hills mostly climbing at 18-19 mph on the 4% grades, no bogging down on uphill starts, and no overheating. The air was about 75F and a slight headwind. At the end of the ride the motor was about 95F measured at the alxle on the cover. Adding 30 to 40F to that gives an estimated temp inside of 125 to 135F. That temp falls just about where other similar wattage motors I've tested have been in similar weather. No suprise there, the laws of physics apply to all motors. Climbing the big hill, I was going about 15-18 mph depending on the slope, with light pedaling. Along the bike path, it was nice to ride full throttle with no worries about going above 20 mph, and possibly ticking off others on the path. Once all alone on the bike lane at the end of the ride, 30 mph would be nice, but up the slight grade with a light headwind, I still easily traveled 19.5 mph. It's a really good compromise between a good strong motor on hills and starts and a motor that keeps you legal. Others just have low wattage, and end up slow on starts and bog down on hills or headwinds. Even planetary gears doesn't cure weak. This motor is nice and strong, but not street illegal in the US. Some don't care about this since the cops ignore them, but some places over 20 mph could get you kicked off bike trails. For instance where I live, the local riders on the mountain bike single track trails have no problems with me or my electric bike on the trails. Were I to have a 35 mph bike on those trails, I would not be wecome to use the motor. But they all have said, if the Ebike is still legaly a bike, I can ride it there despite all the no motor vehicle signs.
European supressor loop.
I took the bike to a street about a mile long, with some 4% grade hill and connected the supressor loop to see if it could still climb a moderate hill at the low power setting. I was a bit suprised at how well it climbed the hill. It was much slower, of course, but with no pedaling it settled in at 10 mph, and with moderate pedaling 12 mph. Not bad for low wattage! This hill is not killer, but I expected 6 mph. On longer rides I like to ride just about 12 -13 mph so I can nearly double my range from full throttle. The hard part, when you know you have to milk that battery to its max range, is to keep from letting the speed creep up to 15 mph, and then end up out of power 15 miles from town in the middle of the New Mexico desert. This limiter feature would make it easy to keep the speed low and get the full range. Most of you will think, boy that's the last thing I'd want. But here where towns might be 60 miles apart, its a nice thing to have for a cross country ride. Instead of fretting the throttle setting, you can enjoy the ride. If it gets too hilly for the low setting, simply unplug the jumper to get up a steeper hill.
The smiley ratings is for those who don't want to read every word.
= It does function or was not entirely satisfactory. = Its okay, or average. = It meets my best expectations, very good. or more= Very happy with it, or beyond expectations. Very very good.Starting with first impressions, once the deal was struck, the motor was shipped within 24 hours. That's very nice, but shipping within 72 hours would be fine by me. Taking a week , or a month would be unacceptable.
The box.
When the motor kit arrived the box was in very good condition, and had an interesting design that made it two layers thick on the sides where axles like to poke through. Nice. Opening the box, we see excellent packing, with the foam blocks to keep the rim centered and foam donuts on the axles. First class packing makes it unlikely that the rim will arrive bent, or the threads stripped on the axle.
Instructions book.
Well written instructions, with pictures, clearly not translated from chinese. What an idea!
The rim and hub.
The rim is a good one, not a brand I recognize, but a good quality double wall rim. It arrived in good straight condition. Black and silver just like the one on the rear of the bike I'll put it on, so that was nice even if purely by chance. The hub is a bit larger than others I've tested, approx 9.5 inches diameter, painted black. It has one nice feature, a protector for the wires coming out the axle. The wires go through a hollow axle which protects them a bit better in case of spinout, and also allows more of the threads to contact the nut. Others have a slot milled down the side of the axle which can make it easier to screw up and strip a nut. A last nice touch is an arrow stuck to the motor indicating which way it turns when it runs. One of the nice features of this motor is that it has a rubber seal to keep water out of the hub. It just makes it that much easier to get it right on the first try when you put the motor on the bike.
Controller
The controller looks good, Like I could tell the difference. I'm the take it out and try to break it tester, not the electronics genius. Only two smiles for the controller because I like an on- off switch. If you buy the battey with the kit, there is an on off switch on the battery box.I also like some kind of led to tell me the power is on. The throtte doesn't have lights for good reasons, but the controller could have a led to let me know the power is getting through from the battery. It just makes it easier to troubleshoot if you can say, Yup the controller is definitely powered up. But there are nice features on the controller too. It's well waterproofed, with nice gaskets for the wires to come out, and looking inside, I see 63v caps. So it appears 48v capable. It's small enough to be easy to find a mounting place for it. On the back, the spec sticker says 22 amp, 36volt. the wiring has some chafe protection on it which helps in the rough ol real world out there. Anderson connectors on the battery wires and the motor power wires makes those critical connections solid for 30 amps. There is a jumper wire with a lable on it that when connected, will limit the wattage for those in places where 200 watts is the legal maximum.
Throttle.
My kit came with all three kinds of throttle so I could evaluate each one. The kit can be ordered with thumb throttle, half twist, and full twist grips. All come with both handgrips, even the thumb throttle. There is not battery lights on the throttle because they can cause a short when a throttle gets wet, resulting in a stuck on throttle condition. With todays lithium batteries, the low battery lights on typical 4 wire throttles are useless except to tell you the battery is connected. I missed taking a pic of the throttles but I'll get one later.
Ebrakes.
The handles look like good quality units, all metal which I prefer on an ebike. Shaving a few ounces with plastic is not needed on an ebike. Opinions vary on the need for ebrakes, but they can make the bike safer if the throttle sticks in the on position. If a kit provides em I usually use em. The motor kit works fine without them if you just hate having the extra wires on the bike.
Torque arm
This is the first kit that came with a torque arm I've recieved. It's a very nice one with adjustable angle to fit most bikes. At 3/16 thick it looks beefy enough to stop a spinout if your axle nuts get loose. Allways a good idea, especially with front hubs. Many feel they are mandatory, but I'm one of the few that thinks not, at least at 36v anyway. Just my opinon, what's mandatory is properly installing the motor on good forks for a motor. As I said, allways a good idea, like using the seat belt in a car with air bags. So why not include the torqe arm in the kit?
Other goodies
Jason did a great job trying to make the kit really complete. He provides a spoke wrench, zip ties, allen wrench, a battery connector wire with andersons, and a nice T shirt with the E-BikeKit logo. A few other tools are needed to complete the install, but nothing most people don't have. You'll need a wrench for the axle nuts, tools to put a tire on the rim, and maybe you'll need to adjust your brake shoes. I liked the inclusion of the allen wrench. I never lose those little things in the garage
Installing the kit
I just maxed out on adding pictures to this post, so scroll down and I'll post some pictures in another post of the installation.Installing the hub on the forks is easy, and I had no issues since this particular bike has had two other front hub kits on it. So I know from the start I will have no problems with getting the axle into the dropouts. My commuter bike is a cheap Mongoose mountain bike with full suspension. Many modifications have been made to it, for my comfort, to support heavy batteries, to have higher gears, etc. But the front forks need no modification for installing this motor.
The bike has suspension forks, but they are the all steel, pinched tube type. The dropouts are very thick and strong on this type of fork. The motor has lots of clearance so installing on these forks is no problem. As the instructions emphatically state, DO NOT use aluminum alloy forks with a front hub motor, EVER. Pay close attention to getting the washers right. I installed the wheel with the washers exactly as they were when they arrived, in place , on the axles. The inner washer goes between the hub and the dropout, then the tourque washer with the tab on it goes outside the dropouts. The tab goes into the dr
opouts facing down, so it fits into the dropouts. There is not one thing more important than getting this right. The washers need to make full contact with the metal, and not be spanning any gaps from "lawyer lips" on the forks. Quick release hubs often have a smaller cup for the QR axles that leaves a gap under the washer. If that gap is covered by the washer, it can later cause the nuts to loosen, or cause a force that spreads the dropouts. So get that washer to fit perfect, or look for other forks. I like to tighten up the nuts gradually on the first install, giving time for the washers to settle in, and then tightening some more later. I use a short handled wrench, a small crescent, so I don't over tighten and strip a nut. Don't rush this, just tighten some, then work on the controller or wiring, and then tighten a fraction more. If the axle wants to squirm out of the dropouts, this is a BIG RED FLAG that your dropouts don't fit the washers. Never file anything more than excess paint off your dropouts.
The torque arm. I installed the torque arm on the side with no wires, and after emailing Jason, I'm told to put the arm behind the fork if possible, but it will work on the front if it fits better that way.
The motor wires are all bundled in one protective cover, so the wiring is pretty easy. This kit has the only connector back at the controller. There is a good reason for this, making it easier to waterproof the whole system. The controller can be located in a protected area, and then there is no vulnerable connector down on the forks. But this does make it a tad more difficult if you have a flat tire, and need to remove the wheel. My personal solution to this, is to use small velcro strips instead of zip ties to secure that wiring to the bike frame and forks. Twice now I've had a wire get into the tire and rub a hole in the insulation, so pay particular attention to wiring the forks so they can't squirm around. With suspension forks you get some extra movement that tends to cause this to happen.
Installing the controller.
There is plenty of wire to install the controller just about anywhere on the bike. Several kits I have recieved have had just about 6 inche less wire than I'd like to have. One of my bikes is a semi longtail cruiser, so for that bike I need the extra six inches. On this commuter mtb, there is plenty of wire to reach my favorite location, and if I liked, I could install it further back on the rear rack. I carry my battery in a steel toolbox on the rear rack, and I like to locate the controller on the front of it, screwed to the toolbox. This gives the controller lots of cooling air, but makes it easy to cover with a trash bag if the bike is parked in the rain.
Installing the throttle.
Easy as pie, unless you can't get the old grips off. I use windex and tweak the rubber with a screwdriver to get the windex in there. Since you get new grips in the kit, you could just cut off the old ones with a razor knife. There is enough extra wire on the throttle to accomodate big beach cruiser handlebars. Leave lots of slack for the front wheel to turn. I chose to try the half twist first, it's my preference of throttle types.
Connecting the wiring.
It's allways something eh? This should have been super easy, but I managed to screw it up. The connectors are obvious which goes where so you can't mix em up. The battery connections are andersons, so they match what I have on my battery. If not, the kit comes with a bit of wire with the andersons you need on it. When I plugged it up everything seemed ok, but then the motor wouldn't run. :x
One extra connector is left after everything is hooked up. It's labled and engages and disengages a speed limiter. So if you live in a place with a strict watt limit, leaving it connected gives you a legal bike in those places. But off road, where watts aren't limited, simply disconnect the jumper and have the full watts. On another kit, I found using the low watt setting was a great way to get extended range if you need it. It can be hard to ride with very low throttle settings all day and using the low watt setting makes it easier to ride slow when you want to.
First Ride
How can you give enough smileys to that first ride down the block with a new ebike? The EV grin never goes away for me. It can be hard to really tell without scientific instruments how a motor compared to others, but this one seems to have a nice pull on the first few feet. It just feels good and seems a tad quicker off the line than other motors I've used. I expect that it has slightly better torque at the same wattage than smaller diameter direct drive motors. In this review I intend to only discuss this particular motor kit. Comparisons naming other motors will be made in other threads that discuss that topic. My battery is a 36v 20 ah version 1 pingbattery with 4500 miles on it. It seems to have little voltage sag, and never has a resting voltage under 40V. With this battery, 26" wheel, 60 psi, and a bike with a very upright non aerodynamic riding position I found the top speed to be 21.5 mph on my calibrated speedometer. I just took a 4 mile test run before dark, and found performance to be about what I expected. The motor is slightly noisy, but not loud. Just a slightly audible clicking sound as the rotor passed the magnets. Under a heavy load, you hear the usual brushless motor grunting, but again not loud. It seems to climb a hill fine, but a really steep grade can stall the motor. I'll be doing a better test of hill performance later today. As testing continues I'll add data to this post, keeping the findings easy to locate and look back up later on.
Hill climbing performance , no pedaling torture test.
The motor did very well on this test, noticeably outperforming another 36v motor I have. The test is 1.5 miles long, starting at 5% grade and then steepening to 7% halfway. Starting from a dead stop and not pedaling at all, the motor reached 15 mph on the 5% section, and 13-13.5 mph on the 7%. Stopping and restarting on the 7% part did not lower the top speed up the grade. Temperature was 69F, wind 3mph from behind. Rider weight 180, and the bike with all the stuff on it weighs about 85 pounds. A commuter, it has bags with tools and water etc all over it so it's on the heavy side. 36v 20 ah pingbattery at full charge. The motor did get hot by the top of the hill, but did not get seriously overheated. A second run went slower, with the battery at half discharged, and at the top the second time, the motor was definitely hot. How hot is hard to say, since I have not thermometer installed inside this time, but it was time to rest the motor by the second time up the hill.
I cannot recomend riding steep hills this way (no pedaling), especially in hot weather. It is done only to get data on the climbing ability of the motor. The best way to get up a short hill is to keep the speed above 15 mph by pedaling hard in the proper gear. A really long climb should be done in the lowest gear, using the lowest possibe throttle to keep the load on the motor low. Rest the motor every 3 miles at least if the grade is 7% or steeper. A short stop beats melting a motor when it's 95 F out there.
In normal riding, usually up and down shorter hills, this mortor will be very nice on the uphills, and moderate pedaling should get you up hills nicely. It definitely climbs steep hills at least 2 mph faster than other 36v direct drive motors I've had. Like all moderate wattage direct drive motors, it will struggle a lot more on hills over 7%. More testing later will be done on hills to see how to climb best with this motor.
48v
I just aquired a 48v 15 ah pingbattery, and the controller runs on it fine. It has 63v caps after all, and the battery is 60v. Speed and hill climbing performance are excellent at 48v . 27 mph top speed, and on 7% grade can maintain 17-18 mph for at least a mile without pedaling. Sweet! At 48v you get all the torque with no sacrifice on the speed end either.
Efficiency
I measure power used by Ebikes crudely, by using a killawatt meter on the charger. Assuming that my 20 ah battery delivers 19 ah, I divide the kwh it takes to charge by .042 to get the amp hours used for that ride. The amp hour number may be off a tad, but comparing two motors this way still gives good data on which uses more juice, and the effect of riding on hills, in wind, or at different speeds. Mabye this year santa will bring me a CA, but for now, this will do.
The motor is very efficient, and should be since it does not take the bike to 30 mph at 36v. The 21 mph top speed keeps wind resistance down, which results in a good efficiency number. The normal commute route including a detour took 12.14 amp hours to travel 15.5 miles. One mile of riding is taking .78 amp hours. Range on the whole 20 ah pack should be 25 miles. Bear in mind that this route includes at least 1000 vertical feet of hill climb and there was a slight headwind on the ride! On flat ground with few stops and no headwind, 27-30 miles should be possible with my 20 ah battery.
This is just one ride, and more data will be posted here as it comes in. This motor seems to equal the efficiency of my Fusin 350 watt gearmotor, but climbs hills under 7% much better. The geared motor can climb steeper hills, but with only 350 watts, it climbs all hills pretty slow. the E-BikeKit motor scampers up the 5 and 6% hill on my commute faster than either the Fusin or the Aotema. At the same speed the E-BikeKit motor is close to the same efficency as the Aotema. The Aotema will use more power if ridden faster though.
Full range ride test------------30.6 miles at full throttle on a 36v 20 ah pingbattery. The range test is part of how I track how my pingbattery is doing, so I do a very standardized route. It climbs 400 vertical feet and back down. It's a big square, so I get to ride up, down, and level. I also get to ride in all 4 compass directions about the same distance so results aren't skewed by wind. Temperature affects battery performance so I try to do this on at least a 70F day. Todays test was done at 80F in 7 mph wind.
Range nearly doubles if you slow down to 13-14 mph, so I could very likely ride 45-50 miles if I rode slow.
First ride home------ .51 kwh
second ride-----------.49 kwh
Ride to work, downhill leg, .35 kwh
First ride home on my commute route.
My route home from work is 14.5 miles mostly on back streets, bike path, or road with bike lane. Near the start I climb about 250 vertical feet at about 4%, then on the bike trail there is lots of ups and downs mostly 4% or so, but no permanent vertical gain. 6 miles from home is the big hill, about 400 feet of vertical over a mile and a half. 5% grade with a few spots of 6% and 7%, along with a few flat spots. It's a pretty killer hill, but not super steep. Just long enough to bog down a weak motor or battery. The last 5 miles are false flat, a long slow grade climbing another 150 feet of vertical.
The ride home went just fine, with plenty of speed up the hills mostly climbing at 18-19 mph on the 4% grades, no bogging down on uphill starts, and no overheating. The air was about 75F and a slight headwind. At the end of the ride the motor was about 95F measured at the alxle on the cover. Adding 30 to 40F to that gives an estimated temp inside of 125 to 135F. That temp falls just about where other similar wattage motors I've tested have been in similar weather. No suprise there, the laws of physics apply to all motors. Climbing the big hill, I was going about 15-18 mph depending on the slope, with light pedaling. Along the bike path, it was nice to ride full throttle with no worries about going above 20 mph, and possibly ticking off others on the path. Once all alone on the bike lane at the end of the ride, 30 mph would be nice, but up the slight grade with a light headwind, I still easily traveled 19.5 mph. It's a really good compromise between a good strong motor on hills and starts and a motor that keeps you legal. Others just have low wattage, and end up slow on starts and bog down on hills or headwinds. Even planetary gears doesn't cure weak. This motor is nice and strong, but not street illegal in the US. Some don't care about this since the cops ignore them, but some places over 20 mph could get you kicked off bike trails. For instance where I live, the local riders on the mountain bike single track trails have no problems with me or my electric bike on the trails. Were I to have a 35 mph bike on those trails, I would not be wecome to use the motor. But they all have said, if the Ebike is still legaly a bike, I can ride it there despite all the no motor vehicle signs.
European supressor loop.
I took the bike to a street about a mile long, with some 4% grade hill and connected the supressor loop to see if it could still climb a moderate hill at the low power setting. I was a bit suprised at how well it climbed the hill. It was much slower, of course, but with no pedaling it settled in at 10 mph, and with moderate pedaling 12 mph. Not bad for low wattage! This hill is not killer, but I expected 6 mph. On longer rides I like to ride just about 12 -13 mph so I can nearly double my range from full throttle. The hard part, when you know you have to milk that battery to its max range, is to keep from letting the speed creep up to 15 mph, and then end up out of power 15 miles from town in the middle of the New Mexico desert. This limiter feature would make it easy to keep the speed low and get the full range. Most of you will think, boy that's the last thing I'd want. But here where towns might be 60 miles apart, its a nice thing to have for a cross country ride. Instead of fretting the throttle setting, you can enjoy the ride. If it gets too hilly for the low setting, simply unplug the jumper to get up a steeper hill.