
It's appreciated. It should help people that want to do this kind of thing make their own blinker setup if they wish. Thank you.
You are using an out of date browser. It may not display this or other websites correctly.
You should upgrade or use an alternative browser.
You should upgrade or use an alternative browser.
Ebike lighting
- Thread starter The Madmadscientist
- Start date
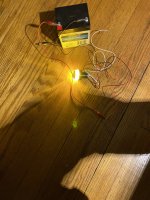
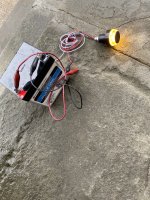
My bar end turn signals just arrived. It draws 0.15 @ 12.6 V. Looks pretty bright indoors. Will test tomorrow in the daylight. For comparison, the turn signals in my rear light assembly draws 0.020 A at 14 V. They're quite dim which I'm not even going to hook up. I'll use just the bar ends since they can be seen from the front, rear and side.I first test these (and couple other cheap chinese ones). Because of the price. I was really disappointed, they are not so bright. In dark they are "ok", but not in daytime. Also they are really cheap feeling. Like cheap plastic (lenses) etc. I ended up to give them to my friend. I wanted really bright ones and that way i ordered those Motogadget ones. Yes they are expensive, but they work.
Those Motogadget versions show really well at daylight also
Some old video, when i didn't have rear blinkers yet:
And there is rear blinkers installed at fender. Now there is rear rack and light and blinkers is moved to that:
Attachments
Well it does not have a flasher built in. So I have to get something like the Novita EP35 you suggested. Have you found a smaller unit that's affordable? I assume there's no mechanical relay inside the plastic relay housing? Maybe I'll take the guts out and hope it's a small circuit board inside.I don't see anything on the page that indicates they have a flasher built in. If they don't, what flasher setup are you going to use? (I just use a regular automotive type, the Novita EP35 Flasher
https://www.amazon.com/dp/B00064LQL2
with my LED lighting on SB Cruiser, and the old CrazyBike2, and it works perfectly with any LED or incandescent, or combination, that I have tried so far. (I think I bought my first one at Checker or Autozone, but it's the same thing as the amazon link.)
It's a smaller PCB than the outside box, but it does have a small relay (goes clicky clicky inside). I think there's a pic of the guts in my SB Cruiser thread somewhere from about 5 years ago or so.
If you need waterproofing, you can leave the board inside the box and seal the box up...it's not waterproof as is.
Alternately you can wait till Nixunen posts the blinker part of his setup and build that, to make it work like his does.
If you need waterproofing, you can leave the board inside the box and seal the box up...it's not waterproof as is.
Alternately you can wait till Nixunen posts the blinker part of his setup and build that, to make it work like his does.
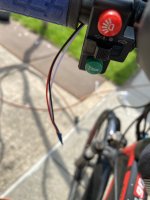
Just did this test running full current through the switch. Plan is to skip the flasher relay for now. A switch will be glued to each grip. My thumb will be the flasher, no chance forgeting to turn it off. Will see how many cycles it can endure before it burns out (I have many spares). Have to increase the button size by gluing something to it to make it easier to find/ push especially with gloves on.It's a smaller PCB than the outside box, but it does have a small relay (goes clicky clicky inside). I think there's a pic of the guts in my SB Cruiser thread somewhere from about 5 years ago or so.
If you need waterproofing, you can leave the board inside the box and seal the box up...it's not waterproof as is.
Alternately you can wait till Nixunen posts the blinker part of his setup and build that, to make it work like his does.
Super glued a piece of bicycle inner tube to the button which should make it easier to push with gloved fingers, I hope. I already have 12V (from a DC/DC converter) to the wireless phone charger on the handlebar, which will make installation of the bar end turn signals an easier job.
I duct taped everything onto the handgrip for a quick test, alligator clipped it to the dc/dc converter's 12 vdc output. The sun is out but the bike is in the shades. Next step is to mount it a little more securely, wire it up temporarily, do some test rides to see if it is viable.
Wow, you've put a lot of neat stuff into your ebike! What kind of heating element did you use for the grip heater? Nichrome wire or something else? How much power does it draw at 0 degree C?Arduino in my bike does many things, like control alarm (using 3 axis gyro), gps, also it control brake light, horn and blinkers of course. It control also battery heating (at winter), when battery temp goes below +10c (i can change temp using android software, that i built, bt connection to arduino) it start to heat battery. It control heating elements and increase / decrease their power depending how cold there is. It also control grip heaters, and "start" my bike. Either using rf remote or my phone bt. And lot of other things.
So basically i can just take blinker code and paste that part. Whole code i don't want to upload. But it takes some time, but maybe in week or so.
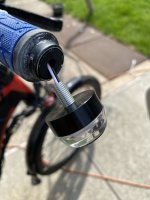
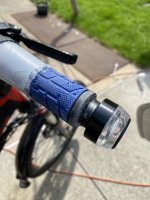
Got the bar end turn signals installed today! I drilled a hole on the bottom of handlebar by the left grip to fish the wires through. An electric guitar E string was perfect for the fishing job. Ran out of time so only the left signal is (temporarily) wired up in the video. Will wire up the right signal tomorrow, play around with the best position for both switches (on the left grip), do some test rides before gluing the switches in and making the wiring permanent and neat.
Attachments
slaphappygamer
100 W
That looks great! I like the location of your lights. It's the right height for a driver next to you to see. I have a mirror on my left handlebar end and I'd have to change my mirror. That is why I installed my lights on my stantions. Probably not the best choice, but it works and my fork doesn't bottom out against the lights. It's really interesting to see how other people install things and the ideas they come up with. Good job!
If you really want to grab attention, you might look into these, which can just stick on, but I glued them on with clear GE Silicone I (using zipties to secure them until the silicone cured). :
 They're DRLs (white front, red rear) with sequential amber turn signals, no flasher needed. Some of the red ones also have a brake flash function.
For a typical bike frame you could install the white ones on the fork stanchions, and the red ones on the seat stays or rear rack supports, etc.
On SB Cruiser the white ones are on my handlebar-mounted mirrors and "brush guards" (which I really use just to keep my hands a little protected from whatever weather is happening and for holding these lights). The red ones are up high on my cargo deck's upper rail, so visible even to SUV drivers, and like the white ones they wrap partly around the side so they signal at least 90 degrees per corner (more, really).
This post

 endless-sphere.com
shows the front ones in just the brushguard and handlebar position I used orignally, but nowadays they instead go from the mirror down to the guards, making a kind of > < shape from the front. There apparently aren't any pics of the red ones on the rear cargo rail, but they look similar to the other red strip lights that are in various images, just a lot brighter and more visible in the daytime as well.
endless-sphere.com
shows the front ones in just the brushguard and handlebar position I used orignally, but nowadays they instead go from the mirror down to the guards, making a kind of > < shape from the front. There apparently aren't any pics of the red ones on the rear cargo rail, but they look similar to the other red strip lights that are in various images, just a lot brighter and more visible in the daytime as well.
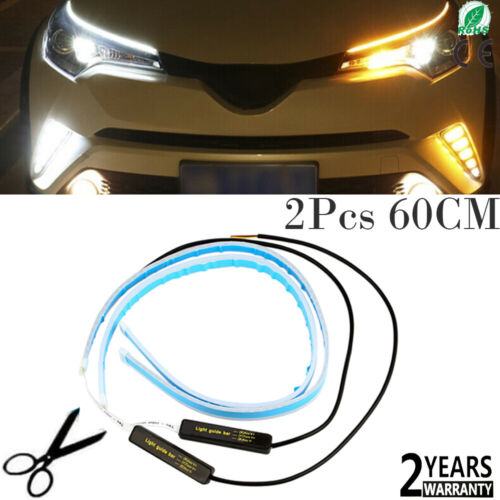
2x White&Amber 60cm Flexible LED Car Headlight Slim Strip Turn Signal DRL Light | eBay
Find many great new & used options and get the best deals for 2x White&Amber 60cm Flexible LED Car Headlight Slim Strip Turn Signal DRL Light at the best online prices at eBay! Free shipping for many products!
www.ebay.com
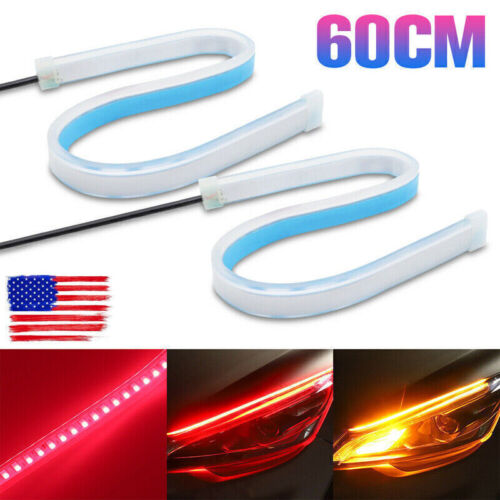
60CM Red DRL Turn Signal Light Strip Sequential LED Tube Yellow Bar Daytime | eBay
Find many great new & used options and get the best deals for 60CM Red DRL Turn Signal Light Strip Sequential LED Tube Yellow Bar Daytime at the best online prices at eBay! Free shipping for many products!
www.ebay.com
For a typical bike frame you could install the white ones on the fork stanchions, and the red ones on the seat stays or rear rack supports, etc.
On SB Cruiser the white ones are on my handlebar-mounted mirrors and "brush guards" (which I really use just to keep my hands a little protected from whatever weather is happening and for holding these lights). The red ones are up high on my cargo deck's upper rail, so visible even to SUV drivers, and like the white ones they wrap partly around the side so they signal at least 90 degrees per corner (more, really).
This post
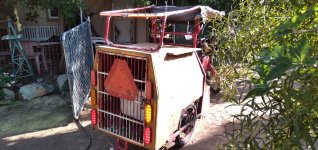
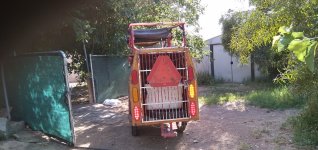
The SB Cruiser : Amberwolf's 2WD Heavy Cargo Trike & Dog Carrier
I haven't used the electric braking on the "new" generic controller much due to the extreme excessive heating (goes up about 10 degrees C every time I use it...peaks have been nearly 70C even when starting at 8C on the last several cold mornings). I'm probably going to disconnect it from the...
I used Koso heated grips (meant for atv / snowmobile). I of course get rid of that control box, that came along with it. And do controlling using arduino. It takes maximum about 40W power, if i use highest settings ( i made 5 different modes)Wow, you've put a lot of neat stuff into your ebike! What kind of heating element did you use for the grip heater? Nichrome wire or something else? How much power does it draw at 0 degree C?
I wanted to arduino control those grips, so i can add everything nicely to my bike. I didn't want to add another led etc, so i decided to show what heater level is used using my main / power button led. It already blink red, when alarm is used. Glow green when everything is ok and can ride. During ride if it start to flash also blue (so solid green, and blue flash, and solid green... again and again) it means that battery is cold and heater is active. It goes solid green when it is warm again. If battery goes too cold, then red flashes, and bike disable regen braking. Because then battery is near 0c and i want to prevent that there is no regen (charging) at battery then.
That led also show when blinkers are active (blink green, same time when blinkers etc). And i have 5 level of heaters. Lowest, is blue, 2 level is warmer blue. 3 level is green, 4 level is yellow, and strongest mode is red (so colors go cool to warm). When i press button it start to roll those levels, and when it is level that i want, i just let go of button. After that led goes off and back to green, that notify me that selected mode is accepted. And when i scroll after mode 5 there is led off section, if i release button there, then grips goes off. It saves last used settings, so if i used level 5 last time before i shutdown my bike, then i just need to press button briefly and it loads last used level
There is short video about it:
Those are grips that i used:
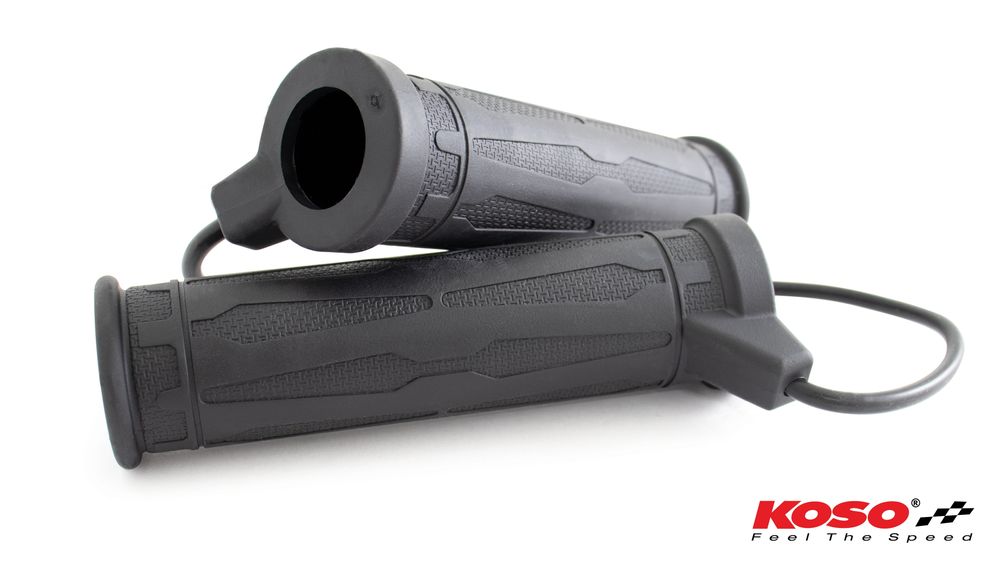
Heated Grips 7/8 Inch + 7/8 Inch L=130mm with external switch - black
This new elegant grip design with revolutionary heating structure delivers heat faster than ever. The new 5 level temperature controller allows you…
Last edited:
Is the 60 cm (24") length 12" each for each? Are they bright enough for daylight under bright sun? If so I may get these under the rear rack. Can they be bent to be 6" long?If you really want to grab attention, you might look into these, which can just stick on, but I glued them on with clear GE Silicone I (using zipties to secure them until the silicone cured). :
2x White&Amber 60cm Flexible LED Car Headlight Slim Strip Turn Signal DRL Light | eBay
Find many great new & used options and get the best deals for 2x White&Amber 60cm Flexible LED Car Headlight Slim Strip Turn Signal DRL Light at the best online prices at eBay! Free shipping for many products!www.ebay.comThey're DRLs (white front, red rear) with sequential amber turn signals, no flasher needed. Some of the red ones also have a brake flash function.60CM Red DRL Turn Signal Light Strip Sequential LED Tube Yellow Bar Daytime | eBay
Find many great new & used options and get the best deals for 60CM Red DRL Turn Signal Light Strip Sequential LED Tube Yellow Bar Daytime at the best online prices at eBay! Free shipping for many products!www.ebay.com
For a typical bike frame you could install the white ones on the fork stanchions, and the red ones on the seat stays or rear rack supports, etc.
On SB Cruiser the white ones are on my handlebar-mounted mirrors and "brush guards" (which I really use just to keep my hands a little protected from whatever weather is happening and for holding these lights). The red ones are up high on my cargo deck's upper rail, so visible even to SUV drivers, and like the white ones they wrap partly around the side so they signal at least 90 degrees per corner (more, really).
This post
shows the front ones in just the brushguard and handlebar position I used orignally, but nowadays they instead go from the mirror down to the guards, making a kind of > < shape from the front. There apparently aren't any pics of the red ones on the rear cargo rail, but they look similar to the other red strip lights that are in various images, just a lot brighter and more visible in the daytime as well.The SB Cruiser : Amberwolf's 2WD Heavy Cargo Trike & Dog Carrier
I haven't used the electric braking on the "new" generic controller much due to the extreme excessive heating (goes up about 10 degrees C every time I use it...peaks have been nearly 70C even when starting at 8C on the last several cold mornings). I'm probably going to disconnect it from the...
Very cool! It does not get nearly as cold here in winter compared to Finland (we didn't get any snow accumulation last winter- no shoveling!). You are hardcore riding in snow at night! I'd freeze to death lol. I ride only when the temp is above 40F, sun shining, no snow on the streets. I use these insulated mitts that cover the brake lever/ grips. I heat 2 small olive glass jars filled with water in the microwave, put it into a sock then stuff them in the mitts. It lasts about 45 minutes and keeps my hands much warmer. I think I'll just stick with the hot olive jars instead of making heated grips since I have limited power in my battery.I used Koso heated grips (meant for atv / snowmobile). I of course get rid of that control box, that came along with it. And do controlling using arduino. It takes maximum about 40W power, if i use highest settings ( i made 5 different modes)
I wanted to arduino control those grips, so i can add everything nicely to my bike. I didn't want to add another led etc, so i decided to show what heater level is used using my main / power button led. It already blink red, when alarm is used. Glow green when everything is ok and can ride. During ride if it start to flash also blue (so solid green, and blue flash, and solid green... again and again) it means that battery is cold and heater is active. It goes solid green when it is warm again. If battery goes too cold, then red flashes, and bike disable regen braking. Because then battery is near 0c and i want to prevent that there is no regen (charging) at battery then.
That led also show when blinkers are active (blink green, same time when blinkers etc). And i have 5 level of heaters. Lowest, is blue, 2 level is warmer blue. 3 level is green, 4 level is yellow, and strongest mode is red (so colors go cool to warm). When i press button it start to roll those levels, and when it is level that i want, i just let go of button. After that led goes off and back to green, that notify me that selected mode is accepted. And when i scroll after mode 5 there is led off section, if i release button there, then grips goes off. It saves last used settings, so if i used level 5 last time before i shutdown my bike, then i just need to press button briefly and it loads last used level
There is short video about it:
Those are grips that i used:
Heated Grips 7/8 Inch + 7/8 Inch L=130mm with external switch - black
This new elegant grip design with revolutionary heating structure delivers heat faster than ever. The new 5 level temperature controller allows you…www.kosoeurope.com
Thanks, glad you like it! The location of the lights is not mine but Nixunen's. I just found some inferior/ cheap ones on Amazon that are probably not good enough in bright sun.That looks great! I like the location of your lights. It's the right height for a driver next to you to see. I have a mirror on my left handlebar end and I'd have to change my mirror. That is why I installed my lights on my stantions. Probably not the best choice, but it works and my fork doesn't bottom out against the lights. It's really interesting to see how other people install things and the ideas they come up with. Good job!
I've got both (L & R) switches temporarily strapped to the handgrip, shortened and neatened up the wiring. Will have to test ride it to see how practical it is using my thumb as the flasher. One issue I see already is that in the cold months my bar mitts will cover up the bar end lights. Maybe I can cut a hole in the mitts.
Coldest temp here, when i still ride is -27c (-16.6°F). It is fine but of course need good clothing etc.Very cool! It does not get nearly as cold here in winter compared to Finland (we didn't get any snow accumulation last winter- no shoveling!). You are hardcore riding in snow at night! I'd freeze to death lol. I ride only when the temp is above 40F, sun shining, no snow on the streets. I use these insulated mitts that cover the brake lever/ grips. I heat 2 small olive glass jars filled with water in the microwave, put it into a sock then stuff them in the mitts. It lasts about 45 minutes and keeps my hands much warmer. I think I'll just stick with the hot olive jars instead of making heated grips since I have limited power in my battery.
My consern about that is how well it work, when you need to use brake or throttle at same time when turning and keep flashing. It is kind of multitaskingThanks, glad you like it! The location of the lights is not mine but Nixunen's. I just found some inferior/ cheap ones on Amazon that are probably not good enough in bright sun.
I've got both (L & R) switches temporarily strapped to the handgrip, shortened and neatened up the wiring. Will have to test ride it to see how practical it is using my thumb as the flasher. One issue I see already is that in the cold months my bar mitts will cover up the bar end lights. Maybe I can cut a hole in the mitts.
I'll see how much more of a workload it is. If I find it too much or unsafe, I'll build a flasher with a 555 timer.My consern about that is how well it work, when you need to use brake or throttle at same time when turning and keep flashing. It is kind of multitasking
slaphappygamer
100 W
Or, you can actually wire those to your existing L-R switch at your lights and horn unit. I had the same one. I ran a 24 awg CAT5 from my lights down to the controller. I wired it all up at that location, using the 12v source. The unit doesn’t have a timer, but you can probably wire the 555 to it.
I attached some pics and video links that I just took to help see what they look like. You can see some of how they bend in how they're mounted on the trike, and the not yet used ones laying on the cargo deck with the ruler next to them. IIRC you can cut them at certain points if needed, and move the endcap to the cut point, but I wanted more light so did not cut any of them. In the ruler pic you can see two of them have boxes on them; these are the front white / amber lights, the rear ones have all their electronics on the strips (there's some pics of that part in another post near the last linked SB Cruiser thread post above, from the rear one I had that sort of died (powers on but "sticks" before it finishes "booting up". ) )Is the 60 cm (24") length 12" each for each? Are they bright enough for daylight under bright sun? If so I may get these under the rear rack. Can they be bent to be 6" long?
They are designed to go on cars in the gap between hood and lights, or trunk and lights, and be seen edge-on thru the silicone strip, hiding the LEDs and making a smoother more even light. I wanted more lighting surface area and brighter, so I use them face-on where you actually see the LEDs. I removed all the gunk and adhesive on them from the factory rather than using that, so it might be good, might not, but I knew GE Silicone I would work.
Attachments
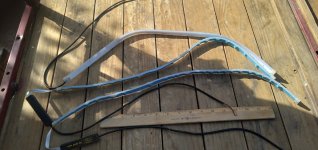

Thanks for the info on the LED strips. Ordered one from Ebay, should get here Wednesday.I attached some pics and video links that I just took to help see what they look like. You can see some of how they bend in how they're mounted on the trike, and the not yet used ones laying on the cargo deck with the ruler next to them. IIRC you can cut them at certain points if needed, and move the endcap to the cut point, but I wanted more light so did not cut any of them. In the ruler pic you can see two of them have boxes on them; these are the front white / amber lights, the rear ones have all their electronics on the strips (there's some pics of that part in another post near the last linked SB Cruiser thread post above, from the rear one I had that sort of died (powers on but "sticks" before it finishes "booting up". ) )
They are designed to go on cars in the gap between hood and lights, or trunk and lights, and be seen edge-on thru the silicone strip, hiding the LEDs and making a smoother more even light. I wanted more lighting surface area and brighter, so I use them face-on where you actually see the LEDs. I removed all the gunk and adhesive on them from the factory rather than using that, so it might be good, might not, but I knew GE Silicone I would work.
The LED turn signal strips arrived early. They are pretty bright! It's too long the way it is. I think the LED's are all in parallel and I should be able to cut it to any length. I wrote the seller about cutting. Waiting to hear back.Thanks for the info on the LED strips. Ordered one from Ebay, should get here Wednesday.
THe LEDs are in sections that are parallelled, probably 12v at a time (usually 3 LED sections).
On mine I think the box showed where to cut them, then glue the silicone cap on the new cut end of the strip, but I don't have the boxes anymore to check.
For the strips I have as just markers on teh trike, with no blinkers in them, they are wired this way, and if cut in the middle of a section the rest of the strip still works but the other 1 or 2 LEDs in taht cut section won't light because they have no series connection to power. I didn't cut my blinker strips because I wanted as much light as I could get.
Seller has not responded yet. I took the adhesive tape off to have a better look. Is that a resistor every 3 LED sets?
If I want 21 sets of LED's to light up, do I cut at the blue arrow? Edit: No instructions on the box where to cut.

If I want 21 sets of LED's to light up, do I cut at the blue arrow? Edit: No instructions on the box where to cut.
Last edited: