flyinmonkie's chopper build

flyinmonkie

10 kW
Joined
Oct 8, 2008
Messages
753
Location
NZ
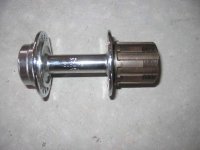
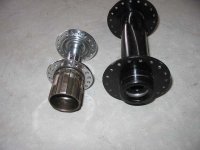
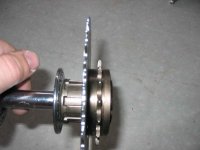
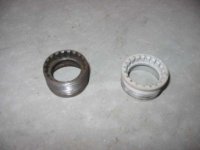
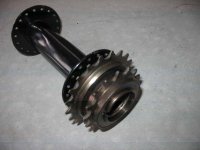
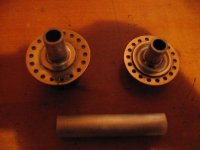
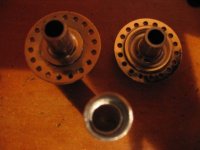
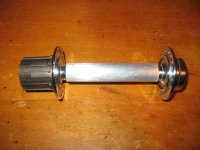
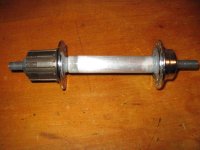
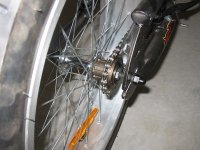
Well, I have begun my chopper build. It is off to a slow start, but I am tackling the hardest problem first. The bike has a 4.5 inch wide rear tire, which is really cool, but makes it a bit hard to sort the drive. It is a single speed with a BMX freewheel and chain and a huge hub. I've relaced a standard cassette hub in and swapped out the axle for the factory one to get the length. Unfortunately that doesn't leave me with as much room for extra sprockets as I want on the cassette. I have used an old school uniglide hub as it is threaded on the outside for the final sprockets that held them all one. A standard right side BMX freewheel fits the threads on the cassette. And that is what you see in the hub picture.

My drive idea, which will work in a standard wheel no problem, is to fit maybe 3 sprockets on the cassette for the motor to drive through a derailleur. There will be one chain from the gear reduction on the motor to the cassette hub. I will hold those sprockets on the cassette with a freewheel threaded on the outside of the cassette (in place of the outer threaded uniglide sprockets). A separate chain will run from that freewheel to the cranks.

This configuration will give me 3 gears for the motor, and the pedals will be a single speed. I can gear the pedals to actually be some help while under epower. With the freewheel on the cassette I will not need a freewheel crank. This is because the freewheel on the cassette will keep the motor from driving the chain connected to the pedals. It does mean 2 chains running to the rear wheel, but they will both be on the right side and only one will turn under motor power.

As I said, easy to do with a standard wheel, but with my 4.5 inch rear wheel, a bit more of a challenge. I am trying to find a 170mm rear cassette hub with a uniglide body, or uniglide compatible body. Not an easy task. My least favorite option is to cut the hub and weld in an extension. I am leaning towards an internal geared hub, but I am not sure if I can get a seperate freewheel on the hub with the standard drive gear.

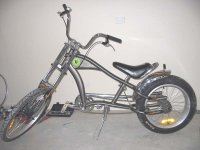
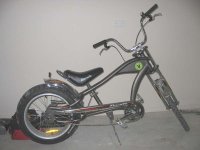
Well, as for the rest of the bike. The motor and probably a single stage reduction will go between the rear wheel and seat tube. The batteries, controller, and charger will go in front of the seat tube and over the chain guard. The bottom bracket is huge, so SLA's fit nicely either way.

Thanks for reading the book I just wrote, it should answer most questions, but feel free to ask any more, or provide your thoughts. Enough already, on to the pics.
 

Attachments

  • chopper 1.jpg
    chopper 1.jpg
    50.1 KB · Views: 5,608
  • chopper 2.jpg
    chopper 2.jpg
    41 KB · Views: 5,609
  • hub.jpg
    hub.jpg
    66.7 KB · Views: 5,599
AWESOME another chopper build :) ChoppersUS have the extra wide 3 speed hubs for the 4.25 setup, i actually had one here few weeks ago mate bought one they are HEAVY ... What motor you thinkin? You mention gear reduction etc...an RC motor in the works possibly?

Look forward to following the build anywayz mate, best of luck...

Kim

Apprentice Gangsta 8)
 
Interesting drive concept. I don't think I've seen a setup like this, with two drive chains to the right side, and two rear freewheels.

I too am interested in what motorcontroller setup you are looking at, and how you do the gearing. What voltage are you looking to run? What sort of top speed? Do you hills you need to get up and down?

-- Gary
 
Kim,

Can you tell me how the drive sprocket attached to the 3 speed hub? Could I get a freewheel on the attachment with the standard drive sprocket?

As for the motor and batteries it is all pretty tame. I have torn a part my previous bike due to lack of space and will be using those components. So it is a Currie 600w scooter motor (no gear reduction on it) and 24 volts of SLA's. 2 12v 18ahr batteries. The performance wasn't spectacular on my last bike, about 30k/hr, but not too bad for having no idea what I was going to get. Ideally, I'd like to get 50k/hr but that might require a 1000w motor or different batteries. I'm going to set it up with what I have and go from there. No major hills here that I'll be ridding, just would like gears as it is a challenge to build.

I'll be running #25 chain from the motor to the gear reduction. A 15 tooth to maybe a 75 tooth. And then either a 11 tooth or a 16 tooth to the rear hub. It depends whether I decide I want a freewheel on the last sprocket of the gear reduction. That would mean only my drive chain and one other would turn when I pedal without the motor. I'll use another rear bike hub for the jack shaft. I'm not sure what size sprocket I'll use on the rear wheel It depends if I have an internal hub and the gearing of that, or if I run 3 gears on the back.

FM
 
flyinmonkie said:
Kim,

Can you tell me how the drive sprocket attached to the 3 speed hub? Could I get a freewheel on the attachment with the standard drive sprocket?

Got a welder? LoL I honestly can't see how it could be done effectively, the drive cog on the 3 speeds are
held in place with a circular split ring they fit over the hub and have 3 notches (for memory) on the sprocket
that slides into 3 channels on the hub...Might have to re-think the drive train setup im afraid bud...I know
a setup that could be used ill draw a quic diagram up for u and post it shortly...

Edit:

Here you go

drive_chain_sketch.jpg


Now it is a little more complex i think than your idea but seeing you have the advantage of a longer frame with
front positioned crank you have the room. The middle set of sprockets are fixed to a jack shaft, you could use
an extended bottom bracket mounted to the down tube for this purpose. Tip...you know the screw in peice for
the bottom brackets, the piece the bearings sit on the inside of? the thread on that is the correct thread for a freewheel
you could utilize one of these on your jack shaft to screw a freewheel sprocket too :: wink ::

Kim
 
Hey Kim,

Thanks for the input. I figured as much, but I could always hope. I may have to pursue it in the future when I can come across a hub to play with. Anyway, I have looked at and thought of almost every drive set up possible. I have been through the drive classification thread and came up with my idea of 2 chains on the right side and basically separate drive systems meeting on the rear hub.

I am not willing to deviate from my drive set up, so I will sort out a larger hub and set up a derailleur. I haven't decided whether to put the derailleur on the rear hub or the final gear reduction. Either could be done. If I put the derailleur on the final gear reduction, then the hub may be easier. I knew about the bottom bracket cup and may use it to stack 2 freewheels on a hub for the rear wheel. I think I have seen someone else here do something similar.

I really like the benefits of this drive set up. Fewer parts are moving when only under motor power, and the pedals can be set up to assist easily. Also, a freewheel crank does not need to be made. Though not difficult, as the parts are readily available, it is a bit of a pain and I think a loss of energy as well as an extra source of noise. With a standard rear wheel, this set up is far easier to do than a freewheel crank. The difficult part is getting a hold of a hub with threads on the outside. They are a uniglide or uniglide compatible hub. Very old school. You can find them as NOS, or new old school on ebay. The older durace hubs might also work, I have one on the way and will let everyone know. The LBS may not know what you mean if you ask, depends how long they've been around.

Anyway, time to tear apart my rear wheel again.

FM
 
I love the chopper builds, but is that the child's model or the adult one? It looks really cramped. I was thinking it might be easiest to setup some sort of chain "scooper that disengages the pedal chain from the rear sprocket when you want to go faster than you can pedal, and just re-engage the chain if you see a copper or want to pedal. Just put a suicide shifter on there and cut a V belt pulley in half that could swing around the rear axle to scoop the chain. 8)
 
Hey Miles,

I'm sure it's not too hard, the problem with that is finding the die to fit, as it is a bike specific thread as far as I can tell. I haven't been able find a die for freewheel threads yet. Also, I need to go the other way. I don't want the freewheel threaded all the way on as I was going to put 3 sprockets on the inside of it for my motor to drive. Unfortunately with the narrow hub, the chain will run into the wheel. So I need a longer hub that will fit a cassette. After much investigation, I have found that either a large DH hub, or a tandem hub will work, but we are talking huge amounts of $ I don't want to spend. Anything from $400NZ to $800NZ. I think I am going to stack 2 BMX freewheels and attach a large sprocket the inside one for the motor to drive and try to get gearing at the final gear reduction.
 
Ah, ok. That sounds more doable.

Anway, if you need a die, you can get it here:
http://www.victornet.com/cgi-bin/victor/productlist.html?subdepartments=Special+Pitch+Dies%2C+1-3%2F16%22+and+Larger%3A1173%2C507%2C599

1 3/8" x 24 tpi [1.375" x 24 tpi]
 
flyinmonkie said:
I have been through the drive classification thread and came up with my idea of 2 chains on the right side and basically separate drive systems meeting on the rear hub.
This to me seems like the most elegant solution - it keeps all the "drive system" on one side. I went looking for cogs/freewheels/sprockets yesterday and am unsure how easy it is to either:
- add an additional freewheel with a single cog (lets assume width isn't an issue)
- downsize a cluster to allow the space of an additional freewheel

I'd go talk to some people in a bikeshop but most of them are really not that helpful (here in Brisbane) when it comes to electric assist pushbikes.
 
Cheers for the link Miles. I did a bit of looking, but then got frustraded and gave up. That put me onto the uniglide hub. It may be easier to cut the treads in a now standard hyperglide cassette hub with the die. Would be nice to have one just to make freewheel adapters. I may have to invest. :lol:

Marks, yes the LBS is usually less than friendly when you mention electric. Not cool enough yet I guess. Or they are all about the exercise, lol. Anyway... What you want to look for is a uniglie or uniglide compatible hub. they are fairly oldschool now, so ebay may be your best bet. You will recognise it because it has threads on the outside of the cassette body. This will allow sever bike sprockets to be place on the inside of the hub abd a BMX or single speed freewheel to be threaded on the outside of the hub. The freewheel will hold the sprockets on. Watch out for the thickness of the freewheel teeth and what chain you want to use. The bike shop can answer these questions. Say you want to set up a cheap single speed on a freewheel hub and they be more helpfull.

If you want to go with a single sprocket for the motor and a seperate single sprocket for the pedals, you can use a freewheel hub and 2 single speed frewheels. There is only room for one freewheel on the hub, but you can thread a bottom bracket cup into the first freewheel and thread the other freewheel onto it. Have a look at the following link. A wealth of bike info.
http://www.sheldonbrown.com/k7.html
Everything you wanted to know about a freewheel and a cassette.
I'll post some pics of the set ups soon.
FM
 
Hey Monkey,

I love these unique builds!

I totally understand what you are going through finding the correct hub and other bits to make this project work. I am going through the same thing with my latest build. :)

I am looking forward to seeing some pics of the project underway.

Is that a steel or aluminum frame?

Matt
 
Hey Matt, thanks. It's steel. I think I have it sorted in my mind and am going to work on the hub and mocking up my battery box this weekend. We have a long weekend here in NZ, so I should get a fair bit done. I'll also set up the different hub configurations I have been talking about and post pics so it may make more sense to everyone.

FM
 
You asked for pics, so here they are. The following are examples of how to set up a double right side drive. I haven't decided which I am going to use as I'm not sure what I have room for and am still see what parts I can get to set either of them up.

The cassette hub set up allows several usable gears driven by the motor in conjunction with a rear derailleur. The freewheel set up only allows for one gear driven by the motor at the rear wheel. But, I am think of using several gears and a derailleur on the final reduction drive to get several gears if I use the freewheel set up.

Both of these set ups allow the pedals to be easily be geared to assist while using motor power. It does limit the pedals to a single speed or 3 speed if you use the front chain rings. These set ups also eliminate the need for a freewheel crank and lower the number of chains that move when under motor power.

FM
 

Attachments

  • cassette.jpg
    cassette.jpg
    45.2 KB · Views: 4,055
  • freewheel.jpg
    freewheel.jpg
    36.3 KB · Views: 4,057
  • comparison.jpg
    comparison.jpg
    48.2 KB · Views: 4,054
  • cassette set up.jpg
    cassette set up.jpg
    37.2 KB · Views: 4,054
  • bb.jpg
    bb.jpg
    27.2 KB · Views: 4,056
  • freewheel set up 2.jpg
    freewheel set up 2.jpg
    41.3 KB · Views: 4,055
Thanks for taking the time to take piccies FlyingMonkie.

Looking at your pictures over and over again, you have shown two solutions to the problem correct?

I suspect the smaller one is more suited to a mountain bike?
 
Hey Marks,

Yes, I have shown 2 ways to achieve the drive system I want. the smaller one will give you several gears at the rear wheel and the bigger one will give you one gear at the rear wheel. The smaller option only works with a uniglide compatible cassette and any bike with a standard width rear wheel. If you have a freewheel cassette the other option will work. My bike happens to have a 4 1/2 inch wide rear wheel so it has a particularly large hub.

I am going to try and extend the smaller hub I have to get everything to fit right. I have cut the hub and just need to come up with some pipe and how I am going to make it all stick together, as the hub is aluminum.

FM
 
Well, it has been a little while as I have been trying to sort out what to do with my rear hub. Well a decision has been made and the results are below. I decided to lengthen a hub I had. We will see how it goes. I think it should be all good. Next will be to lace the wheel and start on the battery box and motor mount.
 

Attachments

  • hub and sleeve.jpg
    hub and sleeve.jpg
    40.2 KB · Views: 3,960
  • sleeve and spacer.jpg
    sleeve and spacer.jpg
    43.6 KB · Views: 3,960
  • hub mock up.jpg
    hub mock up.jpg
    60.7 KB · Views: 3,960
  • glued hub.jpg
    glued hub.jpg
    53.3 KB · Views: 3,956
Aussiejester,

You like my solution? I know it's not a nice clean TIG weld, but I don't have access to it, nor do can I be bothered finding someone here for such a small job. My experience here is that if you don't know them, they charge a fortune for piece work. Anyway, I have used JB weld to make new threads in an exhaust header to hold the exhaust pipe on one of my old trucks. Lasted for years. It's good stuff.

FM
 
Thats brilliant mate, soz had a few ales when i posted previously on further thought i
think it may actuall work, I have used JB WEld myself it is pretty good gear yeah be interesting to see
how it holds up ...

KiM

Apprentice Gangsta 8)
 
how tight was the sleeve? if you had a lathe you could have used a sleeve too small and broached out to the diameter of the cassette, or drill it out on the lathe. if it were tight, then even the bearing retainer would hold it and that would get your bearings closest to parallel. since both would be orthogonal to the bore. chamfer the corner on the cut end of the cassette.

too neat. J B weld rules, bearing retainer right behind it. dm
 
Kim, No worries. I laughed as well. It is pretty getho, but should look better after I clean it up. I'm pretty curious to see how well it holds up as well. It's not a bad test of JB Weld. :twisted:

Dnmun, the spacer was very tight and I wish the hub would have been the same. But, the hub was just about a half a mil smaller in diameter than the sleeve. So the JB Weld acts as a filler as to take up the space as well. If it had been closer that is exactly what I would have done and pressed it all together nice and tight.

I'll be lacing the wheel up this weekend and trying it out in pedal configuration. I'll let you know how it works out. and post some pics of it all together.

FM
 
Back
Top