mike662
10 W
Hello everyone,
So for the past month and a half I've been reading about how to increase the top speed of my bike and things are finally starting to piece together. I've been meaning to start a "re-build" thread for a long time but have been too lazy. I finally have some time to do a write-up of what I've been up to since I started my quest. I've tried PM'ing a mod to see if this is the right section to post in but I've had no replies in the past week so I'll just post here anyway and mods feel free to move it wherever appropriate
So, my current setup is a 1000W Golden Motor rear hub running a 48V12ah li-ion battery and a stock GM controller (not sure how many fets but probably not many as it is TINY).
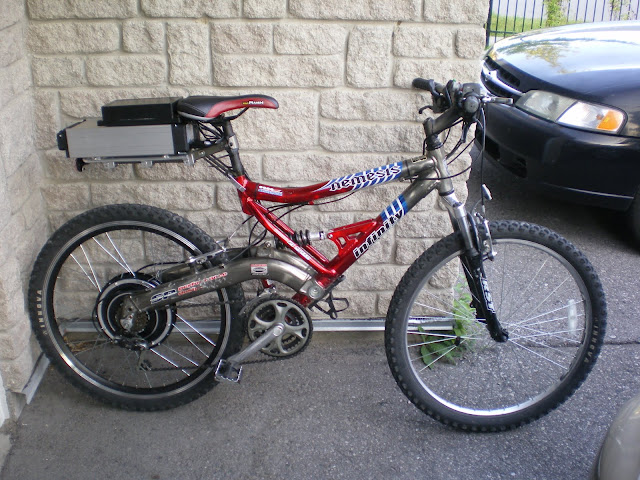
Here's a pic of my old setup (controller above battery):
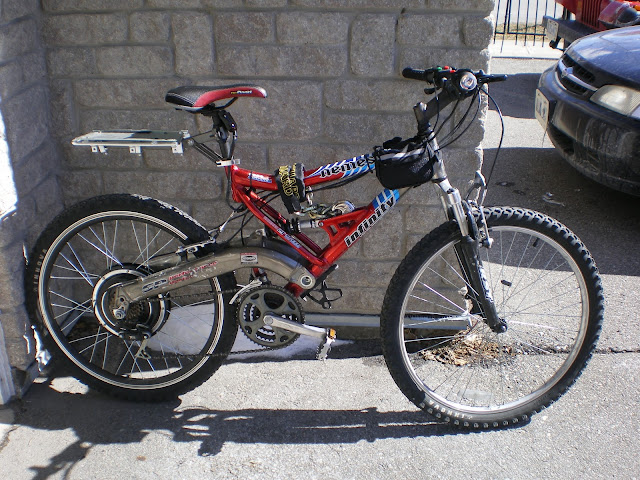
And here's a pic of the new setup (controller and extra cables fit into the front tube bag; battery is off for winter storage, hence the previous picture so that you can see the battery):
So top speed with this current setup is around 40-50km/h and acceleration is, well, weak Don't get me wrong, this was a great setup to start with, but as time goes by you end up wishing you had, more...
So when I first started looking for what to do to increase my top speed, I was a total noob and all I knew was that I needed a higher voltage and probably a new controller. After tons of research and help from so many people on this forum, I've come up with a list of stuff to buy:
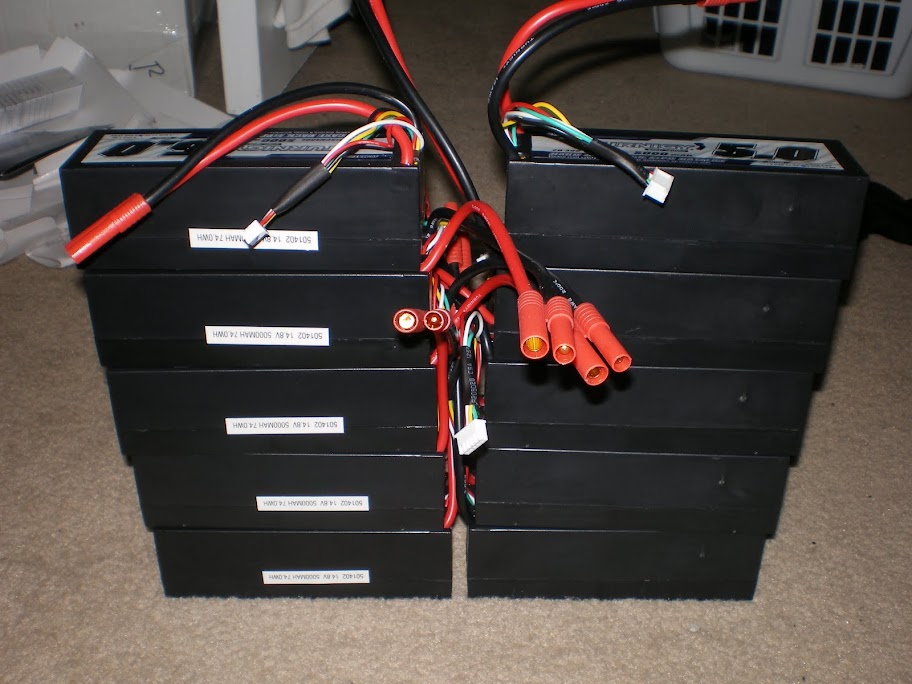
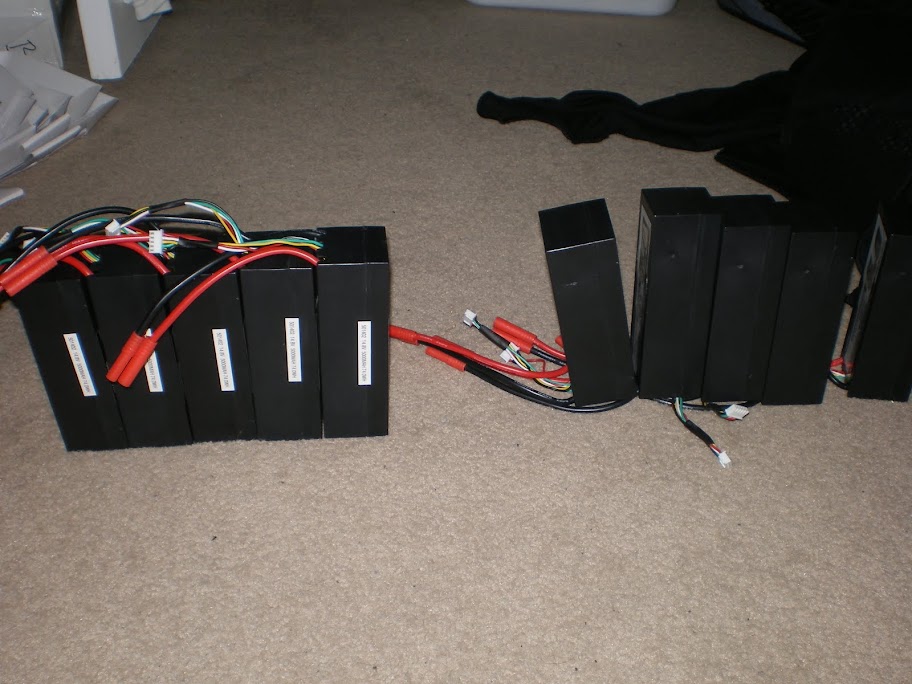
- 11 hardcase 4s5ah20c lipo packs from hobbyking (USA warehouse) for a 20s2p configuration and one battery as a spare/auxiliary power source for lights. http://www.hobbyking.com/hobbyking/store/__15521__Turnigy_5000mAh_4S1P_14_8v_20C_hardcase_pack.html
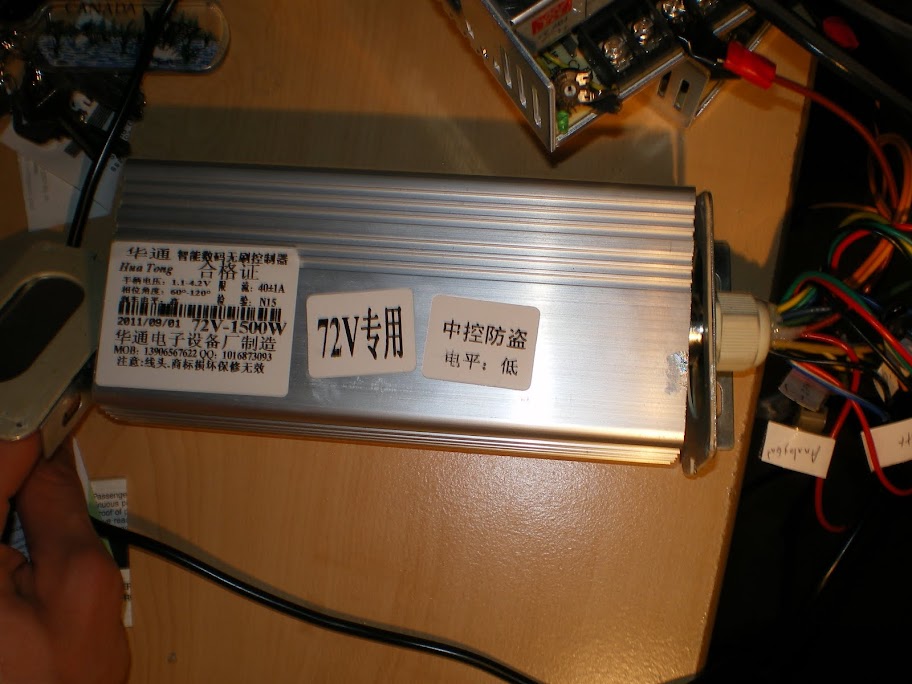
- Hua Tong 72V 1500W controller for $33 from dhgate.com (more info about the controller here: http://endless-sphere.com/forums/viewtopic.php?f=2&t=29469)
- 2 Meanwell (clones) S-350-48 power supplies, connected in series for 82V bulk charging. Bought from ebay from seller anna758595 but I can't find them there anymore. $73 for the two
- 5 balancers from ebay for $18.58 a piece http://www.ebay.ca/itm/260753810568?ssPageName=STRK:MEWNX:IT&_trksid=p3984.m1439.l2649
- 6 low voltage buzzers (1 to spare) http://www.hobbyking.com/hobbyking/store/uh_viewItem.asp?idProduct=18987
- Doctorbass's torque arms 8)
- Large screen cycle analyst direct plug-in. I snipped the plug and wired the 6 wires directly to the controller. I'll make my own harness for it eventually, but for now this will do
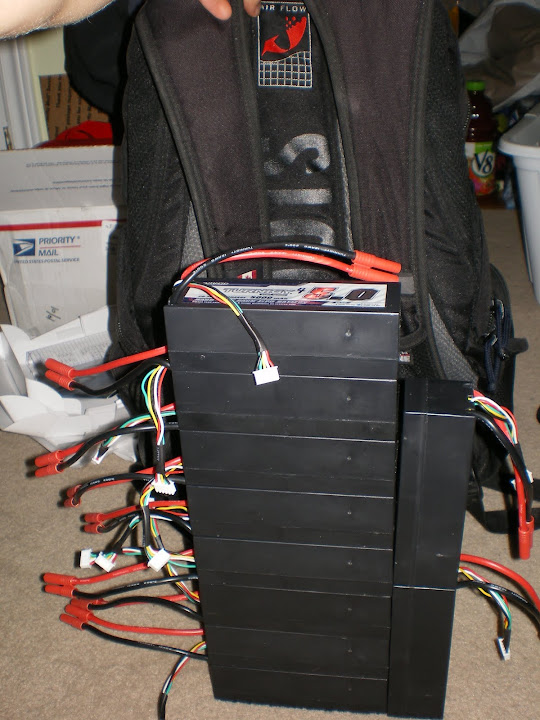
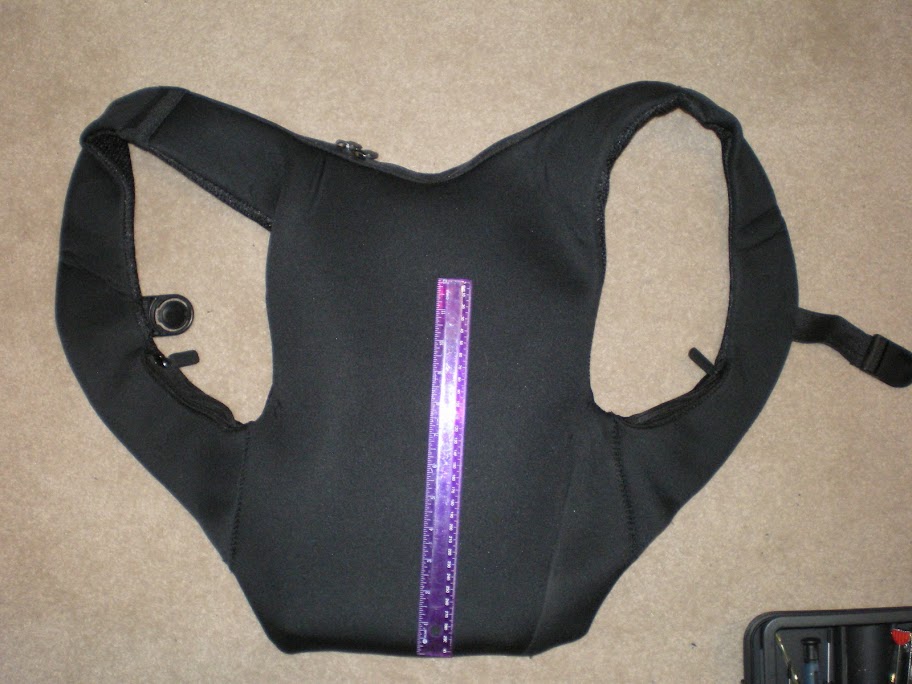
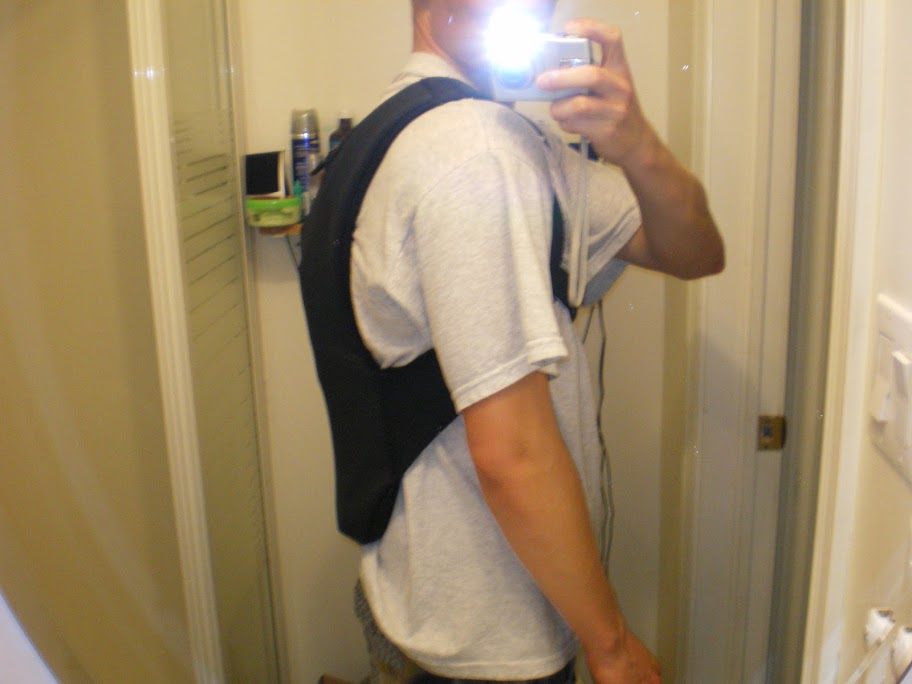
- low-profile backpack for the batteries ~$21 http://www.ebay.ca/itm/170647357372?ssPageName=STRK:MEWNX:IT&_trksid=p3984.m1439.l2649
- downhill full-face helmet http://www.allsportprotection.com/Demon_Ricochet_Helmet_p/dd0003.htm
- body armor http://www.allsportprotection.com/Demon_Proline_Combo_Pack_p/ds9908.htm
- random misc. parts such as turn signals, switches, cables, relays, mud guards, headlight, etc.
Here are HK buddy codes for some of the things I bought, in case you'd like a discount :wink: :
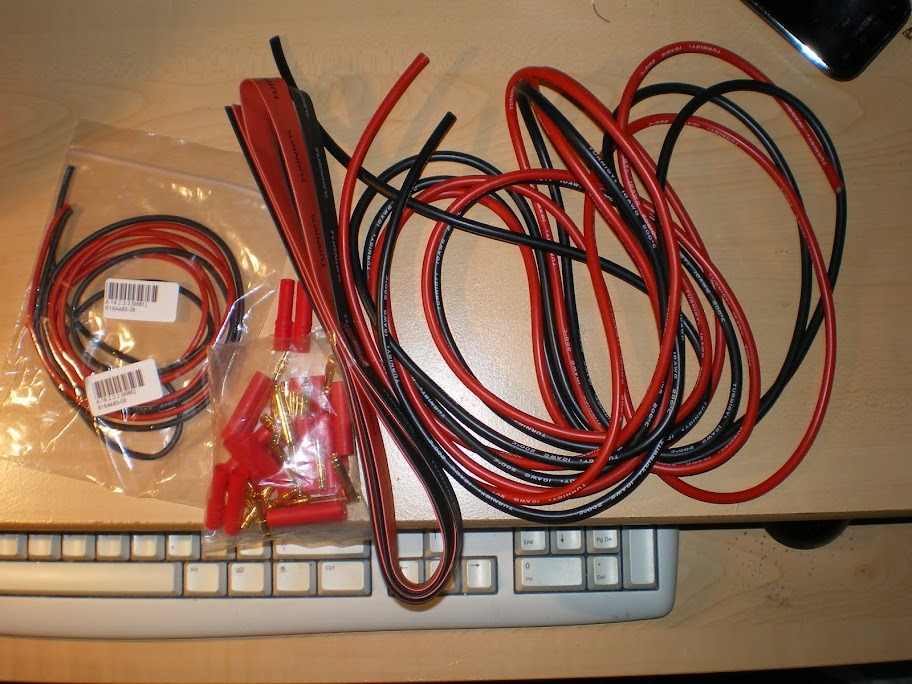
10AWG wire
Red http://www.hobbyking.com/buddy.asp?code=816052C1-91A1-4EA4-8F7C-FF52261EBAEB
Black http://www.hobbyking.com/buddy.asp?code=0EAD8665-01A0-4D12-B389-106E2FB6C53D
16AWG wire
Red http://www.hobbyking.com/buddy.asp?code=07D0110E-9FAB-469A-B045-DEFBEEEC71E3
Black http://www.hobbyking.com/buddy.asp?code=05DE7F0F-392C-4F98-B71D-15C26771D212
10mm heatshrink
Red http://www.hobbyking.com/buddy.asp?code=5F8FCD79-C2F6-46F5-BC97-94D59E3AE151
Black http://www.hobbyking.com/buddy.asp?code=B8AE934C-B37E-49F7-A297-F6FA8F672F22
4mm bullet connectors http://www.hobbyking.com/buddy.asp?code=AA9F236F-F35B-4DD8-B5B0-105737CADA1D
100mah lipo for my mini-helicopter http://www.hobbyking.com/buddy.asp?code=398D2B44-2EA3-4DA9-A042-5818FECC3F7C
So, first I waited what felt like a crazy long time for the batteries to come into stock at any of the HK warehouses as the hardcase are the best bang for the buck lipo. The USA warehouse received stock after a short while but unfortunately they won't ship to me in Canada. So I had them send it down to the border and I picked them up today. That way I got free shipping and all I had to pay was for some gas and a few dollars to pick up the package. To ship from China was ~$86 I also sent my protective gear there as well since they offered free shipping to the US.
(So here's where I get a little ticked off because when I hit preview before posting, it wanted me to log back in to ES and my post got deleted. I had it backed up in notepad only to this point so everything past here is me writing a little angry so I might have missed some stuff)
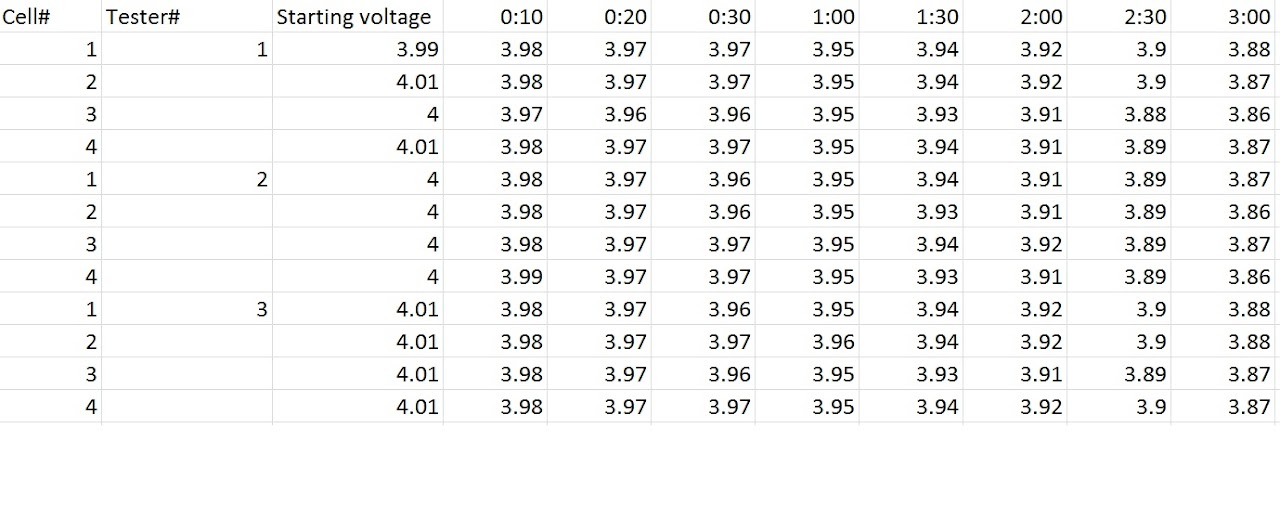
I was at my parents' house in Hamilton for the Thanksgiving weekend (Hamilton is only about 40 minutes from the USA border) so I went to pick up my batteries and protective gear today. I brought one of my balancers to check the cell voltages and to my great relief/surprise, all the packs had their cells within 0.02v of eachother, except for one. The one pack had readings varying from 3.84 to 3.87 so hopefully after a few cycles it doesn't go bad. I'll just use this pack to power my accessories. I later tried my other 4 balancers and they all read within spec as well, although the voltages were slightly different between the balancers of course.
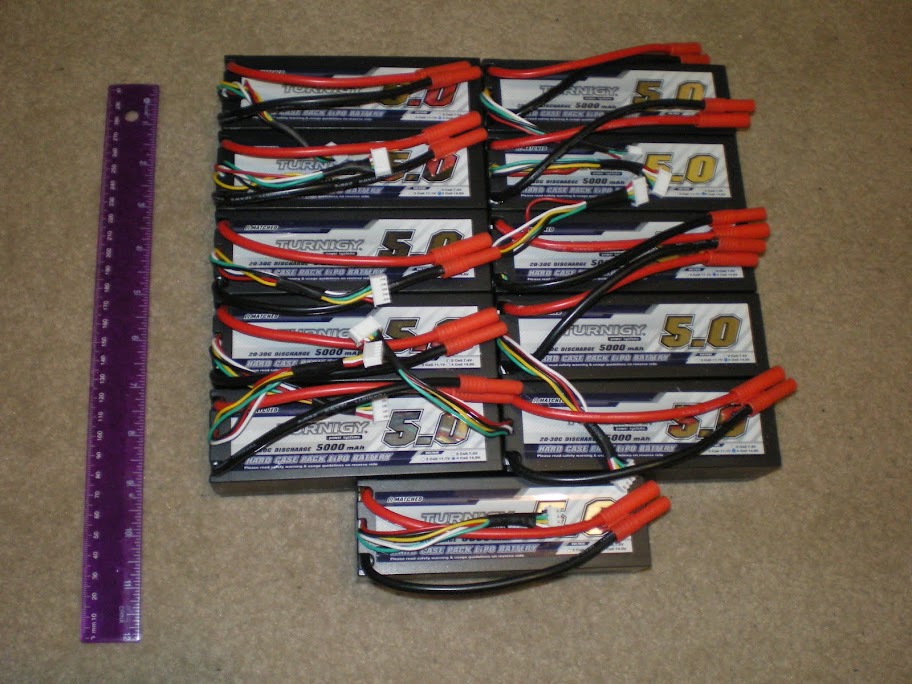
Here are pics of what I picked up today:
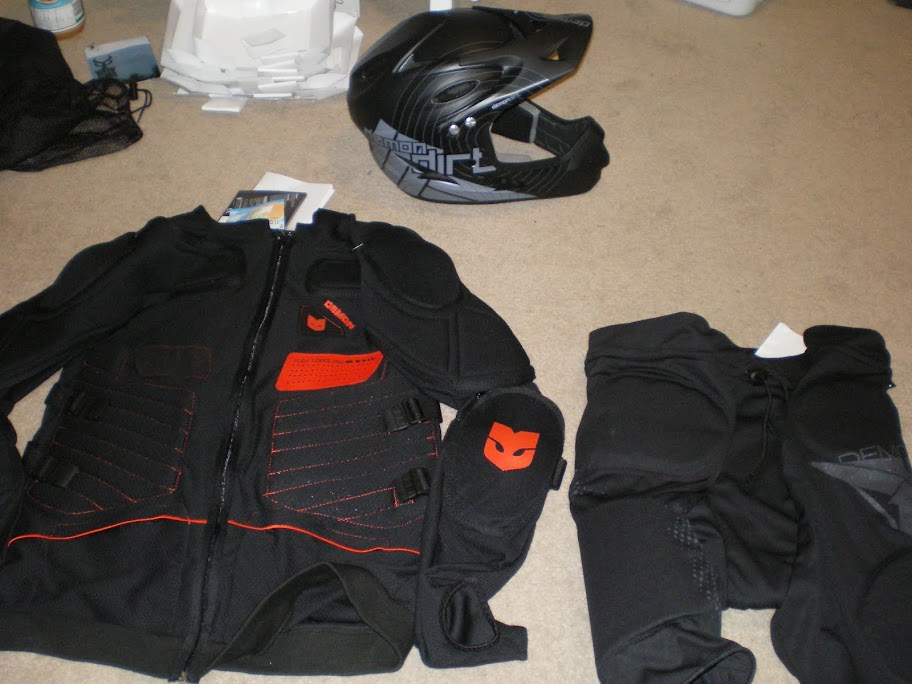
The protective shorts were free so I'll just use them for snowboarding as using them on a bike over regular pants or shorts would just not work very well :?
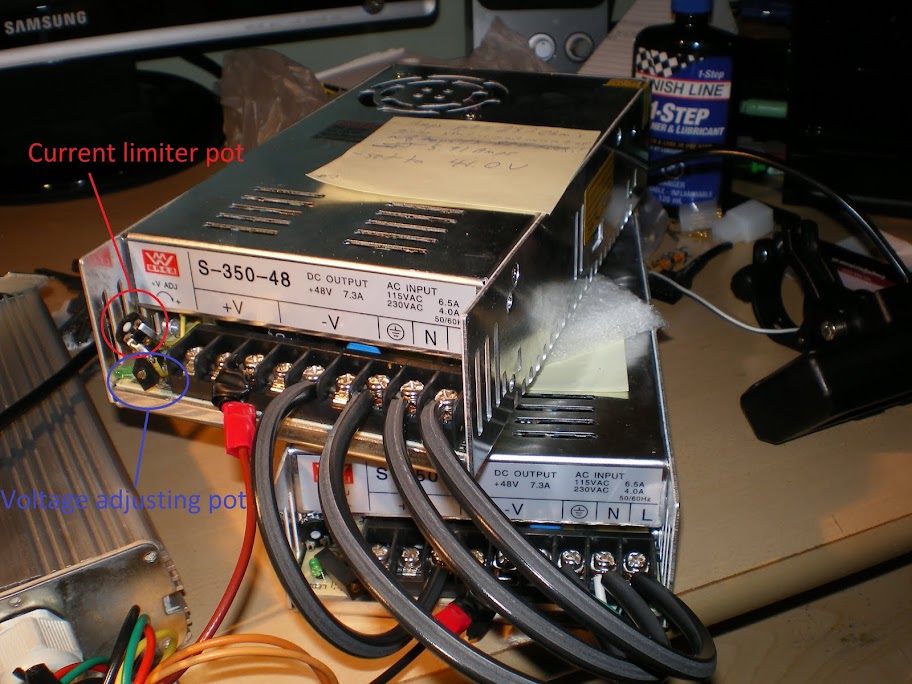
Here are the Meanwells, both modded with voltage and current limiting pots. Only one needs to be current limited but I put it in for redundancy
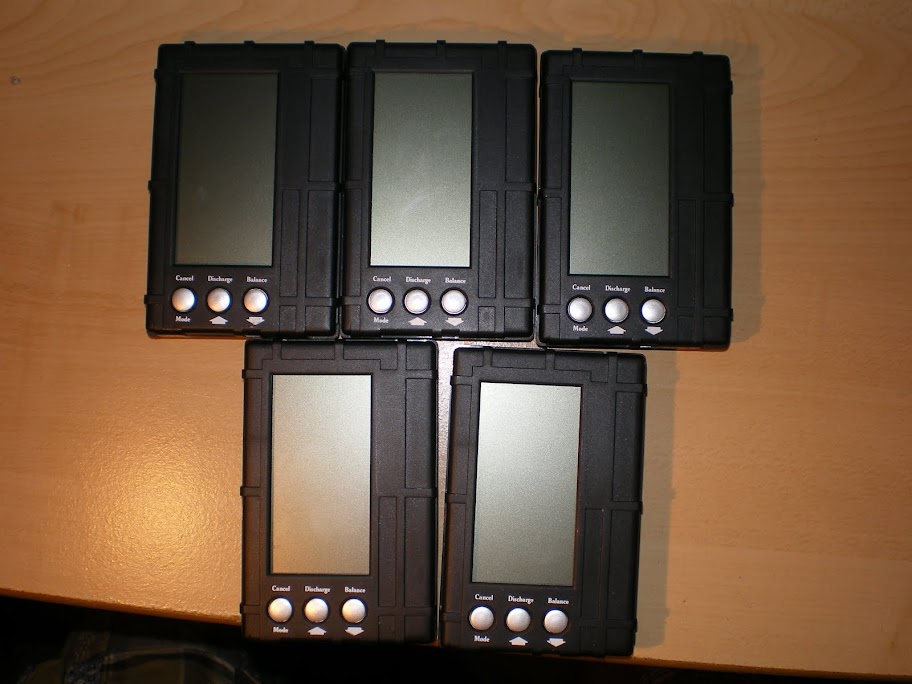
The balancers
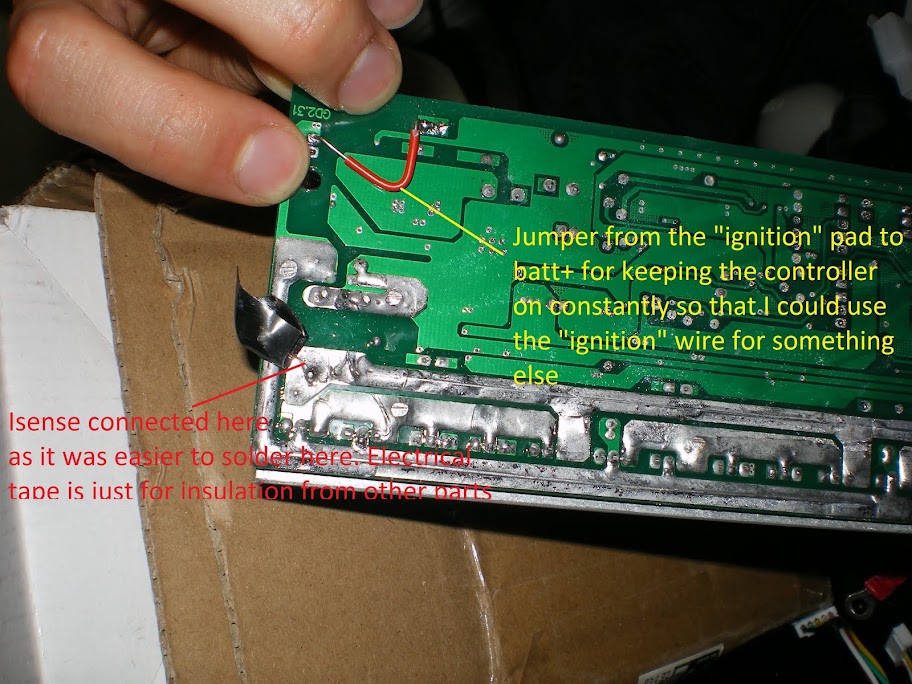
Controller
Videos of first tests with the controller and Meanwells before I got the batteries:
[youtube]D0WpP6ppzsU[/youtube]
[youtube]KlUjrADl78Q[/youtube]
My goal with this bike is to make it as stealthy as possible, but powerful at the same time. The batteries will be in a backpack, the controller I'll fit in between the pedals at the bottom of the frame (which I'll have to remove the suspension temporarily to get the controller in there). The front tube bag which currently carries my controller and extra wires will probably be gone, but I'm thinking I may need it for my extra hardcase battery that will run my accessories. The hardcase won't fit in the bag itself, but I only need 3 of the cells to get close to 12V so I'll have to take it apart anyway. We'll see what happens 8)
For now I'll have to wait on the post man to bring me my cables and connectors at the very least so that I can get the batteries all hooked up and tested. Hopefully Doc's torque arms will come in tomorrow so I can get those put on ASAP as I'll need them before I do any real testing. I'll update as new things start to come in or are tested.
Any questions/comments/suggestions are happily welcomed
Mike
So for the past month and a half I've been reading about how to increase the top speed of my bike and things are finally starting to piece together. I've been meaning to start a "re-build" thread for a long time but have been too lazy. I finally have some time to do a write-up of what I've been up to since I started my quest. I've tried PM'ing a mod to see if this is the right section to post in but I've had no replies in the past week so I'll just post here anyway and mods feel free to move it wherever appropriate
So, my current setup is a 1000W Golden Motor rear hub running a 48V12ah li-ion battery and a stock GM controller (not sure how many fets but probably not many as it is TINY).
Here's a pic of my old setup (controller above battery):
And here's a pic of the new setup (controller and extra cables fit into the front tube bag; battery is off for winter storage, hence the previous picture so that you can see the battery):
So top speed with this current setup is around 40-50km/h and acceleration is, well, weak
So when I first started looking for what to do to increase my top speed, I was a total noob and all I knew was that I needed a higher voltage and probably a new controller. After tons of research and help from so many people on this forum, I've come up with a list of stuff to buy:
- 11 hardcase 4s5ah20c lipo packs from hobbyking (USA warehouse) for a 20s2p configuration and one battery as a spare/auxiliary power source for lights. http://www.hobbyking.com/hobbyking/store/__15521__Turnigy_5000mAh_4S1P_14_8v_20C_hardcase_pack.html
- Hua Tong 72V 1500W controller for $33 from dhgate.com (more info about the controller here: http://endless-sphere.com/forums/viewtopic.php?f=2&t=29469)
- 2 Meanwell (clones) S-350-48 power supplies, connected in series for 82V bulk charging. Bought from ebay from seller anna758595 but I can't find them there anymore. $73 for the two
- 5 balancers from ebay for $18.58 a piece http://www.ebay.ca/itm/260753810568?ssPageName=STRK:MEWNX:IT&_trksid=p3984.m1439.l2649
- 6 low voltage buzzers (1 to spare) http://www.hobbyking.com/hobbyking/store/uh_viewItem.asp?idProduct=18987
- Doctorbass's torque arms 8)
- Large screen cycle analyst direct plug-in. I snipped the plug and wired the 6 wires directly to the controller. I'll make my own harness for it eventually, but for now this will do
- low-profile backpack for the batteries ~$21 http://www.ebay.ca/itm/170647357372?ssPageName=STRK:MEWNX:IT&_trksid=p3984.m1439.l2649
- downhill full-face helmet http://www.allsportprotection.com/Demon_Ricochet_Helmet_p/dd0003.htm
- body armor http://www.allsportprotection.com/Demon_Proline_Combo_Pack_p/ds9908.htm
- random misc. parts such as turn signals, switches, cables, relays, mud guards, headlight, etc.
Here are HK buddy codes for some of the things I bought, in case you'd like a discount :wink: :
10AWG wire
Red http://www.hobbyking.com/buddy.asp?code=816052C1-91A1-4EA4-8F7C-FF52261EBAEB
Black http://www.hobbyking.com/buddy.asp?code=0EAD8665-01A0-4D12-B389-106E2FB6C53D
16AWG wire
Red http://www.hobbyking.com/buddy.asp?code=07D0110E-9FAB-469A-B045-DEFBEEEC71E3
Black http://www.hobbyking.com/buddy.asp?code=05DE7F0F-392C-4F98-B71D-15C26771D212
10mm heatshrink
Red http://www.hobbyking.com/buddy.asp?code=5F8FCD79-C2F6-46F5-BC97-94D59E3AE151
Black http://www.hobbyking.com/buddy.asp?code=B8AE934C-B37E-49F7-A297-F6FA8F672F22
4mm bullet connectors http://www.hobbyking.com/buddy.asp?code=AA9F236F-F35B-4DD8-B5B0-105737CADA1D
100mah lipo for my mini-helicopter
So, first I waited what felt like a crazy long time for the batteries to come into stock at any of the HK warehouses as the hardcase are the best bang for the buck lipo. The USA warehouse received stock after a short while but unfortunately they won't ship to me in Canada. So I had them send it down to the border and I picked them up today. That way I got free shipping and all I had to pay was for some gas and a few dollars to pick up the package. To ship from China was ~$86
(So here's where I get a little ticked off because when I hit preview before posting, it wanted me to log back in to ES and my post got deleted. I had it backed up in notepad only to this point so everything past here is me writing a little angry so I might have missed some stuff)
I was at my parents' house in Hamilton for the Thanksgiving weekend (Hamilton is only about 40 minutes from the USA border) so I went to pick up my batteries and protective gear today. I brought one of my balancers to check the cell voltages and to my great relief/surprise, all the packs had their cells within 0.02v of eachother, except for one. The one pack had readings varying from 3.84 to 3.87 so hopefully after a few cycles it doesn't go bad. I'll just use this pack to power my accessories. I later tried my other 4 balancers and they all read within spec as well, although the voltages were slightly different between the balancers of course.
Here are pics of what I picked up today:
The protective shorts were free so I'll just use them for snowboarding as using them on a bike over regular pants or shorts would just not work very well :?
Here are the Meanwells, both modded with voltage and current limiting pots. Only one needs to be current limited but I put it in for redundancy
The balancers
Controller
Videos of first tests with the controller and Meanwells before I got the batteries:
[youtube]D0WpP6ppzsU[/youtube]
[youtube]KlUjrADl78Q[/youtube]
My goal with this bike is to make it as stealthy as possible, but powerful at the same time. The batteries will be in a backpack, the controller I'll fit in between the pedals at the bottom of the frame (which I'll have to remove the suspension temporarily to get the controller in there). The front tube bag which currently carries my controller and extra wires will probably be gone, but I'm thinking I may need it for my extra hardcase battery that will run my accessories. The hardcase won't fit in the bag itself, but I only need 3 of the cells to get close to 12V so I'll have to take it apart anyway. We'll see what happens 8)
For now I'll have to wait on the post man to bring me my cables and connectors at the very least so that I can get the batteries all hooked up and tested. Hopefully Doc's torque arms will come in tomorrow so I can get those put on ASAP as I'll need them before I do any real testing. I'll update as new things start to come in or are tested.
Any questions/comments/suggestions are happily welcomed
Mike