GM1000W on 20s lipo "re-build" thread

Nice! That hangs pretty low (TWSS) haha how much does it all weigh? I'm scared about it being heavy, but I sure hope it'll be fine. Great to hear that we can have a backpack on top of it too, that'll help with commuting to school if I choose to use the slim backpack in the future.
 
I don't have a scale to weigh it on but it's not heavy at all. Then again, I'm used to carrying huge loads on my back from textbooks, groceries, etc. But I'd say it's about 10-12 pounds.
 
So I'm an idiot and miscalculated the amount of connectors I'd need to create paralleling harnesses so it looks like I'll just wrap the wires together for now. I hooked up 9 batteries into a 12s3p configuration and charged them up. Cell voltages stayed pretty even during charging except one or two that ended up 0.05v ahead of the others closer to the end of the charge. Stacked them into 3's and surprisingly they fit into the backpack stacked 9 high :shock:

IMGP0022.JPG


I also did the Q5 fan mod to the meanwells but for some reason it doesn't work. The first meanwell I did the mod on, the fan would turn on when I told it to. The second meanwell did nothing. After I modded the second meanwell, the first one didn't work either. However, as I was charging, the fan kicked on automatically after a while and when I flicked the switch that shorts the Q5 transistor, the fan turned off. So maybe the transistor was placed backwards into my Meanwells and I have it wired to shut off the fan instead of turning it on? That would make sense, except why then did my first meanwell Q5 mod work temporarily?

Next thing to do is attach bullet connectors to my 10g wire that leads to the controller and take this baby for a ride to cycle the batteries.
 
I need them 12s so that I can run them on my low-power 48V GM controller, which pulls a max of around 20amps. If I had them in 20s it would blow the controller. If I used them right away with my 1500W Hua Tong, it would pull a lot more current than I'd like. Plus, being in 3p, they inherently pull less current as well. After a few cycles like that, I'll rewire them into 20s2p and hook them up to the high power controller.
 
You're getting me all excited! That's pretty good range for 120%. I have pretty thin wheels for a mountain bike so hopefully I'll get that or better :p

Soldering the bullet connectors is much more of a PITA than I expected it to be. Two problems:
1. The 10awg just barely fits on its own into the connector, never mind when it's tinned. I had to snip away around 1/4 diameter of the wire to make it easier to fit in the connector.

2. My soldering iron is too thick/not powerful enough to properly melt the solder in the bullet. Somehow I've made a workable connection (after going through 3 connectors :| ) that will work for now. I'll see what I can do when it comes to arranging the batteries in their final 20s2p setup.

For now I wired the batteries up to the GM controller and everything worked! It's pouring outside (they're calling for 5cm of rain tonight!!!) so all I could do was give the bike a little throttle while holding it in place. I had the battery medics hooked up to monitor if any cells dropped in voltage and for the most part, their voltages didn't change.

I'll take the bike for a ride tomorrow morning to the airport and see how it goes. If all goes well, I'll run the batteries down to ~3.7v/cell and then charge them back up. I'll cycle them maybe 2 more times and then swap 2 of the batteries out with the 2 I still have left over so that they can be broken-in as well. Before I arrange the batteries into 20s2p I'll have to install the torque arms, so maybe I'll do that tomorrow or soon after.

Also, more parts are starting to come in. Here are the turn signals I got off ebay. They're smaller than I expected but that's a good thing as I can fit them into the ends of the handlebars more easily.
IMGP0024.JPG

Also got some waterproof shoe covers so finally no more soaked feet after riding in the rain!
 
510PF5039NL._SL500_AA300_.jpg


This works for up to 8 gauge. I love it. Get's hot in seconds, so no need to keep it on stand by. $30 @ home depot. Been using it for a year, and only just replaced the tip. Next best is a torch I believe.

Drill some holes in a piece of scrap wood to keep the bullets in while soldering.

Tin wire ends first. Then tin bullet cups. Get the solder to wick up the wire.

[youtube]B9yY9Kk4bEA[/youtube]

This is good, but you probably already know it. I've been building harnesses all day. I was pleased by how easy it was to make parallel boards from stripboards. It literally took me 5 minutes for each 4s group. Solder the pins, and then wrap the bottom in duct tape.


Each strip board has 10 jst header, and out puts 10 balance connections. These goes to a 4s to 8s connection and to the cell log or imax for balance charging. Packs are held together with duct tape and colored electrical tape at parllael level, and then velcro for each 8s group. Not as clean as I'd like, but whatever; it's going in my box anyways.


Torque arms are fun... my custom ones are holding up well I think. That was the hardest part of my build as I don't have metal working experience. You should be excited! I wasn't doing wheelies, but I just have to push down on the front and give it throttle to wheelie. Almost threw me off doing that :D Can't wait to solder the controllers shunt so I'm not just limited to 60a 8)
 
I can't believe I forgot that I can use a butane torch for soldering! That is totally what I am going to do!!! I looked up that soldering gun on Home Depot's website but it's like $70. That's ok, I would only really need it for these connectors but here's hoping that the torch works well!

I was just about to place an order on HK for a bunch more stuff but you reminded me that I should get some connectors and make a paralleling board. Thank you again lol

I've been sick the past couple days hence why I haven't updated much. The bike is soooo much more powerful with lipos, even on a 48V GM controller. Today I worked up the torque arm placement and grinding the dropouts and stuff for a few hours. Tomorrow I will place them on with the epoxy as I don't feel like doing any more of that tonight. I also fixed the meanwell's fan mod. Turns out the farthest two pins on the Q5 transistor are the ones that needed to be shorted.

auraslip said:
I wasn't doing wheelies, but I just have to push down on the front and give it throttle to wheelie. Almost threw me off doing that :D Can't wait to solder the controllers shunt so I'm not just limited to 60a 8)
Oh boy I can't wait!
 
I've been feeling poor too. Think it might be allergies. Or too much time with the new girlfriend... late nights and such.

Their are a couple of the weller solder guns. I have the cheapest... I really do love it. Mostly because I always walk away from the work room just to check something online "for a second" and leave the soldering iron on and burn up the tips. With the solder gun I can leave it plugged in with out worry and it gets as I hot as I need it in like 10 seconds. Still, torch is probably the way for 8 awg wires.

here is where I got the strip boards http://www.ebay.com/itm/220868804868?ssPageName=STRK:MEWNX:IT&_trksid=p3984.m1439.l2649 $4 for 3x (6 once you cut em in half)

search for the strip board thread to find the proper connects on digikey... not very much fun crimping them though...
 
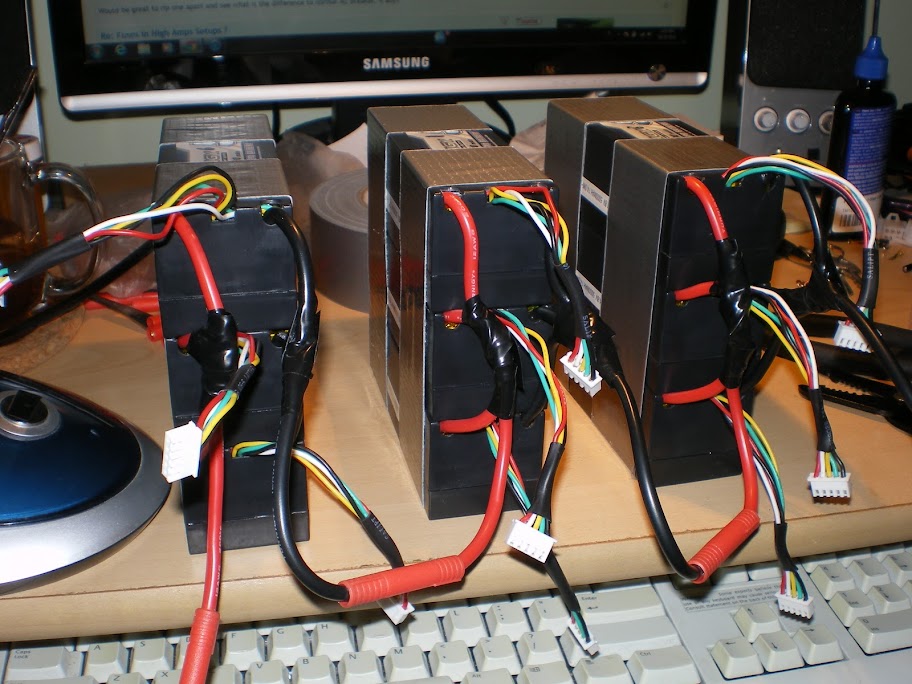
Thanks for the ebay link. I'll have to see what my final physical battery configuration will be before I decide if boards are good to use for balance charging or if I should just create a harness without boards.

Yesterday I finally go the torque arms on. After sanding, grinding, and making a giant mess in the garage and in my room, I got the doctorbass torque arms on! They are on there rock solid. I got a dab of the epoxy on my gear cog and I was afraid it would get stuck to the frame so while I had the torque arms in my homemade furnace, I occasionally spun the gears to make sure the epoxy didn't stick to them.

Here are some shots:

Homemade furnace consisting of a 1500W heater fan and a hair dryer, covered by a box, covered by any type of material I could find lying around:
IMGP0027.JPG


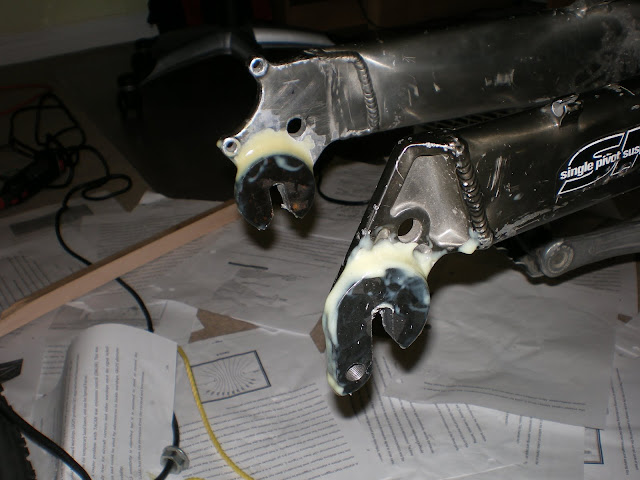
Torque arms after curing:
IMGP0029.JPG


I put the torque arms on one at a time and cured them one at a time. I kept the motor on the bike to make sure alignment was good and I secured the axle from getting stuck to the dropouts by wrapping the axle in plastic food wrap. The furnace was HOT, I burned myself on the spokes at one point. An hour in there for each side and the epoxy was rock solid.

I took the bike with me to Hamilton to see my parents. The city buses are on strike so I had to bike to get to the Go bus (inter-city bus). The lady almost didn't want to let me on because of the front bag but when she saw it was wired on she said it was ok. Guess she didn't care about the motor on the back as they aren't supposed to allow electric bikes on the bus rack, so I'm already rockin' the stealth I guess 8)
For the next few days I'll ride around on the current setup and then swap the two unused lipos so that they can get cycled too. After that, it's time to go full scale with the Hua Tong :twisted:
 
I've been out of the scene for a while now but I've got the bike running. Just thought I'd make a quick update with a video showing it running. What's left is to mount the controller and attach brake-switches to cut off the controller and activate the tail light. Acceleration is nice, pulling max almost 40amps. Top speed uncalibrated around 57kph but felt like it could be more.
[youtube]dckBwuGc-RY[/youtube]
 
Back
Top