SUCCESS! Or, at least... more success than I'd had thus far.
I will talk through my experience to help fill in the blanks from the wikis below for other novices who may not be as familiar/comfortable with programming.
By comparing the wiki at:
https://github.com/EBiCS/EBiCS_Firmware/wiki shown below on the left to the English-translated (thank you, Google!) version of the instructions on the pedelecs.de forum at:
https://www.pedelecforum.de/wiki/do...:open_source_firmware_fuer_lishui_-controller shown below on the right, I discovered a critical step I was missing - installing the STM32 Link utility!

As an added challenge, when I tried to run the STM32 utility, I got an error that "mfc140.dll is missing" or something like that. A quick internet search led me to the following post on the Microsoft support forum:
https://answers.microsoft.com/en-us...fc140dll/fd263446-82bd-4fdf-8e50-a0a2c0cf8486. Following the link in the third post from DaveM121, I downloaded and installed the Visual C++ Redistributable for Visual Studio 2015 from
https://www.microsoft.com/en-ie/download/details.aspx?id=48145. Once I did that, all the other steps worked perfectly. Before that, I could click on "Unlock Controller" or "Compile & Flash" and it would run through all sorts of command-line magic, but would never actually write anything to the controller
")
As soon as I flashed in the new firmware, my Bafang display was working properly with no "Error Code 30". YESSS!!!
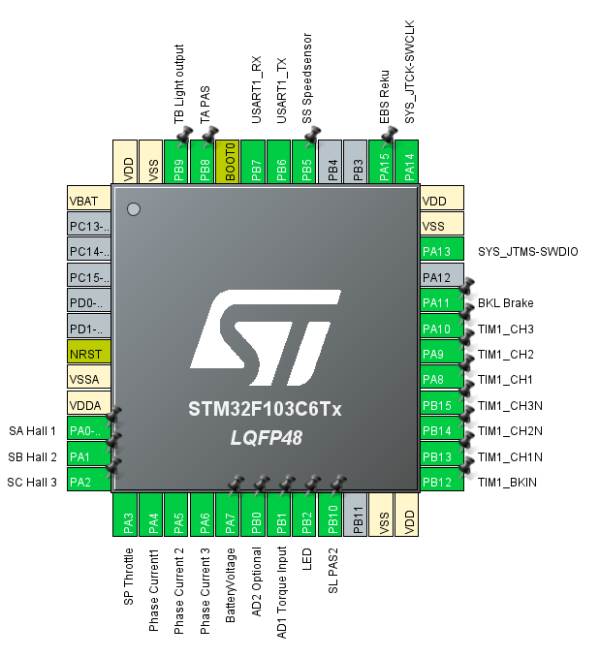
Next task was understanding your instructions about the "autodetect" feature. I was able to eventually figure out that you want to hold down the brake for a wheel that is NOT being driven by the motor! Hold down full throttle, AND hold down brake (for a non-driven wheel), AND power up controller. Once motor starts to move (in my mid-drive motor's case it moved VERY slowly... only a couple degrees of crank rotation every second or so) you can release brake and throttle and it'll run all by itself. My motor still ran very rough after this procedure, so I decided to try the "autodetect on startup" feature. For this, don't forget to not only click that "enable autodetect in debug mode" setting on the "advanced settings" tab, but ALSO select "debug" for the display on the "basic settings" tab. Finally, remember that if the controller is still plugged into your computer, it will not power down
when you shut off the power at your bike.
Even after doing the autodetect procedure a few times in both modes (brake-and-throttle and do-on-startup), my motor was still running very rough. This was my fear! What settings do I need to alter on the basic (or --gasp-- advanced) page to make it proper? Here was my "learning process."
First, I ignored the PAS settings and torque sensor settings as I use a throttle so no worries there.
Next, Batterycurrent max and regencurrent max. Values are inputted in milliamps, so that's easy enough! So far, so good!
On to motorcurrent max and regencurrent. Wha? These numbers are very low, if they're supposed to be milliamps. ::flips back to wiki instructions for parameters:: Okay, what the hell is an ADC? --<<5 minutes of Googling later>>-- It means "analog-to-digital converter." The microprocessor doesn't know what volts, amps, RPMs, microhenrys, or whatever are... it just knows ONES and ZEROES. The various sensors (hall sensors, torque sensors, throttle sensors) talk to the ADC and convert the sensor's various things they are measuring into those ones and zeroes. Motorcurrent max and regencurrent are given in the "ones and zeroes" value, not the actual amperage. To calculate, you simply multiply by a... "38LL<<8"?!?! Now what the F is this?! Common core math? --<<10 minutes of Googling later>>-- ok, that wasn't so bad. LL = "long long" which is programming lingo for a placeholder for a very big (64-bit) value. <<8 is a bitwise conversion used in C++ programming that "shifts" values x number of bits to the left or right within their placeholder in memory. Google yourself if you want to learn more... otherwise all you need to know is "DROP THE EXTRA BS AND JUST KEEP THE NUMBER." Basic settings had "600" for motorcurrent max. multiply that by 38 (from "advanced settings" tab, "FOC Current" field minus all the extra non-integer stuff) and you get 22,800 milliamps, or 22.8 amps. Phew! It's all downhill from here, right.....?
Next, for Voltage min/max and throttle offset/max, same deal. They are also an "ADC value" that we need to convert to volts somehow. Unfortunately, unlike I did with the motorcurrent max and regencurrent values, I could not figure out how to use the "calibration battery voltage" value from the advanced settings tab as described here
https://github.com/EBiCS/EBiCS_Firmware/wiki/The-Lishui-Parameter-Configuator#battery-voltage to figure out what to set! The default value on the "advanced settings" tab is 256. 256 x the default "voltage min" value of 500 gives me, uh, 128 THOUSAND millivolts, or 128 V? Something is not making sense to me, here. Let me move on and come back to it.
Push assist in KPH, speed limit, pulses per revolution (WHEEL revolution), and wheel circumference were all pretty self-explanatory. For Gear Ratio, I was not 100% certain. Fortunately, I was able to find some disassembled photos of a Bofeili motor and was able to see that it had 10 pole pairs of magnets and I could see all the planetary gear train and figure out how it was driven... the ring gear is the driving gear (attached to the motor's rotor) and the sun gear is the driven gear (attached to the cranks). Because the planetary carrier remains stationary in the motor housing, the ratio is actually the # of ring teeth / # of sun teeth, or 88/17 or 5.17 to 1. Interestingly enough, the motor rotates in the OPPOSITE direction of the cranks in this configuration.
So, I set everything up on the "basic settings" according to the above, then re-flashed and re-did the "auto detect" procedure. Still very rough running! Damnit! I guess I'll have to try and tinker with the "advanced settings" page. Here, I got lucky. First thing I did was try unchecking "enable position PLL" and when I reflashed, everything ran perfectly fine!
LONG STORY short... happy endings all around. Using the instructions provided in the wiki AND filling in the blanks as I described above, I was able to get what I was looking for - Lishui true FOC control AND the display of my choice AND bumped up the speed limit to accommodate my new gearing.
THANK YOU for all the support! (though I would still love to know what I'm messing up with the voltage calculation).
-Jon