
You are using an out of date browser. It may not display this or other websites correctly.
You should upgrade or use an alternative browser.
You should upgrade or use an alternative browser.
My 40mph commuter Goped build thread.
- Thread starter MrDude_1
- Start date
MrDude_1
100 kW
NyOliver said:Thanks for the time and energy you put into a document to your project. That is slightly hilarious overlook.
Question about the laptop power supplies in series, did you internally disconnect the negative output from main earth?
I checked them first and they're isolated supplies.
MrDude_1
100 kW
I want to convert it from chain to belt or directly geared... I just don't have the means to do it at the moment.silviasol said:Good luck! One day I hope to have that much power. Wish I remembered where I got my gears they had a ton of different shaft sizes which would keep you from having to drill.
ElectricGod
10 MW
This project is a great read! Lots of good pictures and trials to go through.
How is it going on the belt drive conversion? I'm looking into going this route too.
How is it going on the belt drive conversion? I'm looking into going this route too.
MrDude_1
100 kW
ah. I never updated here. Probably should.
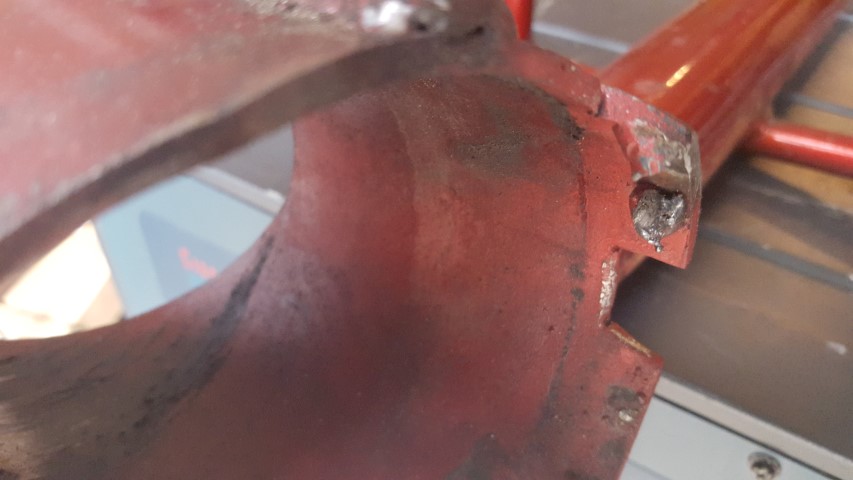
So I had this annoying pulse to the chain drive, because it was not perfectly centered on the rear wheel. It was yanking on the chain and motor mounts
If you recall earlier, I couldn't clear the mounts I wanted inside the tube, and was forced to use nuts, tack welded on each side.
This all went to hell a couple weeks back. one of the nut mounts broke... no big deal to fix, but to get home from work, I rode it with two of the 3 mounts.
about 3 blocks from my house, the second mount broke.
I made it home, but I found that it made the motor rub on the ring... it was moving. it also rode glass smooth as the motor could "shake" with the eccentric of the rear wheel being off.
So I decided to fix it properly, and mount long nuts it on the OD of the mount tube. This means I needed a new motor mount plate, as my current one was flush with the tube OD.
I bought some new 1/4" aluminum plate, and made a new mount.
I tried welding the longer nuts, but the heat melted through. So I had to redo them twice.. eventually learning to NOT have the SS bolts in there, but run normal bolts in there while welding....
I eventually had the new mount plate and mounts done...
I also found someone selling an alignment tool, and purchased it.
I re-aligned the rear sprocket.
done.
It was glass smooth. Every vibration I had was from the sprocket not being round, the weight/balance of the wheel being off from the sprocket not being centered, or the motor from being pulled on by the chain.
Perfect.
until it all went to... well it was bad.
The rear sprocket is held on with bolts... the nuts are on the sprocket side, and the long bolts pass through.
I must not have had the chain tensioner adjusted tight enough, because I hit a bump, and the chain jumped off the rear sprocket.
it wrapped around the bolts.
and yanked.
hard.
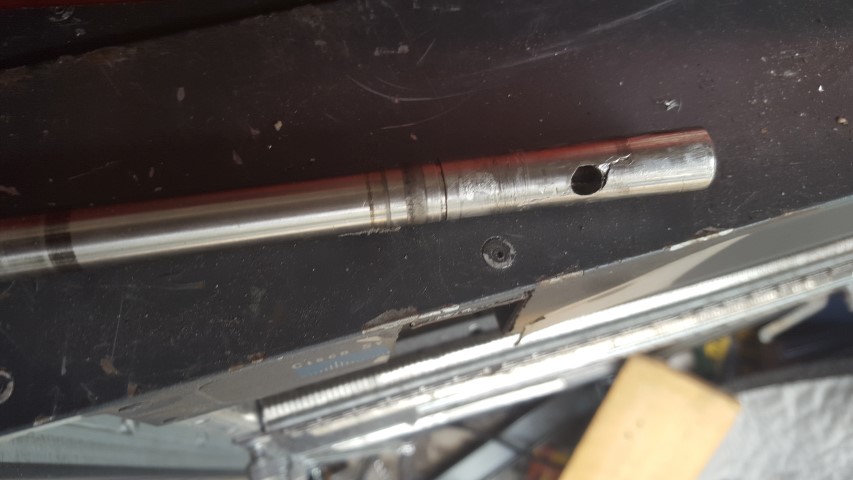
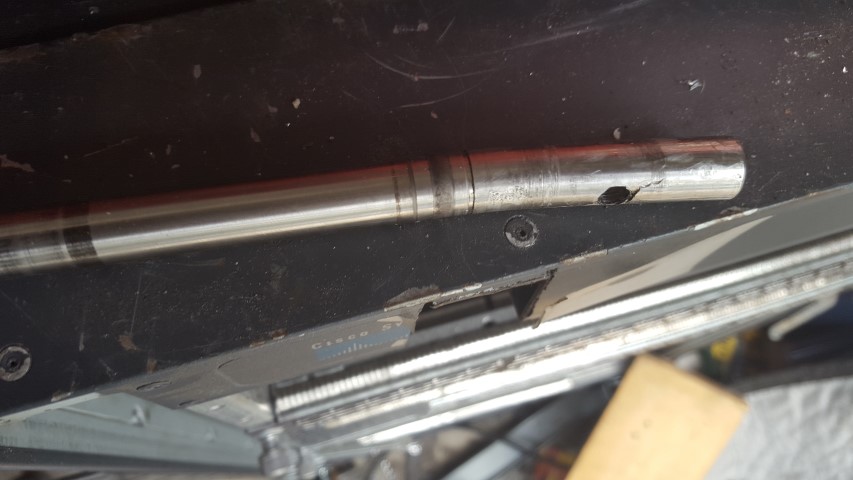
the 12mm stainless steel shaft of the motor was bent. a good 30-40* bend.
I had to push it home.
I decided enough was enough. I hated oiling the chain. I hate that it makes a mess. Its the only part of this that isn't clean... I decided to go belt drive.
after much research, I decided 5mm HTD was the way to go, so I ordered the parts.
I also ordered a new motor shaft and a belt tensioner
The weekend before last the parts arrived. I took the pulleys and drilled them through... the smaller pulley I drilled all the way through to the motor shaft size. I still need to cross drill it for the set screw.
The larger pulley is all set... I think. I went with a plastic (glass reinforced nylon66 I believe) one with a aluminum hub. I drilled out the bolt pattern carefully on the plastic, and then drilled the hub to 7/8.
This SHOULD let me pass the axle (5/8) with spacers on it though... but I would need a longer axle.
My axles are just 5/8" bolts... so instead of buying an even longer bolt so that the nut clears, I am trying a new idea of using an allen headed bolt and passing it through backwards... head on the pulley side.
This means I can run a shorter bolt, and the nut on the chassis side. I keep wanting to call it a swingarm, but theres no suspension.. lol.
So that part is on hold until my bolts arrive. They should be here today, and I'll try them out tomorrow.
Next part is the motor.
With the shaft bent, I couldn't get it out easily.... so I went out and bought a new 12 ton press. Worth every penny as I needed it for other projects too.
pressed it out backwards, and got it all taken care of.
I also drilled out the end of the motor, where the C-clip holds the bearing in... I plan to take Thuds suggestion and use a plastic spacer. This keeps me from needing to cut a groove in the shaft.
I did put the two flats on the shaft for the bell... and pressed it in.
with this ridiculously long shaft on the motor and the rear tire just sitting on a too short axle, I did a mock-up.
motor looks good I just need to cut the shaft.
Motor sprocket is slightly out of round, but not bad at all.
I think the rear wheel is perfect.
my tensioner however will not work as I hoped. It is a AC belt (thinner than the usual) tensioner for a early 2000s Chevy truck. I bought it because its simple and I like the design. unfortunately it is just too big.
So... to fix this I needed to disassemble it. going on my years of experience with this I clamped the hell out of it, put a couple safety cables on it, and disassembled it. I still managed to get the spring to fly 5ft across the room.... thankfully I knew that was likely and stayed clear. lol. seriously though, I was extra cautious. Please don't take apart tensioners like this unless you know how to keep yourself safe.
I will reuse this arm and spring, but the base and roller are going bye-bye.
I have a new roller intended for this size belt coming to me.. its from china though, so it will be a few days. I wanted a US made one, but couldn't find it... well, that's not true. I found a couple for $40+ but I will take the $2 china one instead. It is just an aluminum spool with bearings pressed in. worse case, the bearings are crap, and I will just replace them.
anyway.. as soon as I cut the motor shaft, drill/tap it and the pulley for the set screw, and mount the rear wheel and finish this tensioner.. I can ride it again.
Luckily I am not missing much riding time, as its been unusually cold here lately.
So I had this annoying pulse to the chain drive, because it was not perfectly centered on the rear wheel. It was yanking on the chain and motor mounts
If you recall earlier, I couldn't clear the mounts I wanted inside the tube, and was forced to use nuts, tack welded on each side.
This all went to hell a couple weeks back. one of the nut mounts broke... no big deal to fix, but to get home from work, I rode it with two of the 3 mounts.
about 3 blocks from my house, the second mount broke.
I made it home, but I found that it made the motor rub on the ring... it was moving. it also rode glass smooth as the motor could "shake" with the eccentric of the rear wheel being off.
So I decided to fix it properly, and mount long nuts it on the OD of the mount tube. This means I needed a new motor mount plate, as my current one was flush with the tube OD.
I bought some new 1/4" aluminum plate, and made a new mount.
I tried welding the longer nuts, but the heat melted through. So I had to redo them twice.. eventually learning to NOT have the SS bolts in there, but run normal bolts in there while welding....
I eventually had the new mount plate and mounts done...
I also found someone selling an alignment tool, and purchased it.
I re-aligned the rear sprocket.
done.
It was glass smooth. Every vibration I had was from the sprocket not being round, the weight/balance of the wheel being off from the sprocket not being centered, or the motor from being pulled on by the chain.
Perfect.
until it all went to... well it was bad.
The rear sprocket is held on with bolts... the nuts are on the sprocket side, and the long bolts pass through.
I must not have had the chain tensioner adjusted tight enough, because I hit a bump, and the chain jumped off the rear sprocket.
it wrapped around the bolts.
and yanked.
hard.
the 12mm stainless steel shaft of the motor was bent. a good 30-40* bend.
I had to push it home.
I decided enough was enough. I hated oiling the chain. I hate that it makes a mess. Its the only part of this that isn't clean... I decided to go belt drive.
after much research, I decided 5mm HTD was the way to go, so I ordered the parts.
I also ordered a new motor shaft and a belt tensioner
The weekend before last the parts arrived. I took the pulleys and drilled them through... the smaller pulley I drilled all the way through to the motor shaft size. I still need to cross drill it for the set screw.
The larger pulley is all set... I think. I went with a plastic (glass reinforced nylon66 I believe) one with a aluminum hub. I drilled out the bolt pattern carefully on the plastic, and then drilled the hub to 7/8.
This SHOULD let me pass the axle (5/8) with spacers on it though... but I would need a longer axle.
My axles are just 5/8" bolts... so instead of buying an even longer bolt so that the nut clears, I am trying a new idea of using an allen headed bolt and passing it through backwards... head on the pulley side.
This means I can run a shorter bolt, and the nut on the chassis side. I keep wanting to call it a swingarm, but theres no suspension.. lol.
So that part is on hold until my bolts arrive. They should be here today, and I'll try them out tomorrow.
Next part is the motor.
With the shaft bent, I couldn't get it out easily.... so I went out and bought a new 12 ton press. Worth every penny as I needed it for other projects too.
pressed it out backwards, and got it all taken care of.
I also drilled out the end of the motor, where the C-clip holds the bearing in... I plan to take Thuds suggestion and use a plastic spacer. This keeps me from needing to cut a groove in the shaft.
I did put the two flats on the shaft for the bell... and pressed it in.
with this ridiculously long shaft on the motor and the rear tire just sitting on a too short axle, I did a mock-up.
motor looks good I just need to cut the shaft.
Motor sprocket is slightly out of round, but not bad at all.
I think the rear wheel is perfect.
my tensioner however will not work as I hoped. It is a AC belt (thinner than the usual) tensioner for a early 2000s Chevy truck. I bought it because its simple and I like the design. unfortunately it is just too big.
So... to fix this I needed to disassemble it. going on my years of experience with this I clamped the hell out of it, put a couple safety cables on it, and disassembled it. I still managed to get the spring to fly 5ft across the room.... thankfully I knew that was likely and stayed clear. lol. seriously though, I was extra cautious. Please don't take apart tensioners like this unless you know how to keep yourself safe.
I will reuse this arm and spring, but the base and roller are going bye-bye.
I have a new roller intended for this size belt coming to me.. its from china though, so it will be a few days. I wanted a US made one, but couldn't find it... well, that's not true. I found a couple for $40+ but I will take the $2 china one instead. It is just an aluminum spool with bearings pressed in. worse case, the bearings are crap, and I will just replace them.
anyway.. as soon as I cut the motor shaft, drill/tap it and the pulley for the set screw, and mount the rear wheel and finish this tensioner.. I can ride it again.
Luckily I am not missing much riding time, as its been unusually cold here lately.
ElectricGod
10 MW
Be sure to get the belt pulleys dead straight inline with each other. Chain because it has some side slop allows you to be a little out of alignment and still work OK. Belt pulleys are much less forgiving. I agree, keeping the chain lubed can be messy and chain is noisier than belt. Of course a belt needs to be much wider than a chain too.
I hadn't considered it before, but drive shafts are common on motor cycles. I wonder how hard it would be to adapt one to an EV? Motor orientation could then be completely different than we typically use. I know there are some losses in changing the direction of rotation, but if it's minor, that might be acceptable.
I hadn't considered it before, but drive shafts are common on motor cycles. I wonder how hard it would be to adapt one to an EV? Motor orientation could then be completely different than we typically use. I know there are some losses in changing the direction of rotation, but if it's minor, that might be acceptable.
MrDude_1
100 kW
ElectricGod said:Be sure to get the belt pulleys dead straight inline with each other. Chain because it has some side slop allows you to be a little out of alignment and still work OK. Belt pulleys are much less forgiving. I agree, keeping the chain lubed can be messy and chain is noisier than belt. Of course a belt needs to be much wider than a chain too.
I hadn't considered it before, but drive shafts are common on motor cycles. I wonder how hard it would be to adapt one to an EV? Motor orientation could then be completely different than we typically use. I know there are some losses in changing the direction of rotation, but if it's minor, that might be acceptable.
The problem with driveshafts is the right angle drive. There are very few mass produced gearsets that could work for this kind of application. On top of that, you either need the right ratio, or you would need another step down gearset.
As far as the pulleys go, thats why the motor shaft is not drilled yet.
First I need to have my rear axle finished so it can be bolted exactly in place.
then I can get the ideal location for the front gear accurately. worse case, I can shim anything around anywhere with custom spacers. I can also correct for any minor alignment issues.. the shafts (axle and motor) have to be parallel or the belt will run to one side... I can account for that easily.
ElectricGod
10 MW
MrDude_1 said:ElectricGod said:Be sure to get the belt pulleys dead straight inline with each other. Chain because it has some side slop allows you to be a little out of alignment and still work OK. Belt pulleys are much less forgiving. I agree, keeping the chain lubed can be messy and chain is noisier than belt. Of course a belt needs to be much wider than a chain too.
I hadn't considered it before, but drive shafts are common on motor cycles. I wonder how hard it would be to adapt one to an EV? Motor orientation could then be completely different than we typically use. I know there are some losses in changing the direction of rotation, but if it's minor, that might be acceptable.
The problem with driveshafts is the right angle drive. There are very few mass produced gearsets that could work for this kind of application. On top of that, you either need the right ratio, or you would need another step down gearset.
As far as the pulleys go, thats why the motor shaft is not drilled yet.
First I need to have my rear axle finished so it can be bolted exactly in place.
then I can get the ideal location for the front gear accurately. worse case, I can shim anything around anywhere with custom spacers. I can also correct for any minor alignment issues.. the shafts (axle and motor) have to be parallel or the belt will run to one side... I can account for that easily.
You mentioned chain tensioners earlier. I found this on ebay and it works pretty well for me. The pulley is too wide for my chain so it wanders around on the pully. I'll make a thinner one, but it's probably close to the width you need for the belt.
http://www.ebay.com/itm/331718183146?_trksid=p2057872.m2749.l2649&ssPageName=STRK%3AMEBIDX%3AIT
You said you were drilling out the pulley to fit the motor and wheel axle. That means a round hole through the center of the pulley. Typically set screws on a round shaft wallow out a radial groove in the shaft after a little while if there isnt a keyway or flats. Are you going to put some flats on the motor shaft for the set screws? I thought if I knew the exact spot on the motor shaft that the pulley needs to go, that I might be able to drill some shallow holes for the set screws to drop into. There would be no lateral adjustability, but if I got it right the first time, then there would be no need either. When you talk about drilling the motor shaft is this what you are referring to?
Drive shafts...yes...but if the right ratio existed in an EV size...Helical cut gears are pretty quiet.
MrDude_1
100 kW
ElectricGod said:You said you were drilling out the pulley to fit the motor and wheel axle. That means a round hole through the center of the pulley. Typically set screws on a round shaft wallow out a radial groove in the shaft after a little while if there isnt a keyway or flats. Are you going to put some flats on the motor shaft for the set screws? I thought if I knew the exact spot on the motor shaft that the pulley needs to go, that I might be able to drill some shallow holes for the set screws to drop into. There would be no lateral adjustability, but if I got it right the first time, then there would be no need either. When you talk about drilling the motor shaft is this what you are referring to?
oh, I take it one step further... I actually drill the hole straight through the axle on the belt centerline, and tap the axle. then I use a large set screw that goes though the gear, (also tapped, I have to index the tap to do this) all the way across and into the otherside.
Its harder to do, and overkill...but very effective.
ElectricGod
10 MW
MrDude_1 said:ElectricGod said:You said you were drilling out the pulley to fit the motor and wheel axle. That means a round hole through the center of the pulley. Typically set screws on a round shaft wallow out a radial groove in the shaft after a little while if there isnt a keyway or flats. Are you going to put some flats on the motor shaft for the set screws? I thought if I knew the exact spot on the motor shaft that the pulley needs to go, that I might be able to drill some shallow holes for the set screws to drop into. There would be no lateral adjustability, but if I got it right the first time, then there would be no need either. When you talk about drilling the motor shaft is this what you are referring to?
oh, I take it one step further... I actually drill the hole straight through the axle on the belt centerline, and tap the axle. then I use a large set screw that goes though the gear, (also tapped, I have to index the tap to do this) all the way across and into the otherside.
Its harder to do, and overkill...but very effective.
Yeah! I can see how that would be very solid. A little blue locktite and it's super solid and never going to move by accident.
MrDude_1
100 kW
SO my usual updates have lots of pics... and I didnt do that above, so Im just going to copy that and edit in some pics and details..
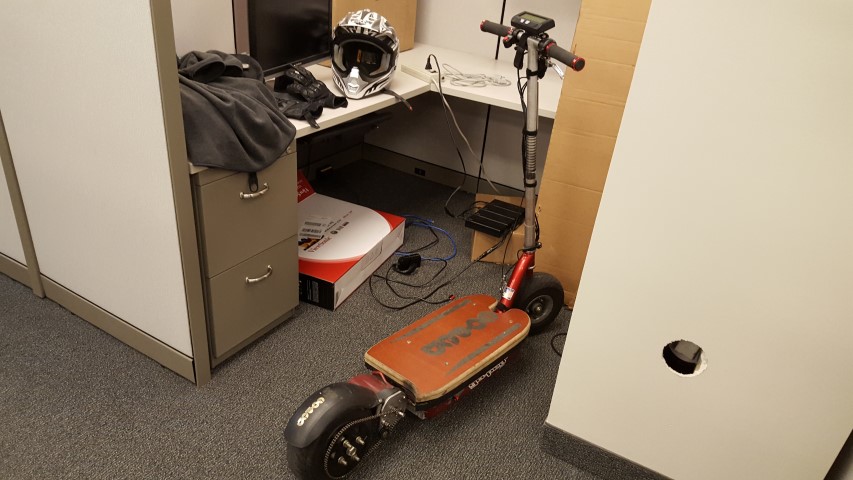
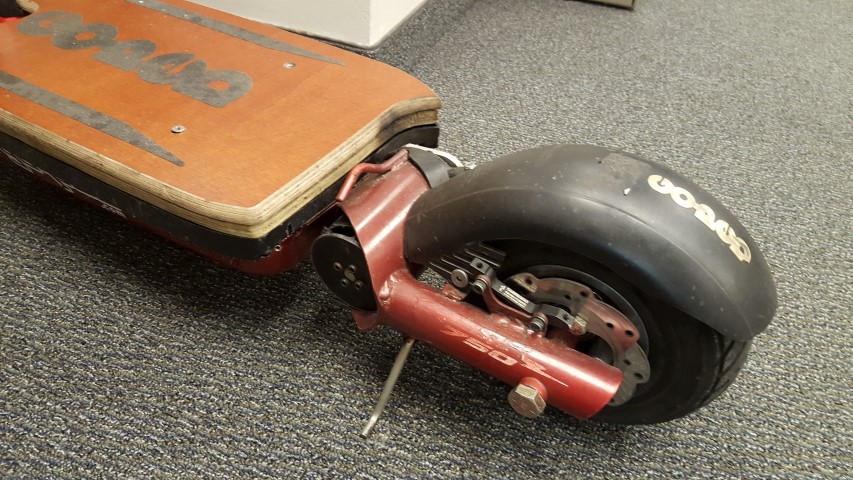
Heres the bike as I was commuting with it... note the 3dprinted fan impeller on the non-chain side, and the chain sprocket.
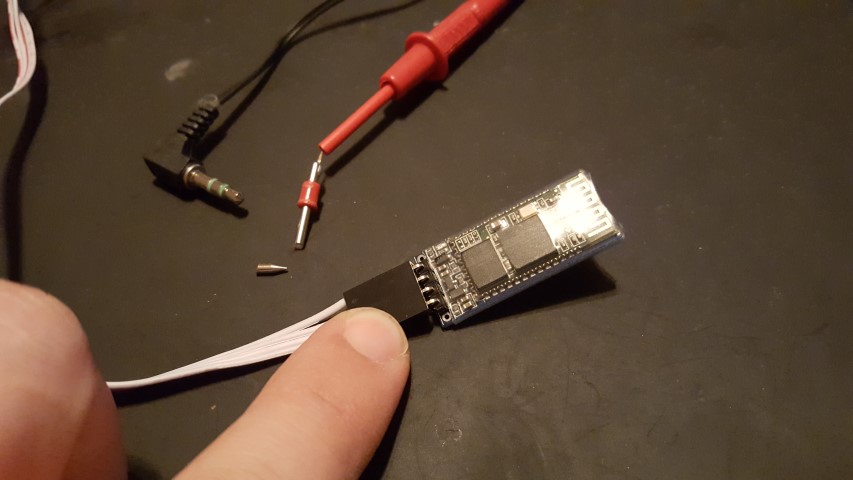
All that seemed to be going good, so I did a nice mod to my Cycle Analyst... I put a Bluetooth transceiver on it. Now I can watch the scooter charge with my phone or PC, without having to look back at it to see if its done.
So I had this annoying pulse to the chain drive, because it was not perfectly centered on the rear wheel. It was yanking on the chain and motor mounts
If you recall earlier, I couldn't clear the mounts I wanted inside the tube, and was forced to use nuts, tack welded on each side.
One of the nut mounts broke... no big deal to fix, but to get home from work, I rode it with two of the 3 mounts.
about 3 blocks from my house, a second mount broke.
I made it home, but I found that it made the motor rub on the ring... it was moving. it also rode glass smooth as the motor could "shake" with the eccentric of the rear wheel being off.
So I decided to fix it properly, and mount long nuts it on the OD of the mount tube. This means I needed a new motor mount plate, as my current one was flush with the tube OD.
I bought some new 1/4" aluminum plate, and made a new mount.
I tried welding the longer nuts, but the heat melted through. So I had to redo them twice.. eventually learning to NOT have the SS bolts in there, but run normal bolts in there while welding....
I eventually had the new mount plate and mounts done...
I also found someone selling an alignment tool, and purchased it.
I re-aligned the rear sprocket.
done.
It was glass smooth. Every vibration I had was from the sprocket not being round, the weight/balance of the wheel being off from the sprocket not being centered, or the motor from being pulled on by the chain.
Perfect.
until it all went to... well it was bad.
The rear sprocket is held on with bolts... the nuts are on the sprocket side, and the long bolts pass through.
I must not have had the chain tensioner adjusted tight enough, because I hit a bump, and the chain jumped off the rear sprocket.
it wrapped around the bolts.
and yanked.
hard.
the 12mm stainless steel shaft of the motor was bent. a good 30-40* bend.
I had to push it home.
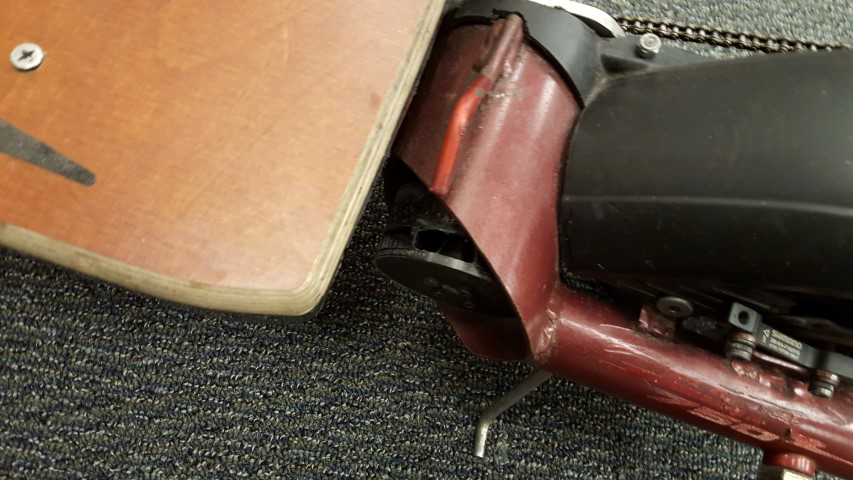
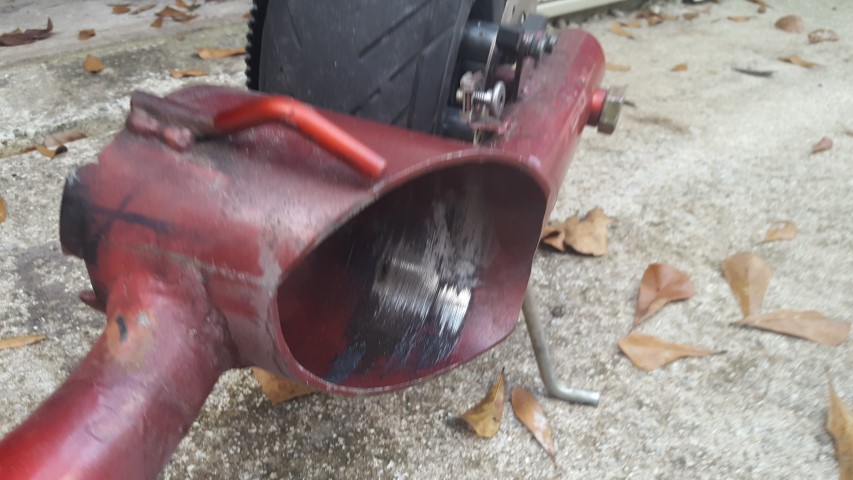
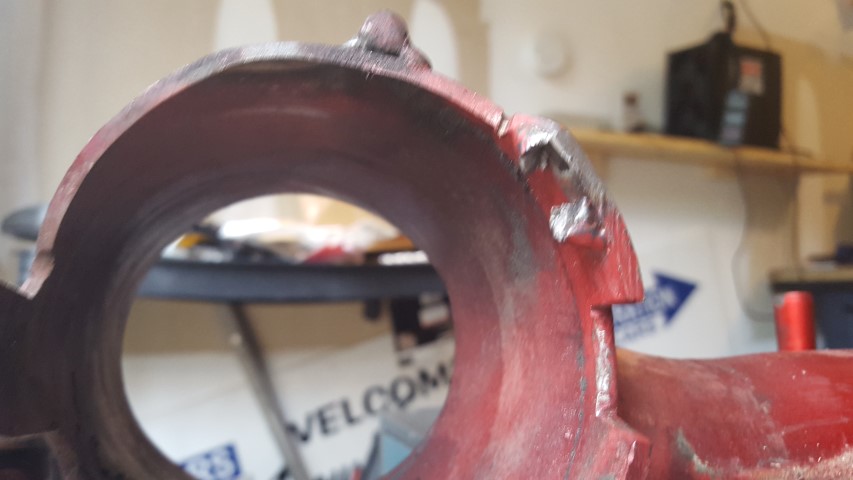
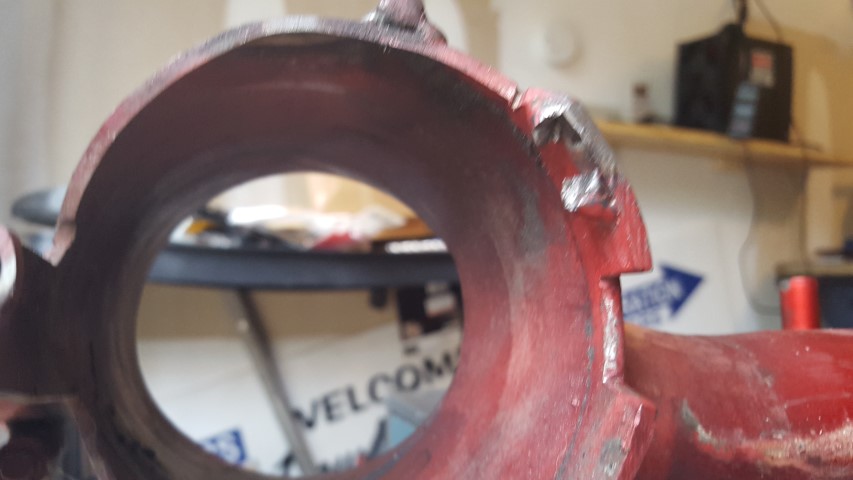
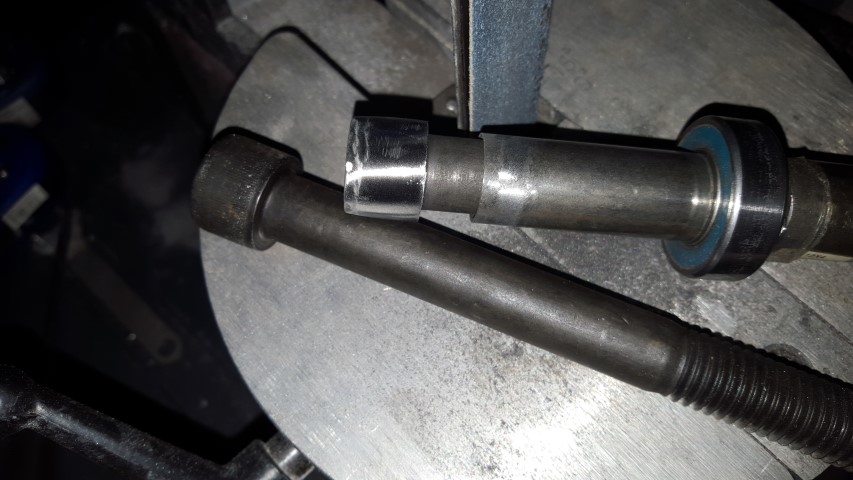
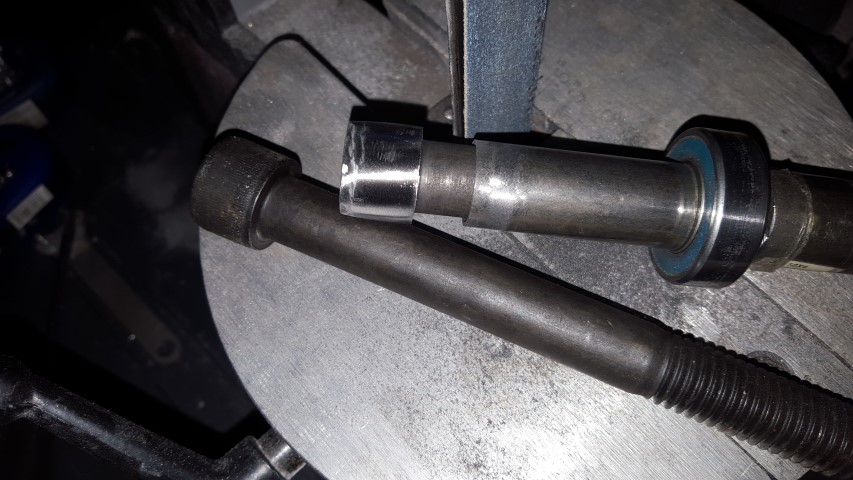
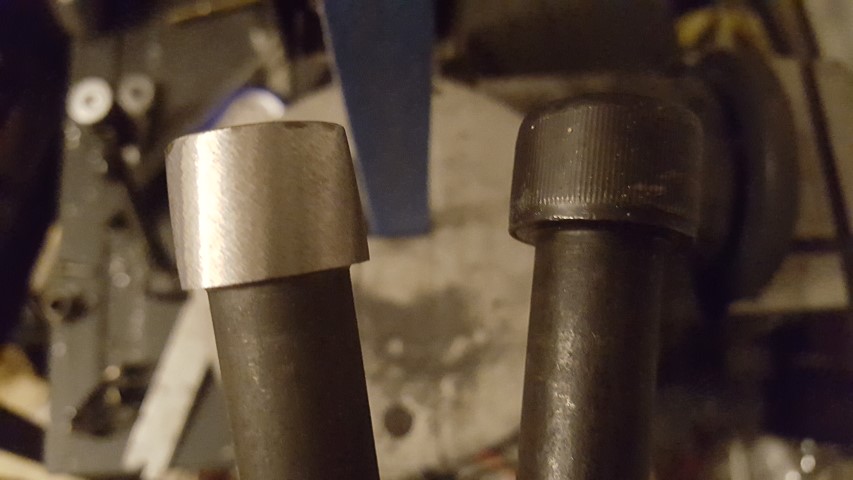
This is the motor shaft after I pressed it a bit straighter, and pressed it out of the motor.
I decided enough was enough. I hated oiling the chain. I hate that it makes a mess. Its the only part of this that isn't clean... I decided to go belt drive.
after much research, I decided 5mm HTD was the way to go, so I ordered the parts.
I also ordered a new motor shaft and a belt tensioner
The weekend before last the parts arrived. I took the pulleys and drilled them through... the smaller pulley I drilled all the way through to the motor shaft size. I still need to cross drill it for the set screw.
The larger pulley is all set... I think. I went with a plastic (glass reinforced nylon66 I believe) one with a aluminum hub. I drilled out the bolt pattern carefully on the plastic, and then drilled the hub to 7/8.
This SHOULD let me pass the axle (5/8) with spacers on it though... but I would need a longer axle.
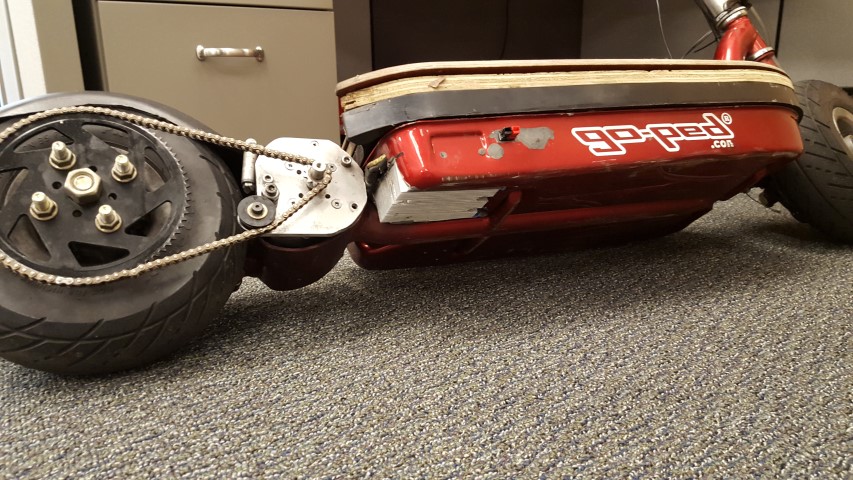
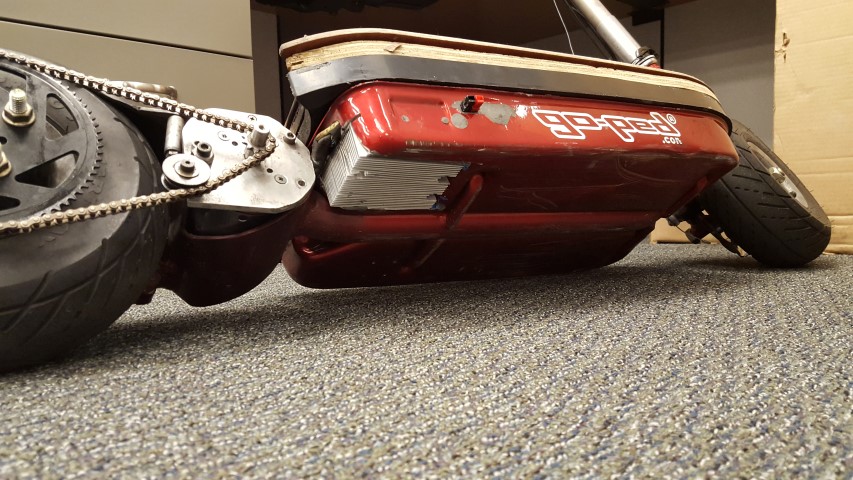
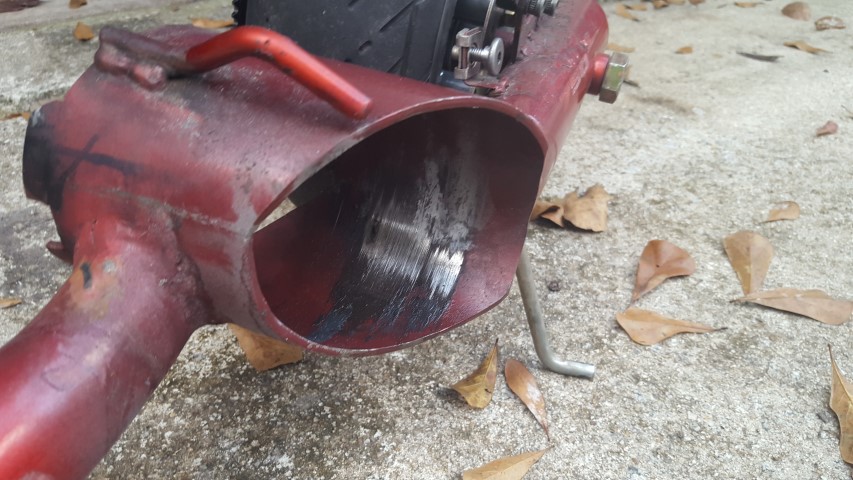
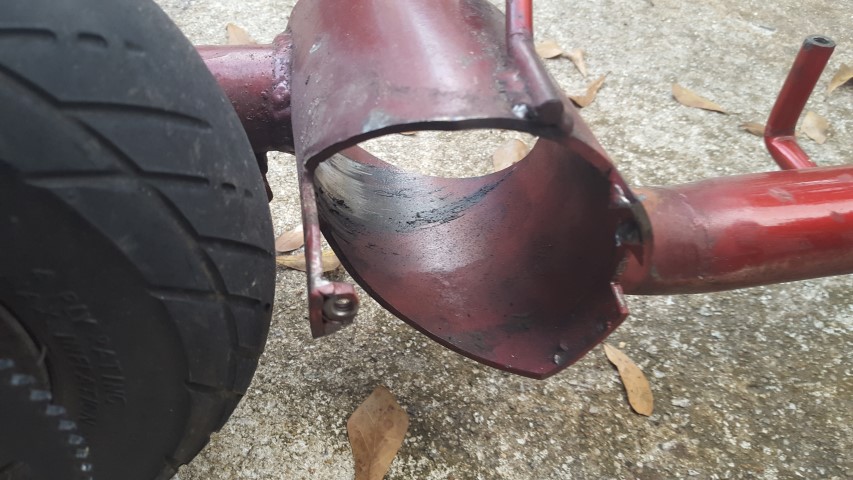
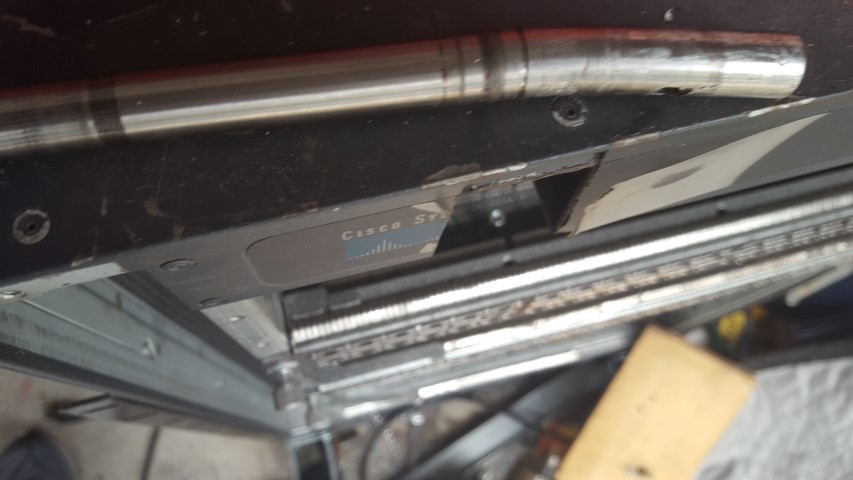
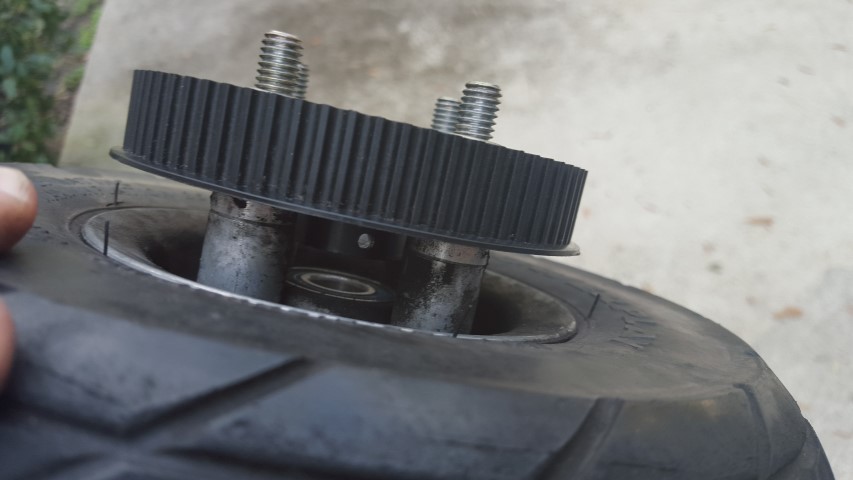
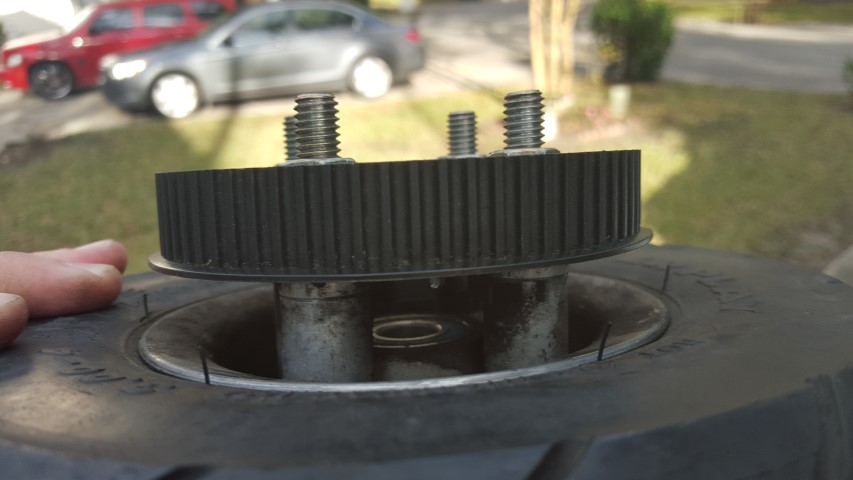
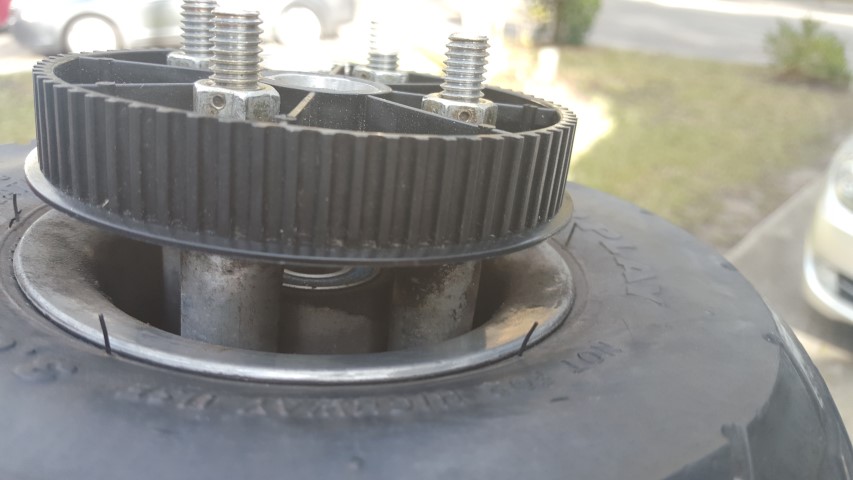
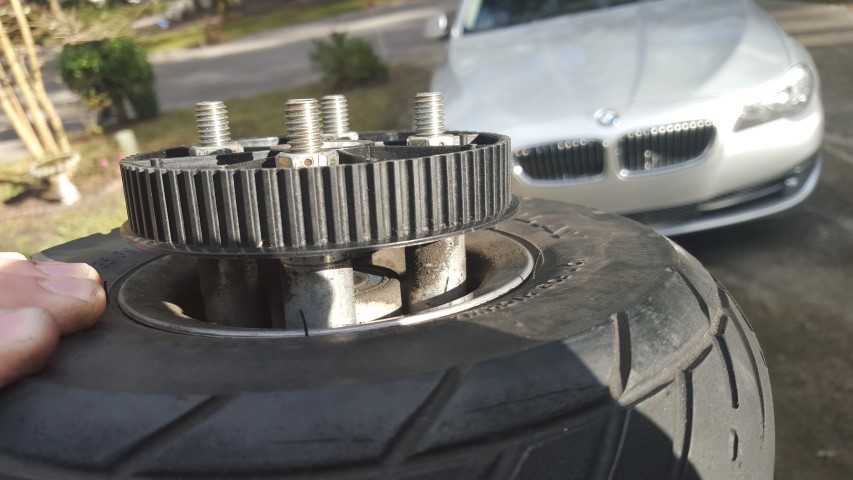
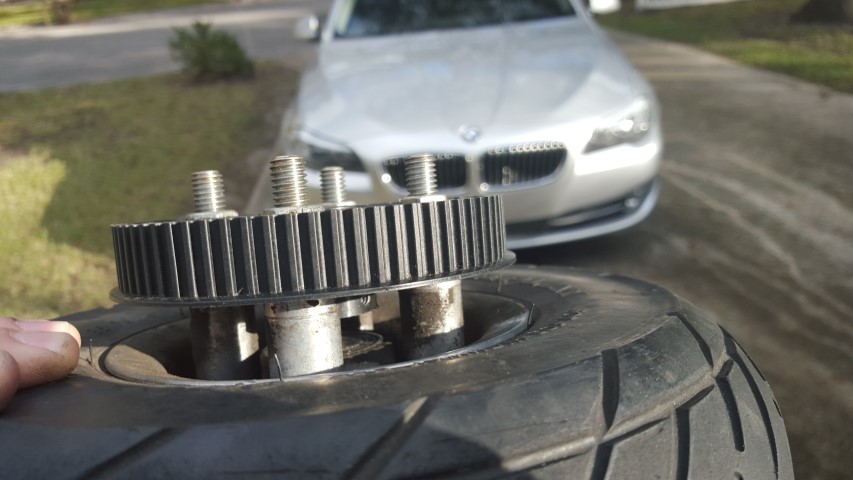
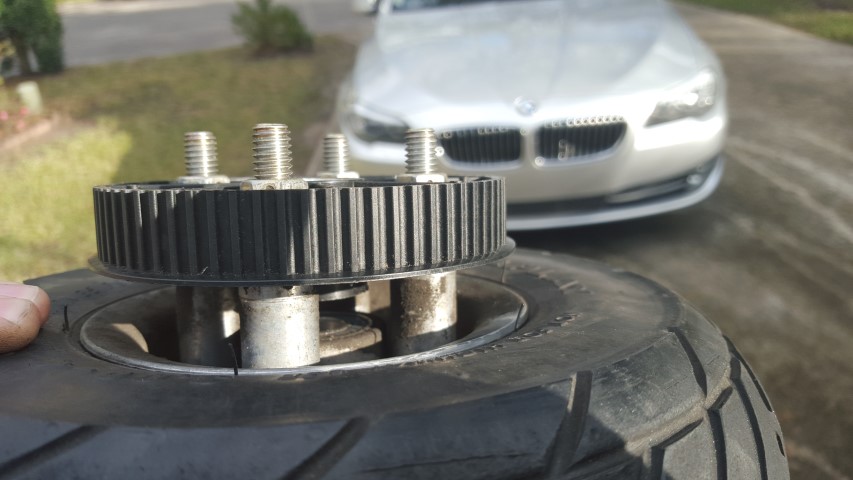
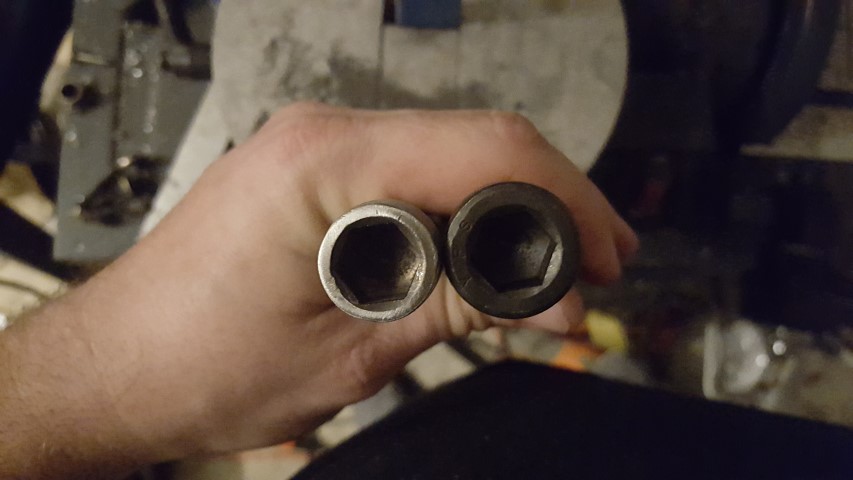
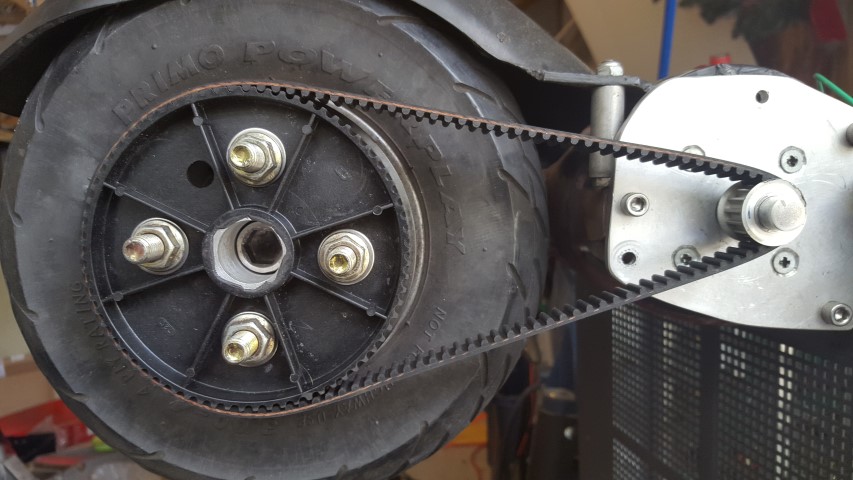
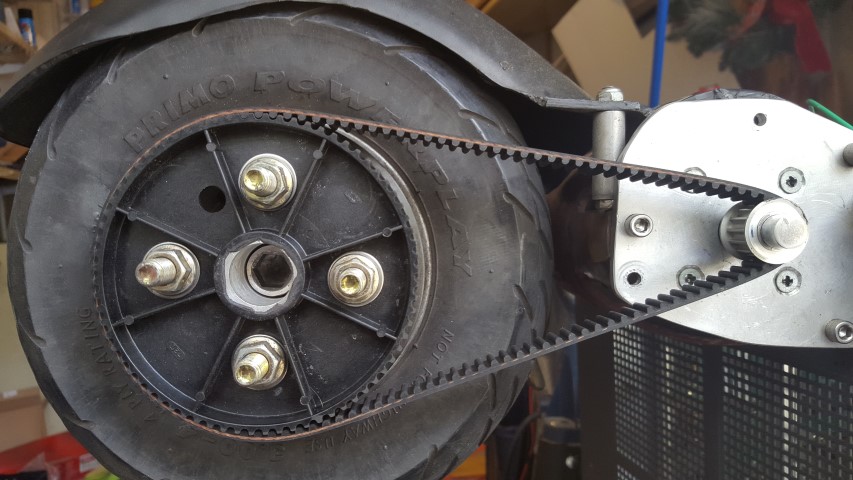
I didnt take any pictures directly of the wheel, but I did take these pics where I could see the clearance of the pulley hub to the wheel hub bearing:
My axles are just 5/8" bolts... so instead of buying an even longer bolt so that the nut clears, I am trying a new idea of using an allen headed bolt and passing it through backwards... head on the pulley side.
This means I can run a shorter bolt, and the nut on the chassis side.
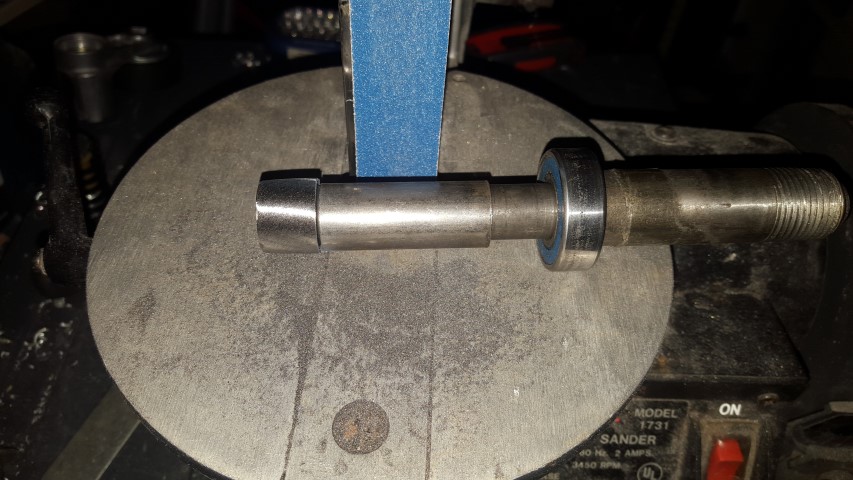
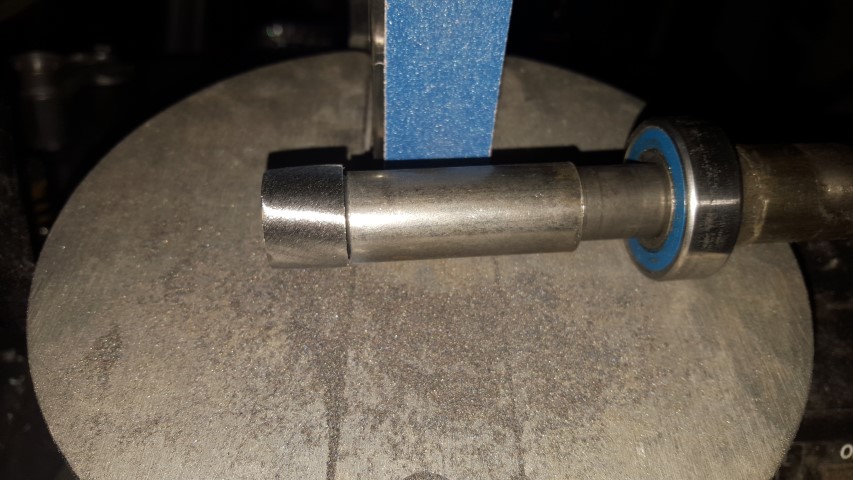
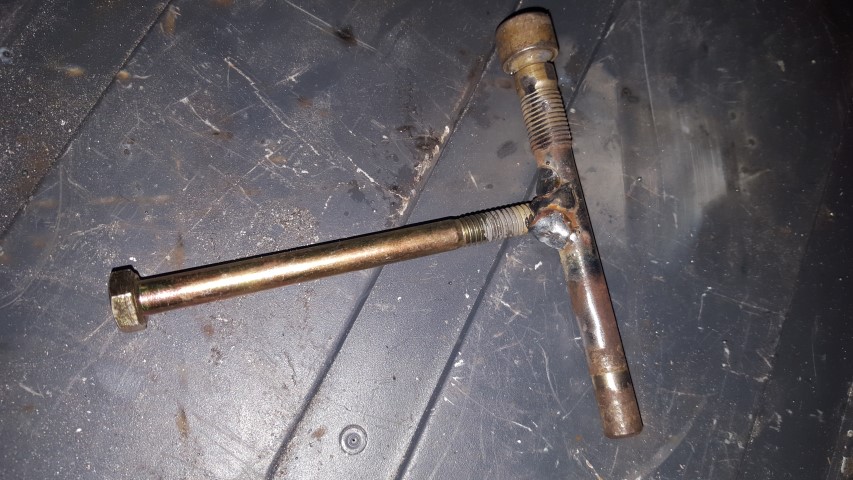
The bolt arrived, but the head is slightly too big... so I mounted a bearing on it so it can spin, and used my belt sander to bring it down to fit.
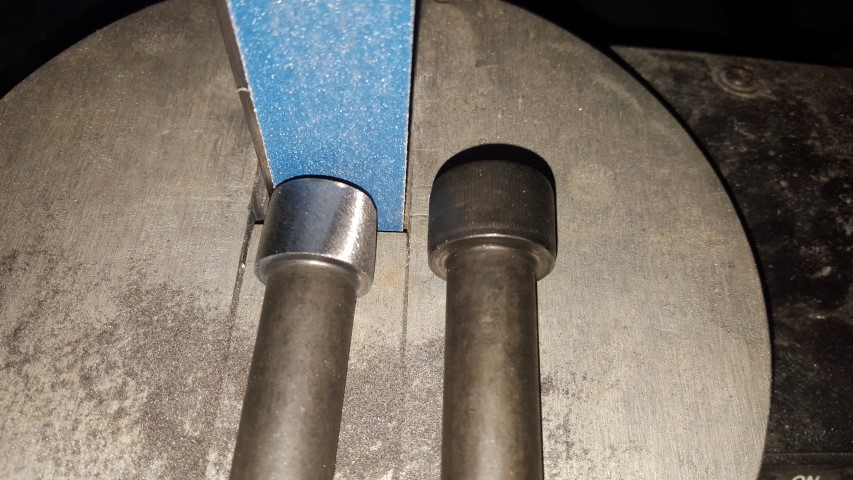
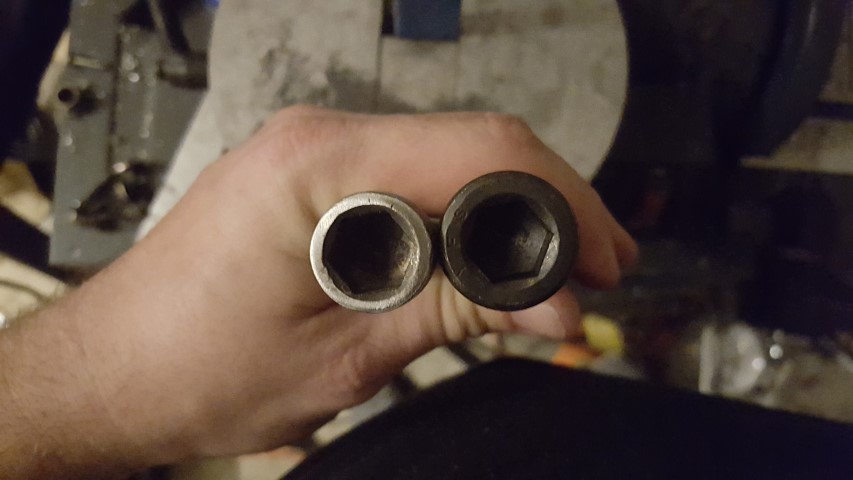
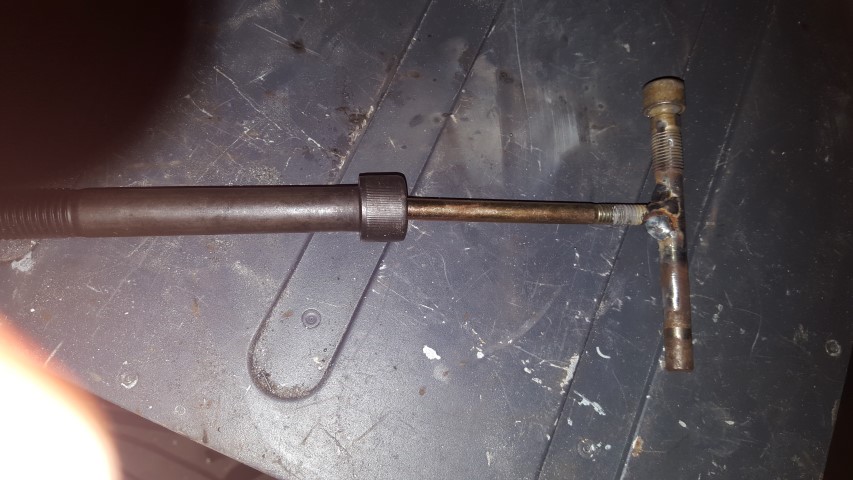
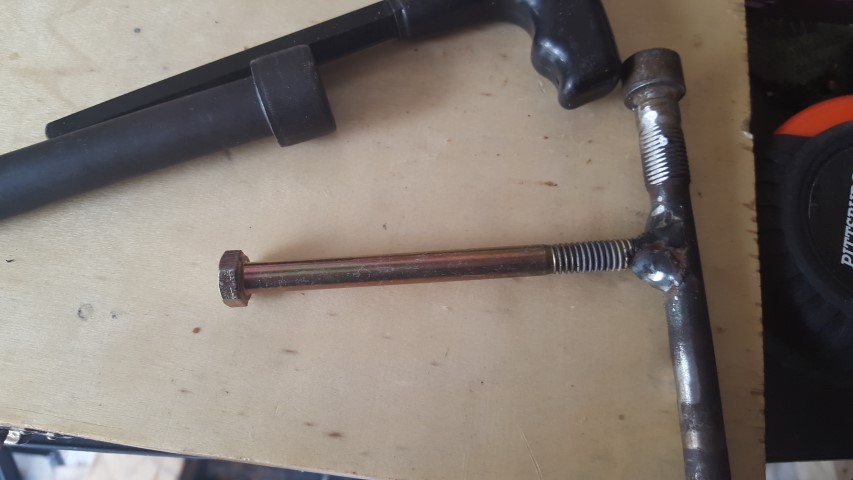
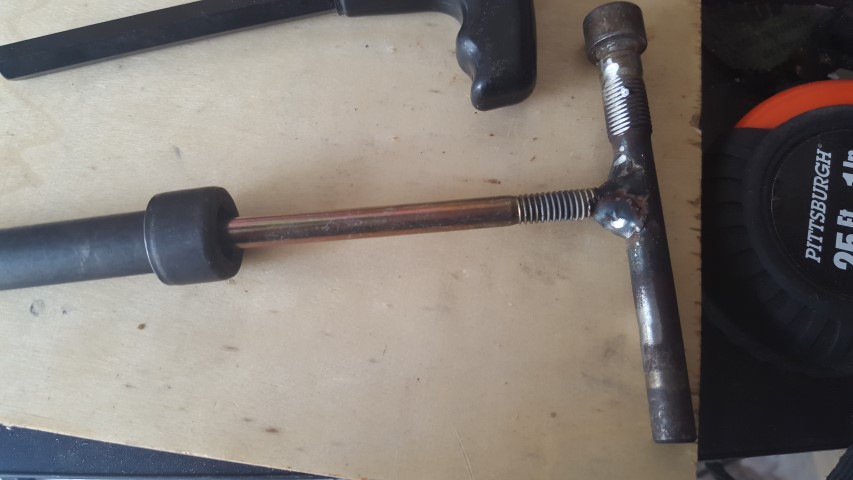
Cool, I now have an allen headed axle that I can pass through the wheel. I just need an allen head wrench that size.
Since I can not find one locally that would reach into the wheel and work, I made a simple t-handle:
With the sprocket on the wheel, and the motor all refurbished, I did a simple mockup:
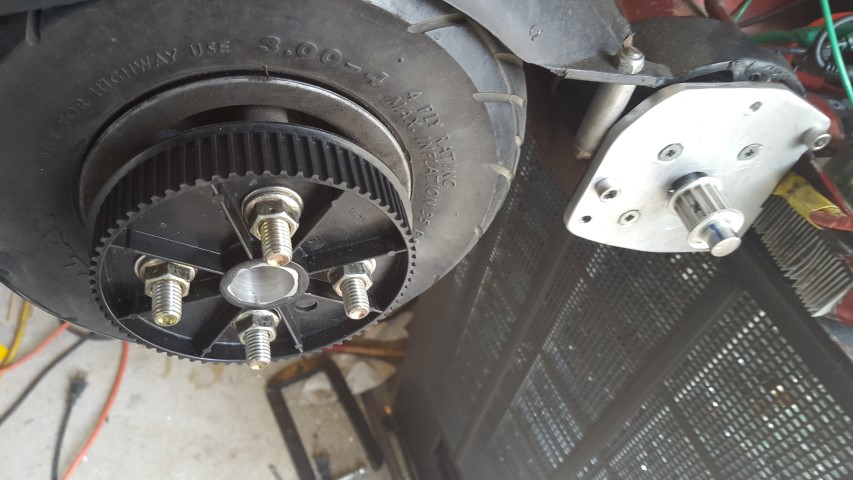
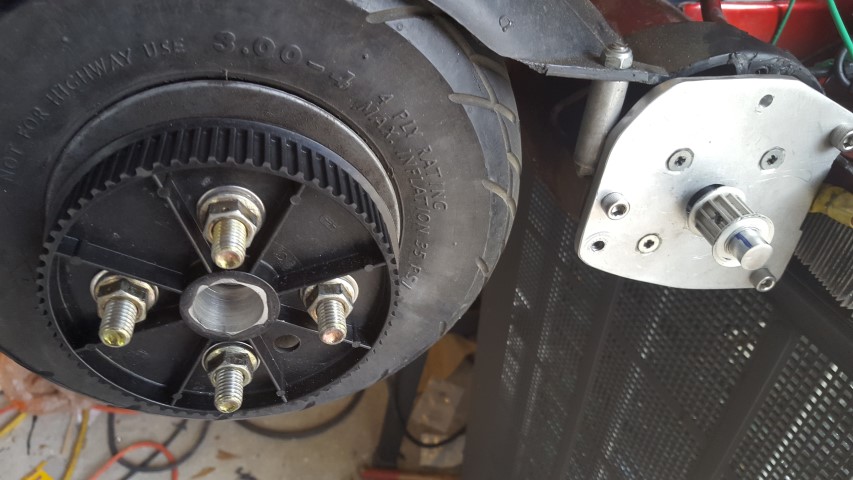
Just slip the belt on and:
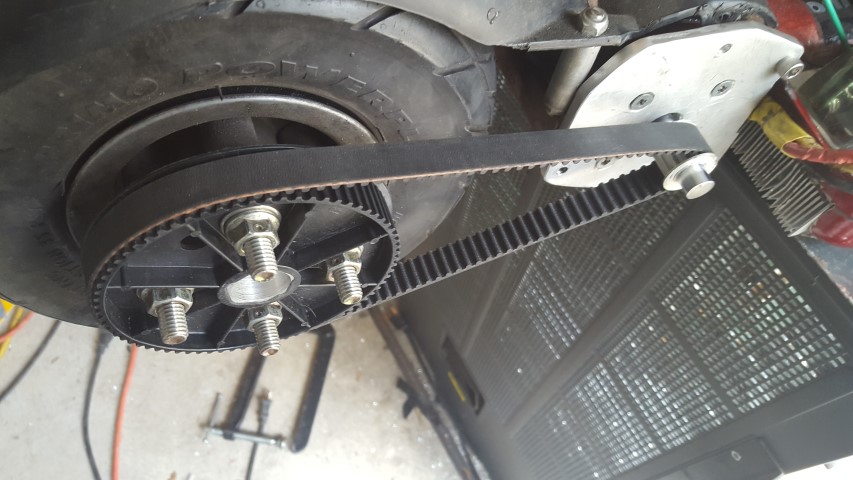
excellent. the slack in the belt is intentional and perfect. The tensioner will press up and give a little extra wrap on the smaller pulley.
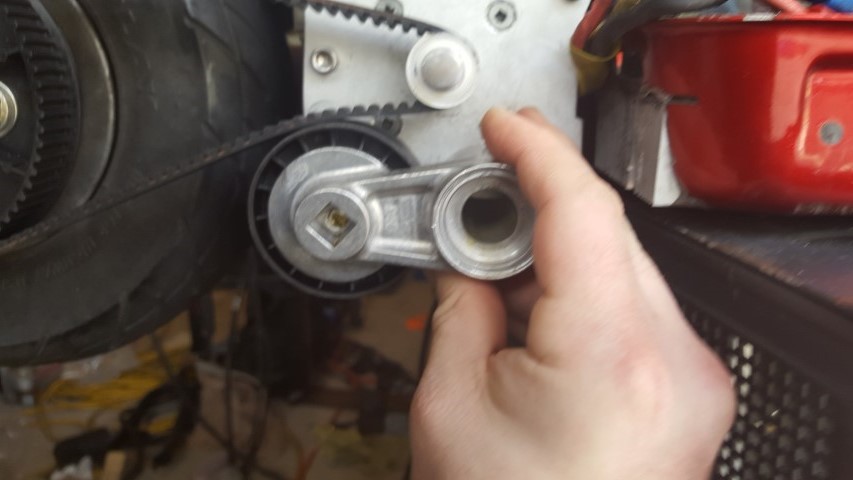
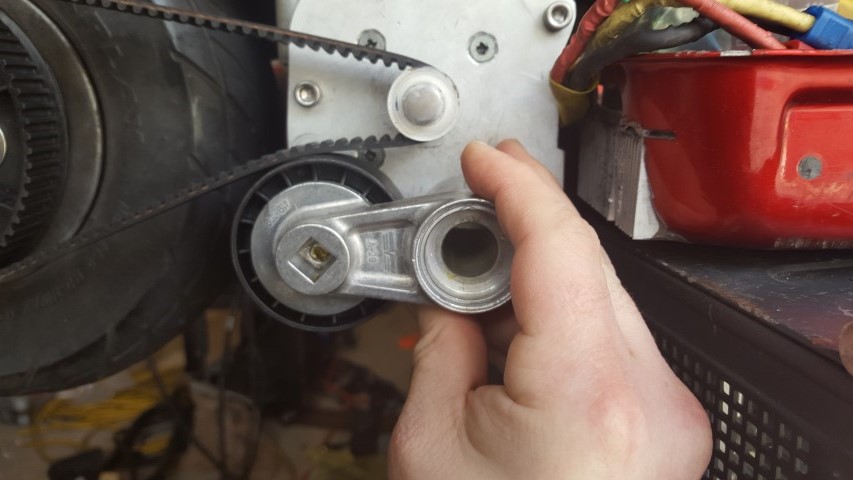
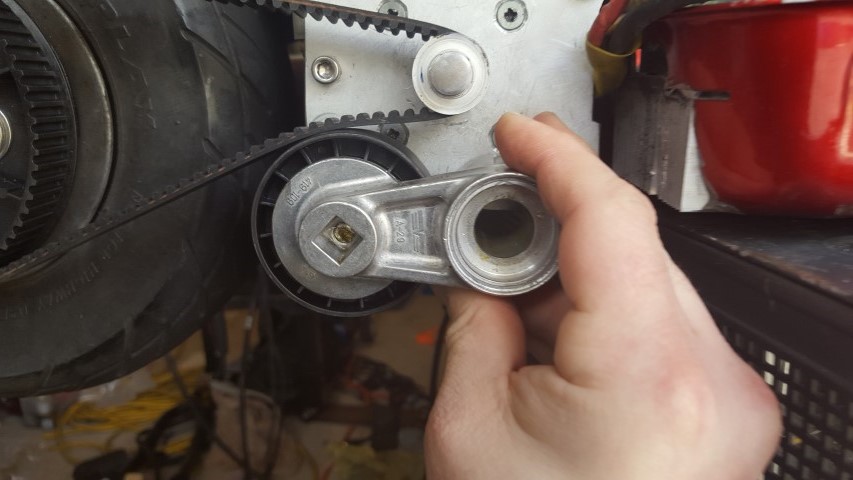
my tensioner however will not work as I hoped. It is a AC belt (thinner than the usual) tensioner for a early 2000s Chevy truck. I bought it because its simple and I like the design. unfortunately it is just too big.
So... to fix this I needed to disassemble it. going on my years of experience with this I clamped the hell out of it, put a couple safety cables on it, and disassembled it. I still managed to get the spring to fly 5ft across the room.... thankfully I knew that was likely and stayed clear. lol. seriously though, I was extra cautious. Please don't take apart tensioners like this unless you know how to keep yourself safe.
I will reuse this arm and spring, but the base and roller are going bye-bye.
here it is, held up on the belt with the huge pulley on it:
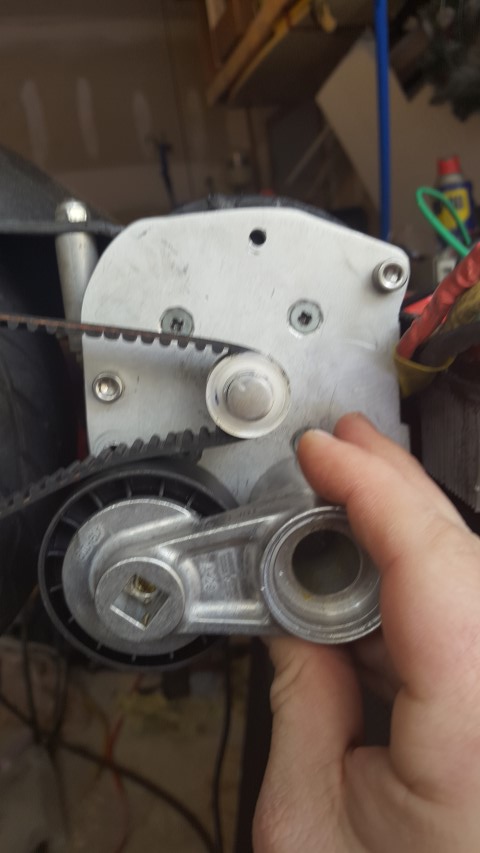
I have a new roller intended for this size belt coming to me.. once it arrives I will either modify and reuse this arm, or just make an all new tensioner from scratch.
Luckily I am not missing much riding time, as its been unusually cold here lately.
Heres the bike as I was commuting with it... note the 3dprinted fan impeller on the non-chain side, and the chain sprocket.
All that seemed to be going good, so I did a nice mod to my Cycle Analyst... I put a Bluetooth transceiver on it. Now I can watch the scooter charge with my phone or PC, without having to look back at it to see if its done.
So I had this annoying pulse to the chain drive, because it was not perfectly centered on the rear wheel. It was yanking on the chain and motor mounts
If you recall earlier, I couldn't clear the mounts I wanted inside the tube, and was forced to use nuts, tack welded on each side.
One of the nut mounts broke... no big deal to fix, but to get home from work, I rode it with two of the 3 mounts.
about 3 blocks from my house, a second mount broke.
I made it home, but I found that it made the motor rub on the ring... it was moving. it also rode glass smooth as the motor could "shake" with the eccentric of the rear wheel being off.
So I decided to fix it properly, and mount long nuts it on the OD of the mount tube. This means I needed a new motor mount plate, as my current one was flush with the tube OD.
I bought some new 1/4" aluminum plate, and made a new mount.
I tried welding the longer nuts, but the heat melted through. So I had to redo them twice.. eventually learning to NOT have the SS bolts in there, but run normal bolts in there while welding....
I eventually had the new mount plate and mounts done...
I also found someone selling an alignment tool, and purchased it.
I re-aligned the rear sprocket.
done.
It was glass smooth. Every vibration I had was from the sprocket not being round, the weight/balance of the wheel being off from the sprocket not being centered, or the motor from being pulled on by the chain.
Perfect.
until it all went to... well it was bad.
The rear sprocket is held on with bolts... the nuts are on the sprocket side, and the long bolts pass through.
I must not have had the chain tensioner adjusted tight enough, because I hit a bump, and the chain jumped off the rear sprocket.
it wrapped around the bolts.
and yanked.
hard.
the 12mm stainless steel shaft of the motor was bent. a good 30-40* bend.
I had to push it home.
This is the motor shaft after I pressed it a bit straighter, and pressed it out of the motor.
I decided enough was enough. I hated oiling the chain. I hate that it makes a mess. Its the only part of this that isn't clean... I decided to go belt drive.
after much research, I decided 5mm HTD was the way to go, so I ordered the parts.
I also ordered a new motor shaft and a belt tensioner
The weekend before last the parts arrived. I took the pulleys and drilled them through... the smaller pulley I drilled all the way through to the motor shaft size. I still need to cross drill it for the set screw.
The larger pulley is all set... I think. I went with a plastic (glass reinforced nylon66 I believe) one with a aluminum hub. I drilled out the bolt pattern carefully on the plastic, and then drilled the hub to 7/8.
This SHOULD let me pass the axle (5/8) with spacers on it though... but I would need a longer axle.
I didnt take any pictures directly of the wheel, but I did take these pics where I could see the clearance of the pulley hub to the wheel hub bearing:
My axles are just 5/8" bolts... so instead of buying an even longer bolt so that the nut clears, I am trying a new idea of using an allen headed bolt and passing it through backwards... head on the pulley side.
This means I can run a shorter bolt, and the nut on the chassis side.
The bolt arrived, but the head is slightly too big... so I mounted a bearing on it so it can spin, and used my belt sander to bring it down to fit.
Cool, I now have an allen headed axle that I can pass through the wheel. I just need an allen head wrench that size.
Since I can not find one locally that would reach into the wheel and work, I made a simple t-handle:
With the sprocket on the wheel, and the motor all refurbished, I did a simple mockup:
Just slip the belt on and:
excellent. the slack in the belt is intentional and perfect. The tensioner will press up and give a little extra wrap on the smaller pulley.
my tensioner however will not work as I hoped. It is a AC belt (thinner than the usual) tensioner for a early 2000s Chevy truck. I bought it because its simple and I like the design. unfortunately it is just too big.
So... to fix this I needed to disassemble it. going on my years of experience with this I clamped the hell out of it, put a couple safety cables on it, and disassembled it. I still managed to get the spring to fly 5ft across the room.... thankfully I knew that was likely and stayed clear. lol. seriously though, I was extra cautious. Please don't take apart tensioners like this unless you know how to keep yourself safe.
I will reuse this arm and spring, but the base and roller are going bye-bye.
here it is, held up on the belt with the huge pulley on it:
I have a new roller intended for this size belt coming to me.. once it arrives I will either modify and reuse this arm, or just make an all new tensioner from scratch.
Luckily I am not missing much riding time, as its been unusually cold here lately.
ElectricGod
10 MW
The belt mod is coming along nicely. Do you have any concern for the one sided axle mount? All that motor torque is on the unsupported side. Did that have anything to do with the chain coming loose?
MrDude_1
100 kW
ElectricGod said:The belt mod is coming along nicely. Do you have any concern for the one sided axle mount? All that motor torque is on the unsupported side. Did that have anything to do with the chain coming loose?
naa. its all thick steel, overbuilt to the point its ridiculous. Its exactly like goped does from the factory.
If you lock the back brake on the stock goped (it doesnt have one normally) you can make the stock motor mount flex... but the rest stays solid. The motor mount for the stock motor is just a sheetmetal U.
With this, its not going anywhere.
The chain jumped off because I was going over some rough spots... the bouncing combined with me not preloading my tensioner enough (or it slipping).
really though, the chain sucked anyway. the front sprockets always wore out, and the chain always needed lube... total pain in the butt.. especially since Goped ESR sprockets are not cheap, and I have to drill them out.
ElectricGod
10 MW
MrDude_1 said:ElectricGod said:The belt mod is coming along nicely. Do you have any concern for the one sided axle mount? All that motor torque is on the unsupported side. Did that have anything to do with the chain coming loose?
naa. its all thick steel, overbuilt to the point its ridiculous. Its exactly like goped does from the factory.
If you lock the back brake on the stock goped (it doesnt have one normally) you can make the stock motor mount flex... but the rest stays solid. The motor mount for the stock motor is just a sheetmetal U.
With this, its not going anywhere.
The chain jumped off because I was going over some rough spots... the bouncing combined with me not preloading my tensioner enough (or it slipping).
really though, the chain sucked anyway. the front sprockets always wore out, and the chain always needed lube... total pain in the butt.. especially since Goped ESR sprockets are not cheap, and I have to drill them out.
I'm currently using double D sprockets and t8f chain. Double D is essentially 10mm shaft with flats at 8mm. The end of the shaft is threaded to hold a nut that secures the sprocket. The sprockets are pretty cheap and come in 9, 10, 11, 12,13,15 teeth. The chain makes a good bit of noise on the smaller sprockets and gets a little quieter with the larger sprockets. The sprockets can be found in #25 and t8f. I'll have to come up with a better sprocket mounting method if I continue using these sprockets. I expect DD sprockets will start rounding over the flats on the shaft after a while with higher torque.
Hi
I’m new here
I hope someone can help.
I just fitted new brushes to my groped 750 esr. I also sanded down the copper commutator with 600 grit on a lathe to get all the pitting out, as the engine previously overheated and seized .
Now it won’t spin at all. It just clicks and heats up when I put the power on. Can anyone suggest any help?
Thanks
Ed
Any updates on your scooter after all these years? Anything you changed to make it better? I just got a hold of a really nice ESR with dead SLA batteries. Going to convert it to a 6374 Outrunner motor brushless and super flat pack lithium battery. Should be snappy!
Similar threads
- Replies
- 1
- Views
- 221
- Replies
- 27
- Views
- 623
- Replies
- 1
- Views
- 110
- Replies
- 164
- Views
- 2,954