My RC Mid Drive with Single Stage Reduction

FZBob said:
Wow, that was quick!

My chains always seem to end up with tight and loose spots. I used to obsess over it. Now I'm used to it. Doesn't seem to cause me a big problem.

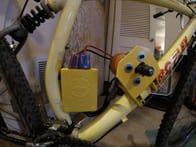
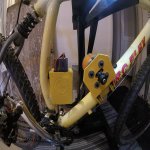
Before you spend a lot of time putting a freewheel inside the chainring, you might want to try riding with your feet off the pedals to see if the system has enough power without pedaling. I tried it briefly. See the second bike pic in my first post, leaning against the bike rack. For me, the motor seemed weak without me providing some assist by pedaling. However, I'm a big guy...

But.. With that nicely machined aluminium chain ring of your's, your chain tension still changes as motor spins? If the chain ring and spindle are concentric, chain tension should be even all the time.

I tried spinning the motor with low infill bracket and it was so flexible that chain was falling off all the time. With the final version (which is way more rigid) of the motor bracket everything seemed OK, just that chain tension was changing all the time. I still didn't ride on an incline to put some real load on it.

My bike was like 11.8kg before conversion and I have like 63kg. I tried the bike without pedaling and it was pulling pretty well. No burnouts but a very even acceleration. Still couldn't take it on the streets for a thorough test, but next week will be the first thing which I'll do.

I may contact that american company to make me a chain ring like your's. Could you give me a blueprint to know exactly what to ask from them?
 
fixvid said:
But.. With that nicely machined aluminium chain ring of your's, your chain tension still changes as motor spins? If the chain ring and spindle are concentric, chain tension should be even all the time.

I tried spinning the motor with low infill bracket and it was so flexible that chain was falling off all the time. With the final version (which is way more rigid) of the motor bracket everything seemed OK, just that chain tension was changing all the time. I still didn't ride on an incline to put some real load on it.

My bike was like 11.8kg before conversion and I have like 63kg. I tried the bike without pedaling and it was pulling pretty well. No burnouts but a very even acceleration. Still couldn't take it on the streets for a thorough test, but next week will be the first thing which I'll do.

I may contact that american company to make me a chain ring like your's. Could you give me a blueprint to know exactly what to ask from them?

I just measured my chain tension. After the last few rides on the new chain, it was pretty loose.
In the tight spot, it had about 10mm of slack, and in the loose spot (180 degrees pedal rotation), about 15mm (very loose!).
I adjusted it and in the tight spot it's about 5mm and in the loose spot, about 10mm.
I measure in the center of the chain run, using a caliper, by pulling and pushing on the chain with a very light force.

Remember - moving the sprocket and chain ring a tiny bit closer together makes the chain very floppy. A little bit of chain ring runout makes a big difference!

There is a small amount of clearance from the chain ring to the bolts, and from the bolts to the crank spider. I would guess about .25 to .5 mm total. I have carefully centered the chain ring on the spider a few times, and then the chain has a nice even tension, but it never seems to last. Possibly from bottoming out the chain ring on a rock or log. (I have only bashed the chain ring a few times, but no harm so far...) The good news is that when riding I can't tell if the chain has loose or tight spots, or if it is loose or tight overall. It just doesn't seem to matter. The chain may flop around, but it has never once skipped a tooth or fallen off!

As an aside, every motorcycle I have ever owned has had tight and loose spots. And the chains tighten and loosen with suspension travel.

I'm closer to 114 Kg, so you have almost 2X the power to weight ratio I have! I can only imagine...

I will PM you the chain ring DXF file tomorrow. Note that the basic chain ring cost around $50 (will work, but heavy), but there was a fee for them to program the CNC file, and another fee to do the extra CNC work. If anyone can tell me an easy way to post the DXF file here, I will be happy to do so...
 
Hi everyone. Hi FZBob. Not a big social poster but I figured I would share this here. Here is my old beat up 96' Pro-flex attack with the Vesc and D5035 skateboard setup. I'm waiting on the 90t chain ring. I used two 1 3/4 muffler clamps and angle aluminum from Mcmaster-carr with square o-rings for motor mounts underneath the mount. I also got a longer m5 bolt to catch one water bottle hole under the motor to reduce twisting though it was super solid with just the clamps. The Vesc is in a Hi-tec servo box. I am only 120 lbs soaking wet so I hope it will help me climb the steeper sections of the trail. The build cost 400.00 roughly if you have a rc charger with xt90 charging cable.
Turnigy 50amp Vesc
Turnigy D5035 125kv
Rebel gears 90t standard. 60.18 with priority mail. Took about a week. I sent my original to match the holes.
#25 hd chain 140 links
Zippy 4s 8000 wrapped in foam and in a box and in a bag on the frame
Electric scooter 9t with grub screws.
throttle 3 wire
3x3x1/4 aluminum
8mm collar
70 Duro buna square edge for motor mounts
small top bar battery bag
150 amp watt meter
 

Attachments

  • gopr0262.jpg
    gopr0262.jpg
    26 KB · Views: 2,127
I'll post the drawings here in jpeg format. If anyone knows an easy way to put the DXF file up, let me know.

E-Bike Chainring 90T a.jpg


The red area below is the base model Rebel Gears chainring as I received it. It does include the four 104 bcd mount holes, and 8 large lightening holes. 230 gm.

The optional cut out version is around 98 gm.

E-Bike Chainring  mod 90T a.jpg
 
Ehead said:
Hi everyone. Hi FZBob. Not a big social poster but I figured I would share this here. Here is my old beat up 96' Pro-flex attack with the Vesc and D5035 skateboard setup. I'm waiting on the 90t chain ring. I used two 1 3/4 muffler clamps and angle aluminum from Mcmaster-carr with square o-rings for motor mounts underneath the mount. I also got a longer m5 bolt to catch one water bottle hole under the motor to reduce twisting though it was super solid with just the clamps. The Vesc is in a Hi-tec servo box. I am only 120 lbs soaking wet so I hope it will help me climb the steeper sections of the trail. The build cost 400.00 roughly if you have a rc charger with xt90 charging cable.
Turnigy 50amp Vesc
Turnigy D5035 125kv
Rebel gears 90t standard. 60.18 with priority mail. Took about a week. I sent my original to match the holes.
#25 hd chain 140 links
Zippy 4s 8000 wrapped in foam and in a box and in a bag on the frame
Electric scooter 9t with grub screws.
throttle 3 wire
3x3x1/4 aluminum
8mm collar
70 Duro buna square edge for motor mounts
small top bar battery bag
150 amp watt meter
That looks like a nice build. At 120lb, it should climb really well! I'm over 2x your weight and I'm happy with the climbing.

I'm not understanding how you used the o-rings... Curious...

Let us know how the grub screws work out. I had problems when I tried them with the belt. But I didn't put a lot of effort in to them. I would guess I didn't file the flats deep enough...

Also would be curious to see your battery bag.

Would love to see more pics. Also, for some reason your pic shows up really small on my screen. I usually re-size to around 600x600 pixels (I think I read that somewhere in the forum rules...), although I have snuck in a few larger ones...
 
Hello,

I've been following this build with much interest and recently started designing my own version.

I plan on utilizing a 60KV motor to take advantage of a smaller chainring with more tooth engagement on the motor sprocket.

I have access to a waterjet through work so I'll be cutting these from either 304 or some form of carbon with a plating applied.

If these fail then I'll move to a thicker aluminum and machine the teeth interface.

This one is a 60t that I plan to use with a 12t sprocket, that gives me the option to drop to a 9t if needed.

These are intended to mount to the granny gear position.

(49 grams)
60t#25bcd58sprocketv2.JPG

here it is mocked up with a chainring I'm considering making
(127 grams)
SprocketSetMockup.JPG

I've also drawn up a few others, I'm considering having this one on hand as it should be a little stronger.
(86 grams)
60t#25bcd58sprocket.JPG

If anyone would like, I could probably make a batch of sprockets in various sizes while I'm cutting mine.

Cheers!

Nate
 
FZBob said:
Remember - moving the sprocket and chain ring a tiny bit closer together makes the chain very floppy. A little bit of chain ring runout makes a big difference!

I was thinking about a pretensioned idler arm to take up the slack like a bicycle derraileur but as you tell me it's rather unnecessary.

Thank your for the chain ring drawings. Isn't it possbile to use a thinner plate for the chain ring ? 6mm thickness seems overkill to me. Or it would be a good ideea to make the chain ring thinner at the mounting holes so one can use it like a "dished" chain ring and use it so to just not hit the chain stay (or get closer to in my case).

NateTN said:
If anyone would like, I could probably make a batch of sprockets in various sizes while I'm cutting mine.

Hi NateTN
Your chain rings looks interesting to me. Have you thought about doing a 90t ? I mean, even with 9t sprocket and 90t chain ring is just a 10:1 reduction and i suppose we would need like 30:1 or more to get full power out of these brushless motors.
 
fixvid said:
Hi NateTN
Your chain rings looks interesting to me. Have you thought about doing a 90t ? I mean, even with 9t sprocket and 90t chain ring is just a 10:1 reduction and i suppose we would need like 30:1 or more to get full power out of these brushless motors.

fixvid,

I plan on using a lower 60Kv motor rather than the 120Kv that FzBob is using, Thats why I'm specing a lower reduction.

I could draw up a 90t if you like, I'm not sure I could be as aggressive with cutting weight at that diameter.

I'd be more confident if I had some real world experience or concrete numbers on the torque output of the motors in this application.
 
Fixvid/Ehead/NateTN

Thanks for posting your ideas on this system. It great to see variations of this system and hopefully positive real world data of these types of system on various terrains and with different styles of riding.

I suspect NateTN is attempting to go with a smaller chain ring for better ground clearance. There're advantages from a mountain biking standpoint. I would love to see how that works out with a lower KV motor without needing an extra stage of reduction.

I see great potential in ultralight systems in the 100-250W range. Thanks to all contributing to this effort.


In the commercial realm, there's a system from Germany called the Fazua system https://fazua.com/en/

(quoted at 1.3 Kg) that's targeting low power and low weight. It's offered on the LaPierre E-zesty and probably cost a fortune.
 
FZBob,

Could we revisit your experience with the E-Power 6354 60kv motor?

Did you ever attempt to run it at 3-4s?

You said it would not exceed 100-200w, could that have been a controller issue?

This motor is one of the few reasonably priced in the 60kv range other than APS, I'd like to use it but your review is a little off-putting.

Btw, I weigh 72Kg and my bike is 10.5, maybe it would have enough power in my application.
 
FZBob said:
Ehead said:
Hi everyone. Hi FZBob. Not a big social poster but I figured I would share this here. Here is my old beat up 96' Pro-flex attack with the Vesc and D5035 skateboard setup. I'm waiting on the 90t chain ring. I used two 1 3/4 muffler clamps and angle aluminum from Mcmaster-carr with square o-rings for motor mounts underneath the mount. I also got a longer m5 bolt to catch one water bottle hole under the motor to reduce twisting though it was super solid with just the clamps. The Vesc is in a Hi-tec servo box. I am only 120 lbs soaking wet so I hope it will help me climb the steeper sections of the trail. The build cost 400.00 roughly if you have a rc charger with xt90 charging cable.
Turnigy 50amp Vesc
Turnigy D5035 125kv
Rebel gears 90t standard. 60.18 with priority mail. Took about a week. I sent my original to match the holes.
#25 hd chain 140 links
Zippy 4s 8000 wrapped in foam and in a box and in a bag on the frame
Electric scooter 9t with grub screws.
throttle 3 wire
3x3x1/4 aluminum
8mm collar
70 Duro buna square edge for motor mounts
small top bar battery bag
150 amp watt meter
That looks like a nice build. At 120lb, it should climb really well! I'm over 2x your weight and I'm happy with the climbing.

I'm not understanding how you used the o-rings... Curious...

Let us know how the grub screws work out. I had problems when I tried them with the belt. But I didn't put a lot of effort in to them. I would guess I didn't file the flats deep enough...

Also would be curious to see your battery bag.

Would love to see more pics. Also, for some reason your pic shows up really small on my screen. I usually re-size to around 600x600 pixels (I think I read that somewhere in the forum rules...), although I have snuck in a few larger ones...


Hi, thanks. Here you can see the rubber o-rings between the clamps and mount. Like a motor mini mount basically. I think it will help will noise and vibration, can't hurt. I got the o-rings for your 9t chain noise originally. The one you see in the picture is a 9t but its the roll pin version. I did not feel comfortable without a drill press drilling a 3mm hole through my new motor shaft. So I ordered another one with grubs. I slotted the water bottle middle hole in the aluminum mount itself so it can be adjusted easily just by loosening one bolt and the clamps for chain tension adjustment. I'm still waiting on the bar bag for the battery, rebel chain ring and some other parts for the bike cause its needs updating badly like a new fork and tires and shifters and the list goes on. I will have more pictures of the battery setup later in the week.
 

Attachments

  • gopr0267.jpg
    gopr0267.jpg
    43.9 KB · Views: 2,024
  • gopr0268.jpg
    gopr0268.jpg
    47.9 KB · Views: 2,024
  • gopr0273.jpg
    gopr0273.jpg
    81.5 KB · Views: 2,024
fixvid said:
Isn't it possbile to use a thinner plate for the chain ring ? 6mm thickness seems overkill to me. Or it would be a good ideea to make the chain ring thinner at the mounting holes so one can use it like a "dished" chain ring and use it so to just not hit the chain stay (or get closer to in my case).

When I ordered my chain ring I didn't think to ask about thickness. When it arrived, I had a bit of a surprise! It worked out OK for me, since I was using spacers with the previous thin chain ring to prevent the two chains from interfering with each other. I just left the spacers out. I suspect they might be able to make thinner rings on request.

Gearing notes (I don't recall if I have mentioned this previously): On my build, the 90T chainring is mounted on the outside of the crank spider. I have a 40T bike chain ring mounted on the inside of the spider (middle position) with the same bolts. On the very inside I have a 22T climbing gear (I may climb slow, but I can climb things that scare me...). My crank set was originally a 3X, which came with 42, 32, 24T chain rings. The 90T replaces the original 42T. I have a wide range 11-40T 9 speed Sunrace Cassette out back, and I'm using a "Goat Link" to lower the derailleur.
 
Ehead said:
Hi, thanks. Here you can see the rubber o-rings between the clamps and mount. Like a motor mini mount basically. I think it will help will noise and vibration, can't hurt. I got the o-rings for your 9t chain noise originally. The one you see in the picture is a 9t but its the roll pin version. I did not feel comfortable without a drill press drilling a 3mm hole through my new motor shaft. So I ordered another one with grubs. I slotted the water bottle middle hole in the aluminum mount itself so it can be adjusted easily just by loosening one bolt and the clamps for chain tension adjustment. I'm still waiting on the bar bag for the battery, rebel chain ring and some other parts for the bike cause its needs updating badly like a new fork and tires and shifters and the list goes on. I will have more pictures of the battery setup later in the week.

That looks like a very simple, easy to fab solution. I like it!

I have a suggestion (you may have already thought of this...) - sketch on right. The frame clamp nuts can be tightened independent of the vibration mount nuts, which might allow the vibration isolation to work better, and allow the clamps to be tighter on the frame. Might want some form of locking nuts on top.

Vibration Clamp a.jpg
 
NateTN said:
FZBob,

Could we revisit your experience with the E-Power 6354 60kv motor?

Did you ever attempt to run it at 3-4s?

You said it would not exceed 100-200w, could that have been a controller issue?

This motor is one of the few reasonably priced in the 60kv range other than APS, I'd like to use it but your review is a little off-putting.

Btw, I weigh 72Kg and my bike is 10.5, maybe it would have enough power in my application.
About the middle of Page 4 was the post with my results on the 60kv motor. It has the pic of all 5 motors I have tried. Long story short, I had very high hopes that I would be able to run a larger motor sprocket and get the same power. Unfortunately, it was one of the biggest disappointments of the build. First I tried 4S, and I did tune the vesc, and play with current limits, but it was gutless. It just wouldn't draw much current. Then I hooked up 8S, and it ran similar to my 120kv on 4s (but not quite as good). It still needed the 9T sprocket.

I'm not a motor expert, so maybe one of the experts here can chime in, but here's my theory. The 60kv motor has a huge number of winds of very thin wire. Therefore, the resistance is very high. Therefore, for a given supplied voltage, the motor does not draw much current. Remember, you can't "push" amps. The controller just determines voltage, and the motor resistance determines current draw for that voltage. (Hopefully a motor expert will stop by and fix my theory...)

I do wish that the inexpensive motor manufacturers would supply more complete motor data!

Unfortunately, I think you would be disappointed in this motor even if you were much lighter than you are. :(
 
FZBob said:
About the middle of Page 4 was the post with my results on the 60kv motor. It has the pic of all 5 motors I have tried. Long story short, I had very high hopes that I would be able to run a larger motor sprocket and get the same power. Unfortunately, it was one of the biggest disappointments of the build. First I tried 4S, and I did tune the vesc, and play with current limits, but it was gutless. It just wouldn't draw much current. Then I hooked up 8S, and it ran similar to my 120kv on 4s (but not quite as good). It still needed the 9T sprocket.

I'm not a motor expert, so maybe one of the experts here can chime in, but here's my theory. The 60kv motor has a huge number of winds of very thin wire. Therefore, the resistance is very high. Therefore, for a given supplied voltage, the motor does not draw much current. Remember, you can't "push" amps. The controller just determines voltage, and the motor resistance determines current draw for that voltage. (Hopefully a motor expert will stop by and fix my theory...)

I do wish that the inexpensive motor manufacturers would supply more complete motor data!

Unfortunately, I think you would be disappointed in this motor even if you were much lighter than you are. :(

That is truely unfortunate, I was hoping to get the #25 chainring smaller for clearance and weight reduction, I'll proceed instead with a 90t and HK motor as that has already been pioneered by you.

Maybe down the line I'll find a suitable motor once all the kinks are worked out, for now I just want to build it and ride!

fixvid,

I intend to use whatever sheet material I can get that is close to the roller width of a #25 chain with 0.005"-0.010" clearance, which would be 0.120" in 316L stainless or 0.125" in 7075-T6 aluminum as this is whats available to me.

The aluminum thickness tolerance concerns me as it can fluctuate by a few thousands which might cause binding on the teeth. In the end, it could be manually clearanced while deburring so its not a huge concern, just notable.
 
FZBob said:
Ehead said:
Hi, thanks. Here you can see the rubber o-rings between the clamps and mount. Like a motor mini mount basically. I think it will help will noise and vibration, can't hurt. I got the o-rings for your 9t chain noise originally. The one you see in the picture is a 9t but its the roll pin version. I did not feel comfortable without a drill press drilling a 3mm hole through my new motor shaft. So I ordered another one with grubs. I slotted the water bottle middle hole in the aluminum mount itself so it can be adjusted easily just by loosening one bolt and the clamps for chain tension adjustment. I'm still waiting on the bar bag for the battery, rebel chain ring and some other parts for the bike cause its needs updating badly like a new fork and tires and shifters and the list goes on. I will have more pictures of the battery setup later in the week.

That looks like a very simple, easy to fab solution. I like it!

I have a suggestion (you may have already thought of this...) - sketch on right. The frame clamp nuts can be tightened independent of the vibration mount nuts, which might allow the vibration isolation to work better, and allow the clamps to be tighter on the frame. Might want some form of locking nuts on top.

Vibration Clamp a.jpg

Unfortunately I had to use a C clamp and squish it together to get the threads started on the u bolts I got so in my build I would not be able to use that method. I know what you mean though and it would be better to tighten it up like that as well.
 
I'm considering THIS motor from ebay, I'm a little dubious of the specs but for the price its worth a try, any opinions?

I think I'll have enough clearance to the cranks, the 10mm shaft is a concern as I can't find a 9t sprocket with a bore larger than 8mm. I could possibly bore out a sprocket if there is enough material left for the the grub screws, or I could turn the shaft down and put a flat on it.

another option is to modify the shaft to accept a D-bore sprocket (a 9t-10mm bore is available in this configuration) by machining a groove for a c-clip and thread the end for a lock nut.

Ehead,
Are you not concerned about the D5035 motor being to anemic?
 
NateTN said:
I'm considering THIS motor from ebay, I'm a little dubious of the specs but for the price its worth a try, any opinions?

I think I'll have enough clearance to the cranks, the 10mm shaft is a concern as I can't find a 9t sprocket with a bore larger than 8mm. I could possibly bore out a sprocket if there is enough material left for the the grub screws, or I could turn the shaft down and put a flat on it.

another option is to modify the shaft to accept a D-bore sprocket (a 9t-10mm bore is available in this configuration) by machining a groove for a c-clip and thread the end for a lock nut.

Ehead,
Are you not concerned about the D5035 motor being to anemic?
I'll take FZBob's word considering all the effort he has put into testing different motors over time. I was very careful and slow with my buying decisions and Bob was spot on for most of the parts. My particular build is for slow riding in 22front/36rear gears on steep hiking type trails that go up and up for miles. I also considered his weight compared to mine. I weigh only 120 and he said he was over 240. The beauty of the Vesc 50amp is 3s-12s so I could go up to whatever voltage I like. I'll start at 4s and go from there. My thoughts from the start were 10 mile range, clean build, kinda stealthy, quiet with FOC mode, light weight and reliable or at least simple.
 
NateTN said:
I'm considering THIS motor from ebay, I'm a little dubious of the specs but for the price its worth a try, any opinions?

I think I'll have enough clearance to the cranks, the 10mm shaft is a concern as I can't find a 9t sprocket with a bore larger than 8mm. I could possibly bore out a sprocket if there is enough material left for the the grub screws, or I could turn the shaft down and put a flat on it.

another option is to modify the shaft to accept a D-bore sprocket (a 9t-10mm bore is available in this configuration) by machining a groove for a c-clip and thread the end for a lock nut.

Ehead,
Are you not concerned about the D5035 motor being to anemic?

Looks interesting. It should make more torque than the D5035. This would allow for possibly running a 11 or 12 or 13 tooth motor sprocket, which might run quieter. It might take more power to turn when pedaling without the motor, but an 11 or 12 tooth sprocket might compensate. If you run a 9 or 10T, it might eat chains due to the extra torque (I'm not sure how close to the limit the chain really is...), but again an 11 or 12 tooth might compensate.

Disadvantage is an extra 270 gm (0.6 lb).

It would be an interesting experiment, not that expensive (Free for me! :lol: )

Just curious, what gearing does your bicycle have? One reason I'm happy with the D5035 imay be that I have very low bike gears for climbing, and I'm happy to climb at 3-5mph... Of course I also weigh about 114 kg. At 72 kg, you are way ahead of me on power to weight ratio.
 
First alpha version ready:

34r6a1l.jpg


1zb9d1j.jpg


I'm still missing a switch ..

I reconfigured the VESC current limits and it seems to pull harder.
My settings are 20/40/80A (batt/motor/absolut max).
5s1p LiFePo4 5.2Ah.
Could go up to 30A on battery side, than increment on mottor side till i hit the 30A average on battery.
What limits are you guys using ?

NateTN said:
I intend to use whatever sheet material I can get that is close to the roller width of a #25 chain with 0.005"-0.010" clearance, which would be 0.120" in 316L stainless or 0.125" in 7075-T6 aluminum as this is whats available to me.

I think my steel gear is 4mm thick but i'm not 100% sure (270gr). 7075-T6 aluminum in 0.125" should do the job and would yield to a pretty low weight.
 
Everyone,

Please forgive me, I had a brain fart and confused the D5035 with the smaller turnigy motor, their numbering always confuses me as it doesn't correlate with the motor dimensions like other manufactures do.

I run a 34t chainring (my goal is max 42t) through a wide ratio 9speed cassette(can't remember the ratios and i'm at work right now!) so I'm sure the D5035 would be adequate for my needs, I'm just exploring other options.

That being said, I'll be ordering the 6384 motor I listed before and report back on performance. It may be a good option for people seeking more assist for hauling cargo or tandem applications (I'll probably try it on our tandem at some point), or an economical solution for those that aren't as concerned with weight.
 
fixvid said:
I reconfigured the VESC current limits and it seems to pull harder.
My settings are 20/40/80A (batt/motor/absolut max).
5s1p LiFePo4 5.2Ah.
Could go up to 30A on battery side, than increment on mottor side till i hit the 30A average on battery.
What limits are you guys using ?
Here are the VESC settings I've been using since last October. Note that the current settings are only valid for the D5035 motor.
I'm not a controller expert, so my current settings were guesswork and trial & error. As I recall, I increased the motor current until the motor "cogged" at lower RPM's and full throttle on a steep hill, and then backed it off about 10%. I just set the battery current to be lower than the Turnigy D5035 motor spec. In any case, I've never seen over 35A on my watt meter.

When I initially set up my VESC, I experienced some hard shutdowns. I believe these were caused by exceeding the Max Current, which I had set around 50A, as it picks up very brief events. I think the VESC can handle brief spikes higher than 100A, and at this setting I have not had any more shutdowns.

Motor Current: 48A
Battery Current: 40A
Max Current: 100A

FOC mode (Quieter, runs good)
Sensorless (Since the motor is already spinning, it starts seamlessly...)
Stator Saturation Compensation: 15%
Temperature Compensation: True

Throttle Setup: (Note that I'm running an old Cyclone throttle with Hall Effect sensor)
Throttle App: ADC
Throttle Voltage: Min: .9 Center: 1.9 Max: 2.9

Control Type: Current (Note that this is important for the natural feel of the assist)
Throttle Curve: -70% "Natural" (Spreads out the low power settings, feels nicer)
 
I made this list a while ago. Don't remember where I got all the numbers, but some are from the Esk8 skateboard forum. These motors are marketed as skateboard motors, so they have a bit more dust shielding than most RC motors. (and the VESC was developed for skateboards...)

Note that other than the 5045 series, you can subtract 30 from the last 2 digits of the motor size number and get the Stator (Rotor) length (except for the D5035). I believe Stator volume gives a good indication of power potential.

The blue highlighted motors are the ones I have tried.

Turnigy Motors a.jpg
 
I'm still fiddling around with the spacing on the main chain rings. Here is the rebel gear mounted and the Morezone bag from Amazon that fits the 4s 8000 fairly well. It is the small size and is a very tight fit with foam around the battery which is good. I couldn't use the box I had for the battery. :( I don't want any movement inside the bag. Magura Twist Grip tomorrow, shifters and tires Friday.

The 3d printed parts on the Cannondale is looking great!. very clean, sharp looking layout
I have a old Anet A6.


gopr0286.jpggopr0290.jpg

gopr0292.jpg
 
Ehead said:
I'm still fiddling around with the spacing on the main chain rings. Here is the rebel gear mounted and the Morezone bag from Amazon that fits the 4s 8000 fairly well. It is the small size and is a very tight fit with foam around the battery which is good. I couldn't use the box I had for the battery. :( I don't want any movement inside the bag. Magura Twist Grip tomorrow, shifters and tires Friday.

Just FYI,I had to cut a bit off the front derailleur so it wouldn't hit the motor chain when shifting into high gear...

Let us know what you think of the Magura. I've heard they are nice, but expensive.
 
Back
Top