open and see . it's possible that the bearing inside blue nylon got wet and got rusty . i had similar issueI'm trying to figure out if I'm having the blue nylon gear issue. I just brought my bike out as it sat in the basement for the winter. The first ride was smooth but today's second ride the chain fell off the front ring. After the chain was set properly back over the front ring, I noticed pedaling was less smooth and had a lot more resistance. On my way home, I shifted at some point and then the bike wouldn't allow me to pedal forward anymore with the motor assist on or off. I was able to walk the bike back home which was fortunately only a few blocks.
Does anyone have any ideas if this is the blue nylon gear issue or could it be something else?
You are using an out of date browser. It may not display this or other websites correctly.
You should upgrade or use an alternative browser.
You should upgrade or use an alternative browser.
New "TSDZ2 Torque Sensor Central Motor"
- Thread starter larsottar
- Start date
scrolltonowhere
10 W
- Joined
- Mar 30, 2022
- Messages
- 76
So did you have to replace the blue nylon gear?open and see . it's possible that the bearing inside blue nylon got wet and got rusty . i had similar issue
bearing onlySo did you have to replace the blue nylon gear?
Scottsub20
10 mW
- Joined
- Oct 8, 2022
- Messages
- 20

TSDZ2 Blue gear failure.
I have had my TSDZ2 for about a year. Maybe 1000 miles. In that time I have been careful to use my gears properly and not overlod the motor. Although there were a few times while shifting that the motor appeared to be overloaded and it would make a grinding noise. Recently the motor would not...
 endless-sphere.com
I replaced my blue gear and bearings to repoir my TSDZ2. Is it possible that only the bearing needed to be replaced?
yes , you have to push it out with vise and socket wrench and press back new one
TSDZ2 Blue gear failure.
I have had my TSDZ2 for about a year. Maybe 1000 miles. In that time I have been careful to use my gears properly and not overlod the motor. Although there were a few times while shifting that the motor appeared to be overloaded and it would make a grinding noise. Recently the motor would not...endless-sphere.com
I replaced my blue gear and bearings to repoir my TSDZ2. Is it possible that only the bearing needed to be replaced?
is it possible to extract blue nylon model and try to print it ? because in this html i see no option for this operation ? is .obj file or anything 3d packed inside html ?With this HTML file you can measure every component in MM. The Blue gear dia is about 0.25mm larger and would do the job.
You can hide any part or component to see inside parts. Each bearing have his description Number for quick order.
This file is used to see and measure.
For production purpose you must refer to my last post with Step files
MaddingCrowd
1 mW
- Joined
- Oct 6, 2019
- Messages
- 10
hey folks, turns out the torque sensor on my TSDZ2 is shot a couple thousand miles. I noticed that I wasn't getting the regular amount of power to the motor and when I opened up the motor the wires coiled behind the torque sensor were coming out.
my question is: is there any way to get more motor power via just cadence sensor while I'm waiting for a replacement torque sensor / motor? I tried changing the settings on the Motor control section as shown in the pic but am only get 20-40 in motor power. Any other settings I can change to still get decent assist in the meantime? thanks!
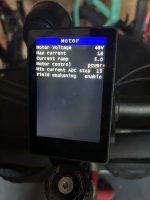
my question is: is there any way to get more motor power via just cadence sensor while I'm waiting for a replacement torque sensor / motor? I tried changing the settings on the Motor control section as shown in the pic but am only get 20-40 in motor power. Any other settings I can change to still get decent assist in the meantime? thanks!

scrolltonowhere
10 W
- Joined
- Mar 30, 2022
- Messages
- 76
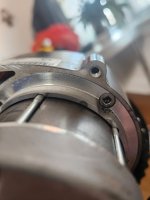
There are four screws that are really hard to get off. One seemed to come off with little effort. Now the other three are stripped. I can't believe this but these little screws are stressing me out. I spent so much time putting this bike together last summer and this is the last thing I wanted.bearing only
Attachments
Natedawgblake
1 µW
they come out easily with good Philips screwdriver and right amount of force so the screwdriver tip won't slip . now you're fried ... have to use unscrew bit and look for new screwsThere are four screws that are really hard to get off. One seemed to come off with little effort. Now the other three are stripped. I can't believe this but these little screws are stressing me out. I spent so much time putting this bike together last summer and this is the last thing I wanted.
You should direct wire it from the battery, but also install a relay driven by the wire coming from the controller, so you can still switc it off and on from the display or remote.Thanks! That's what I was afraid of. I'll see if I can find another one or just go directly to battery like you say.
scrolltonowhere
10 W
- Joined
- Mar 30, 2022
- Messages
- 76
I just took it to a local bike shop. The guy used a JIS impact driver tool. He was able to get one out. Now I have two left. He kind of left me feeling like there's not much luck I have getting them out at this point. He said to go get a dremel tool and cut a slit so I can use a flathead screwdriver but he said I'd likely cut into the surrounding metal. Any other ideas or is this motor toast?they come out easily with good Philips screwdriver and right amount of force so the screwdriver tip won't slip . now you're fried ... have to use unscrew bit and look for new screws
Last edited:
try looking for unscrew tools .special bits that bite into broken screw . even if you need to cut with dremel the motor still will work . you might drill a little hole in the screw and then press small screwdriver but with caution . I still recommend to look for dedicated toolsI just took it to a local bike shop. The guy used a JIS impact driver tool. He was able to get one out. Now I have two left. He kind of left me feeling like there's not much luck I have getting them out at this point. He said to go get a dremel tool and cut a slit so I can use a flathead screwdriver but he said I'd likely cut into the surrounding metal. Any other ideas or is this motor toast?
I'm quite good mechanically and have had problems with these screws in two different motors. I have now bought a JIS impact driver for future problems, but while waiting for it to arrive, I managed to beat the last stuck, rounded-off screw by grinding down a crosshead driver for best possible fit, getting into a posture where I was able to exert a lot of force inwards in order to keep the driver in the cross-slots, and using very small, repetitive back/forth, tighten/untighten movements until I was able to make it move. I think what broke the Loctite was actually a tightening motion. It took a lot of patience, grit and determination, and more than one day. I guess the bad design is use of strong Loctite c/w a screw made from poor quality steel.I just took it to a local bike shop. The guy used a JIS impact driver tool. He was able to get one out. Now I have two left. He kind of left me feeling like there's not much luck I have getting them out at this point. He said to go get a dremel tool and cut a slit so I can use a flathead screwdriver but he said I'd likely cut into the surrounding metal. Any other ideas or is this motor toast?
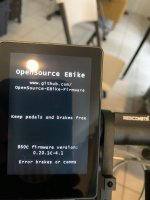
Do you have the same version of firmware on the motor and the display? It won’t work if they are not the same.Hey So I recently just installed 750w tsdz2 and tried to connect the eco cycle 860c display with open source software and I’m getting this error message
Do you have brake sensors? The firmware had a startup hold at that point if the brakes are activated. Just disconnect the sensors and try again.
scrolltonowhere
10 W
- Joined
- Mar 30, 2022
- Messages
- 76
I'm quite good mechanically and have had problems with these screws in two different motors. I have now bought a JIS impact driver for future problems, but while waiting for it to arrive, I managed to beat the last stuck, rounded-off screw by grinding down a crosshead driver for best possible fit, getting into a posture where I was able to exert a lot of force inwards in order to keep the driver in the cross-slots, and using very small, repetitive back/forth, tighten/untighten movements until I was able to make it move. I think what broke the Loctite was actually a tightening motion. It took a lot of patience, grit and determination, and more than one day. I guess the bad design is use of strong Loctite c/w a screw made from poor quality steel.
Thank you for this description on how to get out these screws. I saw on another forum that this is somewhat of a common issue. Did you completely remove the motor from the bike when you did this? I currently have mine still on the bike but feel like it may be a little easier to work on it with the motor off.
Also embarrassingly, I lost the bolt that attaches the pedal to the lever. Is this just a standard size bolt?
Chalo
100 TW
"Lever"? Do you mean crankarm? Pedals screw directly into crankarms without additional fasteners. Remember that the left side pedal has LH threads.Also embarrassingly, I lost the bolt that attaches the pedal to the lever. Is this just a standard size bolt?
If you're talking about the crank bolt that fastens the crankarm to the bottom bracket spindle (which isn't a lever, by the way), that's a standard bicycle part that any bike shop will have, but it's not a common hardware store type fastener. It has a finer thread pitch (M8x1.0) than generic metric screws.
scrolltonowhere
10 W
- Joined
- Mar 30, 2022
- Messages
- 76
Yes the crankarm is what I meant. Thanks for the link, I appreciate your help Chalo!"Lever"? Do you mean crankarm? Pedals screw directly into crankarms without additional fasteners. Remember that the left side pedal has LH threads.
If you're talking about the crank bolt that fastens the crankarm to the bottom bracket spindle (which isn't a lever, by the way), that's a standard bicycle part that any bike shop will have, but it's not a common hardware store type fastener. It has a finer thread pitch (M8x1.0) than generic metric screws.
Can you provide a link to the source of this information? I'm quite curious as I was thinking about upgrading my TSDZ2 to the B-version.According to pedelecs.de the drag on TSDZ2 is 0.8Nm and on the TSDZ2B it's 1.2Nm despite the fact that it's advertised as easier to pedal unassisted just like a normal bicycle.
casainho
10 GW
- Joined
- Feb 14, 2011
- Messages
- 6,047
@beemac, How are things going with VESC to TSDZ2?
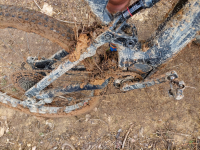
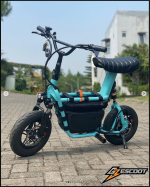
My EBike motor with VESC is going strong. That picture is from a full day riding with a lot of mud:
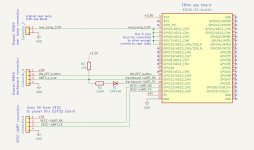
I just replicated the same but now for my Xiaomi M365 Pro 2 stand up EScooter. The DIY EBike/EScooter board is very basic but let me read every sensor and control everything like the original display and lights. The schematic:
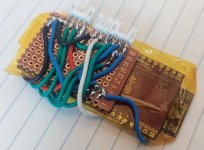
The DIY EBike/EScooter board:
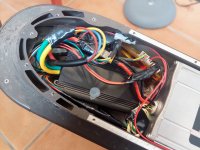
And finally everything installed in place:
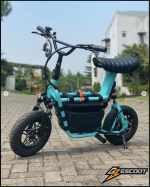
But I am also building a mini seated scooter (Fiido Q1S), with 12 inches tires and a 2 kw motor. I will also use VESC and a DIY EScooter board and the same DIY display I use on my EBike. So yes, using VESC + a DIY EBike/EScooter board, is being work very well for me and is proved to work for any EBike and EScooter!!
My EBike motor with VESC is going strong. That picture is from a full day riding with a lot of mud:

I just replicated the same but now for my Xiaomi M365 Pro 2 stand up EScooter. The DIY EBike/EScooter board is very basic but let me read every sensor and control everything like the original display and lights. The schematic:

The DIY EBike/EScooter board:

And finally everything installed in place:

But I am also building a mini seated scooter (Fiido Q1S), with 12 inches tires and a 2 kw motor. I will also use VESC and a DIY EScooter board and the same DIY display I use on my EBike. So yes, using VESC + a DIY EBike/EScooter board, is being work very well for me and is proved to work for any EBike and EScooter!!

Attachments
Last edited:
Sorry for late reply: No I didn't remove the motor. You might be right: it might be better to remove it. For me having the motor fitted to the bike was almost like having it secured in a vice, I felt like I could get enough force onto the tool that way. Being wise after the event, I suppose I could have avoided the screwdriver "camming-out" if I had chosen the best of my dozen cross-head drivers first before trying it to get the right tool for the job, but it the real world...Grinding the tool to fit also help with sharpening the edges which helped bite into the rounded-off Dinky-toy metal of the cheapo screws.Thank you for this description on how to get out these screws. I saw on another forum that this is somewhat of a common issue. Did you completely remove the motor from the bike when you did this? I currently have mine still on the bike but feel like it may be a little easier to work on it with the motor off.
Also embarrassingly, I lost the bolt that attaches the pedal to the lever. Is this just a standard size bolt?
scrolltonowhere
10 W
- Joined
- Mar 30, 2022
- Messages
- 76
Thanks for the reply. I removed the motor off the bike just now because I don't think I would've been able to get to one screw. I got a dremel and tried to cut into the screw. I unfortunately cut into the metal surrounding the screw area as well. I feel so incompetent with this stuff. I had the slot and I think I just stripped it even worse. This motor is driving me mad. I can't even get access to inside the motor to see what's going on. I feel I have no business doing this kind of stuff. Sorry for airing my frustrations here.Sorry for late reply: No I didn't remove the motor. You might be right: it might be better to remove it. For me having the motor fitted to the bike was almost like having it secured in a vice, I felt like I could get enough force onto the tool that way. Being wise after the event, I suppose I could have avoided the screwdriver "camming-out" if I had chosen the best of my dozen cross-head drivers first before trying it to get the right tool for the job, but it the real world...Grinding the tool to fit also help with sharpening the edges which helped bite into the rounded-off Dinky-toy metal of the cheapo screws.
Can you provide a link to the source of this information? I'm quite curious as I was thinking about upgrading my TSDZ2 to the B-version.
Tongsheng TSDZ2 36V - neues Design 2020
.... casainho auf endless-sphere.com hat den Controller V2 über J-Link folgendermaßen angesteuert: Wenn die Pins für Beleuchtung und Geschwindigkeit, Versorgungsspannung und Masse mit dem alten V1-Controller kompatibel sind, werden SWCLK und SWD/SPD immer SWIM und RST ersetzen und die...
www.pedelecforum.de
beemac
10 kW
@beemac, How are things going with VESC to TSDZ2?
Probably not going to make much progress until the autumn now, too many other projects. My very un-electric (VW Crafter 2.5TDI) campervan conversion is taking most of my spare time when I'm not away somewhere camping in it... Once the evenings start drawing in again I'll get back to writing code for fun. Glad your vesc is still working well
Similar threads
- Replies
- 12
- Views
- 11,723
- Replies
- 35
- Views
- 17,736


