Skeetab's FUTR Beta Build

Started working on the hydro brake system. I bought a rather cheap Shimano set and I am now swapping levers since they put them moto style and I like front on the left. Also I needed to make the cables longer since they were too short for the Beta, therefore I bought a bleed kit too! Also checked the shipped voltage of the Luna pack and its 72V.

IMG_1390.jpg
IMG_1391.jpg
IMG_1392.jpg
 
My hydraulic conversion is being help up by one little $4 part. I thought I ordered 2 but apparently only one was included in the kit I bought last week. Soon I should be able to get things going!

barb.png
 
Dude I just got hydro's on mine. First time using them, and so much more power and crispness. They're only 'formula c1' (pretty inexpensive) but in the future fyi you can order them with various lengths hoses and the levers/clamps go right or left identically. I didn't want to mess with the pre-bled kit, when I might never need to. Some people pretty much never have to.
BUT I'm a little envious of you now because I've not taken one apart and done hoses/bleeding lol. Anyway, for 100$ w/ ok rotors these hydros are the bomb. I can skid and do wheelstands again, and the way they auto adjust for install and pad wear beats the crap out of mechanical too. I'll update my build later and note how long they perform well without service etc.
 
Ya i've had a few downhill bikes with hydro brakes in the past so I have bled them before. The first time I had to youtube video learn lol

I bought a kit with hoses pre bled for cheap, I didn't even look at the length of hose they came with. Both were too short. I already extended them just need one more barb to shorten the fronts, which used to be the rears.
 
Did a little work on the FLX Beta this weekend. Unfortunately not enough to get it back up and rolling, but we are close. I started on the front hydro brakes and then flipped it upside down and opened the battery compartment. From there I took the battery out since I have a new one. This allowed me to remove the rear brake cable that was causing me issues. I then ran the new hydro hose thru but waited on installing the new battery since I am working on the regen switch before I do. I then moved to the rear of the bike where I wanted to remove my 7-speed cluster and add just a single speed 12t freewheel. Everything went ok but now I have a feeling my chain line is going to be the next issue. I have a different adaptor that I pictured earlier in my post...but I cannot use this with a 12t since they don't make one that threads onto the adaptor that small. I will have to think on this one...

small note my front fox forks never came in the mail now I have a claim opened up on them :( its really slowing everything on the front end of the bike down. I have a new 15mm thru axle front wheel to swap over too but the fork is MIA.

bike in an irregular position
IMG_1439.jpg
IMG_1440.jpg
IMG_1441.jpg
IMG_1442.jpg
Pulled off the hub motor and used a freewheel removal tool to take the old one off.
IMG_1443.jpg
IMG_1444.jpg
New 12t installed, but its still not far enough off the motor
IMG_1445.jpg
Motor back in the Beta dropouts. I like this rear end more and more. Very easy to take the motor off
IMG_1447.jpg
IMG_1448.jpg
Shot of the old and new battery, same number of cells but my old one has less capacity and is heavier by a little bit
IMG_1451.jpg
 
Got the time this weekend to spend a few hours putting the bike back together with all of the new upgrades. Started off by extending the wires on my regen button and routing them thru the battery frame. Then after that was done I crammed a bunch of foam protection and my battery into a snug fit and wired it all into the system. The worst part now is the rats nest of wires below the battery, I will have to find a better way in the future I think. After I got that back together I wanted to finally get the other crank on the bike. But I knew that I needed a skinnier bottom bracket first. So I had to remove everything. After bolting that back on I also had to remove the crank from the spider and bolt it to the back of it to bring the sprocket closer to the frame. My chain line is off not nearly as much as it was before and I think it will work just find now. And I prefer the black crank over the shiny silver one. Once all of this was done I had to mount the rear brake caliper and finish running the hydro line to the rear lever. I then got it all tightened up and now its time for the messy part, bleeding the system. The mineral oil kit I bought made it nearly fool proof, but since I am doing this on carpet things are bound to get messy! All and all everything was a success. Now I just have to charge this new pack for the first time and take it for a test ride...

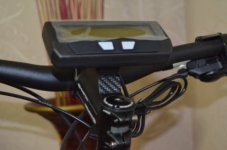
Two pics of the bike right after I finished closing up the battery compartment, before the crank job!
IMG_1473.jpg
Notice the spacers on the caliper adaptor. I didn't have one large enough for this rotor so added an extra set of leveling washers
IMG_1474.jpg
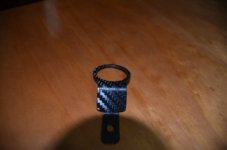
Then mounted the regen button, which is a motorcycle kill switch, cord was a little short but its ran similar to my CA wire so no big deal
IMG_1475.jpg
Shot of the new hydro levers and grips
IMG_1477.jpg
I wish I had one more red end cap for the right side. I had them must have tossed it out...
IMG_1478.jpg
Then for the most important part! I got ride of the awful chain tensioner that was sprung wrong and changed out the bottom bracket and crank and pedals. Also I used regular BMX chain instead of MTB chain so its thicker and I used a master link and it fit perfect!
IMG_1483.jpg
IMG_1484.jpg
Shots of the bike all ready to go
IMG_1485.jpg
IMG_1486.jpg
IMG_1488.jpg
 
Finally got to take this thing for a rip yesterday and it was a blast! I think the next thing on my list is a bigger motor though. It is just a matter of time until I smoke this thing now that I have a decent battery. After only a 10 mile ride my motor was so hot I didn't want to touch it :)

Im sure my winding are changing colors nicely
 
Just re ordered a set of front forks since my last pair never came in the mail. I ended up going with the Rockshox Argyle 100mm dirt/park with a 20mm thru axle. I guess I bought a 15mm front wheel for no reason since I no longer need it. But I got a good deal on the wheel so I will keep it incase I upgrade again one day!

Cannot wait to swap out this front fork, not because its bad...but because it hits the frame when you steer and I feel like it is limiting. I've had this Marzocchi fork for a long time I will probably get rid of it so it can go to a new home now that I am going to reuse the wheel its paired with.
 
Finally sacked up and bought the most expensive tiny piece of metal ive ever bought! The CA center mount bracket, this little guy plus shipping from CA to MA comes in at $34.95...WOW~!

It really does clean up the look of the handlebars though, I like it
IMG_1507.jpg
IMG_1508.jpg
IMG_1510.jpg
 
I bought a Patterson transmission today! Im excited to see if this will solve my drive issues. Lets hope it fits the frame good.
 
Nice build Skeetab! I've been eyeing this frame for a little while now as I really want to go light weight for my next build which will be for mainly trail riding. I love what you've done with yours! I'm really leaning more towards this frame after reading your inspiring, pic filled thread. The only thing really holding me back is that I would really like to go mid-drive for this build. I need to do more research though to see what the options (if any) would be. How much does your new steed weigh?
 
Still need to throw it on the bathroom scale to find the total weight, but I wanted to wait for my new front forks first.

Tracking says they will be delivered today! So I will find out soon!
 
Not sure how I feel about these forks on this bike, but maybe they will grow on me. I haven't even had a chance to take it for a ride yet...So I will hold off on judgement I guess. One thing that is hard to not notice is that the front end of the bike is about 2" lower now, I dont think I like that...Also got my Patterson crank but didn't have enough time to start installing it. I hope it sits in line with my rear sprocket or I will have to mess with the rear end again.

Rockshox Argyle 20mm 100mm coil fork
IMG_1513.jpg
Patterson transmission, I like how when you buy one of these Sam Patterson himself talks to you direct
IMG_1514.jpg
Its got a little bit of weight to it, but I will be saving that on the front end
IMG_1515.jpg
Notice how the front of the bike is much lower than it was before. I lined up the old Marzocchi fork and it seems to be around 2" lower :(
I also didn't cut the steer tube because of this since I want to get a feel for it first, added every spacer I had kicking around
IMG_1516.jpg
Maybe it will grow on me. Right now it feels naked...But atleast I can steer far now!
IMG_1517.jpg
Although I do like the cleaner look on the handlebars
IMG_1518.jpg
 
So I had a little time last night to start getting the Patterson transmission installed on the bike. This is going to take some customizing since it is no where near able to fit. I am working on a way to modify the system so I can adapt it to the Beta!

Lets hope it doesn't take me too long
 
Im taking my sweet time on this Patterson crank since I don't want to put it on and take it off 5 times. I needed to completely disassemble it and remove the shifting mechanisms to get the clearance on the FUTR Beta. Now I have to remount the internals without penetrating to the back of the plate since there is no room on the Beta.

I think I am going to end up making it high speed only for now since it will be easier. So my hill climbing ability will suffer for now.
IMG_1530.jpg
I will need to find an alternative way to stop the plate from spinning since the mounting brackets were all in the way of installation and had to be removed
IMG_1531.jpg
I need to cut the back bolt a lot shorter and get a special shallow nut to attach the gear engagement
IMG_1532.jpg
Then I will need to add a retainer clip for the spring to hold to to maintain tension on the gears
IMG_1533.jpg

wish me luck!
 
Finally got the time to finish the Patterson transmission on the FUTR Beta bike! it came out awesome and im glad I took my time on it.

IMG_1539.jpg
Here is the back of the plate where I had to cut the bolt and nut down on the gear shifter
IMG_1542.jpg
This is the stop bracket that I need to modify to get to fit the Beta
IMG_1543.jpg
Had to cut it down pretty far to make it fit
IMG_1544.jpg
Had to take the hack saw to it for about 30 minutes
IMG_1545.jpg
Not only did I have to make It skinnier but I had to cut a lot of meat out of it also
IMG_1546.jpg
Had to also add a few washers to center the crank between the frame
IMG_1547.jpg
Here is the stop bracket after I modified it to fit the Beta
IMG_1548.jpg
Finished product after install just needs a chain!
IMG_1549.jpg
IMG_1550.jpg
IMG_1551.jpg
Here is the final shot with it upright. I tried to install the chain but I think I need to order a halflink chain now since it will not fit properly without a tensioner
IMG_1552.jpg
 
Nice work. I got 34kg for mine with 1300watthours. Did you weigh yours?

Is the patterson still 1.6:1? I chatted to Sam Patterson on here a few years back and he was considering 2.5:1.


Sent from my iPhone using Tapatalk
 
Ya its 1.6:1 I bought the biggest sprocket they offered because of this. I still have not gotten around to weighing it yet.

But I had fun ripping it around with no chain after not having it operational for a week or so!
 
I am planning on keeping the transmission in high speed at all times for now. I would need to get a very small custom pull bracket made to try and activate the gearing on this frame. For now I just want to see how she rides with it.

So I got my half links in the mail today and even with that the chain is still not tight enough. Looks like I am going to have to put a tensioner in the system somehow.
IMG_1568.jpg
IMG_1569.jpg
 
Same issue. Just bought a dozen nice tensioners off alibaba cos i think its gonna be common issue.
Awesome frame regardless.
 
Well I ended up drilling a tiny hole in the frame derailur hanger so I could get the Godspeed tensioner into position. It went fairly easy without any problems. It seems to be ok but I have yet to take it on a ride. Lets hope the chain stays on...

IMG_1570.jpg
IMG_1571.jpg
IMG_1572.jpg
IMG_1573.jpg
IMG_1574.jpg
 
Back
Top