-- THE SINGLE CELL CHARGER POST --

Ypedal said:
I tested a few last night and got 3.85v peak before the light went green. fyi.

The open circuit voltage is 3.750 on 2 of the chargers i tested so far.

For the large AH packs, i think a large regulated power supply is the way to go.. I'll be charging 48v 25ah !!!!! :shock:

I'll be watching your progress very carefully then!!!! :)

we now have a turnkey solution for the BMS which is a fantstic design too i might ad, (and allows as many cells to be parallelled as possible.

Now all we need is a FAST charging solution, and then i think it would be the ultimate in ebike batteries!
 
HI doc you can put me on the list for ten charger please...

but i would need to know more about how to connect the wires ...i know there are many post like gary on care and feeding but i don t really understand how they are connected ...i am more visual guy i guess...gary explained on one of the post but i don t want to make a mistake

i would like to see how it is connected without bms i am just going to go like xyster... it is the parallel and the small wires coming from the batteries the + and - that is confusing me
 
thank you ypedal for your response...but i would like to see how it done with the little plug that gary has on his 20s4p it looks like he only have to recharge with the plugs at the end of the chargers connected very clean looking but it looks like there aren t 10 negative wires on the chargers and on the battery pack...
 
Ok ypedal i would love to see real pics

i found where gary explain how they are plugged it was on the first page of this thread loll

but maybe if gary could make a diagram or a step by step on how to do that ...it would be appreciated...no bms please


quote ""
No disconnection of anything is required. Each charger is completly isolated from the others, so it doesn't hurt to basically wire them in series, just like the pack. The - side of the 2nd charger is connected to the + side of the first, and the - side of the nth charger is connected to the + side of the nth-1 charger. For 10 chargers it takes 11 wires. One each for the - of the 1st cell, one for the + of the 10th cell and nine more for all the junctions between all the rest.

That the one thing I like about this setup, I don't have to unplug the packs from the bike. I just plug the chargerwiring harness into the Packs balancer plugs. No muss, no fuss. ""

-- Gary
 
Here is a simple charger that should top each cell to 3.6V with a "simple patent high tech protective circuit"... a 12V bulb.

I have some big toroidal transfo that i do nuo use.. a 800VA and a 1500VA for some past high power amplifier project...

I just need to rebuilt some independent winding as multi secondary and to use a rectifier, a zever (CV) and a bulb as the (CC) or I limit..... the number of turn should be made to get around 100mA in the bulb to polarize the zener and the voltage to get stabilized.
:wink:
 

Attachments

  • cheap multicell charger.JPG
    cheap multicell charger.JPG
    70.1 KB · Views: 2,969
One thing I've noticed with a123 cells is that even on the same charger, two cells might end up with different voltages, right off the charger. I've seen variances from 3.58 to 3.72 with 8 cells that I charged individually with a TP-1010C set for one cell. If you put a slight load on these, however, even for just a few seconds, the "resting" voltage for each cell settled in at a voltage of about 3.53-3.55V, so it doesn't mean much to check variances right off the charger(s). Healthy cells will be "full" at somewhere around 3.55V resting voltage. I've seen some cells that have been stressed that will lose some capacity and end up only having a resting voltage (i.e. -- not right off the charger, but after a few seconds of being under a load...) of around 3.42-3.45V. These cells still work fine, but they won't have a full 2.3Ah of usable capacity, maybe only 2.0-2.1 Ah.

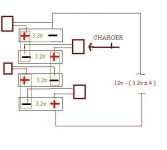
The VoltPhreaks chargers I have all seem to have slightly different cutoff voltages that vary from about 3.80 to 3.85V. After a ride yesterday that consumed about 1.7Ah, I recharged both packs. One ended up with voltages per cell of 3.80V, 3.83V, 3.81V, 3.80V, 3.86V, 3.80V, 3.83V, 3.84V, 3.83V and 3.81V. The other pack had similar variances.

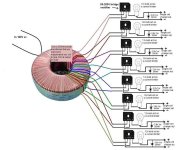
Once you put any sort of load on the cells, however the voltages will drop down to about 3.5-3.6V. This is illustrated in the graphs below, which are from the short test ride yesterday. The data comes from a new version of the EagleTree MicroPower eLogger that I have been testing for them, and there is more info in this thread: http://endless-sphere.com/forums/viewtopic.php?t=2599. Anyway, here's the charts:

Mariner-20s4p-5303-11-4-07a-Graph.jpg


Mariner-20s4p-5303-11-4-07a1-Graph.jpg


In the first one, you can see that the pack voltage starts out at around 73V, or about 3.65V per cell, but this drops quickly when a bit of a load is applied. In the second graph, which is simply a zoomed in section of the first, you can see that this initial drop settles down to about 66V, or about 3.3V per cell, where it remains, even after multiple 80A+ peak loads. This is why these a123 cells are rated as having a "nominal" voltage of 3.3V per cell.

Anyway, it has been my experience that the largest variance between cells will be when they are fresh off the charger. You should always check the balance between cells after they have been under load a bit.

Another thing I've noticed about a123 cells is that if you do have a cell that has been stressed to the point it has lost some capacity, it will always have a much lower voltage right off the charger. I've got a few that will only be at 3.36V, some at 3.48V and some at 3.40V. This is the case even if they are paralleled with 3-4 good cells. The bad one will always pull the good ones down to this level. They still work, but the capacity is reduced to about 1.9-2.0Ah.

-- Gary
 
slayer said:
thank you ypedal for your response...but i would like to see how it done with the little plug that gary has on his 20s4p it looks like he only have to recharge with the plugs at the end of the chargers connected very clean looking but it looks like there aren t 10 negative wires on the chargers and on the battery pack...

I have a drawing I did in the LVC instructions. I'll see if I can find it and post it here.
 
Here is how I wire the packs to two standard 6-pin RC balancer plugs:

Battery%20Balancer%20Plugs.png


For the charger harness, I simply used the female version of the same plug type and wired the chargers exactly the same way. For that matter, that is exactly how the LVC circuits are wired.

-- Gary
 
Although it can take awhile to completely recharge a big pack with these 2A chargers, you can alsways use a big supply or a simple CC charger to initally get the cells up to the 85-90% point, and then use the single cell chargers to "top-off" the cells and balance them. That's what I do when I'm in a hurry.

-- Gary
 
Ypedal said:
Hey, taking this single cell thing another step further...

Is is possible to use more than one charger per cell to double the charge rate with the VP chargers ?

I asked Tony this and he said " No " .. but you guys hack stuff up all the time.. possible somehow ?

I don't see why not.

When the cell approaches cutoff voltage, then there will be a tendency for one charger to do all the work, but by then you're over 80% charged.
 
slayer said:
Ok ypedal i would love to see real pics


quote ""

( not a great picture, i'll get better snaps soon )

I soldered 2 wires to each tab, one for the + and the other for the - of each cell in the pack.

All the cells remain conected in series for 12v, but i can conect one or more chargers as required.
 
Hummm... I can see two pot on the board... i wonder if they are for the I limit and the V limit... :wink:

Let's try to fing that compagny : GOLDEN PROFIT ELECTRONICS LTD. :wink:

Model GPE-838A-03200

I guess the 03 is for the volt and 200 is the 2.00 A


Doc
 
Hmmm, good detective work. I wonder how much if we could get enough people to go in on some of these direct? Especially the 2.5 amp!

Ypedal did something I have been wondering about. I wondered if it would be possible to open up the chargers like that. Because, we could then make our own custom enclosure that can hold however many single cell chargers we need, supplying voltage with some sort of bus and eliminate the individual plastic housings, male plugs and powerstrip - saving a lot of space. This makes it easy to put a 10 cell or greater charger set in our packs I would think.

You could even remote locate the LED's pretty easy it looks like. To a common area of the custom case. You could then see the charge status of each charger from the outside of the case, through a plastic window or something like that.
 
why not use mobile phone chargers, seems companies are using cobalt/manganese chargers for iron phosphate batteries. I haven't tried on iron phosphate cells but have been using mobile phone chargers on 5ahr cobalt oxide cells, works extremely well. I just use the + and - wires from charger, dont worry about the cut off wire, just turn off when you reach voltage you want or if battery starts to get warm, using 800mA charger for 5ahr cells, they get slightly warm, also using 450mA mobile phone chargers, takes longer but battery gets no warmth during charge.
 
EMF : Getting these out of their shells is no joy.. i had to use a blade knife, flat head screw driver, vice-grips, alot of nasty words and more..

they are sealed units with no screws.. either glued or RF sealing.

One could easily solder the power leads onto a buzz bar and box them up with a fan ( they do get fairly warm during use )
 
Ypedal said:
EMF : Getting these out of their shells is no joy.. i had to use a blade knife, flat head screw driver, vice-grips, alot of nasty words and more..

they are sealed units with no screws.. either glued or RF sealing.

One could easily solder the power leads onto a buzz bar and box them up with a fan ( they do get fairly warm during use )
OK, good to know. I was hoping for screws. But, what else do I have to do all winter? :wink: A fan is easy to incorporate as well.
 
A dremel with cutting disks would probably be the best bet.. just have to be careful not to go all the way thru.. jus remove enough plastic to be able to slice thru it with a sharp utility knife..

But again, not alot of room to be gained by removing the shells.. they are already using all the space available in the black-box.. ( I was wishing/hoping they were just a small circuit board with plenty of empty space.. but nope..)
 
Ypedal said:
A dremel with cutting disks would probably be the best bet.. just have to be careful not to go all the way thru.. jus remove enough plastic to be able to slice thru it with a sharp utility knife..

But again, not alot of room to be gained by removing the shells.. they are already using all the space available in the black-box.. ( I was wishing/hoping they were just a small circuit board with plenty of empty space.. but nope..)

Oh, in the picture, the board looked quite flat. So there is more to it inside the plastic shell, that we cannot see?

Edit: Never mind, I looked at the picture again and see what you mean. the electronics are pretty tall here and there. So it fills the shell up pretty good. Still it may be worth a try to make something and eliminate the male plug and case. Especially when you have to lug 10 of these around and a power strip.
 
Back
Top