Isn't the speed sensor (mounted on chain stay) a hall effect type? If so, doesn't it require 5V (from the motor controller) for it to work?If you had powered up the controller and measured 0V, then you can't flash the controller.
May I ask where you bought the Tsdz2B?
You are using an out of date browser. It may not display this or other websites correctly.
You should upgrade or use an alternative browser.
You should upgrade or use an alternative browser.
TSDZ2 OSF for all displays, VLCD5-VLCD6-XH18, LCD3, 860C-850C-SW102.
- Thread starter mbrusa
- Start date
I was using the main connector. And I think I burnt the controler with bad contactAre you sure you're using the proper connector ?
The one Elinx talked about is the one where you plug the speed sensor, not the display. They're the same on the 6 pin and 8 pin versions.
Good way to learn I guess, should have wait for your answer before retry. I have ordered another one. I will tell you the result when received.
Thank you!
I feel your pain.. I broke one once by plugging a ST-Link in the wrong pinsAnd I think I burnt the controler with bad contact
I have a question about flashing the LCD3 display: There is a chip in the display: MM32SPIN25PF - what tools should I use to flash this display? I tried V-link and STVP - it doesn't workI understand that it is difficult to use LCD3 without a manual.
If you have the ability to upgrade display and motor, it is the best choice.
Yesterday, checking the version of the manual on GitHub, I realized that the firmware was not aligned with the one on the PC (LCD3 is not a priority for me), which is why I released a new version. So use yesterday's.
However, only the engine firmware has changed, not the display one and the manual is updated, only the reference to E07 overcurrent error added yesterday is missing.
We started at 1 PM on Sunday. Didn't finish till around 6:30 pm. We chose version Release Open source firmware TSDZ2-v20.1C.4-LCD3 update 3 · emmebrusa/TSDZ2-Smart-EBike-LCD3 and almost did not succeed. We started with the controller but kept getting the error "cannot communicate with the device". We checked the wiring, updated the ST-LINK V2 firmware to the latest, tried battery power, tried USB power, checked wiring again, all to no avail- got the same error. We googled the error and found an Endless Sphere post of someone who had the same error and tried using the 3.3 V pin which led to success. We tried the 3.3 V and sure enough it worked! We were able to read/ save the old firmware and update to the new.
For the KT-LCD3 we used the 5 V pin and had no issues. Everything went smoothly after that.
Updating the controller. Excuse the wire nuts and rubber bands. This is a temporary test bike to make sure everything works after I resurrected this broken TSDZ2 motor I got as a box of parts.
View attachment 350356
Updating the KT-LCD3. I soldered the header to J7 to insure a good electrical connection.
View attachment 350357
View attachment 350359
We went through the 11 menu's and associated submenu's, leaving most settings at their default values. Changed only metric to Imperial, motor from 250 to 500 W, enabled Throttle and not much else. I was able to test ride it for only 10 min this Monday morning with the sky threatening to rain. Because the KT-LCD3 cover was off with the pigtail header still soldered to J7, I did not want to chance getting it wet. First impression torque assist is much improved over the last (whatever) OSF version, where the 5 assist levels did not seem to have much difference. With this latest version, I can feel and see (motor W on display) the difference in assist as I upped the levels. Forecast for the next 3 - 4 days is constant rain so no test rides for a while.
Mbrusa, thank you for your work. Finally have a manual that matches the firmware! Looking forward to learning how to configure the many parameters that's available.
I've put 44 miles on the TSDZ2 since the OSF update, mostly riding at assist levels between 3 to 5. It's not totally flat here , there are some slight hills. Battery dropped to 28% (44.5 V) @ 44 miles (from 54 V fully charged). I have not done torque sensor calibration yet, just used the default settings. Maybe I should do that next since at assist level 5, I feel I should get more help? The highest motor W I've seen is around 300. Internal motor temp never went above 40 C (with ambient temps around 10 C).
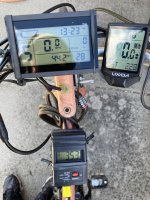
These are my current settings:
10: Advanced Setup
10.0 35
10.1 30
10.2 36
10.3 0
10.4 30
10.5 0
10.6 2
10.7 65
10.8 80
10.9 0
10.10 150
10.11 300
10.12 250
10.13 25
10.14 1
10.15 20
10.16. 20
10.17 20
10.18 34
11: Advanced Technical Data
11.0 43
11.1 0
11.2 111
11.3 0
11.4 0
11.5 0
11.6 0
11.7 0
Last edited:
Hi everyone, after a winter of testing the time has come to release the new version for 860C. It works very well, it's based on @mspider65 version 15 which deserves all the credit.
The 860C V1.3 display (Bafang uart version) is also supported.
Release Firmware open source TSDZ2-v20.1C.5-beta-1-860C · emmebrusa/TSDZ2-Smart-EBike-860C
These are the changes:
TSDZ2 Open Source Firmware v20.1C.5 for 860C display
1 - Updated to v15 version of mspider65 (optimized FOC angle calculation)
2 - Added "Smooth start" feature for Hybrid and Torque mode.
3 - Progressive assist in eMtb mode, based on torque or power.
4 - Levels set the current target in Cadence Assist mode.
5 - Optimized PID parameters in Cruise mode.
6 - Fixed temperature limits with TMP36 sensor.
7 - Enabling Coaster Brake disables Walk Assist, Startup Assist, Throttle, Cruise (safety).
8 - Fixed other small bugs.
9 - Added missing menu items to SW102.
10 - Support new display 860C V1.3 (January 2024).
The manuals are not yet updated.
The stock display version is also ready, I just need to complete the new configurator layout.
No, it is Bafang 860C uart version.How to recognize 860C UART version or not ?
This display does only work with Bafang motors with uart controller. The canbus version of 860C will not work and also can't be flashed.
A Tongsheng 860C can't be flashed too and is delivered as stock display for Tsdz2
Last edited:
Motor Power Limit set to 750If you don't exceed 300W, the first thing to do is calibrate the torque sensor.
Also check: Motor power limit, Street Mode Power limit.
Street Mode (Menu 9.0 is set to 0) = disabled.
Will calibrate torque sensor & test ride.
there will be changes in Java configurator ?Hi everyone, after a winter of testing the time has come to release the new version for 860C. It works very well, it's based on @mspider65 version 15 which deserves all the credit.
The 860C V1.3 display (Bafang uart version) is also supported.
Release Firmware open source TSDZ2-v20.1C.5-beta-1-860C · emmebrusa/TSDZ2-Smart-EBike-860C
These are the changes:
TSDZ2 Open Source Firmware v20.1C.5 for 860C display
1 - Updated to v15 version of mspider65 (optimized FOC angle calculation)
2 - Added "Smooth start" feature for Hybrid and Torque mode.
3 - Progressive assist in eMtb mode, based on torque or power.
4 - Levels set the current target in Cadence Assist mode.
5 - Optimized PID parameters in Cruise mode.
6 - Fixed temperature limits with TMP36 sensor.
7 - Enabling Coaster Brake disables Walk Assist, Startup Assist, Throttle, Cruise (safety).
8 - Fixed other small bugs.
9 - Added missing menu items to SW102.
10 - Support new display 860C V1.3 (January 2024).
The manuals are not yet updated.
The stock display version is also ready, I just need to complete the new configurator layout.
Not sure if I did the Torque sensor calibration correctly but this is what I did this morning:Motor Power Limit set to 750
Street Mode (Menu 9.0 is set to 0) = disabled.
Will calibrate torque sensor & test ride.
Menu 11.2 Torque sensor ADC value = 113 (with no weight on pedal).
Enter 113 in menu 10.10 Pedal torque ADC offset
Menu 11.2 Torque sensor ADC value = 200 (with full weight on right pedal).
Enter 200 in menu 10.11 Pedal torque ADC max
During the test ride (after calibration) I was able to get motor up to around 450 W in level 5.
As I am writing this tonight, I checked Menu 3.0 Torque sensor calibration = (0) Disable, I forgot to change it to (1) calibrated yet it still gave more torque assist! I have now changed Menu 3.0 Torque sensor calibration to (1) calibrated. Will see what the test ride tomorrow shows.
The parameters of the new feature will be added.there will be changes in Java configurator ?
I then want to change the position of the parameters in the sections to make them easier to locate.
Hi,
I have flashed 860C V1.3 for Bafang uart and face the problems as reported by j0bro. In addition I noticed, that the communication with the motor works, when the battery voltage is applied to PL, as I get the following information on the screen:
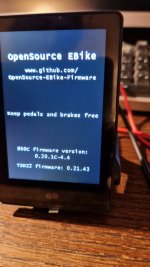
But it is not possible to flash the display with another 860C.bin version via bootloader.
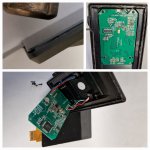
Is there any possibility to reflash this device with TSDZ2-v20.1C.5-beta-1-860C?As the plastic parts of the display housing are rather thin and can be bended, it is very easy to open a 860C display with a heat gun at 80°C outlet temperature (a hair dryer will also work):
I have flashed 860C V1.3 for Bafang uart and face the problems as reported by j0bro. In addition I noticed, that the communication with the motor works, when the battery voltage is applied to PL, as I get the following information on the screen:

But it is not possible to flash the display with another 860C.bin version via bootloader.
Is there any possibility to reflash this device with TSDZ2-v20.1C.5-beta-1-860C?As the plastic parts of the display housing are rather thin and can be bended, it is very easy to open a 860C display with a heat gun at 80°C outlet temperature (a hair dryer will also work):
- Heat up the display along the edges and lift the glass plate from the plastic housing. Disconnect the OLED display on the glass plate from the PCB.
The programming ports are already accessible. - Open the 4 screws to access and the backside of the PCB with the wiring of the interface connectors.

Hi,I feel your pain.. I broke one once by plugging a ST-Link in the wrong pins
After cleaning and removing some pin parts into the connector I could plug it and it seems to work. So I will try to test it again, the right way. So to be sure, I have to test the pins from the speed sensor, but which pin exactly?
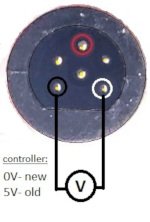
And about my controler, the most damaged pin were the blue one according to the next photo. After cleaning only hakf of this pin remains. The throttle still works so I guess it is not a problem. But can you confirm it is safe to still use this connector?
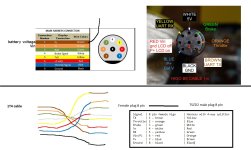
Thank you all!
Because you want to complicate simple things.Hi,
I have flashed 860C V1.3 for Bafang uart and face the problems as reported by j0bro. In addition I noticed, that the communication with the motor works, when the battery voltage is applied to PL, as I get the following information on the screen:
View attachment 350792
But it is not possible to flash the display with another 860C.bin version via bootloader.
Is there any possibility to reflash this device with TSDZ2-v20.1C.5-beta-1-860C?As the plastic parts of the display housing are rather thin and can be bended, it is very easy to open a 860C display with a heat gun at 80°C outlet temperature (a hair dryer will also work):
The programming ports are already accessible.
Reflash with 860C_V13-v20.1C.5-beta-1-bootloader.bin, you can find it in the signature.
For 860C there is no version to flash via JTAG/SWD.
Pull out the speedsensor connector of the motor and measure the motorside connector...... So to be sure, I have to test the pins from the speed sensor, but which pin exactly?
View attachment 350797
You need to power up the controller and measure the pins (black and white on the picture)
If you measure 5V you can flash OSF (without powered up motor)
For OSF you connect STv2 to, red 5V, white Swim and black Gnd (colored circles in that same picture).
Last edited:
Test ride this morning with Menu 3.0 set to (1) calibrated seems to provide the same amount of assist as yesterday, when it was set to (0) Disable.Not sure if I did the Torque sensor calibration correctly but this is what I did this morning:
Menu 11.2 Torque sensor ADC value = 113 (with no weight on pedal).
Enter 113 in menu 10.10 Pedal torque ADC offset
Menu 11.2 Torque sensor ADC value = 200 (with full weight on right pedal).
Enter 200 in menu 10.11 Pedal torque ADC max
During the test ride (after calibration) I was able to get motor up to around 450 W in level 5.
As I am writing this tonight, I checked Menu 3.0 Torque sensor calibration = (0) Disable, I forgot to change it to (1) calibrated yet it still gave more torque assist! I have now changed Menu 3.0 Torque sensor calibration to (1) calibrated. Will see what the test ride tomorrow shows.
I tried changing Menu 10.11 Pedal torque ADC max from 200 to 150 and that gave dramatically more assist. A few minutes later the LCD3 powered off by itself (battery was @ 50.5V). I was able to power it back on but it happened again and I had to recycle the battery on/ off switch to get it to power on again. The battery is 48 V 7.5 AH unit. Wondering if this was a battery capacity problem or the OSF cutting power? I have changed Pedal torque ADC max to 180. Will see if this happens again.
old config files no longer work ? will options be easier to understand ?The parameters of the new feature will be added.
I then want to change the position of the parameters in the sections to make them easier to locate.
endlessolli
100 W
Thank you @mbrusa for your continous development for this motors - esp also for the setup with std Displays. Can‘t wait to test your new firmware-versions once you make it and the adapted java tool available. Great. Thank you!The parameters of the new feature will be added.
I then want to change the position of the parameters in the sections to make them easier to locate.
Dear mbrusa, thank you for the answer!Because you want to complicate simple things.
Reflash with 860C_V13-v20.1C.5-beta-1-bootloader.bin, you can find it in the signature.
For 860C there is no version to flash via JTAG/SWD.
I managed to flash 860C_V13-v20.1C.5-beta-1-bootloader.bin on the 860c V1.3 display after many trials. Somehow crazy, this was only possible, after I connected RXD with RXD and TXD with TXD.
Unfortunately this version seems to have the same behavior on my HW as 860C_V13-v20.1C.4:
The screen shown on the picture is visible as long as the ON button is pressed. It is not possible to enter any menu.
When the display is switched on, the PL output stays low (~5V). The corresponding switch is controlled by port PD2, pin 54 of the MCU GD32F303Rx.
Is there still a mismatch in the MCU pin configuration?
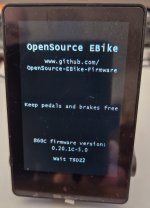
Pull out the speedsensor connector of the motor and measure the motorside connector.
You need to power up the controller and measure the pins (black and white on the picture)
If you measure 5V you can flash OSF (without powered up motor)
For OSF you connect STv2 to, red 5V, white Swim and black Gnd (colored circles in that same picture).
I successfully installed the emmebrusa OSF. And it is awesome.
The stlinkv2 to speed sensor cable is really easy and cheap to make.
I use the hybrid assist mode and the tsdz2b 48v 500w is near to my bbs02 750w. Less power but more than enough, and no more ghost pedaling.
Thank you all for the kind help! Thanks to @mbrusa for the insane work.
I don't know what to say, I got confirmation from two forum users. that the 860C V1.3 version works, the problem is probably another.Dear mbrusa, thank you for the answer!
I managed to flash 860C_V13-v20.1C.5-beta-1-bootloader.bin on the 860c V1.3 display after many trials. Somehow crazy, this was only possible, after I connected RXD with RXD and TXD with TXD.
Unfortunately this version seems to have the same behavior on my HW as 860C_V13-v20.1C.4:
The screen shown on the picture is visible as long as the ON button is pressed. It is not possible to enter any menu.
When the display is switched on, the PL output stays low (~5V). The corresponding switch is controlled by port PD2, pin 54 of the MCU GD32F303Rx.
Is there still a mismatch in the MCU pin configuration?
View attachment 350878
Thanks a lot, it is working and it is great!I don't know what to say, I got confirmation from two forum users. that the 860C V1.3 version works, the problem is probably another.
Sorry it was my fault, I flashed the wrong HW version ...
Similar threads
- Replies
- 9
- Views
- 780
- Replies
- 8
- Views
- 985
- Replies
- 9
- Views
- 2,080
- Replies
- 197
- Views
- 35,822

