
You are using an out of date browser. It may not display this or other websites correctly.
You should upgrade or use an alternative browser.
You should upgrade or use an alternative browser.
Motobecane DS Fantom, BMC 600W torque and now Lipo build
- Thread starter kfong
- Start date
kfong
100 kW
I did some more battery testing. Apparently you need to cycle these packs a few times to wake them up. The battery load I built earlier works out well, but I really needed to automate the testing of so many packs. I need to cycle each pack 3 times. I read about regen charging that the ichargers are capable of, and since I had started a 12volt A123 automotive car jumper pack. This quickly became my choice for the regen battery. It’s a 4S3P pack. You loose a little over an amp from the regen losses, but with 6ahr pack I can easily do 3 cycles and then quickly top off the A123 with a 20amp setting on my Hyperion charger. The cool thing is I’m able to discharge at the max rating of the iCharger. This is close to 7 amps of discharge, but I’m only charging these packs at 1C rate, they are probably 1st gen cells. I just hope they last a couple seasons. The latest readings from one pack were 2.472ahrs. Charged to 4.2V and discharged to 3.5V. This is still short of 2.650, but is acceptable since I don’t plan to push it past the knee. With Turnigy’s you get the full amp hours with the same setting and they don’t require this cycling. For the cost I’m willing to accept a slight performance loss.
I really like the smaller pack sizes; this allows me to really pack in the cells. My new configuration is 12S6P giving me 14.82ahrs if the pack above is representative of the rest. In any case, I am committed to using these packs for the Motobecane and ordered 3 more to get the 12 packs needed for the 12S6P setup. I will know more once all the packs have been cycled. With so many packs, it’s going to take a few days. Here is a picture of the regen charging setup, in the background there is a ceramic pot that the lipo battery is actually put in during this testing just incase something goes wrong.

Here is a picture of the layout on my bike. The width is slightly wider than the Konions. I was not able to fit this much capacity with the 5ahr packs. They are just too bulky. I plan to build new covers, but this time I will be using kevlar/nomex layer for fire protection and will do what I can to secure the packs from moving. Charge taps will be integrated as well with the pcb board I made. It will be difficult to visually check the pacts so I need to do all I can to minimize any fires. With this much capacity I can do away with the rear pack, but most likely use it as well since I now can ride to my trails without my car and still have plenty of run time to to get back. 1.19KWhrs

I really like the smaller pack sizes; this allows me to really pack in the cells. My new configuration is 12S6P giving me 14.82ahrs if the pack above is representative of the rest. In any case, I am committed to using these packs for the Motobecane and ordered 3 more to get the 12 packs needed for the 12S6P setup. I will know more once all the packs have been cycled. With so many packs, it’s going to take a few days. Here is a picture of the regen charging setup, in the background there is a ceramic pot that the lipo battery is actually put in during this testing just incase something goes wrong.
Here is a picture of the layout on my bike. The width is slightly wider than the Konions. I was not able to fit this much capacity with the 5ahr packs. They are just too bulky. I plan to build new covers, but this time I will be using kevlar/nomex layer for fire protection and will do what I can to secure the packs from moving. Charge taps will be integrated as well with the pcb board I made. It will be difficult to visually check the pacts so I need to do all I can to minimize any fires. With this much capacity I can do away with the rear pack, but most likely use it as well since I now can ride to my trails without my car and still have plenty of run time to to get back. 1.19KWhrs
kfong
100 kW
The battery testing has been going good.
Here are the results so far. Charging 4.2v and discharging to 3.5v. I'm only doing 2 cycles now unless the numbers fall way short. Waiting for my other 3 packs as well. Looks like I can reliably get 2.4 ahrs from these packs. So it will be 14.4 ahs in the frame. The test load is about 7 amps. They get slightly warm to the touch, but should be cool when parallel by 6. I'll try to work on the mounting this weekend. Pretty excited about the larger capacity and voltage, but not so much at the idea of all those lipo's grouped together. At least they are all laying flat and will be well supported. I didn't not like the ideas of having any of them at odd angles so the new arraignment works out really well. The bottom pacs are going to see a lot of compressed weight from the packs on top. I plan to separate each layer with a fiberglass sheet to spread the load. This will also help isolate the packs during a fire. I doubt it would prevent it, but it will direct the fire to the sides where I will have some vent holes. I'll try to burn some test samples as well to see how effective a kevlar cover can be against such a fire.
2420
2472
2468
2492
2486
2449
2503
2478
2462
Now waiting for 3 more lipos, but very happy with results. Will know by next fall if these packs hold up to any useful cycle life. For the price, it seems to be a good value. If I can get a couple of seasons out of them it will be worth it.
2466
2470
2462
Results are in and they look good.
shock
1 kW
Build is looking good so far!
I'm debating on ordering more of these packs myself. For the cost, seems to be a pretty good solution.
Do you plan to parallel charge the LiPo array? i.e. keep the balance connectors connected?
I'm debating on ordering more of these packs myself. For the cost, seems to be a pretty good solution.
Do you plan to parallel charge the LiPo array? i.e. keep the balance connectors connected?
kfong
100 kW
I made a PCB board that will allow me to connect all the batteries together so I can connect the balance leads as one big 12S pack. The balance connector is a DB25 pin connector. I will be using 2 boards one mounted permanently on the bike and the other will be used by the Hyperion charger. All I need to connect them together is a standard female to female DB25 cable. I will be posting pictures of the setup when I get to that stage. I have extra boards for sale as well. $10 each for the bare pcb board. You can see pictures of it on the previous page. You can pretty much do any combination of cells with this setup.
Some more info on the boards.
http://www.endless-sphere.com/forums/viewtopic.php?f=14&t=38913
Some more info on the boards.
http://www.endless-sphere.com/forums/viewtopic.php?f=14&t=38913
shock said:Build is looking good so far!
I'm debating on ordering more of these packs myself. For the cost, seems to be a pretty good solution.
Do you plan to parallel charge the LiPo array? i.e. keep the balance connectors connected?
shock
1 kW
What voltage are you running, 48v?
Are you going to separate the serial connection for charging?
Trying to figure these things out on my build.
Are you going to separate the serial connection for charging?
Trying to figure these things out on my build.
kfong
100 kW
I'm going 12S, so that's 48v. I will only need two connectors when I'm done. So it's just plug and play. The DB25 pin balance connector and an Anderson charge connector. My Hyperion does up to 14S, so it makes it easy to charge large cell counts. It manages all the balancing and safety issues. I recommend this charger for ebike use. I won't trust bulk charging lipos and the only other charger 3010b let me down. It burned up during use, bad design flaw plus it only goes to 10S. If you have two Hyperions 1420i, they can be networked to do up to 28S. I picked up a second one during the eBay sale.
shock said:What voltage are you running, 48v?
Are you going to separate the serial connection for charging?
Trying to figure these things out on my build.
maxwell92036
100 W
- Joined
- Dec 13, 2011
- Messages
- 132
Fascinating read. This is similar to what I want to do with a mountain bike. I have been mountain biking for years and have seen many aluminum frames break near the seatpost clamp. I do not believe this is a result of your rack since many riders weigh more than you and your rack and battery pack combined. Motobecane, Gary Fisher and many other non motorized bikes break at this same location. They use aluminum on Full suspension bikes to keep the weight down and the stiffness up, but aluminum will break eventually under these stresses.
Spoke tension and wheel true should be checked at least monthly. It only takes seconds to do, but by the time they get loose and start breaking then it is too late and you need to relace the whole wheel.
I don't know how many miles you have on your bike but it looks like you ride it a lot and ride it hard.
You might want to check out MTBR.com since they have a good review section on bikes and accessories. I would think a Thomson seatpost would not bust on you. Here is an interesting read on racks and weight distribution: http://www.adventurecycling.org/features/rack_primer.cfm
There are many racks that work with full suspension bikes such as this one: http://www.oldmanmountain.com/
kfong
100 kW
I did some material burning with a small torch. Kevlar burns easily, Nomex must be some other type of aramid fiber. When I looked at its properties it does fail at 700 degs. The fiberglass cloth did not catch on fire as much but I was easily able to burn holes in it. A thin sheet of aluminum worked out better. A g10 fiberglass plated would not be very effective as well since the epoxy gave it fuel to burn. So there goes my plans of a fire resistant shell. Looks like a fire blanket over my bike while charging is a better solution. You end up with a loss of a bike but better than a garage. A metal enclosure looks to be the most effective way currently if you plan to house your battery and charge your battery on your bike. Having to charge the packs away from your bike and everything else is the safest and best approach.
For this build I will either have to figure out a quick release so I can remove the batteries from the frame or stick with a fire blanket approach.
I'm now curious as why a lipo sack works so well. Is is a matter of not allowing enough oxygen to get a pack going in the first place? If that is the case then I might still be able to count on a composite shell to do it's job. The lipo sack looks to me like it's made of only fiberglass cloth and some fire resistant outer material similar to duct tape? Does anyone have a clue of the actual materials used?
shock
1 kW
metal is better!
Rock is best, but obvious limitations there.

Rock is best, but obvious limitations there.
kfong
100 kW
Yeap, but difficult for me to mold. I like the looks of composite. Just need to solve the fireproofing part. Looking into alternative materials or an inner liner of thin aluminum tape or silicone layer?
I just tried burning carbon fiber. This looks promising, it just glows and seem to still hold it's structure. The problem is when it's impregnated with epoxy providing the fuel. I wonder if there is anything I can add to epoxy to make it less flammable. After doing some more research on it. It looks to be the right product for the task along with graphite mixed into the epoxy.
I just tried burning carbon fiber. This looks promising, it just glows and seem to still hold it's structure. The problem is when it's impregnated with epoxy providing the fuel. I wonder if there is anything I can add to epoxy to make it less flammable. After doing some more research on it. It looks to be the right product for the task along with graphite mixed into the epoxy.
kfong
100 kW
Never worked with ceramic or I might consider it :lol: Still it's probably too brittle to be of use in this application. Carbon fiber is very easy to work with, no different from a glass layout. Originally the cover were to be of Carbon fiber, just for the cool looks, but I was able to get that with plain fiberglass and save on cost. The only drawback I see is the black will gather heat in the summer. But I had that with Konions and it was fine. There will be vent holes for flames, so I might add cooling holes as well. Since I ride in mud and wet conditions, I might just let the batteries get warm instead. The current draw should not really bring on too much heat. Plenty of capacity. This bike meets all my trail riding needs, so cost is less of an issue and I really can't put a cost on safety. The only upgrade for me to do next is to get a better rear shock. The current one function well though and is reliable. This is my ultimate single track trail bike, not sure what else I would want but a better bike frame but it performs at my skill level, and I've been on better bikes. Even my new DH bike won't be as nimble, but I didn't want a copy as a backup. That bike will be used for a different style of riding.
Whiplash said:HUH, pretty high tech stuff there! Why not a ceramic layer then??
crusoe
100 W
Kfong, are you going to post those videos of you trail riding? I'd love to see what you're putting the bike through!
kfong
100 kW
Maybe this summer, not really into video editing or setting up. The trails in Michigan are fun, but not like out west. The technical single tracks are the only stuff that keeps my interest here. I wish we had mountains. I waste a lot of time watching north shore videos on youtube or mountainbike vids. Maybe I'll do a bike trip out there one day. I did do a mountain bike trip to Moab when I was younger. That was a lot of fun. I would not consider any of my riding interesting to watch. I do treat the bike like I would if it was a normal mountain bike. One of the reasons I put so much time into the build. The bike has held up well with all the crashes. Pedals are starting to look sad though, and all loose parts have broken off. The bike has been though 3 endoes, with spinning crashes each time and countless smaller crashes. Not many good drop offs where I ride. 4 ft is probably the most the bike has seen. This bike does not have long travel like my DH bike. With my Kona or my DH I will risk bigger jumps or drops. Unfortunately no tricks. I'm a better skier and snow boarder. Only started getting serious about mountainbiking in the past three years due to ebikes. Getting old to be reckless  But still enjoy the risk.
But still enjoy the risk.crusoe said:Kfong, are you going to post those videos of you trail riding? I'd love to see what you're putting the bike through!
kfong
100 kW
Getting ready to make new covers. Pulled out the molds from the start of this project and having them prepped with wax and PVA. The carbon fiber is here so I will start the layout tonight. The covers are going to be a bit narrow since they were custom fitted to the Konions. I decided not to make new molds and just create a center piece to hold the two shells together. Not ideal, but it's a lot of work to make molds.
Attachments

crusoe
100 W
Looking forward to progress pictures!
Andje
10 kW
- Joined
- Aug 25, 2010
- Messages
- 779
Hello! I am about to undertake a composite build very similar to your original one with konions and fiberglass. Now that you are moving on, could I ask you about your overall impression of the undertaking? I am particularly interested in a couple of things I couldn't find in your build log;
How did you end up mounting the box to the frame?
How did you end up securing the batteries from rattling around; did you experience any problems with the tabs on the ends shorting to the cases due to horizontal pressure on the cells from the sides of your case? I am loathe to put pressure on them in that vector but maybe I'm overreacting.
Did the fibreglass case you made experience any obvious wear and tear or stress in an area you wished you had reinforced but didn't foresee?
Your project was an inspiration and I can't thank you enough for documenting it; you are literally the only person on the web that has done a log of a fibreglass mould battery case for an ebike.
kfong
100 kW
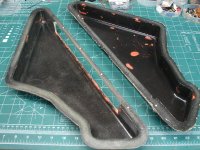
Thanks Andje, the batteries were secured to a thick fiberglass plate with Kevlar straps and fiberglass reinforced packing tape. Here are pictures of the battery pack, I’ve removed most of the tape, since I need to repair the pack. It’s is a very solid setup, with no movement when installed. I use 6 mounting bolts to secure it to my frame. You can see pictures of the setup in earlier posts. The fiberglass shell does nothing for support. It literally hangs on by magnets and some well placed duct tape. It’s such a close fit that it does not rattle. You can see I put a few alignment tabs that force the two halves to lock together. It’s used to keep the packs protected from the weather and dirt. At first I thought I made the covers a bit too thin, but they have been quite durable and show hardly any wear. The mold process takes longer, but I wanted to be able to remake the shell incase I damaged one. No worries about damaging them now. Still glad I went through the process, since I am now remaking the shell with carbon fiber for fire protection.
With the konions, they were a very solid structure when stacked. I had it all wrapped in tape, so I was not worried about external forces. With the lipos I will have to think about how I will protect them from side forces. My current plan is to put a layer of fiberglass plate in between so they are all compartmentalize and have the layers extend just a bit to provide protection. I lost the konions this year due to fatigue with one of the spot welds, even though the packs were secure. Very minute movement and vibration over time popped the welds. Be sure to check all welds if you do go with the konions. They only use 4 spot welds and when building the packs, you might stress the tabs or have a weak weld. My problem would have been avoided if I did a better visual inspection and not assumed they were all welded good. It was the thinner weld tabs that broke. The older thick weld tabs seem to have used a better weld process. Solering them would be another option, but that would be a lot more work, I tried to minimize the amount of soldering I needed to do.
Crusoe, I was not able to document the layout process due to how messy the whole process is. I will be using 1 layer of carbon fiber and 2 layers of thick fiberglass. The glass layer will be on the inside. I will try to give more details this time around.
Attachments


kfong
100 kW
Crap, just realized I screwed up on the epoxy mixture. With this type of epoxy, you measure by weight. I added too little hardener, forgot to add the weight of the cup which was heavy due to previous epoxy mixtures. Stuff has not hardened; it’s going to be a mess to pull it apart. Stuck right now hoping it will eventually set. It's a .33 ratio. Oven hovers at 100 deg. I might need to add another light bulb.
Letting the cover stay in the oven for another day. Looks to be setting very slowly. I might have to redo this one.
In the meantime, I need to start on the other side cover. Since I won't be able to show the process while I'm working. I can at least show the order. The layup is one layer of Carbon fiber followed by 2 layers of fiberglass then a layer of Peel Ply. The Peel Ply is used to allow excess epoxy to be absorbed by a final layer of paper towels. You will end up using a few layers of paper towels to soak up the excess resin. Any extra epoxy only adds weight. All this is enclosed with a plastic bag and vacuumed. I use a Gast vacuum, they are meant to run continuously. You also need to make sure the vacuum tube does not get plugged during this process. I use a layer of cotton to surround the tube’s opening and have it stretched out to provide a path for the vacuum to work. The paper towels will also provide this as well. Shown is the wheel cutter I use to cut the materials. I find that is the best way to keep the weave from getting loose. Make sure you leave enough material to account for the walls. I do all this work in a home build vented hood. With positive airflow, I rarely smell the stuff since it vents to the outside. Also use gloves since long term use, you can develop an allergy to the epoxy. You don’t want these chemicals in your system.
You want to prep the work by having all the layer cut and in the order of placement. It's very messy to work with epoxy, and often time your hands will be pressing into the fabric. Last thing you want to do is try to cut the material with sticky gloves. I use a disposable brush to apply the epoxy. To get a good finish, your first layer is actually the epoxy brushed onto the mold. This will reduce any bubbles and avoid any dry spots. You then place the first layer, in my case carbon fiber. In the previous shell I use a layer of fiber glass that is finer than the next two layer to be placed. This shows up in the finish. Each layer is place carefully, to avoid opening up the loose weave. Once placed, I use the brush to soak the layers. Don't worry about the bottom not getting epoxy. The epoxy will soak itself into the fibers. You want to be more concerned with keeping the layers pressed into all the crevices. You aren't going to be brushing on the epoxy, the technique is called stipling. You basically are dabbing with the brush and using it to press the weave onto the mold. The weave will conform to most contours. Once all the glass layers have been place, you add the Peel Ply. The layer covers the others. You then do the same with the paper towels and then bag the whole setup.
Layers all cut up and ready to be placed.
View attachment 1
The stackup order is reversed so it easy to proceed.
kfong
100 kW
I just finished bagging the second shell. As you can see the vacuum does a great job in conforming to the shape of the mold. The bag material used is a special plastic that stretches 300%. You can see the excess epoxy being absorbed by the paper towel. It will continue to get absorbed untill it’s soaked or when the epoxy sets. This laminating epoxy has about an hour setup time. The black color is from mixing in graphite power. This provides UV protection and will prevent the epoxy from getting brittle from the sun. I used an old sock for to provide more breather material on top of the paper towels. You want to have the intake as dry from epoxy as possible. To make the bag, I converted a bag sealer to allow me to create long seams. The bag is open only on one end where I have the tube enter and a thick bead of bee's wax as a seal.

You can see the epoxy is working it's way into the paper towel. You want to make sure you throw in enough towels to absorb the epoxy. The Peel Ply allows the epoxy to pass into the paper towel, once the epoxy sets. You will be able to separate the paper towel and Peel Ply from the shell.

View of the bag seal. The wax is the same stuff found covering Baby Bell cheese that I've collected instead of throwing out. Works better than any material I've tried so far.

You can see the epoxy is working it's way into the paper towel. You want to make sure you throw in enough towels to absorb the epoxy. The Peel Ply allows the epoxy to pass into the paper towel, once the epoxy sets. You will be able to separate the paper towel and Peel Ply from the shell.
View of the bag seal. The wax is the same stuff found covering Baby Bell cheese that I've collected instead of throwing out. Works better than any material I've tried so far.
kfong
100 kW
Here is the new cover. The one with the bad epoxy ratio is still soft. I'm pretty sure that one is going to be redone. The one from yesterday turned out nice. Here are some photos
This is what it looks like removed from the vacuum bag

Removal of the breather cloth, an old cotton sock.

This is after removal of the peel ply and paper towels which gets discarded.

Trimmed out the excess material

Here is the results. It still needs to be trimmed out on my CNC.

This is what it looks like removed from the vacuum bag
Removal of the breather cloth, an old cotton sock.
This is after removal of the peel ply and paper towels which gets discarded.
Trimmed out the excess material
Here is the results. It still needs to be trimmed out on my CNC.
kfong
100 kW
I finally pulled the first shell after waiting a few days in the oven. Epoxy never got hard.
It looks good.

But this is what happens when you don't have enough hardener. It folds easily, very rubbery feel to it.

It's only good for a lipo burn test, but will have to wait untill spring and gather up my old rc lipos for the test. At least I will be able to see if the Carbon Fiber will hold up to the fire.
It looks good.
But this is what happens when you don't have enough hardener. It folds easily, very rubbery feel to it.
It's only good for a lipo burn test, but will have to wait untill spring and gather up my old rc lipos for the test. At least I will be able to see if the Carbon Fiber will hold up to the fire.
shock
1 kW
Any progress?
Similar threads
- Replies
- 17
- Views
- 1,175
- Replies
- 27
- Views
- 869