Scott's Giant DH Team Build 66 mph!

MAGICPIE3FOCUSPOWER said:
Nice to see your bike is running! 8)
You are carrying battery in a backpack?
Thanks. Yes I am carrying my batteries in my backpack. I don't believe in the "duct tape ride", I want start a new trend for the first ride as a back pack ride instead.

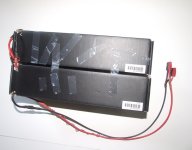
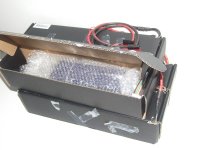
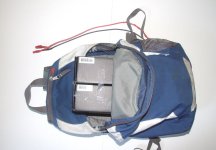
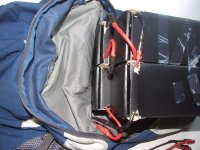
My batteries are in the individual boxes in bubble wrap how they shipped. Then I just cut a small hole at the bottom of my old back back for the wire exit. Then the wire goes to the 2 anderson connectors in parallel so the connector can take 60 amps vs 30.
 
Yesterday I posted this but in the wrong place...

Yesterday (two days ago) I put 4 batteries in series for 24s and around 95v (95 was the lowest voltage we saw for our short ride). The controller is set for 70 battery amps and 117 phase amps. I hit 54mph on the CA and my GPS said 50mph. I should have set up Zombiess throttle tamer, but I did not want to make my friend wait longer than the 30 minutes it took to charge the batteries up. First I rode the bike then my friend rode it. He did the wheelie and I did the endo.

[youtube]XCEMIpDM4v8[/youtube]
 
I would not go any higher on the phase amp setting, I lost another FET on my B phase again. I was set for 140A phase which I suspect is actually much higher since the software can only program the controllers as 18 FET versions. You have probably already seen that the battery amp setting is about 1.5x the value programmed (100A programmed = 150A actual) on these EB324 controllers.

You don't seem to have any lack of start up torque.

As I type this I'm waiting for my soldering iron to heat up so I can finish repairing this controller I am using for the 4th time.
 
zombiess said:
I would not go any higher on the phase amp setting, I lost another FET on my B phase again. I was set for 140A phase which I suspect is actually much higher since the software can only program the controllers as 18 FET versions.
In the program I set it to 90A phase and 43A battery. I mainly just wanted 70A battery and I did not want the phase current to be over 130A, so it set it at 90A in the program so it would end up being around 117A in reality.

Did you set yours to 140 Amps in the program or 105 Amps?
I still would like more acceleration in the 30+ zone. I would like to take my bike to the track and drag race it eventually.
 
I got a new backpack for school, so took my old backpack and cut a hole in the side for the wires to exit.
View attachment 5

DSCF0208 battpack open low res.jpg

View attachment 3

For this picture I had the top right battery' wires coming out the wrong sides of the box. When the battery back pack is not in use I unplug the wire going from the bottom battery to the top one.
DSCF0223 conections low res.jpg

Batteries out of backpack
DSCF0226 just batts low res.jpg

These are the boxes my batteries shipped in, taped together. I cut small holes for the wires to come out. Then the batteries are wrapped in bubble wrap just as they were when they shipped. These boxes are pretty sturdy.
DSCF0253 box open low res.jpg
 
Clever use of the packing!
 
nice build, I might do a similar build for my second ebike this summer
 
DSCF0267 front lights low res.jpg
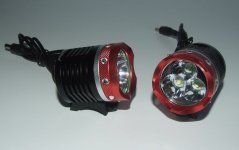
My front lights finally arrived after purchasing them for a third time. Lights Box is the place where I ended up getting them from. http://www.lights-box.com/uniquefire-hd012-3800lm-4-modes-3-cree-xm-l2-bicycle-light-headlamp-with-4-18650-battery-pack-red-color I bought 2 lights they each came with a battery, 2s 2p with 4x 18650 battery cells, also a head strap is included. I bet this light would be nice for night skiing/snowboarding with the head strap! I really like how these lights look and they are pretty bright.
One problem is the connector on one of the batteries doesn’t to work well and if you bump the connector it loses the connection.

I am using one battery and the splitter that came with my rear magicshine light to power the 2 front lights. For the rear I will just use my second battery. Soon I will get a camera battery charger to power all 3 lights off my main battery back that powers the bike. My front lights pull 2 amps each at 8.4 volts and my rear light pulls .3 amps at 8.4 volts. I need at least a 9v 4.5 amp power supply to power my lights off the main battery.

I am going to buy this one:
http://www.ebay.com/itm/AC-Adapter-Charger-9V-4-5A-EH-5-For-Nikon-D700-D300-D300S-D100-D3100-P7000-/310802824825?pt=Batteries_Chargers&hash=item485d4abe79
Although there is a cheaper one in china:
http://www.ebay.com/itm/AC-Converter-Adapter-DC-9V-5A-45W-Power-Supply-Charger-DC-5-5mm-US-EU-UK-AU-plug-/221238669657?pt=US_Server_Power_Supplies&hash=item3382da3159


samoloh said:
nice build, I might do a similar build for my second ebike this summer
Thanks, let me know when your start a build thread if you make one.
 
For my 100 post I have to say that I hit 69 mph today on my bike. :twisted: My goal for this bike was to pass 60 but now I can get to 70. I just need to lean down a bit more on my bike. :lol: I added one more battery for a total of 5 in series for 30s lipo which comes out to 126 volts charged. My motor sounds a lot more throaty/growly with 125 volts vs 100 volts at speeds below 15 mph.

At 100 volts (24s) my bike would wheelie at 30mph pretty easily if I was not leaned over the bars. If I lean over the bars and pin the throttle at 20 mph my front wheel gets about 1 inch of lift off the ground.

At 125 (30s) volts when my batteries were about 70% discharged at 112 volts I pinned the throttle at 40mph my bike and it wheelied violently.:!: I never tried pinning the throttle at lower speeds because I was running out of battery power to get home.
 
Scott said:
At 125 (30s) volts when my batteries were about 70% discharged at 112 volts I pinned the throttle at 40mph my bike and it wheelied violently.:!: I never tried pinning the throttle at lower speeds because I was running out of battery power to get home.

Welcome to the holy crap it's dangerous and really fun club.
 
Unfortunately my CA is not displaying the correct max speed and I only hit 61 mph on that specific “69 mph” run. However I did hit 64.4 earlier that day.

I have since then hit 65.9 mph but my GPS did not work on that run. After riding around a bit I hit 64.9 mph on the CA (while riding, not looking at max speed) and my GPS showed 65 mph. I really want to hit 70 mph so I am going to look into some minor aerodynamics to hopefully get me there.

For controller temp, same results at 30s on 125 volts, on my 65 mph run controller heated up to 30 C then started cooling down once at top speed and still full throttle. Then when I let off the throttle my controller cooled down to 25C in 12 seconds (time it takes to the CA to cycle through temp, miles, Ah). I absolutely love the cooling design of these EB324 controllers. Personally looking at the guts of the EB324 controller it looks really clean and nice on the inside compared to the EB224 controllers. It even looks smaller even though I’m pretty sure it is not.
 
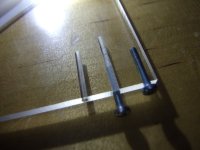
Today I went to Tacoma Screw and got 10x M2 x 12mm Pan Head Zinc screws, a M2 x 0.4HS metric Tapper Tap, and a #52 Jobber Drill Bit. Tim at Tacoma screw was very helpful. These were the smallest screws they had and are just barely smaller than my 1/8 in polycarbonate battery box that I need to tap into to make one side panel removable (other side will be welded on). Instead of waiting until Monday to use a drill press at school I thought I would try to hand drill and tap with an adjustable wrench and I got it on my first try!
I should have gotten 20 screws because 10 were only 50 cents.

Here is the very thin (looks thick in the picture) 1/8 in piece of polycarbonate drilled.
View attachment 1

This is with one hole tapped and a screw sitting in it.
DSCF0395 test plastic screw tapped low res.jpg
 
If I were you I would forget polycarbonate, and go to Al...cause when it breaks it like glass, cuting surface...my side battery boxes covers broke rapidly , @least ad a sticker film on one or both side, it wil keep the pieces when it will crack :wink: ...my own experience...I had that material beetween my b... :twisted:
 
dan974 said:
If I were you I would forget polycarbonate, and go to Al...cause when it breaks it like glass, cuting surface...my side battery boxes covers broke rapidly , @least ad a sticker film on one or both side, it wil keep the pieces when it will crack :wink: ...my own experience...I had that material beetween my b... :twisted:
I don’t have tools to make a metal box, or I did not over the summer when I was building it. I already have $80-$100 into this box and I am just about finished. Plastic was the only thing I could do myself easily so that’s the reason I went for it.

Thank you for letting me know that it breaks like that. I always wondered what would happen if I went down while leaning into a turn. I did some strength testing on how strong the plastic welding is and it went pretty well. I’ll post some videos on that soon.

As for a metal battery box I might go with what Obiwan007 is doing for his Giant DH Team. But, I’m coming close to my money cap for this bike.
 
It has been awhile since I last posted because I have been so busy with college. My power supply broke awhile ago so it takes around 20 hours to charge all of my batteries. To power my iCharger I am using 2 wallwart chargers and a vision peak 2 charger as a power supply. I had to ride my bike to school 2 days in a row so today I only had 3 batteries charged (total of 18s) instead of my normal 30s (126v) and thought I would try out slip charge mode on my controller. Slip charge mode is similar to brake mode on a Nissan leaf, when I let up all the way on the throttle full regen comes on. If I don’t let up all the way then I can coast like normal if I need to.

It is amazing! I saw a max of 1.8kw of regen at around 40 mph. The CA said a min of -25 amps. I really like it, it's just about as strong as I normally brake and I brake pretty hard. I got around 8% regen. I just can't wait to try it out on 30s (126v). Just exactly as Zombiess said almost ½ of a year ago, I can't believe I didn’t try this sooner.

A couple of months ago I passed a Porsche:
[youtube]a9gR5QVolbg[/youtube]
 
Scott, you gotta get a decent power supply man. I finally got two of ice cubes dell supplies so I can charge at 30 amps and it's awsome. Not that expensive. So what's the story on slip charge mode? Does it hit hard at just one power level, like standard regen braking or is it variable in some way? Can any Infineon controller do it. I never payed attention to it until you mentioned it just now. Timely since I spent today tuning up the magnet distance on my home built e-brake levers to get the regen braking to hit just right. So the throttle works the same on take-off but engages regen when you back off? Do you have to come to a complete stop for it to disengage? Obiwan
 
Obiwan007 said:
Scott, you gotta get a decent power supply man. I finally got two of ice cubes dell supplies so I can charge at 30 amps and it's awsome. Not that expensive. So what's the story on slip charge mode? Does it hit hard at just one power level, like standard regen braking or is it variable in some way? Can any Infineon controller do it. I never payed attention to it until you mentioned it just now. Timely since I spent today tuning up the magnet distance on my home built e-brake levers to get the regen braking to hit just right. So the throttle works the same on take-off but engages regen when you back off? Do you have to come to a complete stop for it to disengage? Obiwan

Yes I need to get a new power supply or fix mine. I want a bulk charger but I can’t find one that goes up to 125v anywhere but BMS battery and I don’t want to pay more in shipping than the charger costs.

Slip Charge Mode, for me it’s just on/off. Since throttle mainly controls speed if I let off the throttle just a little bit at a constant speed I would normally just coast. With Slip Charge Mode coasting is the same that way, but if I let off on the throttle all the way then full regen (I believe) comes on. If I need to coast I just use partial throttle, if I want regen I let off the throttle all the way. Here is another topic about it.

However, Zombiess had the exactly same model of controller that I do and he experienced something different. He had variable regen and had a regen button to activate full regen. I set my EBS level to “2” (max) his setting might be different? I do not have a regen button hooked up at all. If my regen would get stronger with a button I would be impressed. I believe Slip Charge Mode works on most Infineon controllers

For me the regen only works down to ~13.2 mph. If I’m going down a hill then I slow down to 13 mph and it stops (regen disables) then my bike speeds up (from gravity) to 15 mph where it engages again. Then this cycle repeats.

I will go get some video of it today at 30s 126 volts! :twisted:
 
The more variable type slip charge regen was on the EB2xx controllers, the EB3xx controllers seem to have a different method. Pretty sure using the button makes the result stronger vs just slip charge on both. It's been a while.
 
Ok, I'm understanding it a little better. My controller is EB3xx so likely won't work as variable. Most of my reading has me believing that, with the exception of the older Infineon boards, variable regen was the Sasquatch of the e-bike world. For me, right now, regen braking acts mostly as an adjunct to my disc brakes which work really good. Thus, I have the ebs set at (0, softest setting). I have been messing with the magnet placement on my levers so that the rear brake engages regen a little after the disc brake begins to grab and the front brake engages a bit later than that. I'm still evaluating it but I think I like it. It took me long enough to integrate my external cruise control module with the CA V3, and the brakes safely (thanks Techlectik) that I think I will leave things as they are for now. Obiwan
 
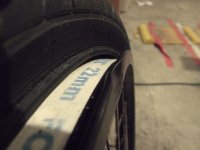
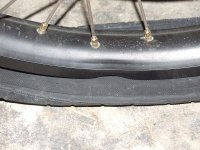
As I was on my way to UW’s unveiling of their Formula SAE cars, I popped my tube and dented my rear rim.
I was riding across a cross walk, there were 2 slow walkers in the middle taking up the whole space. I did not want to cut them off so I thought I would just ride up the curb. I did a wheelie with just the throttle and my front wheel cleared the curb just fine. However my back wheel hit VERY hard. I looked down and everything seemed fine. Once I got another 300ft my rear end started drifting to the left and I heard the sound of a flat tire. Then I pulled over and noticed a flat tire and a huge dent in the rear rim.
I am not sure what I am going to do now. Either get a high quality DH rim or do a MC wheel. I really like the color of Moonshine’s blue rims so I like that idea. Although I have a presentation to give on my bike on Wednesday and there’s no way I can have everything done by then.
DSCF0896 Low res bike dent.jpg
DSCF0899 rim dent low res.jpg
View attachment 1
DSCF0907 rim dent low res.jpg


On the other hand I got some video of regen. It did not feel very strong at 30s, 126v compared to 18s, 75v. I saw the same min amps of -25 but a min of -2.96kw compared to -1.8kw. I guess ill hook up a regen button and see if that adds more power.
[youtube]GAqMFE7nC-8[/youtube]
 
You could do what I would do, put some rubber around that spot on the rim, grab some channel locks and massage it back into place. Depending on the final result I'd leave it alone or replace the rim.

I've slammed the front/rear end of my bike into curbs on purpose at 20mph with an MC rim/tire setup, no issues and it was pretty smooth but doing it was a bit scary and I had to build up to the speed on several attempts.
 
Thanks for the video Scott. So that was solely regen via slip charge mode In the video simply from shutting down the throttle? I think zombiess suggestion is the path for you, at least for your presentation. He'll you may not even need to take the shell off the bike to get it to work. Obiwan
 
Back
Top