Scott's Giant DH Team Build 66 mph!

zombiess said:
You could do what I would do, put some rubber around that spot on the rim, grab some channel locks and massage it back into place. Depending on the final result I'd leave it alone or replace the rim.

I've slammed the front/rear end of my bike into curbs on purpose at 20mph with an MC rim/tire setup, no issues and it was pretty smooth but doing it was a bit scary and I had to build up to the speed on several attempts.
Thanks, I’ll try that. The spoke under where the dent is at is pretty loose so I will need to tighten it up too. Since my batteries are still in my backpack I was sitting down so my battery wire would not come unplugged, that may have caused the problem also with all that weight being all on the rear wheel. MC rim/tire setup sounds pretty good. I am just worried about getting the tire clearance right.

Obiwan007 said:
Thanks for the video Scott. So that was solely regen via slip charge mode In the video simply from shutting down the throttle? I think zombiess suggestion is the path for you, at least for your presentation. He'll you may not even need to take the shell off the bike to get it to work. Obiwan
Your welcome, yes the only thing I did was let go of the throttle to activate regen. Unfortunately I still need to take my wheel off to replace the tube. Also I never put a rear freewheel on and it would be good for the bike to be able to be pedal powered for the presentation.
I’m glad I was able to get some video of regen before I messed up my rim. It happened literally 5 minutes later haha
 
I straightened out the dent with an adjustable wrench and a straight edge. I did not want to use a real straight edge because I did not want to bend it so I used the top of a saw. It looks pretty straight now, it is still a little flat on top vs. being round but I think it should be ok. I peeled away the paint where the paint had wrinkled at and the metal was completely smooth.

My local bike shop does not have a spoke wrench in stock that is large enough for my wheel. I will take my wheel in tomorrow and they will see if one of theirs fits then they will order one for me. That one spoke is still loose, so the wheel probably has a “flat” or “flatter” spot on it around where the dent is and needs to be trued.

I tried a monkey wrench but I could not get it to work, these rims are pretty thick! I did some research on fixing a dented rim and found some instructions on pink bike.
[youtube]Ge9sppMZiqE[/youtube]
 
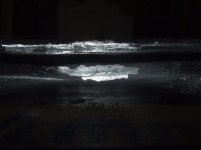
After bending my rim back the metal on the outside looked new again. I scratched off the paint on the inside of the rim just to make sure it was ok. The screwdriver made quite a bit of scratch marks so I sanded down the area a little bit but, unfortunately I noticed a fracture/crack once taking a super macro picture with my camera. It is difficult to see without very close inspection, but it is definitely there. It is shorter than an inch long and does not go through to the other side that I know of.
DSCF1029cracked rim low res.jpg
Highest resolution that can be posted here zoomed in:
DSCF1029cracked rim low res close.png


Inspired by GCinDC I just could not pass up the opportunity to get a video of my ride to school to do my presentation on my bike. Of course in Business Casual!
[youtube]BNM9woGyHI0[/youtube]
I should have put on some longer socks though. :roll:
That bad ticking sound you hear is my rear brake. It is actually not that loud in person because the GoPro is attached right next to the rear brake.
Unfortunately, I did not bring the right GoPro mounts so my GoPro was sideways.
 
MAGICPIE3FOCUSPOWER said:
Thanks for your nice vid!

Did you changed broken rim or it is still usable? 8)

Thanks!

I am still using the same rim. I have ridden at least 200+ miles on it and it looks exactly the same as in the picture above. Its working just fine so i'm not going to fix it unless it gets worse. Every 100-200 miles or so I will check it.

I need to post some more stuff on here because I have done a lot of work on my bike since my last post. I have been really busy but I will try to get some pictures up this weekend. I can fit all 8 of my battery packs in/on my bike with out a back pack now.
 
Yeah looking forward for your new pictures.

Also rear light is activated when brake is applied?
If so how does it work?

I see you are riding at high speed with many miles, how about the lower swingarm worn out issues?
Still no play?

Thanks! 8)
 
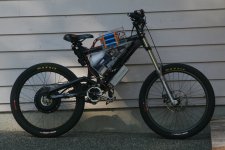
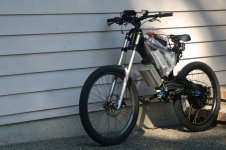
Here are some new pictures, I'll explain the new things on the weekend.
IMG_3442 Giant 3.0 beta right side low res.jpg
IMG_3475 Giant 3.0 beta left side low res.jpg


MAGICPIE3FOCUSPOWER said:
Yeah looking forward for your new pictures.
Also rear light is activated when brake is applied?
If so how does it work?
No, It just cycles through different blinking patterns so it doesn't get boring for drivers behind me. Its a magic shine.

MAGICPIE3FOCUSPOWER said:
I see you are riding at high speed with many miles, how about the lower swingarm worn out issues?
Still no play?
If you are talking about my worn out bushing in my rear shock, no I have not gotten that fixed. Its pretty low on the priority list right now. There is a ton of play with it. I would not go Downhill mountain biking but its "ok" for the street. I did get air a few days ago and the bad bushings made it pretty scarry.
 
MAGICPIE3FOCUSPOWER said:
No I mean the lower linkages where bearings are pressed in.
I see you have Rockshox Boxxer which year is it?
The guy I bought my 2005 frame and swing arm from had recently re greased the bearings so I used the linkage from the 2005 bike and left it alone.

I believe the fork is a 2005. It is a boxxer race. The guy I bought it from said it is new and only had 3 runs on it. It does seem pretty new, the middle crown is scratched up but otherwise its like the only good working condition component that came with the bike!
 
MAGICPIE3FOCUSPOWER said:
Thanks!

Any leaking issue (at lower adjusting screw) with your Boxxer fork?

You're welcome.

I have not had any issues with leaking at the rebound screw.

My rear shock, the stock swinger has 2 ultra tiny holes in the top cap and oil leaks out from there.

A seal broke on the banjo bolt on my front avid code. Rebuild kits for the 2007-2010 codes no longer exist. Don't get me wrong avid codes are fantastic brakes but mine were junk because the onwer before me never bled them.
 
Okay thanks mate! 8)

I have a old Boxxer 2009 World Cup laying around somewhere with leaking issues at lower adjusting hex screws.

Your rear swingarm is 135mm or 150mm?
If it's 135mm any issues with dishing to center of the swingarm?
 
MAGICPIE3FOCUSPOWER said:
Your rear swingarm is 135mm or 150mm?
If it's 135mm any issues with dishing to center of the swingarm?

I'm sorry some how I completely missed this.

I have both. I am using a 150mm one right now and use the 135mm one for non ebiking. I bought a 2005 frame with the 150mm swing arm.
 
Haha no problem man! 8)
Thanks for your update :eek:

Man find a 150mm frame is hard, I think will give up this journey.

How is your bike handling with the powerful beast 8)
Still no breakage, I mean the lower are quite sensitive especially the baerings :x

Thank you!
 
Magic pie I feel your pain but don't dispair there is an excellent, and in some ways even better solution to finding a 150mm drop-out. You can see how I went about it on this part of my build thread:

http://endless-sphere.com/forums/viewtopic.php?f=2&t=55605&start=25

Quality Heliarc (contact info in my thread) has done several of these modifications to date. Mine is a year old and is as good as new, maybe even better. And the price is the cheapest way to go. Given that to make a factory bike with 150mm drop-outs you need to buy two bikes. Plus you can get it out to 155mm negating the space that gets used up by the Kiwi TA (Huge thanks to Scott for keeping it alive). The cost of getting this done is even cheaper than buying a 150mm swing arm from Giant used to be. Also on my build thread you will find some inovative solutions to disk alignment and actually fitting a 3-speed freewheel with the Cromotor. If you go this route (cromotor) you will love the torque. I am currently in the design and acquisition phase of a new build on this frame. I am having the swingarm modified both in the front and the back to accommodate 4" fat tires. And may go as wide as 165mm in the back to accomodate a 5-speed freewheel. In addition I am redesigning the battery box to function like a saddle that utilizes the space along the sides of the down tube for extra battery real estate inside. This modification should allow my same battery arrangement in the slightly smaller 18" frame as well as the 19" frame. Once complete the battery box will be bolt-on ready and orderable by anyone that wants one directly from the fabricator MSM sheet metal. I may also do a short run of the "disk flip" spacers that allow you to mount your disk between the disk mount and the side cover for better alignment. I am even considering having custom fit foam inserts for the inside of the battery cover done up so they can be lazer cut.
 
Waauww thanks for the info man! 8)

But too bad I live in Europe, welding company is located in US?
How much have paid for your custom made swingarm?
I will have a look in your build topic 8)

Thank you..
 
Hey magic, so the cost of the swingarm mod is $150 if the welded joints are bead blasted clean before you send it, $190 if he has to do it. The cost of the stripping that I had done after the welding was $25.00 for a good dip in the tank that made it really clean for powder coating. Should have done that first. So stripping plus welding $175.00 the new swing arms from Giant were $260.00 plus shipping on top of that. The powdercoat isg cost me $150 but that was a two stage process and powder coat is a pretty variable cost.
 
Obiwan007 said:
Hey magic, so the cost of the swingarm mod is $150 if the welded joints are bead blasted clean before you send it, $190 if he has to do it.

I think I paid $280 for my second frame and swing arm. So any thing under than for a 155 mm swing arm mod is defiantly worth it. I think that getting it modded like Obiwan did is better because 1. you have 5 mm more space and 2. you can get it repainted and looking brand new for almost the same price as getting a beat up one. However the one I bought was in really good condition except for the owner before me went through a rock garden and scraped up the bottom of the linkages. The full bike I bought was pretty scratched up every where.


MAGICPIE3FOCUSPOWER said:
How is your bike handling with the powerful beast
Still no breakage, I mean the lower are quite sensitive especially the bearings

It handles very nicely. I am not having any problems with the bearings, just my leaky rear shock.

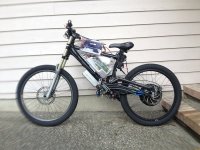
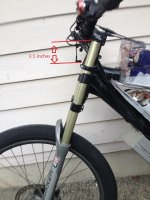
I did lower my bike a few days ago by 3.25 inches and it feels amazingly better! I thought it felt great until I lowered it. It feels like I have more traction and the front wheel is planted to the ground.
Giant 3.1.jpeg
Unfortunately It will be rainy here for at least 2 more weeks so all I have is a bad picture shot from my iPhone in a water resistant case that mounts to my bike which made it look blurry.
 
Stielz said:
Thats a good idea, how did you lower it? I'm working on a giant DH team build too

Cool! They are solid bikes.

I pulled the stanchions up through the crowns to lower the front end. I do need to be careful when going off sidewalks because it could damage the seals if the crowns bottom out on the seals. I mostly do road riding so I don't have a problem with it.
Giant 3.1 close up on stanchions.jpg
 
Thanks for help mates 8)

Any link to the welder website?

Yup I did the same with my old DH bike b lowering shock stanchions for better handling 8)
Do you guys use any chainguide? If so what type will fits?

Thanks! :D
 
Welder has no web site. He is too busy...welding. His contact information is:

Rob Colcord
Quality Heliarc
(775)750-7676
1200 S. Rock Blv. #8
Sparks, Nevada 89431
rfncl@sbcglobal.net

All of the stock chain guides are too small for my 52 tooth Rennen chain ring. I did have quite a lot of chain slap though so I have just installed a Bionicon that mounts to the chain stays.
http://www.bioniconusa.com/cguide/

It seems to work a treat but I have not been using it long.
 
Does anyone has a picture of this frame with battery mounted to under triangle tube? I mean battery mounted between front wheel and bottom of front lower triangle tube.

Thanks 8)
 
Back
Top