Another No Solder/Weld 18650 Build (Updated 03/09/2014)

parabellum said:
It is actually piece of art battery packaging, actually useful in hi current application. Those are 2 things hard to combine. Hats off to you!
Will you add cardboard or Teflon washer on the positive end?
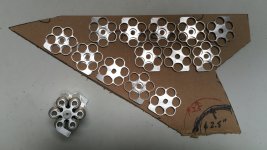
I was not planning on using washers. I just don't see a reason, but maybe I'm missing something. The white posts are fasteners and insulators. They also will be used as spacers and mounts to the outside case. I will finish it in couple of days and post some more photos. Maybe someone else will find is useful.
 
notger said:
Ecyclist said:
I made a couple of changes. Removed metal to make it lighter, reduced the gap between cells from .08" to .02" and streamlined connecting tabs.
Some of my friends thought that I made a gun. It kind of looks like a barrel of a gatling gun.

looks really nice, but might not be the most space efficient way to do it. cause how are those stars stacke togeter, there might be quite some empty room between them ?
But like you said probably you are more on the beauty side
I made connectors both left and right, so they will be only on the outside of two rows of hex-packs. This way there will be no wasted space. Kind of hard to visualize, but I will post photos shortly. Overall fun project, but it got me confused a couple times.
 
Hillhater said:
notger said:
...., but might not be the most space efficient way to do it. cause how are those stars stacke togeter, there might be quite some empty room between them.....
And there is the missing 7 th cell in the centre ?
Obviously, but I need a 6p pack and I need to hold these cells somehow. The same idea with quad spider for 4p might give better space savings. Once I need a 4p pack I will give it a try. :)
 
It turned out that with hex mounts, I can fit inside the triangle of my donor bike: a 13s6p battery pack, up to 4.5" dia. motor, an inline hypocycloidal reducer, and a BMS. No room for a controller.
I'm only going with 10s6p and a smaller motor, so a controller will fit with room to spare. In short, everything including the rear shock of the bike will fit nicely. Now I need to make a container for all that, but that's off topic. I will start new thread about the whole thing in a not-to-far future.
 

Attachments

  • Battery layout.JPG
    Battery layout.JPG
    123.6 KB · Views: 3,497
Ecyclist said:
Now I need to make a container for all that, but that's off topic.

It's almost a shame to hide it. That's a beautiful looking way to mount the batteries. Maybe a clear polycarbonate case so you can see the batteries inside?
 
mlt34 said:
Ecyclist said:
Now I need to make a container for all that, but that's off topic.

It's almost a shame to hide it. That's a beautiful looking way to mount the batteries. Maybe a clear polycarbonate case so you can see the batteries inside?
Thank you kindly.
That is exactly my plan. Black anodized aluminum plate on the chain side and polycarbonate on the other. This will produce good contrast and give me an option to stand the bike in such a way that the battery is visible or not visible.
 
Whether a pack like this is a personal build, or is being made for sale to the public, I like the idea of clear polycarbonate side panels.

It's easy for the end-user to paint them, or apply any type of coating they desire...
 
spinningmagnets said:
Whether a pack like this is a personal build, or is being made for sale to the public, I like the idea of clear polycarbonate side panels.

It's easy for the end-user to paint them, or apply any type of coating they desire...

Agreed. Plus if it ever gets to that level, he can market them as "bulletproof"!

It also has a pretty high glass transition temperature. So if heaven forbid something bad ever did happen inside. you'd clearly see the smoke inside and have plenty of time to place the battery somewhere safe, like on a concrete slab or in a BBQ grill or something. Not that I think that would happen, but it just in case, it is nice to have a window into what's going on inside a battery.
 
Mlt34 even with all your experience you still remember the danger we still have with battery Fire. I"m carrying heavy lifepo4 for safety. No bms for safety. ?
 
I will stick with 18650s because they are the best for EVs. Once Tesla changes cells I will reconsider. For now, it looks like they will be going with 2170s. Similar chemistry and 50% increase in volume while doubling the level of charge. Simply awesome.
 
Here is an assembled 10s-hex pack with components next to it. The small T-connector will also accept BMS wires. I used o-ring for extra safety.
The pack is surprisingly stiff considering how flimsy 3mm polycarbonate sheets are. It looks like I will be able to use poly on both sides.
 

Attachments

  • 20170602_140545_1496440709193_2.JPG
    20170602_140545_1496440709193_2.JPG
    154.5 KB · Views: 3,192
Wonderful! I think an under-used configuration is a 10S pack inside the triangle, and a slim 4S pack under the downtube...equaling 14S

If you own an Electra (like me) then you have a ton of frame triangle space. However...once you add-in the need for full-suspension when travelling at higher speeds...the rear shock takes up so much precious frame triangle space.
 
bzhwindtalker said:
Assembled 10S6p 60°V2
https://www.facebook.com/photo.php?fbid=10155513865014617
View attachment 1
I like your super compact assemble, but I cant figure out how you hold cells together.
Can you post a close-up picture please?
 
I calculated the deformation in the middle of the pack, it should be OK especially for the 10S6P (calculated for a 8S10P version)
The springs can compensate the middle deformation of the holder. There is a balance of clamping force to spring rate to find to make it work with a specific configuration and holder material. The spring travel is around 2.4mm and here the deformation is max 1mm, also this is with V1 springs with higher force, I reduced the springs force since this calculation.
 
bzhwindtalker said:
I calculated the deformation in the middle of the pack, it should be OK especially for the 10S6P (calculated for a 8S10P version)
The springs can compensate the middle deformation of the holder. There is a balance of clamping force to spring rate to find to make it work with a specific configuration and holder material. The spring travel is around 2.4mm and here the deformation is max 1mm, also this is with V1 springs with higher force, I reduced the springs force since this calculation.
I couldn't see springs. Obviously you know what is going on and have all corners covered. Great job! You built a fantastic no weld pack.
Are you going to sell these beauties?
 
I see as is a very good discovery as long as you know where the center is for heat you can address the issue . Data. Then years as it takes years. My A123 2ah 24s 85a and 1,015 cycles lots of weight. Yes stil balanced. Quality means. Something
 
Very good to see how the heat is centered in the pack now there is an honest way to address it. Yes Elon Musk approved of 18650 cells. Quality controlled cans. Controlled.
 
999zip999 said:
Very good to see how the heat is centered in the pack now there is an honest way to address it. Yes Elon Musk approved of 18650 cells. Quality controlled cans. Controlled.
The above picture shows the deformation relative to the springs clamping force in the holders, not heat :wink:
I did similar calculations to test the behavior of thermally improved solderless packs with heat bridges to alu end plates, but the actual heat thransfer acheived was quite low
 
Back
Top