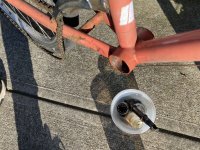
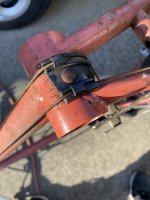
Just ordered a crank puller from Aliexpress for the right side. May as well use the correct tool.I tried to remove the aluminum crank arms today that's never been touched since 87. The nuts came off easily but the cranks were stuck real good. I couldn't find my pickle fork and used a 90 degree long nose pliers (which works like an adjustable pickle fork) and a hammer. It wouldn't budge with lot's of penetrating fluid and hammering. I thought maybe if I went for a ride, it will work itself loose. After a few miles the cranks didn't move. On an uphill section I pedaled as hard as I could on low gear. Shortly after that the left crank came off. The right crank did not get any penetrating oil and is still stuck. I need to go for another ride with penetrating fluid applied and hope I get the same result.
You are using an out of date browser. It may not display this or other websites correctly.
You should upgrade or use an alternative browser.
You should upgrade or use an alternative browser.
Best sort of frame for a mid drive?
- Thread starter taiwwa
- Start date
Waterlogged bottom bracket areas are the main concern.Does Chromoly rust? Where are the likely rust spots and how do I check? Surface rust is cosmetic and don't matter?
It rides fine.
I drill holes in the bottom of the bottom bracket shell for this reason. The tapped M5 hole for the bolt to fix the derailleur cable guides is insufficient for drainage, they really ought to all have a second hole, even if it is obscured by the plastic cable guide.
The chainstays near the bottom bracket will rust, as will the lower portion of the down tube. Rusty BB threads and smattering of rust dust in that region will tell you whether to investigate further.
First step is capping the BB openings and pouring liquid down the seat tube, then swooshing it around. If what drains out after removing the BB plugs is more the consistency of mud than of tainted water, or contains flakes, I’d ditch the frame.
The next step is flushing the frame of any loose rust, and thoroughly drying it out.
After that, tap the region of the down tube around the BB junction, repeatedly, at different spots, with a heavy solid object, firmly enough to risk denting the tube. Don’t hit the chainstays … the rust there will be equivalent to the bottom of the down tube. Shake the frame after. If rust flakes dislodge, ditch the frame. You’ll get a feel for what’s going on by the pitch. Hollow thuds, rather than pings, tend to precede flakes. Really bad frames, you’ll tap a hole right through the frame on the first hit.
Flakey paint often indicates water damage, but pristine paint doesn’t guarantee absence of internal rust.
In short. Dusty rust, not much concern. Chunky stuff, ditch the frame.
eren_kadakal_4
1 µW
You can prefer hub motor electric conversion kit with pedal sensor. Pedal sensor provide a light weight conversion and do not harm your bike's steel parts. Like brompton examples brompton bike's frames made from steel but that's are the most comfortable folding bikes. I tried my friend his own electrified brompton in last summer and, that's my best electric bike experienceI have a bike with high end steel but I’m hesitant to install a mid drive on it. What is the best material to install? Alu?
Thanks for the detailed steps in checking for rust. Even if it fails some of the tests, I'll probably still convert it to the TSDZ2 provided I will be successful in swapping out the broken casing because:Waterlogged bottom bracket areas are the main concern.
I drill holes in the bottom of the bottom bracket shell for this reason. The tapped M5 hole for the bolt to fix the derailleur cable guides is insufficient for drainage, they really ought to all have a second hole, even if it is obscured by the plastic cable guide.
The chainstays near the bottom bracket will rust, as will the lower portion of the down tube. Rusty BB threads and smattering of rust dust in that region will tell you whether to investigate further.
First step is capping the BB openings and pouring liquid down the seat tube, then swooshing it around. If what drains out after removing the BB plugs is more the consistency of mud than of tainted water, or contains flakes, I’d ditch the frame.
The next step is flushing the frame of any loose rust, and thoroughly drying it out.
After that, tap the region of the down tube around the BB junction, repeatedly, at different spots, with a heavy solid object, firmly enough to risk denting the tube. Don’t hit the chainstays … the rust there will be equivalent to the bottom of the down tube. Shake the frame after. If rust flakes dislodge, ditch the frame. You’ll get a feel for what’s going on by the pitch. Hollow thuds, rather than pings, tend to precede flakes. Really bad frames, you’ll tap a hole right through the frame on the first hit.
Flakey paint often indicates water damage, but pristine paint doesn’t guarantee absence of internal rust.
In short. Dusty rust, not much concern. Chunky stuff, ditch the frame.
1. I have no other bike to convert and I don't really want to look for another bike atm.
2. So that I can get a feel for a mid drive (first for me) and whether I like them or not.
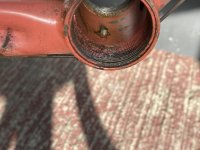
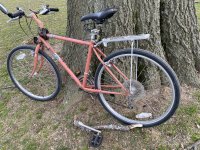
This pic is from yesterday's ride after the left crank came off. How does the rust look? Or impossible to tell the inside from outside?
Chalo
100 TW
It's the seatpost stuck in the frame? If it won't move, that's a point in favor of retiring the bike. Removing a stuck seatpost can be a time consuming, elaborate chore.
When your crank comes off from riding, because it's loose, the inside taper gets damaged and after that the crank won't stay on no matter what you do. So you'll need a new left crank arm at least.
When your crank comes off from riding, because it's loose, the inside taper gets damaged and after that the crank won't stay on no matter what you do. So you'll need a new left crank arm at least.
Seat post not stuck in the frame. I do remove it from time to time to lube the seat tube with vaseline. Bike is kept under an awning but does get wet with windy rain.It's the seatpost stuck in the frame? If it won't move, that's a point in favor of retiring the bike. Removing a stick seatpost can be a time consuming, elaborate chore.
When your crank comes off from riding, because it's loose, the inside taper gets damaged and after that the crank won't stay on no matter what you do. So you'll need a new left crank arm at least.
I didn't ride it for very long to get home after the left crank came off and only put pressure on the right crank, walked the bike on uphills etc so I was being carefull not to abuse it. I will inspect the left crank arm for wear later.
Yes, something like that. While rusted out frames typically show more cosmetic rust than yours, a relative absence of surface rust is no guarantee. And there are plenty of bikes with more rust than paint on them that are actually still structurally sound.How does the rust look? Or impossible to tell the inside from outside?
DaLanMan
10 kW
Wow, if you were closer I would help ya out with .. oh, a new everything : : Oh and in general, if anyone needs parts, I have literally a couple dozen frames etc that I currently have no plans for, and in the future.. I doubt I will ever be shy on frames...
Thanks for the offer. I am sticking to this Raleigh for the TSDZ2 conversion (for now anyway) provided I am successful in swapping the guts over to the new TSDZ2 casing. If I find that I like mid drive with torque sensing, then I may look for a full suspension bike to move the TSDZ2 kit over to.
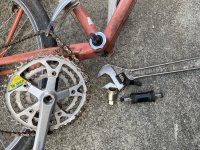
I was able to remove the chain ring with the crank puller tool (the smaller of the 2 black ones). It was on really tight! No way I would hsve been able to remove it w/o the puller and not damage it in the process.
Can anyone tell what type of BB I have from this pic? Will I need to use the BB tool (large black one/ bought a long time ago/ never used). Will there be loose ball bearings that I have to be careful of not losing? I won't be pulling the BB until I am ready to install the TSDZ2.

Chalo
100 TW
Can anyone tell what type of BB I have from this pic? Will I need to use the BB tool (large black one/ bought a long time ago/ never used). Will there be loose ball bearings that I have to be careful of not losing?
View attachment 348473
That's what those of us who are old enough to remember it, call a "bottom bracket". As in square taper, loose ball, adjustable cup, bottom bracket for a cotterless 3-piece crank.
You'll need a BB plate wrench or a wrench that can open to 36mm for the fixed side (which is LH threaded) and a hook spanner or lockring pliers for the adjustable side (which is RH threaded).
Last edited:
Not identical but does this video show the same type of bottom bracket as mine?That's what those of us who are old enough to remember it, call a "bottom bracket". As in square taper, loose ball, adjustable cup, bottom bracket for a cotterless 3-piece crank.
You'll need a BB plate wrench or a wrench that can open to 36mm for the fixed side (which is LH threaded) and a hook spanner or lockring pliers for the adjustable side (which is RH threaded).
You'll need a wrench that can open to 36mm for the fixed side (which is LH threaded) and a hook spanner or lockring pliers for the adjustable side (which is RH threaded).
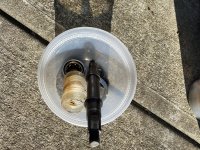
After looking at videos of different types of bottom brackets, I realize now the silver piece with the hex drive is an isis bottom bracket wrench. The large black piece is an isis bottom bracket! I bought both as a set a long time ago not knowing what type of bottom bracket I have.Thanks for the offer. I am sticking to this Raleigh for the TSDZ2 conversion (for now anyway) provided I am successful in swapping the guts over to the new TSDZ2 casing. If I find that I like mid drive with torque sensing, then I may look for a full suspension bike to move the TSDZ2 kit over to.
I was able to remove the chain ring with the crank puller tool (the smaller of the 2 black ones). It was on really tight! No way I would hsve been able to remove it w/o the puller and not damage it in the process.
Can anyone tell what type of BB I have from this pic? Will I need to use the BB tool (large black one/ bought a long time ago/ never used). Will there be loose ball bearings that I have to be careful of not losing? I won't be pulling the BB until I am ready to install the TSDZ2.
View attachment 348473
Chalo
100 TW
Yes.Not identical but does this video show the same type of bottom bracket as mine?
Chalo
100 TW
There was a pressed in pin holding the cable guide which I had to grind away with a Dremel stone. Is that normal to have a pin like that on all bikes?
Yes. Usually it's a screw instead of a rivet.
Kottbullar
1 mW
Zambam:
Keep the updates coming .... this is good learning for those of use contemplating near-future conversion project .....
Keep the updates coming .... this is good learning for those of use contemplating near-future conversion project .....
Yes. Usually it's a screw instead of a rivet.
There's no drain hole anywhere on the BB AFAICT. Should I drill one? If so what size?
Old chain is rusty in sad shape. I need a new chain that can handle the extra power from the mid drive motor. It'a has a 6 speed cassette.
Are these good chains? Any other suggestions?
Amazon's choice, many sales.
Are these good chains? Any other suggestions?
Amazon's choice, many sales.
Chalo
100 TW
KMC are good chains, like for like. I can't think of any I prefer.
Similar threads
- Replies
- 10
- Views
- 465
- Replies
- 1
- Views
- 282
- Replies
- 1
- Views
- 139
- Replies
- 7
- Views
- 558


