Hill Climbing eBike

old idrive.jpg

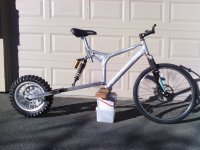
This is a picture of the original frame with it's unusual "I-Drive" pivot.

The swingarm on mine cracked near the shock mount.

This was one of many early designs attempting to adjust for pedal bobbing.

It also looks to be a later version.

Where it's going next...

file.php
 
Weight Weenie Alert

Weight Weenie.jpg

Did not have anything in Aluminum that fit correctly... but I used a drill and a grinder as a lathe and ground down something until it fit.

So now I can use smaller steel bolts with the aluminum sleeve filling up the excess.

If it breaks I just get a bigger hammer... um... bolt.
 
Should be OK. Failure there should not cause serious injury, as opposed to front wheel falling off, or steering locking, braking failure, etc.
 
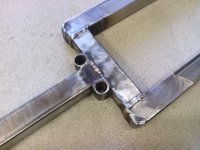
Upper Shock Mount.jpg

Upper Shock Mount.

Actually welded it wrong the first time.

Had to cut it apart and weld again.

Mild steel does not care... beat it, heat it, grind it... a very forgiving material.
 
Eastwood said:
What size rear rim? Also what are the tire specs?

Wheel:

https://www.ebay.com/itm/12-REAR-ALUMINUM-RIM-WHEEL-FOR-15mm-Bearing-DISC-BRAKE-PIT-DIRT-BIKE-I-RM07Y/373660084219?mkcid=1&mkrid=711-53200-19255-0&campid=5338678874&toolid=20006&customid=s:GS;gc:20a474887a291fd7b9ce15753afcb2ab;pt:1;choc:1&customid=s:GS;gc:20a474887a291fd7b9ce15753afcb2ab;pt:1;choc:2&msclkid=20a474887a291fd7b9ce15753afcb2ab&pageci=479d6800-d7b7-4896-ae2c-6cd11b819361&redirect=mobile

Tire:

https://www.ebay.com/itm/Irc-Tires-Mini-Cross-Motocross-45F-300X12-Mx-T10300/124545639348?pageci=1c7656d2-9934-483e-b1c4-46feea32dad1&epid=171243723&redirect=mobile

You can define this as an 18" wheel using bicycle terminology.

The outside diameter is right around 18".
 
SafeDiscDancing said:
You can define this as an 18" wheel using bicycle terminology.

The outside diameter is right around 18".

How rough is the terrain off road “fire Road” ?
I’m wondering how the rollover resistance will be with the smaller tire diameter. I’m considering a similar situation of putting a 14 inch rear Moto rim and the tire has an outside diameter of around 20.5”.
 
Eastwood said:
How rough is the terrain off road “fire Road” ?

It's a plowed fire road and it skims over sandstone in some areas, but then can become open loose dirt in others.

At no point are there any deep ruts so I'm not worried about dropping into anything deep.

The big problem for me is that it is steep and the loose stuff is really loose while the sandstone is very hard so I expect a wild ride getting up these hills with the highly variable traction.

My choice of this one rather than the step up to 14" was because I wanted to lower the weight.

And I got the weight down pretty well after a lot of grinding so it is not much different than a bicycle wheel.
 
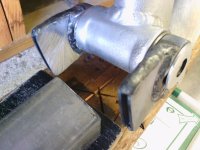
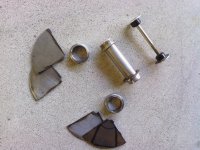
Swingarm Pivot Parts.jpg

This took all morning just to get to this stage.

Rather than trying for a heroic full day of effort to get the pivot done I'll do more later.

I spent hours trying to figure out the strongest and yet lightest way and this looks like the best path to go down.

The tricky part was adapting to the existing components because none of my scrap metal gave a perfect fit.
 
If you have the right tools you can just power through anything, I just dealt with a 1-1/7'th hole in 1/4" steel that took me 3 hrs with cheesy rotary tool, 7/8 drill bit, smaller bits and 8-10 rotary bits.
 
calab said:
If you have the right tools you can just power through anything, I just dealt with a 1-1/7'th hole in 1/4" steel that took me 3 hrs with cheesy rotary tool, 7/8 drill bit, smaller bits and 8-10 rotary bits.

I wasted a few hours building a tool to attach to my drill so I could spin those end pieces into something relatively square.

They are two different tubes which required all sorts of fiddling to get them matched up perfectly.

Whenever possible I try to avoid situation like you did where you need a big hole but have to do the "drill the edges" and then grind everything afterwards. Those are very time consuming.

I haven't started grinding the plates yet but since everything can be hit with the grinding wheel easily it should go fast.

Some days I just don't have the drive for the eight hour "GrindFest".
 
Most humans are lazy but the follow through is the key, you climb mt. everest one step at a time, but mt. everest isnt exactly a hard mt to climb unlike k2 with a 25% kill rate.
 
Swingarm Pivot Done.jpg

Welcome to "GrindFest 2022" the premier place to showcase your domination over mild steel. :lol:

So it went together well.

Next will be attaching and especially aligning the pivot to the main square tube.

That alignment must be perfect.

There are a couple of spacers inside the bolt area needed, so it's not 100% done, but good enough for now.

The weight stayed reasonable, so I didn't do anything stupid with useless extra metal.
 
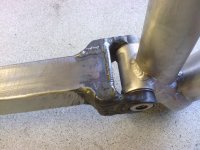
Swingarm Pivot Added.jpg

Very hard work day.

Seems like I managed to get it done without adding excessive additional mild steel.

It's light and strong.

The bolt that holds it together has aluminum fittings on each side and I found that by grinding them down so they fit inside the pivot that gave the result I wanted.

As far as I can tell the alignment is good, but late in the day your eyes have a way of distorting reality so I'll know how good it is tomorrow.

A very big advance because now I have the base for the swingarm in place.
 
Spacer Reduction.jpg

Starting the new day...

Step One... reduce the axle spacers significantly.

I'll have to chop off the excess axle and thread it some more to permit the bolt as fastener.

Really tired from the last three days so no sure how far I'll go today.

As far as I can tell the main swingarm tube is on there pretty much in alignment so I don't see any need to go back for any correction on it.
 
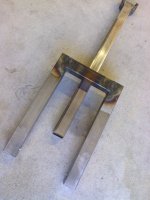
Chainstays.jpg

Enough for today I am very tired.

The chainstays are welded into the cross brace.

I'm thinking of a total swingarm length of 30" compared to a typical bicycle of about 18".

Somehow that seems less insane with the thick 1.5" square tubes supporting the idea.

6.25" hub mounting width to the swingarm compared to a bicycle which is about 5.25".

That's probably not far from fat bike rear hub mounting dimensions.

Plenty of extra square tubing so I'll have scrap for little reinforcement pieces.
 
Swingarm One Piece.jpg

The Swingarm is now one piece.

Checking the alignment will take time.

There are tricks with mild steel where you can introduce slight changes by heating up an area of metal and then letting it cool and shrink.

So I'll look it over and see if it passes the "good enough" rule or I can go back and try to improve on it.

30" swingarm pivot to axle.

Overall bike wheelbase is.... 55" which is plenty.

There is a bottom bracket to add, mounts for a stand I plan to build and lot's of tweaks so it's days from being finished.
 
That poor guy in Russia.

All he wanted was to share his great DIY work.

And his bike was an amazing example of innovative ideas but I suppose technically since it was not at all related to battery power it did not qualify for being here.

This is a Hill Climbing Ebike... ENTIRELY ELECTRIC.

file.php


That white thing in the upper right hand corner is the battery.

And that battery was itself innovative because of a built in Rotary Switch shown here:

https://endless-sphere.com/forums/viewtopic.php?f=14&t=114594

The true DIY builders are rare in this world.
 
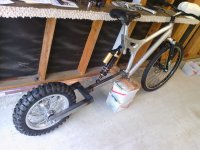
Long Long Long.jpg

I really needed to get a picture that shows the full length of this swingarm.

55" overall wheelbase is a Long, Long, Long ebike.

I'm glad I went with 30" on the swingarm because more would be ridiculous.

The alignment seems pretty good. If it's off it's not by much. I'll keep staring at it to see if I notice anything.
 
Swingarm addons.jpg

More welding.

Note the rounded edges added to prevent serious injury in a crash.

Those tubes being used for added support will do double duty as a bike stand mounting location I plan to build.

With an ebike it's much easier to have a stand that can support the bike and get the rear wheel off the ground.

That makes life easier.
 
Wow that's a lot of progress. I like the long swingarm, like a hill climbing motorcycle. Does the rear axle slide out for maintenance?
 
This thread just gave me some inspiration and an idea which makes me think about wanting to do something with my broken aluminum frame rigid bicycle, there are no pivot points to utilize but a beefy steel clamp to weld onto, clamped to the seat post, switch it to rear suspension. One clamp near the top tube, another clamp near the bottom tube, with a metal bar welded to them. This would actually open up a bunch of ideas to think about more. I could do anything from making the bikes wheel base longer for a battery pack placement behind the seat tube. I got to get laying beads, I only ever laid one 5" bead on a arc stick welder on some spare steel vouchers they call them.

How do you line up the rear wheel to the front wheel or frame to keep everything inline and straight?
 
E-HP said:
Wow that's a lot of progress. I like the long swingarm, like a hill climbing motorcycle. Does the rear axle slide out for maintenance?

The rear axle is hollow aluminum and it's still not 100% done yet. The ends are threaded (by me) but I need to go to the hardware store and get the exact bolts to finish it. I'd like an Allen wrench bolt ideally.

My goal was massive weight reduction over a big fat 12mm solid steel axle which would have been stock.

Only time will tell if it can survive the stress I put on it eventually.

Everything is about keeping the weight down and so far it's working out well.

The swingarm is a few pounds and does not feel abnormally heavy.
 
Back
Top