kWeld - "Next level" DIY battery spot welder

I'm looking for the ability to change weld power without using the knob. I have a small CNC-board on which the k-weld is mounted and I'm welding 21700 cells. The amount of power needed is different when welding the minus pole vs the plus pole and I want to automate the "change".
that would require a firmware extension as kWeld does not have a proper automation interface. It has been requested many times, but I just never hav gotten to that :-/
kWeldPro will definitely have that - automation via USB, and also a digital input/output interface for use with CNC machines. For example, one input (to kWeldPro) is the trigger, one output is a ready signal and another output is pass/fail.
 
Hola How can I get the pro version of the kwed and how thick can it weld?
not yet, but we are making a first batch of 20 right now. I hope to be able to open up for preorders before Christmas. The first units will be kits, and I might have a price point in one or two weeks from now. Software will be limited when they get released, but we are and will remain working heavily on that thereafter. My plan is to reach at least kWeld status, with proper energy metering and of course capacitor voltage control.

And to your question: it has already done stress testing with full steam 13ms / 3300 ampere pulses, once every two seconds. Sock solid after 100,000 cycles :) That amount of current is definitely by far enough for 0.3mm nickel, and also solid copper sheets should be possible. But I havent been able to test many variants yet, rather concenrating on development. I'm curious to read what you guys will achieve with it.
 
I ordered a Kweld, but none of the recommended batteries on their website are available at Hobbyking. Can you recommend an alternative LiPo battery? Or any of these Acid batteries should work?
aarrgh, again... checking,


are shown as 'in stock' but with just a few of them. I guess I need to make more test buys soon...
 
Check out the SMC brand of flight packs. These are currently the top of the line in quality and performance as depicted on the RCGroup forum thread by MCSGUY. This thread has been running for 12 years and MCSGUY knows his stuff. Lipo ranking table on Pg 1 is always up to date. Battery Load Test Comparisons - RC Groups
 
Last edited:
Check out the SMC brand of flight packs.
I am telling you guys, use a 20$ stack of Ev lipos from such as the Chevrolet. Volt.
The pack that runs my K-Weld.... Well over 2000A, still not dead, 12 years old... 20$. They ( LGCHEM) made the cells years before this man (Frank) ( Tatus) ... amde this spot welding machine.. and I cannot kill them and they do 2x the power out aH for aH, than ANY SMC or Hobbyking junk hobby grade lipo.

In SCC you want a good current? use a 20$ stack of EV lithium polymer.
You wont kill it. I am sorry, BVH.... I know I am a broken record with what I repeat... but ... they just dont fail for me. I have even posted in Wayne giles and MCSGuy's threads telling them too. they know me certaainly, perhaps they remember me still.

....the most ( maximum) I can measure is ~3000A.


I do not like overpriced hobby grade lipos.
 

Attachments

  • 431820817_7805790416117886_2447396504181106886_n.jpg
    431820817_7805790416117886_2447396504181106886_n.jpg
    127.5 KB · Views: 18
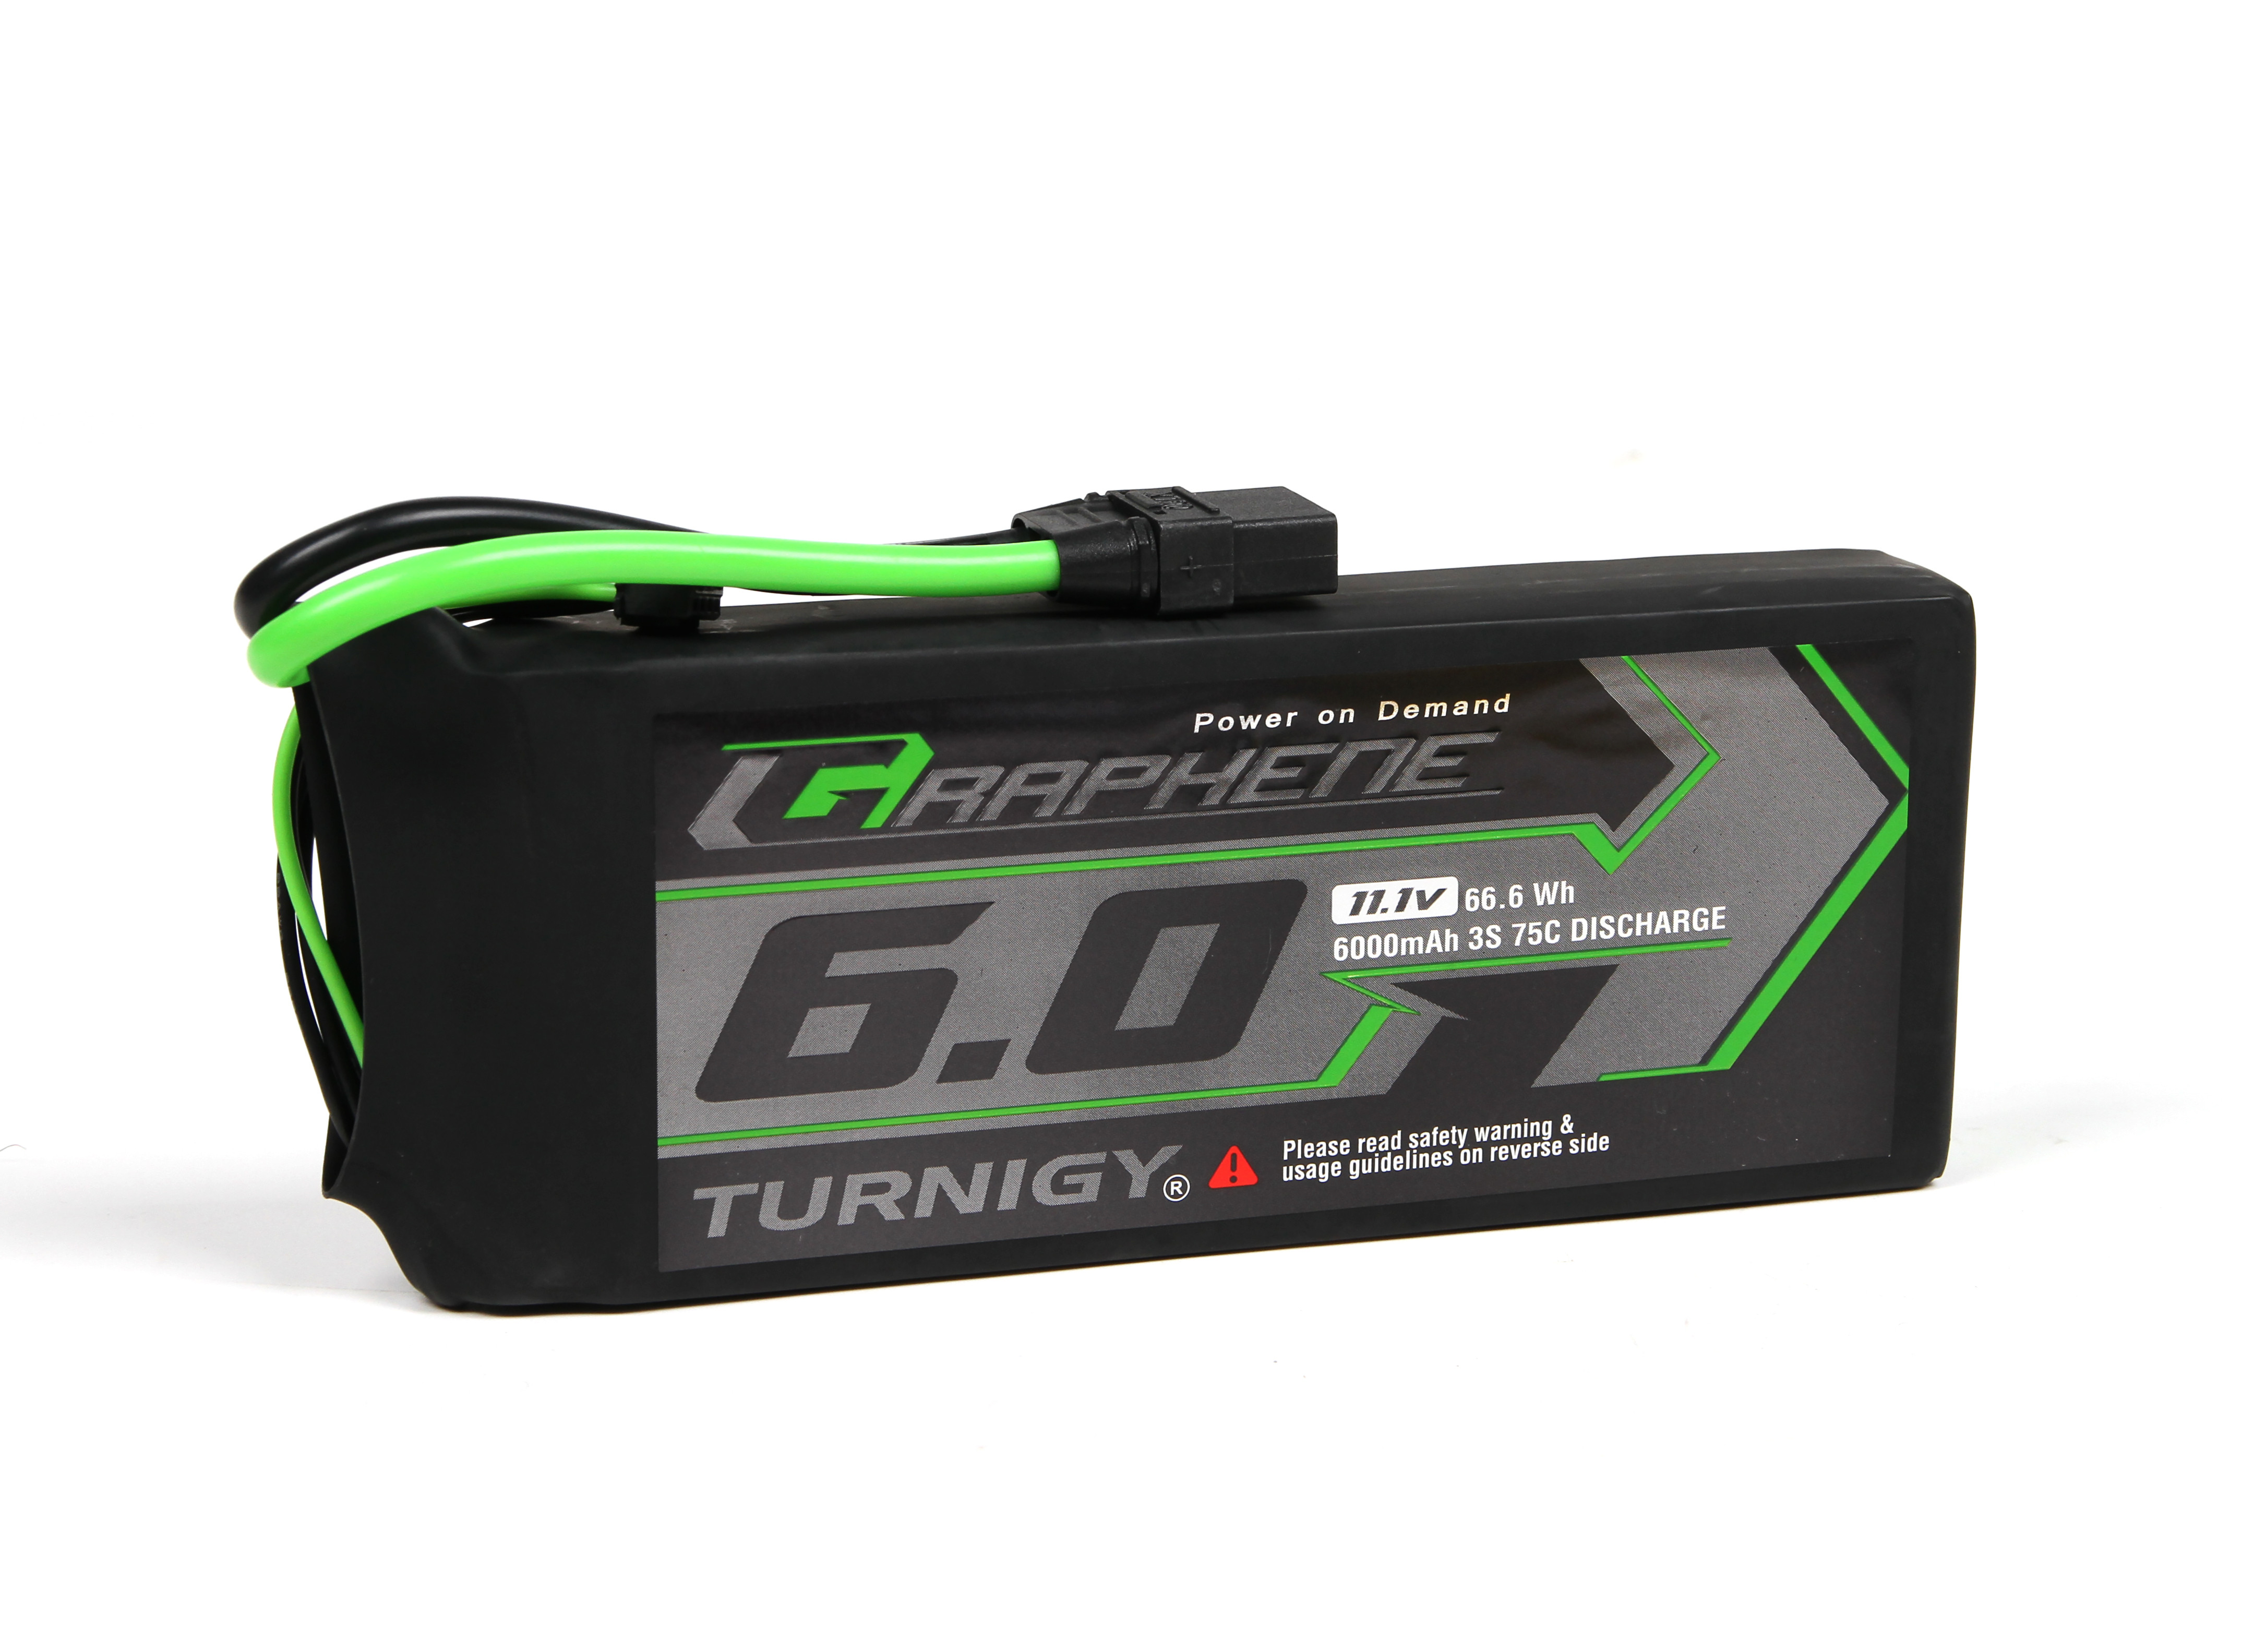
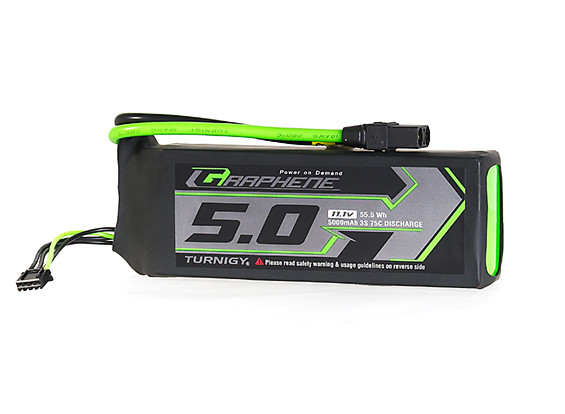
Should we build SuperCap module out of this Maxwell 3400F, 3V/3.15Vmax. For 3S2P, we will get 2,266F with higher Vcap, much lower ESR, 10x the Farad, I expect > 3,xxx Amp output can be achieved. Or the more hard-core 4S2P, or even 4S1P with the > 3,xxxF, 2.85V (total 750F or so) this is what we can get much more headroom V (2.85V*4Serial). From V = I*R, increase V (from 3S to 4S caps = from 8.55Vmax to 11.4Vmax) and lower R (big wires), Imax will be increased and t will be decreased dramatically - that is exactly what we want for high Q (very high energy in very short time). PSU might need to be upgraded to ≈14.5V / > 60A, programmable CC-CV charger preferred. Just make sure your gears can withstand this magnitude of punch. The 3S/4S balancer board also needed. Should be able to weld thicker Cu directly to cell cap. May be 0.3-0.5mm ? Have to unlock current kWeld from its 2,000-A limit (factory default). It just looks promising. These Maxwell 3400F3V/3.15Vmax are expensive plus they are heavy and gigantic (1 pc ≈ 1 soda can). So shipping cost will be steep too. Alternatively, I found 3400F 2.85V Maxwell used ones for sales cheap at $10.- ea. But buying used ones is like buying lotto, could be a complete Crapacitor. :lol: :lol: The ESR is what matters here and they keep increasing with usage - not to mention if they are even genuine Maxwell originally. That's the trade-off. I don't know whether there is an easy way to test these SuperCaps reliably, especially the ESR. Any idea ?

Also the TVS diodes might need mods to cope with the new much higher oomphs ?

Frank, do these sound OK to you ? Is it possible to unlock this kWeld's 2,000-A limit ? Pls advise. :) :)
Hello, how can I unlock the current kWeld from its limit of 2000?

 
not yet, but we are making a first batch of 20 right now. I hope to be able to open up for preorders before Christmas. The first units will be kits, and I might have a price point in one or two weeks from now. Software will be limited when they get released, but we are and will remain working heavily on that thereafter. My plan is to reach at least kWeld status, with proper energy metering and of course capacitor voltage control.

And to your question: it has already done stress testing with full steam 13ms / 3300 ampere pulses, once every two seconds. Sock solid after 100,000 cycles :) That amount of current is definitely by far enough for 0.3mm nickel, and also solid copper sheets should be possible. But I havent been able to test many variants yet, rather concenrating on development. I'm curious to read what you guys will achieve with it.
any news Frank? still waiting :p
 
I have some kind of problem now.

I exchanged the kweld original sticks to another branded one and after that. All the same the welder pushes alot of current through piecring the cells.

50 Jouls feels like maybe 150-200 J and max setting is 150 right?

Putting down the Joule down to 8-10 is rather normal area and around 50-70 jouls of power.

The only thing I did was add some alcohol on the nut and tightened it up on the fuse side output as I feelt the lower nut, as this has two was a little lose.

It has been through an event of a loss of a small screw on the copper bar on on negative input most to the right which triggered a flash or a surge / short circuit somewhere put it didn't trigger the big fuse. After a new screw and tightening of bolts it started up and worked as normal. - this was a year ago in my kwelders history.

Please what can be the issue this time?

Can I do a reset or factory reset somehow and have it back to standard power or has this happened to someone else and can I then use new Joulse levels calculated from the new values that seems to be lower for higher power.

It seems the problem allows current to pass for longer than it just did before and as such this current heats up and pierces through the cell instead of welding it.

I guess it would be powerful enough for copper and I will try but this is seriosly something I need to fix.

I use 0.15mm pure nickel and 50 J is very good power for this. Maybe too much and now I put settings to 8-10 I think. I will continue to try and see.

I have since then also put back the original kweld cables and copper rods. They don't seem to cause the issue. Input battery power is 4s 35ah lipo rated to about 1780A current on my kweld.
 
Wire length in the settings is 1.0 Meter so the lowest I can do on my firmware and boardversion 3

I will do a new calibration CAL as I didn't short the copper rods to themselves but to a metsllic tool and I didn't receive all the info that I should. ms and resistance and the okeys.

I hope it will work as I can't do any work with a piecering 18650 welder hehe.

I did a test with two 1cm square nickel pieces with 0,15mm pure nickel.The 1 joule didn't do much, the 1,5J did a little movment and 2J it jumped, power was though normal setting for this should be 10 to 20J
 
Maybe recalibrate the resistance and wire length like when you first bought it. 🧐
Yes. Now it works. I'm happy.

One small issue that can be adressed is when using the small M4 screws to hold the rods. Either use a checker to just tighten it up to the small torque requirments or redo this somehow as my threads has been damaged and so I can't fasten my rod.

Now I fixed it with a new hole and new theads and a new nut but its not the easiest and fastest fix.

We have a new kweld coming in soon as backup.

Reliability is high on kweld. I only didn't know this CAL was very important. Todays test gave out 1590A and low resistance like 2,56ohm or something with original cable. Now the welder is working again and I can work.
 
Hello to this forum

I just finished my KWELD and ran into calibration problem.
Searching this thread does not show a solution for me.
Thread #1,503 was not helpful.

Setup is KWELD with attached new (and charged) Turnigy graphene 3s 5000mAh and XT150.
Systems starts up to "CAL" prompt
Pushing knob brings (very fast) "open" and "OK" then falls into a
loop: Offs= 64 Std= 1.9. OK
Values of Std= are different each time restart
neither knob nor pedal ends the loop

When not selecting CAL by pushing knob it is possible to cycle through menu points and selecting them.
Changing menu values is also possible.

I just contacted Keenlab but its weekend ....
maybe someone here has a hint what to check?
 
Cal is this

1: use knob and klick CAL
it says something, use the pedal and klick once

2: Now it will say "short"
short the copper rods together without anything between and klick the pedal

3: now it should be calibrated

I used a metallic tool because I had a 3d printed handle keeping rods apart but my weld settings became weird and too strong destroying cells, timing was of leading to overheating at low Joule settings. (Se my post before this one here in the thread.) It is solved because I did the calibration the wrong way. There should be nothing in between but the copper rods shorting together when doing the calibration, CAL.
 
Back
Top