LFP reverse polarity.

So more B.C.H or you through with those guys?

Who ? Don't get what you said.

I was talking about US vs China for LIFEPO4 batteries and shipping.

My choices are TOP BAND , HEADWAY or cells from Battery hookup or clearinghouse.

556 AM 11/13/23

I hooked up the proper 33.6V Charger for 12S LTO. 2.8 * 12 33.6V. Two 6S packs in series charging.

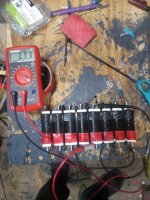
The 28V charger is hooked to the 10S LTO pack. All four external balancers are reading perfect voltages. All between 2.5 and 2.6V charging. It is amazing. Probably wont be able to tell which cells were reverse polarity.

8 miles of 25 to 30 mph both motors 60 amp total load but did not do full throttle for either motor. Was a test. It passed as well as the LTOs.. I love doing this. I am living the dream. Got to check voltage now on my external balancers. IF or when I see a cell skyrocketing I can pull the plug to avoid damage.

Thanks

Skyler out.
 
Last edited:
My LTOs did 8 miles at 20 to 30 mph and see no issues. Cells are 2.48V to 2.56V. ALL 22 of them.

Balancing now with 12S 33V charger and 10S 28V. Looking perfect as cells are finally balanced.:)

They are now perfectly balanced.

I really don't need another 1500W kit when I already have one plus five other ebikes and #6 pending so might get a spot welder for Christmas.

Not sure. , Looking at other options maybe that require no welding or solder to the cells just the power wires.
I got a few ideas from reading old posts here and other forums so we will see what happens.

12/16/23

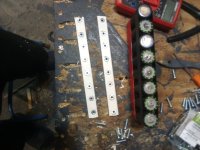
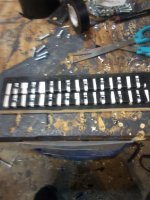
I did not even need glue. I cut strips of electric and max strength black duck. I drilled the holes in that 8 foot piece of plastic strip. It was about $5 with tax and less than $6 for the nuts and bolts.

First I used a Dremel tool to grind any pieces of the tabs and make sure good contact will happen for the bolts.

I used 3 drill bits to get the holes so would not split the material , Slightly smaller hole than the nut so can pound in with a hammer.

Lots of strips of electric and duck follow. Right now when I try each bolt it is firm contact. The next step is two strips of 12 gage wire. wrapped around each bolt. I want to strip long enough pieces to connect two cell banks in series.

Before I do it though I am temporary wiring 18 gauge for parallel charging at 2 amp. I will just wrap around each bolt twice and use small pieces of duct at the ends to hold it tightly in place. I can use the same wires over for parallel charging any banks in the future.

After the series connections strips of electric and duck will wrap around the top of each bolt and then strips all the way around the top.

All six banks will lay out on a table and when all balance wires are hooked up it will just fold up one bank on top of the other. A few more zip ties and some duck tape and will be ready for a custom wood box.

If it works I wont get a spot welder. I will use shorter bolts for any future packs. I got 3/4" and should have got 1/2".

11/16/23

There is no doubt it will work. That is a fact. The drawbacks are it takes a lot more time to do than spot welding. The drill bit makes sloppy holes and thin strips of tape is required to keep the nuts in place.

I actually taped all around the nuts to get a tight fit. I will also be taping over the tops of the bolts after the series connections are done and balance wires installed.so 100% positive that all cells will have contact with the bolts.

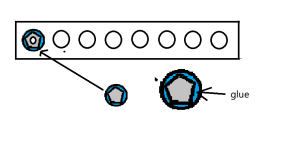
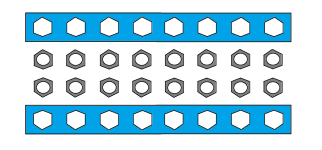
What I might do instead of ordering a spot welder is order a 3D printer. With 3D printed plastic strips with holes the nuts will simply slide in for a perfect fit. A very tiny amount of glue around the edge. Very little glue will be needed. No tape will be required. see pic below.

. Then all that will be needed is four zip ties the right length. I had to use two so the ends of the zip ties will add some space when stacking them.. I will need to replace with longer ties. Space is precious when building batteries.

The more compact the better. Stacking will work and only the width due to the bolts will be around 1 inch inch larger than a spot welded pack. The height and length will be equal or less than a spot welded pack. When I switch to 1/2" bolts then 1/2" wider than a spot welded pack.

The time it will take to install and glue in the nuts and zip tie and screw it together will be much shorter if no tape is required.
If the width of the box is exact enough then will be pressure against the top of the bolts with a tight fit. NO tape over the bolts will be required.

Also thick nickel strip like double or triple the thickness of what is used for spot welding can work by drilling holes and simply sliding it over the bolts with an extra nut to tighten it down..

Finally the other advantage is all the hardware can be re used to rebuild a wore out cell bank or even an entire pack. Hopefully someone with a 3D printer will take a look at this and start printing.

I was going to invest in a 3D printer awhile ago but the problem is how to find or create with the software. How would I go about designing such a thing. I no absolutely nothing about programming a 3D printer to print anything.

I have watched a lot of videos on 3D printers printing stuff so what I want to do would be easy as pie for just about any modern printer. Please let me know what you all think.Untitled.png

Thanks.

Skyler.

View attachment 342936View attachment 342937Untitled.png
 
Last edited:
ok.

I could not open the pics as thumbnail. I need full image.

Could be on my end. Not sure. I cold try and open with my other PC.


IMG_20231116_004959999.jpgIMG_20231116_005352307.jpgIMG_20231115_233821188.jpg
 
Last edited:
ok.

I will take more detailed pics showing the steps taken to build cell bank #2. There will be six cell banks of 8P for my first pack . It is because I already have a soldered 7S - 8P pack. In series they will be 43 working volts which works perfect for my 36V e bikes.

After that I will build two more 6S and a 5S for myself. My friend Tom wants a single 16S pack so will need a 40 amp Bluetooth BMS so he can monitor his cells. Since he is not at all familiar with any type of cell balancing active or external I need to make it simple for him . Hopefully he wont have any issues monitering via. Bluetooth. It is something I need to learn first before I can teach him.

I will be putting up more pictures soon.

#1. cell recovery and preparation.

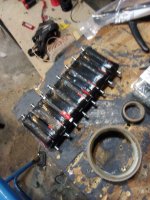
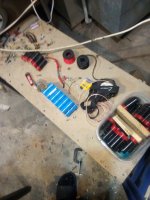
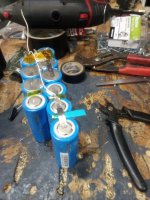
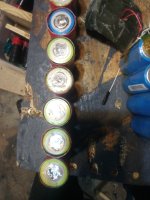
Notice the piece of blue plastic to raise the tab before snipping so there is no spark / short.

Then a Dremel tool is used to grind any jagged edges form the tabs.

IMG_20231117_191719938.jpgIMG_20231117_191739644.jpg

I think before I make any more I should get some super glue to glue the nuts in. I can still use tape but not as much.
I am charging one cell bank now with the LiPo charger.

Looking at the picture it is just a waste of tape. A better way is to cut all the strips needed for the pack and drill all the holes and glue in the screws. If the bolts are already in the hole it can not get glue on the threads. Mabye go around the nuts on the top with hot glue.

I should get voltage to each cell with no tape at all. If I do add tape it will be very thin strips of duct around each nut. Not all that tape in the pictures.

I can charge the other later but before making permeant series connections I should un tape those two packs and use super glue on the nuts as well as any packs in the future.

Also I should wait and balance charge the pack when fully assembled. Running the charger for each cell bank will take too long and extra wear and tear on the charger.

I think I will go with the 12 gauge wire I have. I do not plan on running more than 35 amps. 40 amps tops as all my 36V e bikes are < 40 amps.

The most powerful would be the 750W chain with the 350W Bafang up front so 1,100W / 43V = 25.6 amps continuous. 40 amps would only happen for short peaks or a steep hill.


IMG_20231117_211825821.jpgIMG_20231117_215118993.jpgIMG_20231117_232004899.jpg

Thanks


Skyler.
 
Last edited:
I think before I make any more I should get some super glue to glue the nuts in. I can still use tape but not as much.
I am charging one cell bank now with the LiPo charger.

Looking at the picture it is just a waste of tape. A better way is to cut all the strips needed for the pack and drill all the holes and glue in the screws. If the bolts are already in the hole it can not get glue on the threads. Maybe go around the nuts on the top with hot glue.

I should get voltage to each cell with no tape at all. If I do add tape it will be very thin strips of duct around each nut. Not all that tape in the pictures.

I can charge the other later but before making permeant series connections I should un tape those two packs and use super glue on the nuts as well as any packs in the future.

Yea.

Maybe not.

I have no glue and if I did I would want larger round holes so it fills in the space with the glue. ( see pic below )

What I do have is tape as I got two rolls and the long zip ties at dollar tree for a buck and a quarter each.

Also I do not feel like taking anything apart. ( if not broke do not fix ) I got three cell banks built so three to go. I just want the job done.

cell bank #3 is on the charger so will continue building and charging separately. Then build the pack , Balance and top off the charge and run.

I have posts on three forums and was told so many times not to solder and if I did the packs would never run or be damaged goods.

The cold hard facts is I soldered a lot of packs and traveled hundreds of miles on packs I built which according to many folks should have never ran. Or only ran a few miles and a few cycles before failing. They still run Look at the pictures.

The facts , believe it or not is I can build any battery pack I put my mind to do and can do it by soldering , spot welding or with no solder or welding. I just have not spot welded yet. I do not feel like spending a lot of $$$ on a spot welder. Maybe I will at some later date. Not sure.

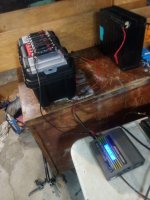
The bottom picture shows the #3 cell bank charging and the two on the bottom charged. The pack on the right is the soldered 7S - 8P pack I will be running in series with the 6S solderless pack I am currently building. Mission soon will be accomplished.

It is a lot of work without a 3D printer. If the plastic strips could be printed with hard plastic like they use for gears in a geared hub motor they could be threaded. Only zip ties would be needed and the bolts would simply screw in and a pack could be built just as fast as spot welding.

However the cold hard fact is the mainstream or majority of ebike builders and designers wont embrace something that is new or not test proven. There are solderless kits for 18650 cells out there but are terrible

VRUZEND – Battery building made simple!​


That is a really bad joke. Back when I was building 18650 packs I tried it and the cheap plastic melted. It was a calamity to say the least. I am amazed the company still exists. It is what made me start thinking how it could be done correctly. I just made it better but without a 3D printer not really practical.

That or any cell holders for 26650 cells will take up extra room due to the spacing of the cells. Since 26650 cells naturally run much cooler than 18650 there is no need for the extra space. When I build my strings of 8 cells I do add extra tale on top and bottom for about a millimeter or so spacing , plenty for 30 to 40 amps. I would need more only if I were pushing 60 or 80 amps continuous for an extended period of time.

The second pic shows my 43V LIFEPO4 all soldered and 55V of KICK ASS LTO. Might be heavy but the discharge factor and performance will only be beaten by solid state batteries when they come out. Right now I have the best batteries in the world.

Thanks.

Skyler out.4.pngIMG_20231118_072142991.jpg4.pngIMG_20231118_072003218.jpg
 
Last edited:
Looks like my first and last solderless pack for awhile.

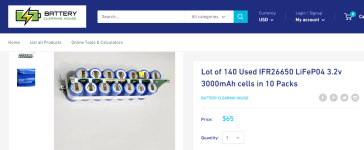
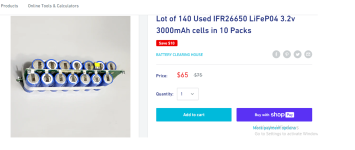
pic #1 top - 140 cells. I can save most or all the tabs. . I built all 17S with those cells and only needed to solder a wire to the tabs. Not directly to the cells.

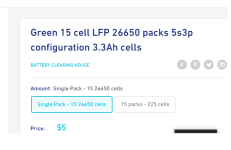
Pic. #2 $5 for 15 cells. Even if only 10 are good it is still a great deal. I got two of those awhile ago.

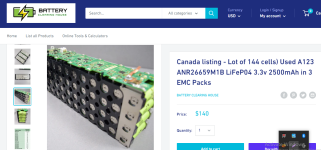
pic #3 The Canada listing is a nightmare. I bought one awhile ago when they were shipping them to the USA. I pounded the shit out of it with a hammer outside. for about a half an hour and still did not get it apart. I actually had to hire my friend to help me get it apart for 3 - 24 oz beers LOL. Some cells got too banged up to use. I lost at least a dozen and a few more were zero voltage.

You need to look at what your buying when dealing with them. The first two are a go but the Canada listing is no go. It is most of those and a few cells in pic #2 that I am building the solderless pack with as could not save the tabs.

I will be ordering the 140 cells in pic #1 as soon as my disability check comes in. For around $80 with shipping I can build a 17S - 8P pack. I am thinking about doing a 10S - 8P and wiring it with two 5S balance plugs like I did with my 10S LTO pack. Then another 7S - 8P pack like the one I got shown in the picture in my last post.

So I got three more solderless cell banks to do and will be finished. Since solderless packs with no glue for the bolts is a little sketchy I will be testing for voltage after I am done charging each cell bank. After that will be a simple series connection for the banks then tape around the top of each bolt. Electric stretch then duck to hold in place.

After that I will stack them on the side panel when constructing the box. I will use a layer or more of Styrofoam between the panel and the bolts.. Then the same Styrofoam on top of the bolts and then the other side panel. I will then stack about 20 pounds of weights on that to keep pressure on all the bolts. I will then install the ends , top and bottom.

Thanks.

Skyler out.

Untitled4.pngUntitled5.pngUntitled6.png
 
Last edited:
No hammer needed to open the case on the EMC packs (NEC)
I ordered 9 nec/emc battery pack and dissembled them. after viewing the above video
Later floyd
 
My laptop wont play it.

If you post the name I can do a youtube search.

I will be ordering the 140 cells though as easier to save the tabs. I just hope they will still have them on the third.

If I were ever lucky enough to find brand new 26650 cells affordable then my solderless packs could work. The thin plastic strip is perfect but an extra 1/8 " in width would enable me to drill slightly larger holes and then fill with hot glue around the edges of the nuts. My pictures are in detail and easy to see. I also explained everything.

With a 3D printer almost anybody could build solderless packs just as easy as that

VRUZEND – Battery building made simple! kit.​


The only difference is the 26650 cells in 8P configuration wont melt plastic and my kit would not take up as much space as a VRUZEND kit if they even made one for 26650 cells.. I dont think they do.

Thanks guys for posting and nicobie for your patience moving forwards .

Skyler out.
 

Attachments

  • Untitled7.png
    Untitled7.png
    17.5 KB · Views: 1
Thank you.

Maybe not.

I have no glue and if I did I would want larger round holes so it fills in the space with the glue. ( see pic below )

What I do have is tape as I got two rolls and the long zip ties at dollar tree for a buck and a quarter each. Also I do not feel like taking
anything apart. ( if not broke do not fix ) I got three cell banks built so three to go. I just want the job done.

Well I am fixing it. I just took one of the packs apart. It was a messy job but filled each hole I drilled up with hot glue. Then used the hammer to pound the nuts back into the glue filled holes. This will prevent the nuts from spinning when tightening the bolts.

I used some olive oil to soak the bolts in and then screwed them in the nuts pushing out the glue from the inside of the nuts. I made sure by repeating it that the threads in the nuts would not have any glue.

I then used sand paper to remove any excess glue from the plastic strip. I am waiting 24 hours for the glue to dry before re building the cell bank. It is a temporary set back but well worth the effort so it is built right. It will also save tape in the future.

It was not broke but I made a big mistake in putting them together. The nuts were on the top which is the side I hammered them in. When I tightened down the bolts the nuts would raise up.

That was why I used tape to keep them from falling out. But any tape stretchers. It was a crucial design flaw on my part and am really glad I caught it before building the rest of the pack.

Now with the nuts facing down or over the cells the nuts have nowhere to go so can not raise up. The bolts will go thru from the other end and with zip ties I can tighten them up and wont need any or very little tape. I will use a zip tie on both sides of each bolt instead of just using four. It should work much better. We shall soon see.

With a 3D printer the plastic strip would either have threaded holes so no nuts needed or it would have the exact shape of the nuts for a perfect fit. No glue would be required in a solderless kit. Just plastic strips. , nuts , bolts , cells , strips of nickel with the holes drilled for the bolts and a lot of zip ties. I think it would be totally worthwhile to do.

Soldering cells can cause damage. Spot welding not as much but the cheap battery powered spot welders might do 0.15 mm nickel strip. These cold be a lot more as just place the plastic strip over the nickel strip and drill out the holes.

It looks so much better without all that tape. (bottom pic.)

After a 6S pack I can use shorter bolts next time making the boxes more compact. It is about uniformity. I wrap each cell with electric tape and red duck.

It is because during cell recovery when cells are glued together the wrap rips and tears so wrap them nice so wont short. I just need to make sure how long the strips are so each cell is the same. Measurements then the 3D drawing for the printer.

I wrap extra tape on top and bottom for a little space but way more compact than 26650 cell holders.3D printed plastic can be strong enough to have threaded holes so no need for nuts. You should not have to tighten down that much anyway.

Also they can be rebuilt with newer cells as many times as you want. Basically 1 kit will last forever. You will just need to replace the zip ties.. Nothing else in the kit.

A very simple kit including the metal strips with the holes drilled can be made then. I don't plan on it any time soon as I can just build my own the way I am doing it

I just wish 26650 cells were more affordable and brand new cells were available for US shipping. Unfortunately due to the ridiculous price for them I am limited to Battery Clearinghouse or Hookup for used cells. The 140 cells I ordered before were rated for 80% capacity. I think the actual capacity to be about 65 to 75% with at least 1 out of 10 dead cells with zero voltage.

. I am not sure if I will order 10 Ah Headway at $10 each or more used 26650 cells. next month. I do plan on buying a 3D printer in the future for many other reasons as well as e bikes parts. Gears in geared hub motors is one idea so can do the kits then maybe.

Does anybody like the idea. ? Any links for low cost brand new 26650 LIFEPO4 cells that ship here from the USA ???

Thanks.

Skyler out.


Untitled8.pngIMG_20231120_035727687.jpg
 
Last edited:
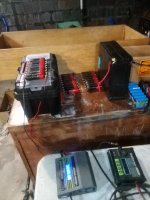
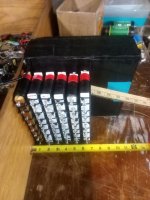
Almost finished with the 6S - 8P LIFEPO4 pack. I have an idea of weight and dimensions

Not sure what went wrong with the 7S pack I built about a year ago. ( center pic ). It is longer than it should be. 12 maybe 12 - 1//2 inches. I can do 10S in the space I used for 7S.easilly.

Looks like

Weight is about 8 pounds for 6S so 10 pounds with a box and wiring. ( top pic ).

10 / 6 = 1.6 * 17 = 28.3 pounds for 17S -LIFEPO4. I use six - 2.5Ah + two 3.3Ah so about 21.6 Ah new so minus 25% = 16.2 Ah.. I charge to around 80% so 16.2 - 20% = 12.96 so I will say 13 AH..

However after about 700 cycles it will drop to around 10 Ah. That is what I think the LIFEPO4 packs I built a year ago might be. At least 13S.

The 7S pack I built back then I only ran a few times as been running 43V about 80% of the time in the last year. It is the reason for building this 6S pack so I can run it with the 7S pack for 43V.

The scales (bottom pic.) have 22S - 55V - LTO and looks like very close to 50 pounds.:rolleyes: 56V - LIFEPO4 is almost 22 pounds lighter. It is why I plan on ordering a lot of 26650 cells. I will build 10S , - 7S and 6S packs for 13S 43V , 16S - 52.8V and 17S - 56.1V.

I like running two packs to get the voltage I want. Not three like the two 5S - LIFEPO4 hooked to the 3S - 3P headway for 43V and the three giant LTO packs to get 55V. I have no choice for the LTO as they need to be split up for better weight distribution.

Two 10S - LIFEPO4 packs would be 66V and 33.3 pounds. 16.8 pounds lighter than 55V - LTO. Each pack will have an 80 amp fuse on the negative side. I will continue to balance externally.

Thanks.

Skyler out.


IMG_20231129_024953117.jpgIMG_20231129_025332768.jpgIMG_20231129_030039539.jpg
 
Last edited:
The 6S pack was successfully built. I finished it a few days ago and ran it about 2 miles for a test run. The 7S - 8P pack I ran it in series with was 85 to 95% charged but has three low cell banks. Around 30% after only a couple miles.

The new solder less pack was all 67% to 82% so ok for a couple miles as was 85 to 90% before I ran it. I doubt they will last long though. Here is why.

The cells are old and used. They claim 80% on some of their cells but in reality maybe 60 to 70%. I do not need to test for capacity. I have run a LOT of batt hookup and clearing house 26650 cells.

Even considering the fact that 6S LiPo chargers are not ideal for LIFEPO4 and some are only 80% starting off I did not solder to the cells. They had tabs about 1/2 " from the cells and just soldered a 10 gauge copper wire across them. It was quick and easy. So my method did not compromise the 7S - 8P pack.

Another factor I considered is I probably ran an e bike 6 to 8 miles about three times a week on average. I figure a year so maybe 150 partial cycles around 85% down to 25 or 30% so 150 cycles on my other LIFEPO4 packs but maybe 40 or 50 cycles for the 7S - 8P as did not run as often.

I will be ordering brand new 10 Ah Headway cells for $10 each from e bay. That will be $80 for eight so $160 + tax and shipping for 16. - 52.6V.

Looking at 16 hopefully this month if I have the $$$ , then 16 more in January for 16S - 2P - 20 Ah. about 25 pounds with the boxes. Most factory built 20 Ah 48 volt LIFEPO4 packs only have a 40 amp or less BMS you are stuck with. The Headway cells with balance plugs and in line fuse can do as many amps as the fuse up to 200 if needed at 1P. I will have 2P by February.

I will be running 16S LTO - 40V for all my 36V e bikes. They can triple the discharge as the Headway. 800 amps without flinching. That is around 30 pounds. The piss poor 26650 cells from Battery Hookup is only good for < 3 miles. I cant even take them to Wall-Mart unless I charge them before I come back. :oop:

The only way I will ever build any more solderless packs is if I can get brand new 26650 cells. So far from what I have seen they are way too much $$$. I see no deals for them. With brand new 3.3 Ah 26650 cells I should only need 6 to get close to 20 Ah.

3.3Ah * 6 = 19.8 Ah. - Brand new. 8P from the used cells don't even get me much more than 6 or 7 Ah and even less than that after only a few dozen cycles. Not worth my time or $$$ to do.

If anyone knows of a source for 26650 - LIFEPO4 cells brand new around a dollar and 50 cents a cell please let me know. Battery Clearing house only checks cell voltage. They do not check for capacity. 16S - 6P = 96 cells * 1.5 = $144 for 20 Ah.

16S - 20 Ah of Headway is > $320 so I guess I could go up to $200 for 100 - brand new 26650 cells for 20 Ah. It is a lot more work though building 16 - 1S - 6P cell banks when Headway has the threads for bolts and only need 1 or 2P.

They do advertise 5 Ah and 6Ah 26650 cells on e bay but are they really all that.???? If I could get real genuine 5 Ah cells I would only need 16S - 4P for 20 Ah. That is 64 cells so could go like $2 or 2: 25 cents a cell if they are really 5 Ah.

If anyone knows of a great deal on 26650 cells please post. If shipping is really high I am not interested. Shipping from the USA is usually cheapest for me.

Thanks.

Skyler.
 
Last edited:
Yea. I guess nobody wants to post here anymore.

My 2 Kilowatt 45 amp hub kit will be here Tuesday which is for days away. The Headway cells are new but only get 10 Ah for close to $200 with shipping. No other options for new cells. It looks like if I want 20 Ah it will cost around $300. The cheapest $230 but only one and comes with a 40 amp BMS.

Looking at the packs I built from the used cells from Battery Clearing house , the cells were 2.5 Ah each and A123 cells I think. That is 20 Ah new and looking at 80% which is what they claim them to be that is 16 Ah.

However I do not believe their claim. I will go with 70% so 14 Ah shipped out. After 150 to 200 cycles that will drop to around 10 Ah. Looking at google search 10 Ah will get you roughly about 12 miles.

Now factor in voltage sag under load with cells operating at around 50% capacity and discharged to around 15 to 20%. I had to push my 20" ebike about 1 mile and a half a few days ago. It lost power and the LVC would only let me g about 1 or 2 mph. It did not completely die.

. I did not want to totally kill the 26650 cells as running down to zero volts and reverse polarity. I had a few cell banks at 20% and one at 15% but that is still > 3V per cell bank with LIFEPo4. I charged them back up to around 3.4 to 3.5V or 85 to 90% but have not run them more than a couple miles since.

144 cells from Battery Clearinghouse is a gamble. I can spend close to $200 for 10 Ah brand new or spend about $80 with shipping for enough used cells to build a 27 Ah - 16S 8P pack with 3 Ah cells instead of the 2.5 Ah cells.

Even if the cells are only 60% that is still 14.4 Ah for $80. It should go 10 miles for at least 300 to 400 cycles. 20 Ah of SLAs might do that but > $100 and as heavy as 22S LTOs. Even a decent relatively safe lithium ion pack will set me back > $200 for 20 Ah.

I do not want 50 ponds of LTO for my Giant Roam. I do not want to mount batteries on the frame either. I already screwed up my factory stickers painting a wood triangle rack. I removed it last night and cleaned up the stickers and got most of the paint off it. If I do a little touch up with a little white and black paint and shoot some clear over it it should look almost like brand new.

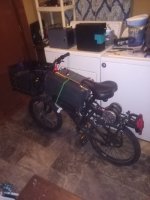
The only spot for about 23 pounds of LIFEPO4 16S - 8P is in a front basket. It has a rear basket for cargo and a 2 kilowatt motor in the rear so should have decent weight distribution. I just need to reinforce the front basket to support the weight and build the battery boxes to all fit inside it.

I will be ordering them tonight and will continue building 8P cell banks as soon as I get them extracted. I really do not see any other choice that is affordable with my budget. All I can do is hope for the best. Until then I will have to run about 32 pounds of LTO for 40V. It is not really that bad though for a 20" e bike as it has a lower center of gravity.

Also 16S - LTO will fit on my top bar with my custom wooden triangle rack. I still have my front basket for cargo. Also when I fix the flat tire on my 1,800W brushless motor it has a huge rear cargo basket and a large front basket as well. I can mount 12S LTO in a triangle rack and the 10S LTO in the front basket for 22S - 55V and still be able to haul 50 pounds of cargo in the rear basket.

The 3 kilowatt brushless motor will have a similar set up on my 20" - BMX Diamondback Cobra 20. That is my heavy bikes. Hopefully if the new 16S packs I am building are half way decent I will have a 2 killowatt e bike with a battery weight < 25 pounds and go about 10 to 15 miles. HOPEFULLY. !! :rolleyes:


Untitled.png


Thanks.

Skyler out.


IMG_20231208_193021367.jpg
 
Last edited:
Wow, that battery looks huge compared to the bike.

I had some used A123 cylindrical cells in the past. Most of them died, but a few are still going strong in power tools. Typical failure mode was excessive self-discharge. Apparently once these cells get below around 2v, bad things happen to the chemistry. If they go down to zero volts, there's not much chance they will recover.

Yes I agree. And they drop like a ton of bricks too. Once they go < 3V it is like they get pushed off a cliff. It don't take long to reach zero or the bottom of the cliff.

The LTOs are very large and heavy. They have much better capacity though but also drop like a big rock after they hit < 2V. The big difference in LTO and LIFEPO4 is LTO can hit zero volts and even reverse polarity with little or no noticeable damage. They just require extensive balancing and maybe a little help reversing polarity back. If it is too far in the negative.

I hooked one up to a normal cell in parallel and speeded up the reversal back to normal polarity. That only happened to one cell. I had two other cells reversed back by themselves. They all charged to > 2..6V but took several days balancing. The trick is to NEVER run them too low. 3.1 or 3.2V for LIFEPO4 and 2.1 to 2.2V for LTO is about where I need to be. Any lower could lead to catastrophe.

Thanks.

Skyler.
 
I got 140 more cells from Battery Clearinghouse. Looks like I will be able to save all the tabs and are about 1/2" .

Also I found 40/60 rosin core solder at an auto parts store about a block away. It will be much cheaper and easier than building solderless packs.

My solderless pack was successful however and a perfect option for brand new cells or used cells that don't have any tabs to solder to.. It just makes sense.

They have rolls of copper wire without insulation that is about 6 or 8 gauge. I can cut pieces of that and solder across the tabs. A lot less work than striping wire and can do all the parallel and series connections.

For the negative and positive cell banks on each pack I will need more flexible wire as it needs to solder to 8 tabs and extend out about 12" for the power wires ending with 4mm bullets.

It should only take about a week or less o do working one to two hours a day. I want a simple 10S pack and a 6S pack to run and charge in series for 52.8V. I can charge that with my 54.6V - 15 amp charger.

For my two 48 to 72V controllers I can add a 6S pack for 72.6V. I can charge that separately with a 5S - 21V - LiPo or lion charger.

I have two 6S - LiPo chargers at home but will need a 15 amp - 21V charger for out on the road so I can charge 16S and 6S in the same amount of time.


Skyler.
 
Solid wire should be OK for making bus strips. Just try to avoid heating the cells as much as possible when soldering. I did something similar in the past and wrapped the tabs around the wire, then soldered them. 6ga will probably be overkill and hard to bend. Even 10ga will probably be good enough depending on the layout.
 
I bought 140 cells from Battery Clearinghouse.

I really wish i did not. So far the first 28 tested are mostly complete garbage. Only about 6 are > 2.5V. About half are zero volts or reverse polarity. About 6 rest between 0.5V and 1V.

I contacted them and still no reply. I feel like a total idiot for ordering them in the first place.

They said I will get a full refund minus shipping. I can live with that as might be able to build a small pack maybe 7S - 8P if I can salvage about 30 cells out of the 140 as I have some decent cells from a year ago when I ordered cells from them.

$30 for 30 cells > 2.5V is acceptable I guess but I was really hoping to build a fresh 16S - 8P pack with at least 80% of the capacity of brand new cells.


Skyler
 
Last edited:

Higher Wire Inc.

1321 W McKinley St

Phoenix, AZ 85007

480.442.2007

sales@higherwire.com

Looks like Battery Hookup and Clearinghouse is not the only game in town..

Has anyone ever heard of these guys ???????

I need decent cells. I am sick of ordering junk !!!

These guys claim they actually test for capacity.

That would be a miracle..

Please let me know.

12/18/23 - 1: 27 PM.

I have made contact with the seller. They do capacity test all their batteries. They are the real deal.

I will be placing my order in about 10 days. Most likely I will be ordering from them again in February if I am satisfied with the first order. There are very few if any sellers of high quality , tested LIFEPO4 cells in the USA for those prices.

Also shipping is very reasonable and when I called their number , someone answered the first time I called. The information was straight forward and very accurate. The seller sent me an email with what appears to be a sweetheart of a deal. We will soon see.

I am sharing this information because I am a long time member here on ES. I have got a lot of help over the years and appreciate that very much and if I can help someone else here that might be interested in LIFEPo4 then I am glad to help.

I will test the cells with my LiPo chargers as well as onboard videos once I construct a pack. I will use an onboard power level meter and GPS speedometer app. Also the trips will be google mapped for total distance.

Also I have several e bikes to run these tests with. That will determine the best efficiency as well as top speed and hill climbing ability. Looking at > 7 e bikes in the next 8 months or so.

That is a lot more comprehensive than a simple capacity test with a 6S LiPo charger. I am looking at a complete kit with the cell holders and bus bars. They are 15 amp cells similar to Headway cells from the pictures sent to my e mail.

Thanks. everyone and keep living the dream.

Also Happy holidays to all here on ES.

Skyler out.
 
Last edited:
As far as all the packs I already built and all the 26650 cells I have laying around I will start doing capacity tests on those. I might even pull a couple packs apart and break them down into cell banks like in the youtube video,

Capacity test of every individual cell block in a bad ebike battery.

Since I will be building cell banks I should be able to test at 6S for less wear and tear on the chargers. I am just looking for low cell banks to replace with good ones.

I need reliable packs that can do at least 10 miles at 13S - 8P. When a packs fails due to two or three cell bans then it needs to be tested. For 26650 cell banks with 8 in a row this cold be a very easy thing to do with my solderless packs which I am in the process of upgrading the way I build them.

My technique needs some basic changes and quality control testing. I still did not give up on a 3D printer and will soon be meeting someone who actually owns at least a couple and I might be able to buy one used if he can show me how they work and I can print the plastic strips for the parallel connections.

I will show detailed pictures of my new cell banks once they are built. Even though I am ordering cells similar to Headway with all the connecters and spacers in a few days I am still ordering more 26650 cells for my solderless packs as they have a ton of reliable cells already tested for capacity.

Thanks.

Skyler.
 
I've never heard of Higher Wire, but if they actually test the cells, the dud rate should be lower. I've had cells that would charge and give good capacity but had unacceptable self-discharge rates. Measuring voltage after sitting for at least a week is a good test.
 
Measuring voltage after sitting for at least a week is a good test.
Sitting at what voltage level for a week or better a month?
full voltage or close to it
around storage voltage
at lower voltages
 
Around nominal voltage, 3.3v or so. There will always be some superficial self-discharge if they are over 3.5v.
 
Back
Top