Motobecane DS Fantom, BMC 600W torque and now Lipo build

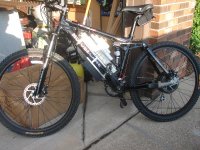
Just a word of warning...

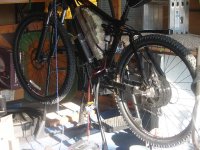
Despite the ratings on the rack, if you ride over bumps at all, it will fail.


I've broken my rack twice and a seatpole, when I had a similar weight battery on a cantilever rack.


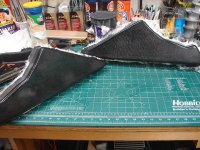
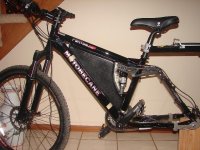
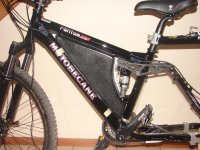
I thought the batteries were going in the frame? They really should go in the frame.
 
That's good to know. I'll have to see if I can strengthen it for the trails. The packs in the triangle will be my main packs for trail riding. The rear rack is to be use for long distance. I would like to use them in the trails as well when exploring, but it looks like I will need to worry about it breaking from what you are saying. I’ll try to come up with some sort of solution. What rack company was the one that broke on you? Did it brake in a consistent location? This one looks well built.
 
It failed here:

file.php


Then I did this:
file.php


Then the seat post failed.


Then the frame failed, but that was suspension related..
 
Nice job on improving the original rack. It looks like a steel type rack you bought. Mine are aluminum. I bet mine will break where the weld is since the rest of it looks good, it's a triangular extrusion. If I can get a second seat post in parallel and do something similar to your design, then I'm pretty sure it will be reliable.
 
Good work with that confined space. I turned my rear shock around to gain another centimeter, you could have done the same if it was necessary.
 
Hey, I hadn't thought about that. Good to know. I've actually moved the shock closer to the seat post. Apparently my bike can go to 3" 4" and 5" of travel depending on the position of shock. The bike didn't come with a manual, but I assume the travel will be longer the closer it is to the pivot point. I have plenty of room now, and can go back to 4" if I need to.
 
I've given some thought to the rear rack problem. I think I might try using carbon fiber tow from the top of the seat post to the rack. This should give it a lot of support, just need to figure out if there is a way to still have it quick release. Maybe some type of mold structure would be needed and a locking pin. Would be a unique solution that I have not seen done yet.
 
I needed to build a battery compartment and wanted a better way to secure the packs. I will be using Kevlar tape to secure the battery to the base of the bag. The separating material is .1” fibreglass.
 

Attachments

  • Battery separator.jpg
    Battery separator.jpg
    67.6 KB · Views: 3,303
  • Battery and separator.jpg
    Battery and separator.jpg
    87.3 KB · Views: 3,303
  • Separatror test fit.jpg
    Separatror test fit.jpg
    80.2 KB · Views: 3,303
I’ve been busy as usual with other projects. Found some time this weekend to work on the bike. Here is the mold cut in half and prepped for layout. The second picture is my vented work area I use for anything from sanding to chemical stuff. It’s vented to the outside so I don’t have to breathe any of the fumes or dust. If you plan to do any composite work a good ventilation system is a must. It’s a tight space as you can see; having a lazy suzanne helps when moving the part around.
 

Attachments

  • mold.jpg
    mold.jpg
    51.9 KB · Views: 3,303
  • vented booth.jpg
    vented booth.jpg
    56.5 KB · Views: 3,303
  • Layout time.jpg
    Layout time.jpg
    39 KB · Views: 3,303
I took the mold out this morning. it's looking good. Some small bubbles, but that can be easily fixed. I need to get the other side done now. It's a lot more work, but I wanted the ability to make spare covers, since it would of been the only part that I could not easily replace. The black coloring is due to graphite in the epoxy. It provides a slicker surface for releasing.
 

Attachments

  • mold.jpg
    mold.jpg
    51.9 KB · Views: 3,303
  • mold inside.jpg
    mold inside.jpg
    43.8 KB · Views: 3,297
I've been busy with other projects, but should have updates soon. The enclosure is taking a while to get done, half of it turned out good, but the other half had a lot of pin holes. I’ve been rather anal at getting the finish smooth. This meant a lot of sanding and filling which isn’t much fun to me. I’ve been working on it off and on, almost would have preferred to redo the mold. It’s finally to the point where I will do a pull within a week. I’ll probably go with glass and black graphite for the enclosure. The carbon fiber I have was weaved with glass. This didn’t look good as a finish when I tested a sample. Once the cover gets done, the rest should follow rather quick.
 
Haven't even used the Konions, they have been sitting till the bike gets finished. Won't really know much about them till I can ride the bike. Wiring is custom to the bike so I haven't tried it at all.
 
oh wow! i thought maybe you had a temporary duct tape enclosure holding it together for now until you finished the fiberglass shell.

I'll look forward to the review and pics when everything comes together.

Also, I was thinking about implementing fiberglass sometime in the future. I was wondering what was the best way to smooth it out once it dries? Are you using bondo? or layering another coat of resin over the top (i think that might fill in any voids)?
 
The process I'm using is much more involved. No Bondo is used, if you go to http://www.rcgroups.com/composites-fabrication-210/ you will find all the info you need there. I've been involved with RC planes for a while and currently building from scratch a hand launch glider. This involves using composites and mold techniques. I’m just applying what I know to the Ebike stuff. The technique is closer to what industry does when they create a mold and cast a part from it. I will be able to make more than one battery enclosure. I wanted this ability incase I needed a spare. Not really worth the trouble if all you are doing is one part.

doc007 said:
oh wow! i thought maybe you had a temporary duct tape enclosure holding it together for now until you finished the fiberglass shell.

I'll look forward to the review and pics when everything comes together.

Also, I was thinking about implementing fiberglass sometime in the future. I was wondering what was the best way to smooth it out once it dries? Are you using bondo? or layering another coat of resin over the top (i think that might fill in any voids)?
 
I’ve been busy with other projects as usual. I finally put some time on the Motobecane build. Doing the molds has sure taken on more time than I initially planned, mainly because its been a tedious process, so forcing myself to work on it has been the main setback. I was finally able to layout the glass last night. I ended up not using any carbon fiber. The stuff I had just didn’t look good after a test. It wasn’t full carbon. Instead I opted to just use glass and graphite powder. Here are pics of the results this morning. I was not able to take pictures during the layout process, since it was so messy. The molds are currently in the oven to set. I will know tonight if all this effort has lead to covers that will be usable.
 

Attachments

  • epoxy work area.jpg
    epoxy work area.jpg
    51.8 KB · Views: 3,143
  • vacume bagged2.jpg
    vacume bagged2.jpg
    94.8 KB · Views: 3,137
  • remove vacuum bag2.jpg
    remove vacuum bag2.jpg
    68.8 KB · Views: 3,137
  • remove excess epoxy layer3.jpg
    remove excess epoxy layer3.jpg
    85.5 KB · Views: 3,143
  • peel ply test.jpg
    peel ply test.jpg
    76.1 KB · Views: 3,143
  • ready for oven.jpg
    ready for oven.jpg
    93.9 KB · Views: 3,137
  • oven.jpg
    oven.jpg
    39.6 KB · Views: 3,137
  • oven2.jpg
    oven2.jpg
    36 KB · Views: 3,137
  • excess epoxy.jpg
    excess epoxy.jpg
    88.7 KB · Views: 3,137
Success, I now have a set of battery covers now. As you can see from the first picture. One of the molds needed work. Would of been better to just redo it, but I had lost the CAD file and had put too much time into the mold it already. I just need to put the covers on my CNC and trim it out. I’m happy with the general appearance and overall quality. If I were to do another set, I would add one more layer of glass. I’m sure these will hold up just fine though. The glass can be seen, something I didn't expect. The results looks great so I won't bother to paint it.
 

Attachments

  • battery covers.jpg
    battery covers.jpg
    111.3 KB · Views: 3,137
  • battery covers2.jpg
    battery covers2.jpg
    100.9 KB · Views: 3,143
  • battery covers3.jpg
    battery covers3.jpg
    116 KB · Views: 3,143
I wanted to see how it looked on the bike and verify the fit. Very cool, blends in nicely. Worth the effort, look like it's part of the bike.
 

Attachments

  • test fit.jpg
    test fit.jpg
    82.3 KB · Views: 3,137
  • test fit2.jpg
    test fit2.jpg
    90.4 KB · Views: 3,143
Very nice work on the box.

I also noticed your torque arms. :shock: They look pretty nice too. Can you so us some close-ups, and provide a few more details.

I am just trying to work out how I will do them for my new frame.

- Adrian
 
The torque arm is still a work in progress. It's actually 3 pieces of 1/8 stainless and 1 aluminum anchor per side. I need to still bend the arm to actually fit the frame. I will go into more detail when I get to that stage. I used my CNC to mill it, but stainless is actually quite difficult to work with. There are pics of parts of it earlier in the thread. I will be using 2 sets for this bike. Both sides needed custom cuts.
 
I have finally ridden the Motobecane under battery power today. I took it out for a shakedown test. I needed to verify the batteries are holding up. The bike tops at 21mph, seems a couple miles slower than the simulator. This is the torque version of the BMC V2 motor, the bike doesn’t seem as torqey as my Cylcone setup. I will do more comparison now that it’s running. Overall I’m happy with the initial test run, the gears work well with the motors. The smallest sprocket I have is an 11tooth and I’m able to keep up with the motor at max speeds. This bike should be a blast to ride in the trails. It’s also much quieter than I had expected. My tires make just as much noise.

The battery covers need anchors mounted and holes put in for the wiring but it fits perfectly over the batteries. I should have that done in a few more days hopefully. The custom torque arms seem to be holding up. No mechanical issues very smooth bike to ride. Batteries are very secure as well. Nothing loose on this build.

Things that still need to be done before its final is relay power switch, second battery to be wired for the rear rack, and battery covers need to be installed. I’m not bothering with anodizing till the fall. Need to ride the bike.
 

Attachments

  • testride.jpg
    testride.jpg
    98.8 KB · Views: 3,144
  • testride2.jpg
    testride2.jpg
    108 KB · Views: 3,144
I took the bike out to the trails this morning and have already broken one of the reflectors on the pedal. Need to get the suspension stiffer. It was riding a bit low. The performance seems to be on par with the cyclone setup. It has a much smoother power band than the cylcone. I really like the feel of this bike. The suspension is really soft at the moment; I will need to stiffen it up. I just moved the rocker pin to the center post, less travel. I should have installed mud guards; I have some cleaning up to do. I’m quite happy with the overall results. Batteries were holding up, used up 11.5Ahr and the CA gave me plenty of notice on low voltage level. I covered about 12 miles in the trails with pedaling. I need to get the second pack done so I can increase my range. I’m actually going faster with this new setup, the power band seem about right and the bike is more forgiving of mistakes.
 
Back
Top