New "TSDZ2 Torque Sensor Central Motor"

gfmoore said:
Sorry you have to keep repeating yourself mate! :? I've only got upto page 252 on the big thread and I've forgotten what I'm reading, something to do with blue gears I think. :lol: oh and thinking how many motors did Casainho destroy to achieve nirvana :D

Thanks.

Might be beneficial to yourself to read the full thread, it would keep the useless question count down a bit :wink:
 
I am on GF Moores's side on this. His was not a useless question. It is nigh impossible to go through so many pages and to discern the definitive or even just the most current best practice on an issue like this. It really isn't that painful for those who have the knowledge to repost a few times or even more. The tradeoff is you post the answer which takes a couple minutes or GF has to spend hours paging through the forum and maybe still not finding the answer.

For instance, one thing I am interested in doing this winter is upgrading the bearings in my TSDZ2. I have gone through the thread and even used the search function but there are hundreds of instances of "bearings" and I can't find the definitive answer as to which specific bearings work best with the least amount of fitment hassles. Lots of back and forth, many different solutions, but hard to find the specifics. We really need this sort of stuff in a sticky.

gfmoore said:
Waynemarlow said:
it would keep the useless question count down a bit :wink:
 
Fair enough but to do as you ask, someone has to volunteer to categorise the thread, which in effect simply moves your time searching onto someone else’s shoulders. If you wish to pay for a secretary to do so by all means let’s set up a PayPal fund to pay for that secretary, get your hand into your wallet please.

On the other hand feel free to volunteer yourself to tidy up the thread and update the GitHub document that others started and usually didn’t complete due to the time this takes stopping them from riding their bikes.
 
Every forum has its resident grouches. I will probably just recreate the wheel when it comes to the bearings. It'll be faster for me to R&R the motor, disassemble it and measure the bearings than to dig through this landfill of a thread. And also better to not have to deal with grouches. And when I get around to this I won't have any problem answering questions as many times as they are asked.

Waynemarlow said:
Fair enough but to do as you ask, someone has to volunteer to categorise the thread, which in effect simply moves your time searching onto someone else’s shoulders. If you wish to pay for a secretary to do so by all means let’s set up a PayPal fund to pay for that secretary, get your hand into your wallet please.

On the other hand feel free to volunteer yourself to tidy up the thread and update the GitHub document that others started and usually didn’t complete due to the time this takes stopping them from riding their bikes.
 
raylo32 said:
...I will probably just recreate the wheel when it comes to the bearings. It'll be faster for me to R&R the motor, disassemble it and measure the bearings than to dig through this landfill of a thread. ....
All bearing sizes are mentioned in the Tsdz2 wiki.
Famichiki has dissambled the motor in the past and has search for the better replacement bearings.
His "bearing story" starts about page 305
 
raylo32 said:
Every forum has its resident grouches. I will probably just recreate the wheel when it comes to the bearings. It'll be faster for me to R&R the motor, disassemble it and measure the bearings than to dig through this landfill of a thread. And also better to not have to deal with grouches. And when I get around to this I won't have any problem answering questions as many times as they are asked.
You’re obviously new to the thread, let’s have your measurements for the bearings it would be good to have a second look and update to the Wiki. Fill your boots it will save Elinx having to repeat his posts
 
Aquakitty said:
PROBLEM: The temperature sensor works fine when the bike is not in use. It shows the correct room temperature. However, when I press the "walk" button for testing, the temperature on the display goes up to like 180 degrees and of course this cuts out the motor. It is not really getting hot obviously. It works fine again when I turn off this feature.
Most probably one of the LM35DZ leads are touching the motor casing and likely to be Vcc or Vop.
 
feketehegyi said:
Here's my XH-18 look watch face. :)
[youtube]1iTvw87h5VA[/youtube]
You can implement a real watch face that shows TSDZ2 motor real time data, like motor power, battery voltage, battery SOC or pedal human power!!

You just need to use our TSDZ2 wireless controller and a Garmin smart watch, since you can develop for Garmin watch faces that communicate with the EBike wireless standard ANT+ LEV, that we already support on the wireless controller.
 
casainho said:
You can implement a real watch face that shows TSDZ2 motor real time data, like motor power, battery voltage, battery SOC or pedal human power!!

You just need to use our TSDZ2 wireless controller and a Garmin smart watch, since you can develop for Garmin watch faces that communicate with the EBike wireless standard ANT+ LEV, that we already support on the wireless controller.
Lots cool things indeed. Thanks!
 
raylo32 said:
For instance, one thing I am interested in doing this winter is upgrading the bearings in my TSDZ2. I have gone through the thread and even used the search function but there are hundreds of instances of "bearings" and I can't find the definitive answer as to which specific bearings work best with the least amount of fitment hassles. Lots of back and forth, many different solutions, but hard to find the specifics. We really need this sort of stuff in a sticky.

I wrote this up for someone a while back but never did anything more with it. After all this, I really just wanted to get on with riding my bike again. If you search through my post history you will find many photos documenting my rebuild, and if anyone would like to compile it all into a wiki page please be my guest.

In addition I recommend reading these threads for some more discussion of the various issues we are trying to resolve.
https://endless-sphere.com/forums/viewtopic.php?f=28&t=98361
https://endless-sphere.com/forums/viewtopic.php?f=28&t=108017

First up be aware there are differences in the original and later motor revisions with regards to shims, torque sensor construction and number of non-drive side bearings.

I did replace most of the bearings but in particular the ones on the spindle don't improve play much simply by replacing them however you will get a longer service life. (The only bearings I didn't replace were those in the blue gear, but I did replace that gear with another the same while I had the opportunity - even though it looked fine. Pictures of motors full of metal filings from chewed brass gears convinced me to stick with plastic.)

I experimented with shimming the races but in the end used an equivalent to Loctite 641 medium strength bearing retainer (RS Components R41) to affix the non-drive side ball bearing to the spindle as well as within the motor case. You will need shim washers between that and the circlip, and on the drive side between the torque sensor and sprag clutch. I bought an assortment of thicknesses and experimented and yours will be different.
https://au.rs-online.com/web/p/retaining-compounds/9082770/

Shim washers are:
ID 15mm, OD 22mm, thicknesses from 0.1mm to 1mm
ID 30mm, OD 42mm, thicknesses from 0.1mm to 0.3mm

That retaining compound seems easily released with a little force such as tapping the spindle out with a hammer or pressing things in a vice. It should hold well enough for rotational forces though. The higher strength stuff is pretty much permanent and requires extreme heat to break free.

I also added highly sealed ball bearings in place of the dust seals. I affixed the outboard non-drive bearing the same way, but on the drive side only applied compound to the inner race. It's an interference fit in the cover so didn't look like it would spin, however I added silicone sealant to hold and waterproof it with the idea that it would be easier for removing the cover in the future. You can't keep the dust seals with the added bearings, except on the non-drive side where you need to use a standard width bearing instead of the wider version I used.

Replacing the roller bearing on the torque sensor was tricky but not overly difficult, I think I made a post about that and how you need to desolder the coil to allow removal of the hall sensor so you can slide the old bearing off.

I noticed a big improvement in play by replacing the sprag clutch, not within the clutch itself but related to how the inner race was machined.

I also created a better fitting key to hold the sprag clutch. This is the part I bought, I needed to cut in half and then file down, the length allowed me a second try in case I messed up the first one.
https://www.smallparts.com.au/store/item/k080007003600ac/?v=5166

Unfortunately I'm in Australia so these suppliers probably won't be of use, but you can get an idea for the parts I used.

Sprag clutch - CSK30P 30 x 62 x 16mm with internal key way
generic brand
https://www.ebay.com.au/itm/123904447578

Spindle, non-drive side - 6902RS (old version uses two)
SKF 61902 2RS1
https://au.rs-online.com/web/p/ball-bearings/1440863/

Spindle, new outboard bearings - 6902RS x 2
Drive side: Enduro 6902LLUMAX
https://www.scvimports.com.au/product/5544-enduro-6902-15x28x7-max
Non-drive side: Enduro 6902LLUMAX-E (extended 10mm inner race)
https://www.scvimports.com.au/product/5545-enduro-6902-15x28x7-max-e

Torque sensor - roller bearing HK2214 x 2 (older motors may have been the 2mm narrower HK2212)
INA HK2214-RS-L271
https://au.rs-online.com/web/p/roller-bearings/1946937/

Reduction shaft (outer), between pinion gear and blue gear - 6001RS
Nachi 6001-2NSE9CM
https://www.ebay.com.au/itm/272114032787

Reduction shaft (inner), in motor housing - 608RS
SKF 608-2RS or 608-2RSH
https://au.rs-online.com/web/p/ball-bearings/4419953/
I bought the 2RSH which have stronger seals but are overkill and increase drag.

Motor external, end of spindle (in case) - 696RS
generic brand
https://www.ebay.com.au/itm/151628723903

A whole new blue gear with bearings is cheap and less hassle, but here are those details for completeness:
Blue gear, bearing - 609RS
Blue gear, roller clutch - HF1216 (or FC12)
Blue gear, washer - 8.2 x 11 x 0.5 (spindle is 8.0mm)
 
Wow, thanks for going above and beyond the call of duty with this. I've not had any problems with mine yet and I already have a spare blue gear and brass gear in the shop for when I do. Interesting your observation of chewed brass gears. I'll keep that in mind. It would probably also be a good idea to put a spare torque sensor in my repair parts inventory. I am going to save this great post in case I decide to tear into it this winter. But between my pedal bikes and other e-bike I don't think I'll kill my TSDZ2 anytime soon. And really for the time savings and relatively low cost it might be a lot easier to just get a whole new one if and when the time comes... and then rebuild the old one at my leisure.

famichiki said:
I wrote this up for someone a while back but never did anything more with it. After all this, I really just wanted to get on with riding my bike again. If you search through my post history you will find many photos documenting my rebuild
 
famichiki said:
.....

I wrote this up for someone a while back but never did anything more with it. After all this, I really just wanted to get on with riding my bike again. If you search through my post history you will find many photos documenting my rebuild, .......
:bigthumb: Great summary

As said before:
Your "bearing story" starts about page 305


raylo32 said:
.... Interesting your observation of chewed brass gears. .....
See this post :wink:
 
famichiki said:
Big_Daddy said:
Anyone ever Badly strip one of the four internal screws that attaches the motor to the gear housing and how Did you remove it? Thanks

I began to strip one but got it out. Normally to remove you need a good fitting phillips head and firm pressure to keep it from camming out. If it's too far gone, you may have to very slowly try to drill the head out of the screw. I just switched mine to torx so I don't get this problem again.

torx.jpg

So are the original screws Phillips or JIS? Hard to decide what screwdriver to buy before opening the motor. What type of screwdriver handle would be sufficient to develop enough torque to avoid damaging the original screws.
 
sysrq said:
famichiki said:
Big_Daddy said:
Anyone ever Badly strip one of the four internal screws that attaches the motor to the gear housing and how Did you remove it? Thanks

I began to strip one but got it out. Normally to remove you need a good fitting phillips head and firm pressure to keep it from camming out. If it's too far gone, you may have to very slowly try to drill the head out of the screw. I just switched mine to torx so I don't get this problem again.

torx.jpg

So are the original screws Phillips or JIS? Hard to decide what screwdriver to buy before opening the motor. What type of screwdriver handle would be sufficient to develop enough torque to avoid damaging the original screws.
 
Doohickey said:
Hudson said:
1. The back wheel will not free wheel at all, it feels very stiff, if i want to reverse I have to lift the back wheel. Got the bike on the stand now and can rotate the wheel backwards but it is not smooth. It rotates less than one revolution and then gets very stiff and then frees up, then rotates the same again before getting stiff.

I think you'll have to take apart the motor to to figure anything out. Since it doesn't spin properly, this sounds to me like something broken / snapped / stripped / stuck (possibly the blue gear?). I'd start off by taking off the non-drive side cover to access the inner motor and blue gear (IMO this is one of the easier things to check, depending on your bike this can be done without even taking the crank off, just take off the pedal, slide the locking tool over the crank arm and loosen the big nut); check that everything in there looks good.

Beyond that the main drive gear is also relatively easy to access to check, you need to take off the spider and chairing I believe.

Be careful since both the outer hex screws as well as the inner phillips ones holding the motor unit strip easily - use a good tool and try to avoid letting it slip out as you undo them, and don't overtighten when putting back together. (I replaced mine with torx)

What size Phillips screwdriver should be used? PH0, PH1 or PH2? Using Wera screwdriver with special laser markings on the head for reduced slippage might be overkill?
 
Sorry if I talk about this problem but it drives me crazy and I just don't know how to fix it.
I bought a tsdz2. 48v from pswpower at the end of June.
I immediately changed firmware with mbrusa version 20 01b. The engine stopped running after less than an hour. The torsometer no longer works. The walk assistant and the accelerator work.
Even with some difficulty, pswpower sent me new torsometer and ECU.
I waited over a month, reassembled the parts, the engine worked. I immediately did the flash and the torsometer no longer worked, as before.
I tried to put back the original firmware but nothing.
With the assistance of mbrusa, whom I thank very much, we tested the motor, the torsometer and the pas sensor. Everything works except the pas sensor, cadence is not detected.
Is it possible that two new ECUs have broken in the same component? The first after an hour, the second at the first firmware change? I don't think buying a third control unit is the solution. I am also afraid to buy a new engine, this is already new, with the control unit replaced together with the torsometer. who tells me that the new is not the same? I also tried old firmware versions but nothing, honestly I don't know what to do anymore. I know the engine quite well, I have had 2 others, no problems.
 
famichiki said:
charakaSamawry said:
Anyway seems he has a lot of different greases and I’m more confused as to what I need now?
any more advice on my first service Would be much appreciated. Things to check and worth replacing?

I wouldn't touch the sprag clutch or roller clutch inside the blue gear in case they start slipping. But since you are in the UK, the easiest solution is to order a small container of Molycote PG-75 from Performance Line Bearings and use that for everything else as it's safe for plastic gears.
https://www.performancelinebearings.com/product/gear-grease-for-ebike-motors/

Molykote pg-75 is 130°C and NLGI2 compared to original Molykote Em-50l 150°C and NLGI1. Not sure if Molykote pg-75 will be sufficient despite the fact that it's used by preformancelinebrarings on mid-drives such as Bosch and Yamaha?
Also the semi-synthetic Molykote pg-75 is said to have lower friction while synthetic Molykote em-50l is said to have better noise reduction properties. Not sure if solid additives in Molykote pg-75 are responsible for lower friction or not. There are almost no rewievs or discussions about Molykote pg-75.
Some sources say Molykote pg-75 is intended for low loads, others say it's intended for high loads. Vehicle track rod joints are said to be required heavy duty grease, so the Molykote pg-75 should be good for high loads. Go figure.
In pedelecforum.de one person said Molykote Em-30l is better for higher loads while Molykote pg-75 is for lower loads. Although Molycote Em-30l datasheet mentions precision equipment and audio appliances which doesn't seem to be highly loaded at all.
 
andrea_104kg said:
.....
Is it possible that two new ECUs have broken in the same component? ........
Have you already tried to measure/test the PAS/Cadence sensor on the first ECU?
(The one that is not build in, with a battery and multimeter or led)
 
How to deal with bad mileage calculation on the 860c display? The wheel diameter settings do not correct the distance traveled. mdumdei changed the lines of code only even if I tried to do it, I do not know how to edit the file with the program? I am asking for a hint.
 
Elinx said:
andrea_104kg said:
.....
Is it possible that two new ECUs have broken in the same component? ........
Have you already tried to measure/test the PAS/Cadence sensor on the first ECU?
(The one that is not build in, with a battery and multimeter or led)
I tried to connect a charged battery (4.19v) to the positive and negative of the hall sensor. There are 2 more threads, one blue and one yellow. Both read 4.19v. If I approach a magnet, they go to zero volts. however it depends on the direction of the magnet, one pole works, turning the magnet does not work. I think this is normal and the sensor is working. He no longer knows what to do or think ...
 
andrea_104kg said:
I tried to connect a charged battery (4.19v) to the positive and negative of the hall sensor. There are 2 more threads, one blue and one yellow. Both read 4.19v. If I approach a magnet, they go to zero volts. however it depends on the direction of the magnet, one pole works, turning the magnet does not work. I think this is normal and the sensor is working. He no longer knows what to do or think ...

Try to move slowly the crank forward and check the signal sequence on the Yellow and Blue wires. The signal should change about every 5 degrees.
The sequence should be:

H=5Volt L=0Volt
Code:
Yellow  Blue
   L      H
   L      L
   H      L
   H      H
   L      H 
   etc...
 
andrea_104kg said:
....
I tried to connect a charged battery (4.19v) to the positive and negative of the hall sensor. There are 2 more threads, one blue and one yellow. Both read 4.19v. If I approach a magnet, they go to zero volts. however it depends on the direction of the magnet, one pole works, . ...
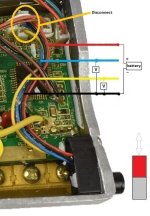
Blue and Yellow are the outputs of the two hall sensors.
I understand well you didn't need resistors?
halltesttsdz2b.jpg

I looks indeed that the PAS sensors on the first ECU (outside the motor) are working

For the second ECU inside the motor, you can try the solution of mspider65 after disconnecting the PAS connector.
In that case you use the magnet ring of the torque sensor, or again a magnet if you had removed the torque sensor.
 
[moving my post from the OSF thread]

Hi folks,
The pedal assist stopped working in the first few miles on a new build 48v 8pin, VLCD5, stock firmware. Throttle and walk assist work perfectly. The hidden menu shows TE/TE1 values of zero regardless of manipulating the pedals.

Things I have tried:
- don't touch pedals during bootup sequence
- check speed sensor magnet alignment and distance (speedometer reading has always worked perfectly. measured 12mm spacing)
- try with speed sensor cable disconnected
- remove motor covers and inspect cables
- remove controller and inspect connections
- check that cadence sensor is not sanded down like this
- use multimeter to verify motor hall sensors fluctuate 0-5V

I would suspect a faulty torque sensor given the TE reading of zero, but I have not been able to find any others on this forum who reported the same. Is it possible to test the torque sensor with a multimeter? (Edit: related)

Elinx has replied on my other wrong post to try OSF to help isolate between the different sensors that could be preventing pedal assist from working. I will consider that option, though to be honest andrea_104kg's experience above is not confidence inspiring :|

P.S. Every post mentioning the hidden menu says hold info+power 10 seconds, but that does not work on mine. Mine requires first to press info once, then hold info+power 3 seconds, then info 3 times. I figured this out by dumb luck after being very frustrated using the wrong instructions. Just wanted to point that out in case it helps anyone else in the future.
 
Back
Top