I'm sure it isn't what you're going for, but I actually like the way the sanded plate looks--back when I used to scratchbuild various kinds of models and scifi props, I often had to work really hard to get that "aged patina" look. ")
I'm sure it isn't what you're going for, but I actually like the way the sanded plate looks--back when I used to scratchbuild various kinds of models and scifi props, I often had to work really hard to get that "aged patina" look.


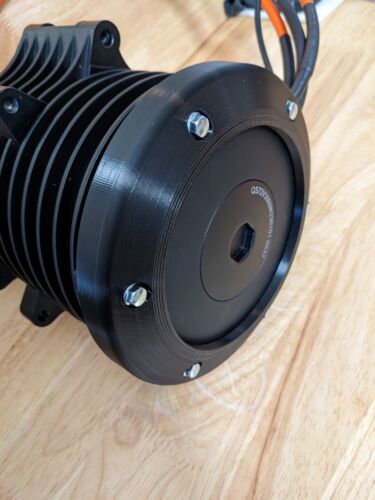
I have a wierd request that might be asking a lot:Yeah I like the look of the sanded plate, Just not with this build as I envisioned everything blacked out. Sanded aluminum looks the best. Not quite polished aluminum but that sanded/hazy look

I expect that one should be fine; if you think a vent might get clogged or damaged you could carry a spare so you can unscrew it and replace it.So I can’t decide whether to use one or two pressure valves on the side cover. What are your thoughts, should I use 2 or maybe just 1 vent?
I have a wierd request that might be asking a lot:
Before you do any thing else to it, can you take a few good straight-on pics of that cover, lit from the side or above, no flash? (and maybe one with a flash?) And some from the "top" so it looks like a dome, lit from a different side and from that side? And if possible, one from this angle/lighting angle:
View attachment 341261
I ask because I have been collecting some interesting textures and images to use for song and album "cover art" for the music over at my Amberwolf page, and it just struck me that this one would be nifty. (Some of Skohorod's images are going to be used (at least parts of them) this way).

I expect that one should be fine; if you think a vent might get clogged or damaged you could carry a spare so you can unscrew it and replace it.
I can't imagine you'd ever have enough of a pressure difference to require two valves to relieve it.
I would skip the vents, I think the risk of damaging them is greater than the benefit of having them. (If you cant mount them in a more shielded area)
Then hope that venting internal through the wires is enough
and if not hope that a little extra can sip though the shaft seal inside the gear reduction..
Another option would be to add a little tube where the wires enter to use as vent.
Gosh that factor phase wire crimp doesnt have me holding high hopes for whatever is going on inside my qs180... They lathered the end caps in silicone too. Not looking forward to opening it at all. In regards to the vent of only put one. I don't really think it's nessecary but since you have them...
Why is there no pressure venting on the stock? Or is there? I only see the drain hose on the drive side. Curious why you’re installing a vent
I’ve been doing this with all my 138’s but I’m assuming you drain the original gear oil and refill? Are you filling it like a differential to where it starts to seep from the fill plug? Also what viscosity are you using?

 I’ve use some tape to help direct the airflow through heat sink fins. I first tried using the fan, pulling the air away from the heat sink, but it was bogging down the fan. I then switched blowing air into the heat sink and it flows much better that way. I can feel the airflow shooting out both ends of the controller, through the heat sink canals.


Devil's advocate. Why are you using a thermostat at all? Why not just wire it directly to your 12v output, which would turn it on as soon as you start up your bike, and run all the time? My 3 reasons for this thought: First, it's not like it's a huge parasitic draw that will eat up your battery power. I found one review online saying this model fan only consumes 0.6W, which is practically nothing compared to a single throttle twist. Secondly, if it starts running as soon as you turn the bike on, it's pre-cooling the controller's heatsink before you even get going, which will temper upcoming heat increases. Whereas if you use a thermostat, the thermostat waits until the controller heats up first, before it turns on the fan to cool it off. Thirdly, in my opinion, the thermostat is just one more component, one more addition to your wiring harness, one more component that potentially can break and need to be replaced later. I personally like to have all of my projects with as few components as possible.Will use this thermostat to control the fan. The display will be Hidden out of sight. Set it and forget it
Definitely the way to go, this is how 3d printers do it. One time I was replacing my printer's fan, and I installed it backwards and didn't notice. The heatsink then had no cooling whatsoever and I had to clean out a massive filament jam.I first tried using the fan, pulling the air away from the heat sink, but it was bogging down the fan. I then switched blowing air into the heat sink and it flows much better that way. I can feel the airflow shooting out both ends of the controller, through the heat sink canals.
Yeah I wouldn’t expect those temperature displays to be waterproof. I made them waterproof by adding silicone. They’re basically potted now. Did the same with my other builds never had an issue.You can set the fan to come on in the vesc app to switch on at a given temp or like me was after 10seconds or after throttle is applied.Also used the same display and sensors in my first ever build and was about as waterproof as a toilet roll unfortunately.
I’m concerned with all three but the battery is the least of my concern because it’s over built. Will be using less than 50% of the discharge rate most of the time. So heat should not be an issue with the battery. My bus bars are 4.5 pounds of copper plus about another 3-ish pounds of discharge wires. Do you really think battery temp is a concern with this build? The motor is the weak link and that’s why I need to watch the temperatures. The battery temperature will be displayed on the BMS display. So all three components I will be able to see temps conveniently located in one spot.As the motor and controller both as you know have temp information already from factory i would be more concerned about battery temps data on a ride.
Lol Definitely comes down to opinion. The BMS displays will mainly be used as my voltage display and battery temp.but display is bulky and ugly.
Just use an old phone bar mounted that's has everything under one roof in terms of rtd.


Devil's advocate. Why are you using a thermostat at all? Why not just wire it directly to your 12v output, which would turn it on as soon as you start up your bike, and run all the time?
My 3 reasons for this thought: First, it's not like it's a huge parasitic draw that will eat up your battery power. I found one review online saying this model fan only consumes 0.6W, which is practically nothing compared to a single throttle twist.
Secondly, if it starts running as soon as you turn the bike on, it's pre-cooling the controller's heatsink before you even get going, which will temper upcoming heat increases. Whereas if you use a thermostat, the thermostat waits until the controller heats up first, before it turns on the fan to cool it off. Thirdly, in my opinion, the thermostat is just one more component, one more addition to your wiring harness, one more component that potentially can break and need to be replaced later. I personally like to have all of my projects with as few components as possible.

This is of course all my personal opinion. You obviously have your reasons for wanting it thermostat-controlled, just wanted to bring up a different method for others who are reading this.
Definitely the way to go, this is how 3d printers do it. One time I was replacing my printer's fan, and I installed it backwards and didn't notice. The heatsink then had no cooling whatsoever and I had to clean out a massive filament jam.
Another thought. You obviously got a really great $25 fan for its IP67 waterproof rating, but I can't picture where the fan is in relation to the rest of the build. Is it going to encounter mud, dirt, dust, rocks, other debris?
Especially with your style of trail riding. I'm wondering whether it's going to be physically damaged by something other than just water, like a rock/pebble hitting it and snapping off a blade.
If that's the case, perhaps you can go with super cheap PC fans of the same size. They're practically disposable, I've got a box of 40-50, all from leftover projects or scrap processing. Ride it for a few trails until it breaks, swap it out. Just a thought.
All fair points. Just what was coming to mind if it was my buildBecause I simply don’t want to hear the fan running all the time. It’s not needed, the controller should not have temperature issues either but it’s just for those really hot months in the summer when I’m really pushing the bike I will then need the fan. In the winner, the fan may not even turn on because I will be using less than half the rated discharge rate of the controller most of the time.
Yeah the power draw is the least of my concerns. The fan pulls 1.1watts which is nothing.
Yeah, there’s no simplicity about this build lol
No, there will be an enclosure around all of the electrical components. None of it will come in contact with mud or water. The airflow coming off, the controller will be directed out the enclosure.
Cheap fans are loud, that’s why I went with a nicer more quieter fan. Plus cheap fans break faster. I like the method of buying quality parts instead of buying cheap parts multiple times, plus the headache of having to change the fan.
All fair points. Just what was coming to mind if it was my build


 . I didn’t want the graphics to be the focal point, but to simply blend in and complement the build.


Looks great. Can you please briefly share your numbers of primer, sanding steps, rest time, final coats and rest times in between, ect?And finished. Used ceramic engine paint, flat black. The goal was to simply repair and repaint the side cover to a factory looking finish.
Looks great. Can you please briefly share your numbers of primer, sanding steps, rest time, final coats and rest times in between, ect?
 I just needed to repaint it and I end up spending a lot of time.