Suzuki RMZ 250 EV Restomod

I wonder if a solid 3D printed guard could be installed with the side cover bolts.
But was thinking more of something along these linesView attachment 341899

Yes this would be perfect. I like this red cover that just protects the lower half 👍
 
  • Like
Reactions: MDG
Well, I’m back working on this project. I’ve made some small progress with the battery in the last week or so, lots of detailed tedious work.


File down these areas to give me better clearance for the battery case. Was able to sacrifice those two mounting holes and will use that on the front side of the battery case for Mounting. Battery case will sit flush against the frame, so you won’t see the sanded off powder coat.
479147E0-8659-4A2D-A8EC-075EEAA5BDD7.jpeg
3856C84E-7B67-4D53-AF07-0DB79CB49DF8.jpeg

So the battery is 4 levels and I’ve got the first 2 levels connected and working on connecting the third level now. Bending these copper busbar’s needs to be very accurate to ensure good surface contact. 65C67D86-5F26-4B5A-8D4D-BD5EE5B63033.jpeg
6F266ED8-E8AA-48E5-A01F-D3E713BC7D8B.jpeg

I made paper templates out of the busbar shape to figure out where to bend.
F2AE4D7B-9FD6-45B1-AD87-C5BCDB352D59.jpeg

Then for this busbar because the way I had to bend it, it needed supports under the busbar as you can see in the pic.
60D43208-9B8A-4525-A583-959EB6246009.jpeg
Glued each one of these into place
58C141B8-3EF7-416E-B114-7BB9307EC187.jpeg

Then I used FR4 board to reinforce around the edges. All of the edges of the battery that comes in direct contact with the battery case, will have extra reinforcement to prevent those cheap cell holders from breaking.
7EC9D953-59D9-4A94-BF37-D24D7723105C.jpeg

Here’s the bottom, two levels connected.
3212F0B3-4225-4FEF-9088-8A340612B28E.jpeg
Put extra insulation/FR4 to protect the battery cells from the connecting bolts.
1378B199-F1FF-40C6-B63F-B092B16A9E6C.jpeg

the bottom two levels connected in the bike and I’m working on the third level connection now as you can see from the paper template on top.
2D2C0F1B-BE8F-41BD-9A4E-C1CA19F597B1.jpeg

This inner layer of the battery case being ABS plastic is just to seal off the battery. They will be another carbon fiber layer to protect from impacts. There will also be some metal shields in certain areas. The goal is to make this battery indestructible from impacts.
 

Attachments

  • 6F498E93-FA6F-4C84-9B9E-6B3E77CEE30B.jpeg
    6F498E93-FA6F-4C84-9B9E-6B3E77CEE30B.jpeg
    1.5 MB · Views: 3
Working on the 3rd level of the battery this evening. Had to glue those little supports just like the 2nd level as you can see in the pic.
E0F6BE1D-435C-40CB-AC27-4D52FD265B6A.jpeg
EBBF7216-7881-40B3-B0FC-F0E4EAC8A78B.jpeg
With these wellgo busbars the welding part dips down below the copper bars.
C41ECFD3-0429-4B34-A4A2-2AFCA638CA1D.jpeg

so it relies sitting on top of cell spacers to support the actual copper busbar.

after gluing those little spacer/supports, have to file them down to size to ensure good contact between the welding material and the positive terminal on the cell.
8606D1A5-29C4-4BCE-8E2D-333023AC3E77.jpeg

Here you can see in the pic the welding material is almost touching the + battery terminal, need to keep filling a bit more.
78C8A273-EA0F-472B-98EF-9DC38BF96DEB.jpeg


There’s probably lots of details I’m leaving out as it’s hard to remember all these tedious steps.

As mentioned in my last post, I added this reinforcement to edge the battery where it comes in direct contact with the battery case to add strength. Now I’m considering reinforcing each level like this 👇
FA49A33F-546D-47D3-8D1F-F07EE7152319.jpeg
 
Last edited:
Well decided to reinforce all 4 levels. reinforced the bottom 3 levels so far. As you can see in the pic, I used FR4 board and cut into strips then used dp420 epoxy to hold everything together. I left a gaps in the middle to allow air to pass through. The battery levels feel much stronger now and there’s zero flex. 96512CFA-5F95-406E-ACF7-873D2026EDE8.jpeg

I haven’t connected the third level yet, as I still need to bend the busbars.

As you can see in the picture, I added an extra thick FR4 board under the 3rd level which is right in the middle of the battery, this will help support the weight. Still need to cut the FR4 board to size.
4CE98A87-93E8-4A4C-A8E3-C38457B72157.jpeg

think I used enough epoxy on this one edge? Lol
This edge is super reinforced as it comes in direct contact with the battery case. It’s also on the front so makes it vulnerable for impact. That’s one of the areas that I will have a metal shield covering the battery.
196C01A9-3D39-4EB0-9A27-995739D2C786.jpeg
EF5D58AE-4970-410A-88F0-C3A5C0F2434A.jpeg
 
Beautiful battery, and one more level to go. Like a wedding cake.🎂
Do you have any links to where your copper buses came from?
 
Beautiful battery, and one more level to go. Like a wedding cake.🎂
Do you have any links to where your copper buses came from?

Thanks!

Haha that’s true, like a cake 🎂
A very powerful cake lol

Yes, here’s a link to Ken’s store. Ken is really easy to work with, just pm him on Alibaba.

 
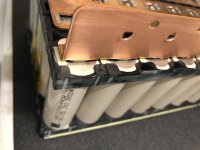
So I decided to beef up my motor mounts by welding it to the bottom of the battery tray. Also, being that I originally purchased these motor mounts they drilled the holes way too big for the connecting bolts so I’ve welded an additional plate to strengen up that area, but it also helps connect the battery tray to the motor mounts.

This image is before adding the additional plate for reinforcement. You can see the hole was drilled way too big in the motor mounts. I guess they did that so it fits multiple bikes, but would’ve much preferred to drill my own holes.
245D107D-DA1E-4CE6-B1FD-E8BEAA28F8FC.jpeg

So will add these plates to reinforce.
BF7F3E72-458B-49DA-855D-0981C79BB109.jpeg
F8EAFB29-A9CB-4BD7-9C14-FBBFCD4A28B9.jpeg

Then here’s the plate connected with the bolt, but not welded at this point.
73468A8C-BBF4-46AC-95B9-B17A63171F3D.jpeg

Here’s the motor mount without the bracket as you can see it’s just way too big of a hole.
5B6EA98E-9551-48F3-9BED-C27B5C489F62.jpeg

Here’s everything, prepped and ready to weld!
8D654FE2-E1AF-401E-B5B1-1F6BAA1E725A.jpeg
Here’s a close-up you can see I left a little shoulder sticking out so I could build up the Weld bead 💪
55D5B1B8-6809-4563-A997-D750BEB76F16.jpeg

Here’s everything welded together!
57257BB1-CBEF-42D3-BFF6-8CDCB389F7A5.jpeg
Not perfect welding, but should hold up just fine
AC800F32-3887-4553-80F7-2BB40B6DCB0B.jpeg
Here’s the reinforcement plate welded.
83E59F5A-71E2-4A6D-8B75-F04A4FEA1BD2.jpeg

This was actually my very first stick welding job I’ve done. I’ve used Mig once back in the day for auto bodywork but Man is there a learning curve with trying to arc weld/stick weld. Had to practice for several hours before I could figure out how to maintain the arc. So thankful for YouTube welding videos!

Oh, here’s a pic of my cheap welding set up. You can get this stick welder on Amazon for about 100 bucks not bad at all. It also does lift TIG. Comes with a power adapter you can plug into 110 V outlet.
9C4ACC35-D744-499E-8E0C-AA721DE87C11.jpeg

But yeah, I went this route just because it was cheap. I don’t feel like spending to much money on a true welding set up with gas.

Had to pause on the battery assembly because the battery is pretty much being built into the Bike so needed to make sure that these motor mounts were beefed up enough since a lot of the weight will be sitting directly on top of the motor. Lots of thoughts and planning in this build.

Up Next I will weld some angle iron around the bottom of the battery tray.
4ADCA08A-9EB2-4D88-92EF-666718BCC51D.jpeg
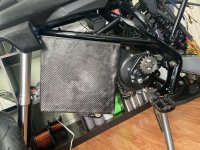
That’ll give me connecting points so I can build a shield around the battery. Originally I was going to go with metal shield, but I might end up using carbon fiber sheets that are premade. They come 5 mm thick which should be strong enough for impacts. The carbon fiber would look a lot better than a metal shield because the metals gonna scratch every time you hit a rock so the carbon fiber might be the best solution, still brainstorming on ideas, but I’m not to that exact step yet.
 
Last edited:
I'm gonna go with polycarbonate on mine eventually. You're making a nice clean battery. Interested in showing it off?

Haven’t made much progress on the battery since the last update except reinforced the final 4th level with FR4 board and lots of epoxy. Still need to connect the 3rd level but once I do so, won’t be able to pull the battery out of the bike. That’s why I had to pause on the battery assembly to fix/reinforce these motor mounts first. Also, still in the process of notching the frame so that’s holding up the battery assembly as well. Every time I try to work on the battery, I then realize something else needs to be done first lol. It’s never ending! 🤠

Hopefully I can get this piece finished today and welded, Still trying to figure out the exact size.
D449CDE8-2174-4ACD-9EAE-E20335A3ED90.jpeg
 
Haven’t made much progress on the battery since the last update except reinforced the final 4th level with FR4 board and lots of epoxy. Still need to connect the 3rd level but once I do so, won’t be able to pull the battery out of the bike. That’s why I had to pause on the battery assembly to fix/reinforce these motor mounts first. Also, still in the process of notching the frame so that’s holding up the battery assembly as well. Every time I try to work on the battery, I then realize something else needs to be done first lol. It’s never ending! 🤠

Hopefully I can get this piece finished today and welded, Still trying to figure out the exact size.
View attachment 347753
I just mean, you had mentioned that you were thinking about carbon fiber for the sides rather than metal. But what about polycarbonate? It'd be clear, and you'd be showing off your good work.
 
Or polycarbonate then carbon. Or better yet polycarbonate then black kevlar
This doesn’t have the nicest finish and should’ve done it in stages instead of trying to wrap it going different directions without letting material underneath that’s pulled a different direction cure first

Polycarbonate is very cheap unless u get them to build the box for u.

Sand the corners down so the fabric doesn’t have a sharp bend.
 

Attachments

  • image.jpg
    image.jpg
    3.9 MB · Views: 15
I just mean, you had mentioned that you were thinking about carbon fiber for the sides rather than metal. But what about polycarbonate? It'd be clear, and you'd be showing off your good work.

Oh, well would consider that for something on the street. With this build, the clear plastic would be cloudy after the first ride from mud, grit sand, etc…
I would like to build a drag bike in the future, and would definitely consider having some part of the battery viewable with using polycarbonate or something.
 
This doesn’t have the nicest finish and should’ve done it in stages instead of trying to wrap it going different directions without letting material underneath that’s pulled a different direction cure first

It still looks good 👍

I plan to use these premade carbon fiber sheets. This particular one comes in 6 mm thick, should be strong. I’ll have to order a scrap piece to do some impact testing. I’m planning to rivet these carbon fiber sheets into place so that they can be replaced once they get too scratched up or damaged.
riveting carbon plates I’ve never even heard of. I think going forward my solution to every battery-building obstacle will be polycarbonate wrapped in carbon then kevlar, then winch straps.
U can see I glued the motor to the pedal beam w carbon. It’s partially matte from peel ply I used to squeeze it into the motor grooves

What cogs are you using for the qs138?


What top speed?

I’m so impatient and blew up my cl700 and waiting for another in the mail. First a copper whisker got in the 26-pin plug.. then I let the 26 pin wire slip out n slap a phase wire and I saw it’s ghost.
 

Attachments

  • image.jpg
    image.jpg
    2.5 MB · Views: 10
Last edited:
My apologies if you've mentioned it before, I searched. Can I ask what thickness copper you ended up using for the battery plates and what is your pack peak current?
Thanks
 
riveting carbon plates I’ve never even heard of. I think going forward my solution to every battery-building obstacle will be polycarbonate wrapped in carbon then kevlar, then winch straps.
U can see I glued the motor to the pedal beam w carbon. It’s partially matte from peel ply I used to squeeze it into the motor grooves

What cogs are you using for the qs138?


What top speed?

I’m so impatient and blew up my cl700 and waiting for another in the mail. First a copper whisker got in the 26-pin plug.. then I let the 26 pin wire slip out n slap a phase wire and I saw it’s ghost.

Yeah, you can pretty much rivet any type of flat paneling. I’ll just need to be super careful when drilling the holes through the carbon fiber. I may use some steel washers on the backside of the fiber to help prevent the rivet pulling through the carbon fiber.

Front sprocket is 13T and rear is 50T with 520 chain.

Not sure on the top speed it’s not too much of a concern since trail riding is typically at slower speeds. When I did testing with a 72 V battery and my 200 amp sabvoton controller, the top speed was around 47 mph. Now that I will have 28S should have better TopSpeed, although I hardly ever use it with this build.

Dang, I hate to hear you blew up your CL 700! I’m sure it’ll be worth it once you get everything set up with that proper controller.
 
My apologies if you've mentioned it before, I searched. Can I ask what thickness copper you ended up using for the battery plates and what is your pack peak current?
Thanks

Yeah, no worries! The copper busbars are 1 mm thick. The battery has a max continuous rating at 495amps. Although I’ll never take it that high maybe if I’m drag racing I may take it up to 450a but just for a very short period. Most of the time I’m guessing to be using around 200a but I won’t really know until I can get a feel for the bike.
 
Well, pretty much finished with this piece. Now need to make another one for the other side 😅
That one piece took several hours, mainly grinding and filing to get it smooth. Once I make the other side, I will then weld these to the bottom of the battery tray. It weighs 0.6lbs
59D505CC-1D12-42DD-8A17-91FF8B2D6D8F.jpeg
5B547D56-B159-4595-B401-AB836F9D3E3D.jpeg7C54E0E6-3BD9-47D6-9763-9BBF7F623F6C.jpeg
 
Got both sides made. Still need to weld these to the battery tray then paint. Been so busy with work, Haven’t had time to get this finished.
C0E92430-62DE-45CC-8450-DFFE816A3AC8.jpeg

Received the carbon fiber shields for the battery. Excellent quality! I can’t believe how incredibly hard these sheets are! I haven’t worked with too much carbon fiber in the past normally just ABS plastic. Went with 3mm.
656AB9A0-9883-47BC-88DD-CF0D90A6EC9C.jpeg
401DC2EF-0888-4A40-BA04-C3F07CA52FCF.jpeg


A lot of this will be cut away as the shields will be the identical shape of the battery. I’m guessing maybe 2.5 pounds max once everything is cut to size.
91F30BE6-BE5E-4C98-87A2-85401E31463D.jpeg
To be clear, the actual battery case is made out of ABS plastic lined with rubber insulation on the inside. These carbon fiber “shields" will actually not touch the battery. They’ll be a small gap between the actual battery case and the fiber shields. This way, the battery case itself will never take impacts. The main concern are rocks and boulders with Enduro trails. These fiber shields will be riveted to the bottom battery tray, and then bolted to a factory mounting hole at the top of the frame so it makes it super secure. Anytime a shield gets hit, It has the strength of the frame supporting it. This will make more sense as I make progress and post pictures.
 
Last edited:
Had to clean up these bottom rails from taking the motor in and out so many times. Plus, I had to cut off a little factory mounting bracket that was in the way of the battery tray. The paint is an exact match to the existing powder coat.
62558CD0-678E-4A9F-8CEB-6F6870961139.jpeg81B2ACE6-C64F-467C-8315-7D74A9AECEA0.jpeg

In this picture, you can see where I had to cut a bracket off the frame. You can also see the end pieces are now welded to the battery tray
A4DFDFF9-4498-4779-B30D-2519E506A566.jpeg


Looks way better!
CA474AD1-EED3-4CCA-9C79-C10184681B29.jpegA04FD0BE-5D84-43CB-A72E-73719AC07E66.jpeg

I’ll post pictures of the battery tray soon. I’m finally getting the hang of stick welding! I got some really solid welds on this battery tray top and bottom. I have so much time and hard work into this battery tray, i’m not a professional fabricator by any means so it takes me a lot longer, but my aim is to produce perfection.

Here’s a pic of some of welds, they’re not perfect but strong, yes!
56C88ECA-EE2D-4FE2-95BB-F9A29DE2BD3C.png
 
One word - wow!
nice job on welding, post a pic of the welder close up pls when you have a min, which rod did you use?

I can't over how fancy those copper bus bars look? how did the bend the bus bar so cleanly?
 
I’ll post pictures of the battery tray soon. I’m finally getting the hang of stick welding! I got some really solid welds on this battery tray top and bottom. I have so much time and hard work into this battery tray, i’m not a professional fabricator by any means so it takes me a lot longer, but my aim is to produce perfection.
Nice work mate.
Just one little suggestion: leave a hole in the battery tray on the side where the bike leans when it's parked. Otherwise water might stay there and either rust the tray or find its way inside the battery.
 
One word - wow!
nice job on welding, post a pic of the welder close up pls when you have a min, which rod did you use?

I can't over how fancy those copper bus bars look? how did the bend the bus bar so cleanly?

Thanks
Here’s the welder, 100bucks on Amazon. It’s a stick welder, but also supports lift Tig.
For the rods, I tried all the different ones and I like the 7018 the best. Welded at 90amps with 1/8” rods/electrodes.
DC6D6354-D1DF-4B82-94AB-5FED9F3E73A3.jpeg
7031BD52-DEDD-4CA6-8D3A-BD6D3CC317A1.jpeg

Yeah the copper busbars look really clean 👍. Hope they perform as good as they look lol.

Then for bending the busbars, I used a break bend, there’s some pictures a couple pages back.

Nice work mate.
Just one little suggestion: leave a hole in the battery tray on the side where the bike leans when it's parked. Otherwise water might stay there and either rust the tray or find its way inside the battery.

Thanks mate
Yes, I have been planning on drilling a few small drain holes In the lowest part of the battery tray. I’ve went a step further and filled any cracks and crevices with epoxy, so that water can’t puddle up anywhere in the battery tray. Plan to post pictures of that soon once I get it finished and painted.
 
Eastwood, found the bending post and found the welder on amazon, Danke!

Battery tray:
You could also add strips of 2mm or 3mm rubber, which will keep the battery raised above any moisture on the bottom and absorb some shock too.
 
Back
Top