Using the Wangdd22 1500W 30A DC Boost Converter on an ebike

I had several opportunities to test out the Wang and it did make a difference, particularly in top speed. Acceleration not very different but 52 volts instead of 36 raises top speed by about 5 mph. Not bad for about 35 bucks.
otherDoc
 
docnjoj said:
I had several opportunities to test out the Wang and it did make a difference, particularly in top speed. Acceleration not very different but 52 volts instead of 36 raises top speed by about 5 mph. Not bad for about 35 bucks.
otherDoc

You could wire it with plugs so that you could bypass it and run at lower voltage in case of failure or if you want maximum efficiency. I'm thinking about getting a 36/48 volt controller so that I can do that.
 
I have to raise the amps screw to see if I get better acceleration. I really don't need a higher top speed.
otherDoc
 
I have an ammeter and a wattmeter but it is getting too hot to ride here. Gotta wait for cooler weather.
Thanks
otherDoc
 
docnjoj said:
I have an ammeter and a wattmeter but it is getting too hot to ride here. Gotta wait for cooler weather.
Thanks
otherDoc

Too hot to ride?!?! Riding an ebike provides a natural wind that acts like inexpensive air conditioning. :^)

I was born in Phoenix, so I guess I just don't mind the heat on a bicycle.
 
Well that is 'cause Phoenix has that "dry heat"! Here in the South, the heat comes with humidity, and the only place to survive this is in a pool! That is my story and I'm sticking to it!
otherDoc
 
So, my current bike configuration has a total of 8 36v 4.4 amp Samsung "hoverboard" battery packs. Theoretically, that gives me about 1250 watt hours of storage and a range of around 60 miles assuming a 20 wh/mi consumption - longer if I ride more conservatively. But 20 wh/mi should let me ride at a typical speed of about 20 mph or a bit better. I've been thinking about taking a long range trip or two and was thinking that splitting the day into a morning and afternoon ride (with a pause to charge in the middle )might make sense. So I've been thinking about a ride from Fountain Hills to Payson and back as a test of that theory. But Payson is about 68 miles from Fountain Hills and it is up hill. So my current battery is not enough.

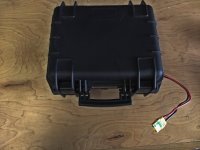
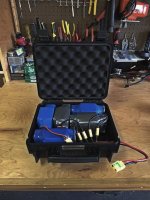
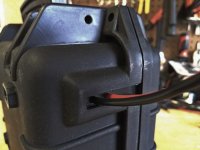
So I put together this five pack battery and may do a test run this weekend. All I've done is the wiring, I haven't cushioned the batteries yet. This will add almost 800 watt hours for a total of around 2000 watt hours and a theoretical range of about 100 miles at 100 wh/mi. As a practical matter though, I think it wise to assume that only about 80% of the nominal storage is actually available. So this should give me about 80 miles range without much worry.

I don't plan on mounting this battery. I'll probably just sit it in the milk crate on the back rack. It weighs about 13 lbs.

AuxBatt_sm.jpg
AuxBatt3_sm.jpg
AuxBatt2_sm.jpg
 
So Saturday I tipped my bike over while unlocking from a bike rack. It appeared to bend the derailer or hanger, so I partially bent it back into position and rode home with a marginally functioning rear derailer. Checked things out on Sunday and saw that the derailer was fine but the hanger was bent. Of course it snapped in two while trying to bend it back straight. I suppose that's better than killing a derailer. OTOH, it is ridiculous that a replacement hanger costs $20 but even more ridiculous is that these things aren't a LOT more generic. I don't see why we need hundreds of designs. I was lucky that the LBS had two (slightly different thickness) replacements.

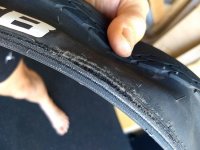
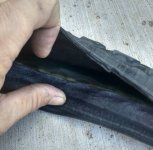
While I was replacing the hanger, I notice that what I though was a minor issue to watch with my rear tire was not minor at all. The sidewall of my WTB Slick 1.85 tires was separating where it seams up to the wire bead. The identical front tire of almost the same age is fine. I don't know if this is something I can fault WTB on though. I stuff it with a combination of tube, protection strip, and an old tire. So maybe having all that stuff in there stresses the sidewall unduly? Or maybe it is just all the stress of being the rear tire on my very rear heavy ebike that did it in. Also, I notice that the tire was full of rubber particles. Apparently my layered inner tube creates some friction and causes some grinding of the rubber. But all that is happening away from the wire bead and seam.
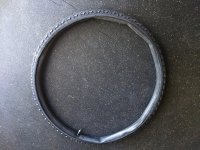
Anyway, these two photos show the layers and the combined "inner tube" I'm using. I went 2600 miles on this combo and no flats. Also, the WTB tread is doing fine. I surely would have lasted at least to 5000 miles.
IMG_20190605_070020509_SM.jpg
IMG_20190604_070522117_SM.jpgIMG_20190604_070449365_HDR_SM.jpg

I replaced the tire with a Bontrager 26 x 2.0 because that's the best that the LBS had. While it seems to give my inner tube combo more space to live, it doesn't have a puncture resistant casing like the WTB Slick did. We'll see how well it lasts.
 
I've mentioned before that I've been using paraffin wax to lubricate my chains. I love how they stay clean. Anyway, I removed the chain whild checking on the derailer and hanger. I used those missing links and I just grab the chain and press in so that the plates slide to the larger hole allowing the side plates to release. On a normally lubed bike chain, my hands would be a black mess. This is how dirty my hands were after that.
IMG_20190602_073343755_SM.jpg

The chain isn't perfectly clean and your hands do pick up some dirt. But it isn't very messy at all. This is one hand after having grabbed a chain that has been on the bike for about 1000 miles and pushing on the "missing link." All you feel on your hands is a bit of wax and maybe a little grit. After wiping my hands with a dry paper towel, they are almost perfectly clean.

IMG_20190602_073414261_SM.jpg

Anyway, I'll continue to lube my chains this way. I rotate three chains, swapping them out and measuring them every 1500 miles or so. I keep one spare on the bike and one at home. Heating up paraffin is certainly more trouble than squirting oil on a chain. But I just take the most recently removed chain and get it re-lubed in the background of other stuff. I really like having chains that don't make nasty messes.
 
I could see the extra material inside the tire causing problems, but I don't have nearly as many miles racked up as you so far. Very nice with the wax for a lubricant!
 
Maybe it's cuz I use cheap tires, but I've never seen a bead sewn to a tire casing--they've all been molded as one piece.

I *have* had beads separate, but it's almost always from low pressure, and often from some kind of pinch damage.

Except on Kenda tires, which have sidewalls that delaminate the rubber from the cloth, and hten the cloth shears thru usually somewhere near the bead, either from braking torque on the front, or pedal torque in the rear. (this was before I started using motors--after that I had problems from acceleration torque wherever the motor was).


Regarding "extra material" inside the tire...I have done the same thing as Wturber, with no issues (as long as the wire bead is removed from the inner tire).

Nowadays I use old thickwall innertubes with their valvestems cutoff and slit along the inner circumference, to enclose the "actual" innertube. Have used up to two, plus a protective plastic strip between them, with no issues (the extra tube layers prevent the strip from doing any of the damage it can do to an inflated tube wiggling around over time).

Anyway, "extra" stuff in the tire hasn't caused any sidewall or bead damage on my rides or trailers.
 
amberwolf said:
Maybe it's cuz I use cheap tires, but I've never seen a bead sewn to a tire casing--they've all been molded as one piece.

It isn't sewn. So maybe "seam" isn't the best term. But the problem seems to originate near this juncture.

amberwolf said:
Except on Kenda tires, which have sidewalls that delaminate the rubber from the cloth, and hten the cloth shears thru usually somewhere near the bead, either from braking torque on the front, or pedal torque in the rear. (this was before I started using motors--after that I had problems from acceleration torque wherever the motor was).

This sound much closer to what I'm observing. Note that the front tire is identical but is not showing any of this kind of distress. But it sees a lot less weight, but probably more torque stress (intensity max, not frequency or duration) from braking. Also, these tires have a fairly thin sidewall.

amberwolf said:
Regarding "extra material" inside the tire...I have done the same thing as Wturber, with no issues (as long as the wire bead is removed from the inner tire).

Nowadays I use old thickwall innertubes with their valvestems cutoff and slit along the inner circumference, to enclose the "actual" innertube. Have used up to two, plus a protective plastic strip between them, with no issues (the extra tube layers prevent the strip from doing any of the damage it can do to an inflated tube wiggling around over time).

Anyway, "extra" stuff in the tire hasn't caused any sidewall or bead damage on my rides or trailers.

The only odd thing that I can directly attribute to the "tire in a tire" is the rubber particles - and I could see no evidence that any harm was being done. They appear to be a result of the inner tire rubbing against the inner casing. And I think the "knobs" on the inner tire are being abraded by the texture of the outer tire casing.
 
wturber said:
The only odd thing that I can directly attribute to the "tire in a tire" is the rubber particles - and I could see no evidence that any harm was being done. They appear to be a result of the inner tire rubbing against the inner casing. And I think the "knobs" on the inner tire are being abraded by the texture of the outer tire casing.

Talcum powder will help with that. (also keeps from ripping a tube when taking it out to patch it if you do get a flat...but can make it a little harder to scrape clean to apply the patch.)
 
amberwolf said:
Talcum powder will help with that. (also keeps from ripping a tube when taking it out to patch it if you do get a flat...but can make it a little harder to scrape clean to apply the patch.)

I'm not sure if I used talc when I put the the WTB on the rim, but I used loads of it when I put the new tire on the rim this time.
 
If you used talc, there will be sparkly bits in the rubber surfaces somewhere (kinda pearlescent) in sunlight, at least in all the ones I've opened up afterwards. OFten it will also feel "slick" or "smooth" rather than "rubbery".
 
Hi all,

I'm planning to buy something similar..
Anyone have guide on the adjustment?

1. Can I set battery low voltage adjusment to most minimum (8V) and let the BMS handle the under voltage cutoff?
2. How does the current output adjustment works? what is the pro/cons of turning the potentio to the max?

I'm not sure what to do about the statement below?
Note: When using battery, switching power supply, solar panel, or generator as input power, please it is necessary to decrease the battery protection voltage value. Otherwise it will cause damage to the battery and the power supply.
 
Why do you want to use a boost converter?

Yes, you can set the low voltage to something below the BMS low voltage cuttoff. I used three 9volt batteries in series to get a cutoff of around 29 volts.

I've experienced no problems letting the boost converter output its maximum current. However I did have to adjust my motor controller not to draw its maximum current. If I did not, the voltage would sag under maximum loads and the controller would shut down for a few seconds. That was the major tweak I had to get right in order to get reliable functioning.

Isn't that warning the same as your question 1? Set it to a value so that you can't over-discharge your batteries. This will be especially important if your batteries don't have a BMS.

Here is a link to the instructions for making adjustments to my boost converter.
https://endless-sphere.com/forums/viewtopic.php?f=2&t=90369&start=50#p1337830
 
Keep in mind also that most ebike batteries' BMS units use a very very low LVC, right down at the cells' spec sheet minimum. This is because a BMS is a last ditch line of defense against damaging a battery or causing a fire, and it's why controller LVCs use a much higher LVC. (for instance, a BMS may use a 2.8v per cell LVC, while a controller may use a 3.0v to 3.2v per cell LVC).

So when you set the converter's LVC, I'd recommend setting it to a value that is 3.2v times the number of series cells in your pack. 3.0v times that number if you really *have* to get that extra bit out of the pack...but 3.2v may be a lot easier on the cells, and give a longer lifespan.
 
amberwolf said:
Keep in mind also that most ebike batteries' BMS units use a very very low LVC, right down at the cells' spec sheet minimum. This is because a BMS is a last ditch line of defense against damaging a battery or causing a fire, and it's why controller LVCs use a much higher LVC. (for instance, a BMS may use a 2.8v per cell LVC, while a controller may use a 3.0v to 3.2v per cell LVC).

Maybe. I figured that the controller uses a higher voltage per cell because they must generalize since they can't know ahead of time what your particular cell spec actually is. Someone designing a battery is, however, in a great position to know what cells are being put in the battery.

amberwolf said:
So when you set the converter's LVC, I'd recommend setting it to a value that is 3.2v times the number of series cells in your pack. 3.0v times that number if you really *have* to get that extra bit out of the pack...but 3.2v may be a lot easier on the cells, and give a longer lifespan.

That is certainly a safe approach and it isn't as though you are going to lose much cell capacity. Most cells have a very steep voltage drop after about 3.3 volts or so even if their actual safe cuttoff is as low a 2.75 volts - as is the case with the LG-MF1 cells that I have. It is worth keeping in mind that the boost converter's LVC must take the place of the motor controller's LVC since the motor controller's LVC is blinded by the boosted voltage from the converter. So setting it to the same or similar value makes sense.

I've only once run my batteries so low that the BMS kicked in and shut them down. That was before I was monitoring volts, amps and watts on my handlebars and was at the end of a 50 mile ride. And for me, regular monitoring while riding is the main line of defense and partly why I don't worry that much about the booster's LVC. I always have a pretty good idea of my battery's charge level. The other reason is that I know that battery voltage sags under load and that the LVC will probably get invoked at around a tenth of a volt or more higher than what you have set. One of the big tricks if don't happen to have a variable voltage supply handy is actually getting a reference voltage that is at the level you want that you can use to set the LVC .
 
wturber said:
amberwolf said:
Keep in mind also that most ebike batteries' BMS units use a very very low LVC, right down at the cells' spec sheet minimum. This is because a BMS is a last ditch line of defense against damaging a battery or causing a fire, and it's why controller LVCs use a much higher LVC. (for instance, a BMS may use a 2.8v per cell LVC, while a controller may use a 3.0v to 3.2v per cell LVC).

Maybe. I figured that the controller uses a higher voltage per cell because they must generalize since they can't know ahead of time what your particular cell spec actually is.
Actually, they can, because the common cells have, within a tenth of a volt or less, the same cutoffs, regardless of brand and model. So the same 3.0 to 3.2v LVC works for all of them just as well, to protect them against overdischarge, or running them all down really far every time, while leaving enough overhead that if you have an unprotected (no BMS) pack that is not well balanced, it's not as likely to overdischarge any particular cell

Someone designing a battery is, however, in a great position to know what cells are being put in the battery.
Yes, but that doesn't mean they care, or understand, or actually know more than the very basics of what the cell spec sheet says (whcih is not the whole story of limits when building a pack). Many probably do, but some don't. Just like pack builders here on ES, with this whole site as a resource, often still prefer to run their cells at the max the cell spec sheet allows for both current and capacity / voltage....

Also, most (especially cheap and commonly available) ebike BMS are designed to cut off at the very lowest the common Li cells can be run down to, about 2.8v, which is harder on them to do every time, vs a higher level like 3.0 to 3.2v. That's really a pretty fine cutoff point, when looking at a cell's spec sheet's discharge curve, and vs the lifespan of keeping a cell within a narrower voltage range (though the high end being high is harder on the cell than the low end being low, they can both affect it).
 
thundercamel said:
wturber, did you notice any difference in range (drag) after the statorade was added to your hub?

Nope. I filled it per Justin's test recommendations that try to find the best compromise between a good cooling effect and increased drag. I haven't noticed any practical difference. It is there only as insurance for going up hills in the summer. Tire inflation differences dwarf anything I can notice with Statorade.
 
Thanks! I put statorade in all three of my hub motors, since they don't have an internal thermocouple. I did 10mL in both of my 35mm motors, and 8mL in the 25mm StefEbike motor. It's a bit higher than recommended, but I did look at the graphs, and wanted the insurance at higher speeds. They felt like a tad more drag to me, but it could be in my head. If both 35mm motors were operational at the time, I should have done a before and after comparison between the two.
 
thundercamel said:
Thanks! I put statorade in all three of my hub motors, since they don't have an internal thermocouple. I did 10mL in both of my 35mm motors, and 8mL in the 25mm StefEbike motor. It's a bit higher than recommended, but I did look at the graphs, and wanted the insurance at higher speeds. They felt like a tad more drag to me, but it could be in my head. If both 35mm motors were operational at the time, I should have done a before and after comparison between the two.

I almost never get to ride on level ground. So it would probably be hard for me to detect any drag since gravity is always such a big factor.
 
Back
Top