
You are using an out of date browser. It may not display this or other websites correctly.
You should upgrade or use an alternative browser.
You should upgrade or use an alternative browser.
crf450r 45kw race bike build
- Thread starter rivvs
- Start date


harrisonpatm
10 kW
- Joined
- Aug 8, 2022
- Messages
- 824
Maybe it's the pic angle, but it looks like there's a lot of spots where the busbars are veeeeery close to shorting. Is that a concern for you?
speedy1984
100 W
- Joined
- Sep 28, 2018
- Messages
- 248
 Agreed they do look very close from this picture anyway.Also not sure about the battery cell configuration,but I'm sure he knows what he's doing
j bjork
1 MW
There are no upper cell holders on the cells in the lower picture, so the cells are probably not in proper position.
The busbars dont look to be in perfect position either.
In the upper picture, were there are upper cell holders it looks better.
The busbars dont look to be in perfect position either.
In the upper picture, were there are upper cell holders it looks better.


Eastwood
100 kW
- Joined
- Jan 13, 2021
- Messages
- 1,479
There are no upper cell holders on the cells in the lower picture, so the cells are probably not in proper position.
The busbars dont look to be in perfect position either.
In the upper picture, were there are upper cell holders it looks better.
Yep I noticed that one side didn’t have cell spacers yet. Also, I’m not sure if they realize that you haven’t spot welded the connections yet, the busbars are just sitting on top of the cells loosely.
speedy1984
100 W
- Joined
- Sep 28, 2018
- Messages
- 248
Yes of course I realized Now the spacer in-between on the other hand is a great idea I didn't see
Now the spacer in-between on the other hand is a great idea I didn't seeharrisonpatm
10 kW
- Joined
- Aug 8, 2022
- Messages
- 824
Oh, so the busbars are kinda like recessed into the cell holders? That's actually rather awesome, do you have an .stl for that?
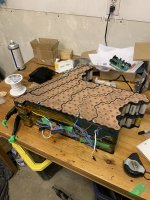
so update The battery box that took 2 month to build is not going to work. It is too close to shorting the busbar and I forgot To make space for the balance wire.....
So I am working on a new battery case. I Took my talaria battery to test the bike. It is 60v and can output 110 amp max.
So I am working on a new battery case. I Took my talaria battery to test the bike. It is 60v and can output 110 amp max.
Update on the build. The new design of the battery case is the center portion is going to be printed and each side will have aluminum plate. I started printing the case but my printer broke again right before leaving for a week for work.... I also started spot welding the battery.
jonescg
100 MW
Beautiful work! And I agree this style of copper-bus, nickel-tab battery is a solid solution.
jonescg
100 MW
I used to build battery packs exclusively using pouch cells, and devised a pretty robust termination system too. But the problem with pouch cells is their propensity to swell, rub, fret and go bad. Plus you're limited to rectangular battery pack shapes. In the end I've moved to 21700 cells, despite their power limitations.At first I wanted to use pouch cell but I could not find a good source for them.
hallkbrdz
100 W
Agreed, although if the Amprius cells actually deliver what they claim and get down to about a 5x price premium over the same capacity of cylindrical NMC cells, pouch it is for me.I used to build battery packs exclusively using pouch cells, and devised a pretty robust termination system too. But the problem with pouch cells is their propensity to swell, rub, fret and go bad. Plus you're limited to rectangular battery pack shapes. In the end I've moved to 21700 cells, despite their power limitations.
Man what a build! This thread is definitely inspiring and has me questioning a few things about my build. Specifically the importance of CS placement relative to the stock location and the viability of pouch cells.
Much to think about. Thanks for the inspo and I hope it rides as well as it looks!
Much to think about. Thanks for the inspo and I hope it rides as well as it looks!
Well another problem occured with the build. I was setting up the bms and there was always 1 or 2 cells that was at 6v instead of 3.6v. turns out this bms need the two slave board to be the same and they can only have 1 cells difference. I have a 12s and a 18s board so it does not work. Also the master board just does not work anymore. The bms tool and vesc tool does not recognize it anymore it say that there is no firmware in the bms. I emailed ennoid and he says it is not possible. I am still waiting on a reply from him for a week. Looks like this bike will not be finished before winter.

Hey this is very interesting
I just read this tread and the one from your last build.
Do you know or have an idea of what happened to your last battery?
Do you think heat is the issue as you said the previous battery reached 37°?
Im also building a battery but i was wodering how do you 'collect' that current from the copper strip to a wire.
Do you have multiple temp sensors or just 1 in the battery?
Update on the build.
I took a long break as I started a new project( 1971 240z restoration) but back on working on the bike now!
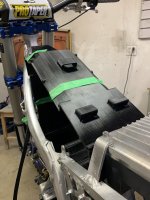
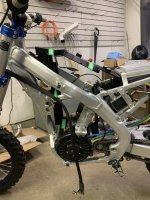
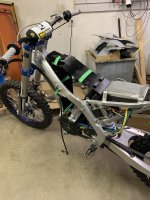
The battery is almost finished I just need to seal it. It almost did not fit the frame I had to grind a little bit.


I took a long break as I started a new project( 1971 240z restoration) but back on working on the bike now!
The battery is almost finished I just need to seal it. It almost did not fit the frame I had to grind a little bit.
Eastwood
100 kW
- Joined
- Jan 13, 2021
- Messages
- 1,479
Update on the build.
I took a long break as I started a new project( 1971 240z restoration) but back on working on the bike now!
The battery is almost finished I just need to seal it. It almost did not fit the frame I had to grind a little bit.
View attachment 346332View attachment 346333
Excellent work! I know you have a lot of time in that battery case as that’s the second case you made right?
I’m in the same position, have to file down the frame in a few spots for battery clearance. I think as long as we don’t remove too much material, it doesn’t weaken the frame by that much. These Japanese aluminum frames are super strong!
Similar threads

- Replies
- 131
- Views
- 5,937
- Replies
- 45
- Views
- 3,791
- Replies
- 174
- Views
- 25,928
- Replies
- 6
- Views
- 2,201
- Replies
- 84
- Views
- 17,149