Ampera/Volt inverter with Lebowski brain

arber333 said:
Strange thing is that if i only reduce resistance R then motor becomes powerfull while still retaining the kick at transition.
However if i also reduce the L value my transition becomes more managable. Not perfect but with L at 120uH and R at 48mohm i get better pullout and quite good power. Car is actually fun even with my limited Kokam battery.

At one point Lebowski was recommending an L/R ratio of 1e-3, I don't think that is still current but the point I am making is that the suggestion at the time was to increase R to achieve that not reduce L. It is established that the controller can not measure stator resistance perfectly so we know we must increase the value of R to get ideal results. So rather than reducing L maybe you could try increasing R to approach the ideal L/R time constant but leave L at its measured value. I find that if you increase R past a certain point the field weakening is affected so it is a matter of "suck it and see" trial and error. Have you reduced menu N) sub h) to the default 1000? I really think 35,000 cycles is not helping.

Are you able to recalibrate the RLS encoder without removing the motor from the car? If so that might be a good idea to see if you can eliminate the large HALL sensor offset.
 
kiwifiat said:
At one point Lebowski was recommending an L/R ratio of 1e-3, I don't think that is still current but the point I am making is that the suggestion at the time was to increase R to achieve that not reduce L. It is established that the controller can not measure stator resistance perfectly so we know we must increase the value of R to get ideal results. So rather than reducing L maybe you could try increasing R to approach the ideal L/R time constant but leave L at its measured value. I find that if you increase R past a certain point the field weakening is affected so it is a matter of "suck it and see" trial and error. Have you reduced menu N) sub h) to the default 1000? I really think 35,000 cycles is not helping.

Are you able to recalibrate the RLS encoder without removing the motor from the car? If so that might be a good idea to see if you can eliminate the large HALL sensor offset.

That will be usefull too thanks.

Yes i reduced 35K to 1K. It seemed good on desk but when in a car and error happens with35K there was a lot more banging under hood than with 1k setting.

Like i said with 120uH and 48mOhm i dont get any hint of a problem at FW.
However i noticed at speed if i put motor in reset in the area of FW it wont recover. So i have to reduce speed to get under FW and then motor will recover good. In driving terms this is like under 90km/h.

I can recalibrate RLS encoder with one wheel up but in forward i allways get confidence 6. While in reverse i can get as high as confidence of 7 on 3 positions. Should i recalibrate in reverse then?
 
I got some time to play with motor settings some more.
So i figured something that is quite obvious, but it diddnt occure to me before.
Lebowski inverter has option to save hall sensor position in case of errors and ovrcurrent events. Also manual position saving is performed for sensor calibration. Every time i would setup my controler Pug would drive good, but after some time performance and precision would degrade.
I went on and calibrated my RLS sensors to like 0.55deg forward and reverse. And again after an hour or so the car would became jumpy and difficult at start.
Then i erased Hall history and effects stopped. I left previous settings in controller.
Now that i knew i just erased hall statistics and in setup i disabled "online saving" parameter in menu Z.
Then i saved it to dsSPIC

From here on driving got effective. I will probably try to calibrate further.
 
arber333 said:
I got some time to play with motor settings some more.
So i figured something that is quite obvious, but it diddnt occure to me before.
Lebowski inverter has option to save hall sensor position in case of errors and ovrcurrent events. Also manual position saving is performed for sensor calibration. Every time i would setup my controler Pug would drive good, but after some time performance and precision would degrade.
I went on and calibrated my RLS sensors to like 0.55deg forward and reverse. And again after an hour or so the car would became jumpy and difficult at start.
Then i erased Hall history and effects stopped. I left previous settings in controller.
Now that i knew i just erased hall statistics and in setup i disabled "online saving" parameter in menu Z.
Then i saved it to dsSPIC

From here on driving got effective. I will probably try to
Have you disabled also the online current sensor calibration ? This one can run away and cause problems after a while, if turned on. This one can be disabled in the currents menu I think, something about current sensor calibration when current under ..A
 
Lebowski said:
Have you disabled also the online current sensor calibration ? This one can run away and cause problems after a while, if turned on. This one can be disabled in the currents menu I think, something about current sensor calibration when current under ..A

Yes! I had to disable both. Online hall sensor data saving and current sensor saving and now i can freeze my data without beeing corupted by my driving habits :).

I think i still need to calibrate RLS sensor further but at least now i can get a normal takeoff.
Let me tell you Bas, this car feels really good at high rpm. I havent had a conk out as you say it at all. And you almost do not notice that motor is in FW.
However if i fool around with setup button above FW speed i cant get the motor back online untill after i go below FW.
I really enjoy driving the car. And that is only with one IGBT side!
 
Lebowski said:
Have you disabled also the online current sensor calibration ? This one can run away and cause problems after a while, if turned on. This one can be disabled in the currents menu I think, something about current sensor calibration when current under ..A

Are you referring to menu o) online Kv, L and R ?
I can't see anything in the current sensor menu unless menu "f) sub b) perform offset measurement" triggers ongoing re-calibration?
I always calibrate current sensor offset simply because I run the DSPIC at ~5.2V as recommended and as a consequence the current sensors will never be sitting at 2.5V at zero current.
 
kiwifiat said:
Are you referring to menu o) online Kv, L and R ?
I can't see anything in the current sensor menu unless menu "f) sub b) perform offset measurement" triggers ongoing re-calibration?
I always calibrate current sensor offset simply because I run the DSPIC at ~5.2V as recommended and as a consequence the current sensors will never be sitting at 2.5V at zero current.

No he meant menu Z where you enable uC to record data from transitions and errors as well as calibration from sensors.
It seems this option can also save erroneous data and makes hall sensor calibration worse after a while.

I have now found out my mistake.
Since i had to install new battery and remodel its mounting i decided it would be a good time to also clean up the hall sensor interface. Before i used 1nF decoupling caps on each signal line. Hall sensors obviously shouldnt be decoupled.
I removed the caps and tried the drive. It felt a little rougher at really slow speed, but motor would start without switching directions as before.
I also changed the throttle curve from 1.3, 1,0 to 0.7,1,0 Bas is correct, i do have more/finer control at slower speed.
I also increased the phase current to 550A and reset DC current limit to 350A. Increase in acceleration is now really evident. So is the wining noise of the motor spooling up under stress :).
 
arber333 said:
No he meant menu Z where you enable uC to record data from transitions and errors as well as calibration from sensors.
It seems this option can also save erroneous data and makes hall sensor calibration worse after a while.

Thanks, I did not realize that option also enabled current sensor calibration while the controller was operating. I can't find anything in the manual about it :?

Great news that you have improved the response in drive mode 2. The fact that Arlo1's CRX can beat a BMW M5 ( A supercar in disguise) in a drag race proves there is nothing lame about the Lebowski controllers torque production.

Where you able to reduce the standard deviation of the error in your Hall signals? Given that each 6 valid HALL codes represent 60 electical degrees having a SD of over 20 degrees which could mean +/- 20 degrees if you recall your high school statistics class is a lot of error for the controller to have to deal with. I thought Arlo1's suggestion about the RLS sensor location not being quite right was a plausible explanation for the large standard deviation you are seeing in your HALL signal error. And that may have nothing to do with your installation but rather the precise location on the sensor elements in the RLS chip or a small offset in the radial magnetization of the sensor magnet.

Recently I doubled the sampling rate in my resolver to HALL converter and I now find that I can leave all the control loops in menu G) at the default settings whereas before changing sub menus e,f, and g made a big difference to running in mode 2. Also in the HALL menu L) I can leave the PLL setting in sub menu e) at the default 100Hz. Did you get around to building up the converter you designed using the resolver chip off the Prius inverter?
 
Ok, now i need to add some additional comments to summarize my use of Lebowski brain.

This weekend i went through the RLS RMF44U, commutation encoder manual here: https://www.rls.si/fileuploader/download/download/?d=0&file=custom%2Fupload%2FData-sheet-Commutation-and-incremental-magnetic-encoder-solutions.pdf

Because i just couldnt capture encoder 0° I decided i need to take apart the encoder and inspect magnet mounting and rest of assembly. Because i needed to do lots of steps quickly and by myself i wasnt able to take pictures.

What i found out...
1. I found my encoder mount had only 2 bolts fixing it to the motor case. What an error! It seems i was in a hurry and put only 2 bolts in to test the assembly and then forgot to close everything for sure.
2. I found that my magnet mount was rubbing on the encoder mount/plate on the inside. Probably because of the incorrect fitting.

I also discovered when i tightened the fittings that magnet mount protrudes just a tiny bit over encoder fitting. I couldnt torqued it more because it came to its stop on the motor shaft, So i took it off and put it in my lathe and shaved about 1mm off of the rear side. I deburred edges and tried to install it. I could set it in ok with a little play.
Sergio Fabris from RLS explained to me that magnet itself is not susceptible to high temperature and can withstand some 600°C before it looses its magnetic properties. But he also explained the optimal gap under the encoder plate is 0.5mm to 1mm. If encoder is too close or too far it would not capture correct sensor position.

Then i went on to calibrate hall sensors and i got good 0° capture with some 3° of deviation. I will need to work on that still.
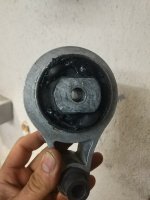
But now i get really good driveoff in reverse. But i still got quite some jolt in the forward direction. That got me thinking my motor mount is to be blamed... It has large holes in its rubber to alleviate vibrations from diesel engine. Electric motor does not oscillate, but rather moves through the whole amplitude. This might move the sealant block center to its edge where it hit the metal edge... bang! Also that move is detrimental to motor position readback.
I took the mount down and filled the holes with some Sika window sealant that is elastic after drying and can withstand a lot of force. After drying off i put the mount back in the car and went for a test run.

Vibration has lessened substantially but that 3rd mount is still too soft for my liking. I think i will order replacement sealant block and push it in the mount.
 
arber333 said:
Then i went on to calibrate hall sensors and i got good 0° capture with some 3° of deviation. I will need to work on that still.

Great news, you found and solved the reason for the crazy high standard deviation in your HALL signals. 3 degrees of SD is pretty good, I am getting ~2 degrees using the original resolver and a converter.

You have one major problem left to resolve. That fact that you are getting loss of sync and have been forced to use Hall assisted sesnsorless is telling you that you have a problem with your current sensor signals. Does you pcb design have 2 or 4 layers? Did you include the RC filtering network on the current sensor feedback signals? How good is your 5V supply bypassing and do you have the decoupling caps as close as physically possible to the 5V supply pins on the DSPIC30F4011? Do you have your 5V supply set at ~5.1-5.2V as recommended? Some food for thought.
 
kiwifiat said:
You have one major problem left to resolve.

Well i went for two longer rides now and i didnt get any loss of sync since i rebuilt the rear of the motor. It seems poor encoder signal was the culprit here also... i will keep track of it the same.

Now that i have everything sorted i feel the magnets at very low speed, like when i am gliding last few cm to a stop. It feels like intermittent regen but i have that limit set to 3000eRPM. Might just be the way IPM handles?
 
Yeah that trembling just before stop is gone now. I just had to recalibrate sensors.
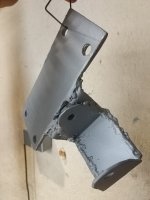
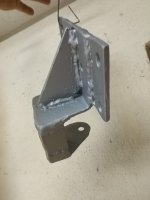
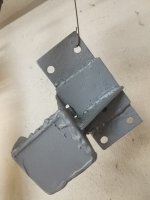
Also i had another problem. All the banging and motor jumping has caused my motor mount to break. It split on the weld seam and was causing terrible noise in my engine bay. I guess 3mm box and my welding skills were not enough to prevent that.
I took One 5mm and cut myself L shape with a brace. It even looks better and more compact now. I welded old fork and new mount together and paint it with Zinc spray.
I finally gave it a coat of black paint and then put it in the car. Now there is no more banging and motor feels really firm.
It also helped i filled up the holes in the mount rubber with Sika rubber.
 

Attachments

  • IMG_20210313_205408.jpg
    IMG_20210313_205408.jpg
    87.9 KB · Views: 773
  • IMG_20210313_205348.jpg
    IMG_20210313_205348.jpg
    77.1 KB · Views: 773
  • IMG_20210313_205337.jpg
    IMG_20210313_205337.jpg
    80.4 KB · Views: 773
  • IMG_20210313_205620.jpg
    IMG_20210313_205620.jpg
    102.2 KB · Views: 773
I had some difficulties while driving. Inverter would reset at speeds, but would resync into speed.
AC relay on the BSI module pulls hard. There is this 12V supply line that goes from BSI to the rear of the car from where i took 12V to supply my DUE and relay logic. It is connected to the AC relay somehow. When AC relay goes OFF this whole line wiggles with transients. This causes my DUE VCU to drop the signal to Enable and Notaus relays. Last one in particular can reset my inverter middrive! Really unpleasant though not dangerous due to excellent reset pickup by Lebowski brain.
To solve the issue I took one wire from my latching relay. This will provide 12V when inverter is ON. I routed it through the firewall to my 12V connection under center console. I reconnected my DUE and from the short drive i took to test it seems AC clutch relay doesnt disturb DUE anymore.
I still hear the AC relay OFF unpleasant burst through the radio, but my new supply line is clean now. :cool:
 
I ressurect this thread to notify anyone interested that i changed setting n) in menu g) from 48 to 16 and it seems i got somewhat better/surer start from 0.
 
I finally had an opportunity to test the amplitude setting menu g) sub h and i.
I had it set as high as 400 / 20 and as low as 10 / 0.5 and i found that last setting is really good for a smooth takeoff and transition to mode 3.
HOWEVER!!! With low amplitude setting at speeds beyond field weakening i.e. 120km/h suddenly it started to shake. I tried to push over and my inverter conked out! I managed a good restart and then tried to repeat this several times. Every time conkout happened!
On higher setting the transition was not really comfortable with shaking on transition.
Did anyone notice similar behaviour?
I guess i will have to rebalance this setting to one that does not conk out.
 
Back
Top