E-bike with lost connection between motor and battery

Cyclomania

10 kW
Joined
May 22, 2022
Messages
516
Location
Northern Europe
Hi

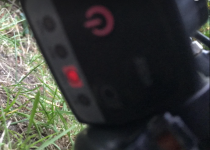
So I have an ebike that has a functioning battery. The 36-volt battery gives current to the display of the ebike. But the connection between the motor and the battery seems to be lost. Why this is happening is a mystery :)

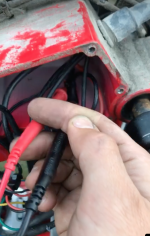
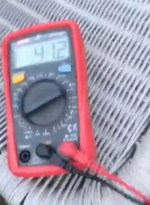
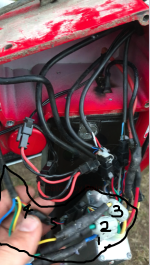
As you can see from the pictures, I have opened up the box below close to the pedals, where the controller sits, and I have measured current there going from the connection, from the inside of the bike's screwed up box. And it seems on the multimeter that the battery is giving current into the controller, since the multimeter is measuring 41-42 volts there, right below where the battery is connected to the bike.

And from here on I would like to get some help. Because looking at the other cables I don't quite know what and how to measure if there is current going into the motor.

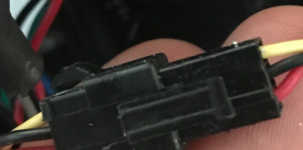
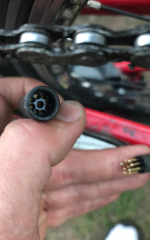
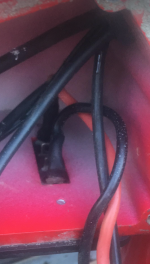
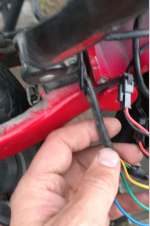
The Julet connector from the motor I am not sure about how to measure. Is it possible to measure plus and minus inside of that with the multimeter somehow? And if so how? There are several little holes in that Julet connector and I don't know what is plus and minus or if that is a possible alternative ?

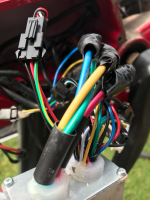
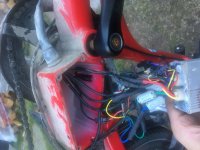
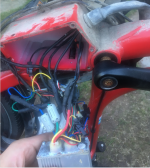
Also, from the controller to the motor there are several cables, with many different colors. And I am not sure how to find the issue going forward. Any suggestions? How do I measure the current(or non existent current) going from the controller to the motor with the multimeter? (If you think that is the problem). And if it could be something else, please let me know.

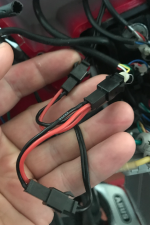
Seems to be around five cables going from the controller to the motor. But only the black and red going into the controller, to give it current. So I am not sure about how to measure current going out of the controller. Or to see if the controller might have some issue inside of it.

Here is a video:

https://www.veed.io/view/03e9d4f0-1b59-4fcf-a52c-fc3df06687b8
 

Attachments

  • Skärmavbild 2022-08-13 kl. 21.45.38.png
    Skärmavbild 2022-08-13 kl. 21.45.38.png
    892.5 KB · Views: 864
  • Skärmavbild 2022-08-13 kl. 21.45.57.png
    Skärmavbild 2022-08-13 kl. 21.45.57.png
    589.2 KB · Views: 864
  • IMG_0755.JPG
    IMG_0755.JPG
    2.2 MB · Views: 861
  • Skärmavbild 2022-08-13 kl. 21.55.28.png
    Skärmavbild 2022-08-13 kl. 21.55.28.png
    404.5 KB · Views: 861
  • Skärmavbild 2022-08-13 kl. 21.53.35.png
    Skärmavbild 2022-08-13 kl. 21.53.35.png
    862.4 KB · Views: 861
  • Skärmavbild 2022-08-13 kl. 21.54.17.png
    Skärmavbild 2022-08-13 kl. 21.54.17.png
    2.3 MB · Views: 861
  • Skärmavbild 2022-08-13 kl. 21.55.15.png
    Skärmavbild 2022-08-13 kl. 21.55.15.png
    1.1 MB · Views: 861
  • Skärmavbild 2022-08-13 kl. 21.58.32.png
    Skärmavbild 2022-08-13 kl. 21.58.32.png
    2.3 MB · Views: 861
  • Skärmavbild 2022-08-13 kl. 22.09.57.png
    Skärmavbild 2022-08-13 kl. 22.09.57.png
    1.1 MB · Views: 853
  • Skärmavbild 2022-08-13 kl. 22.10.07.png
    Skärmavbild 2022-08-13 kl. 22.10.07.png
    867.7 KB · Views: 853
e-beach said:
The OL (no reading) on the axle is good news. It means that you have no short inside your motor (most likley)

Since all your testing seems to read normal, that bike should run unless you have a bad battery connection.

As for changing a mosfet, yes it could be done if you have a 100w soldering iron and good electronics repair technique. It requires disassembly of the controller to access the circuit board. Removing a lot of solder. Unbolting the bad mosfet from the heat sink, removing it and then replacing it. It is not an easy job but it can be done.

Since everything (except maybe the controller) seems to be working, charge the battery, connect everything except the ebrakes, plug it all back together and see what happens. If nothing happens, wiggle the battery connector while pressing the throttle.

Aha good to know. We have tested a lot of different things now. You are probably right. I am going to charge it up like crazy and then test it again. Wiggle around the battery some while gassing the throttle.

Now I have found a place online that sells a controller which I believe is the same one that I have now. Costs about 55 dollars + shipping.

Could be worth it to order one and try it out, instead of this one, when it arrives(on wednesday I assume), don't you think?
Could probably use it on another bike if that is not the issue with this one.
 
e-beach said:
E-HP said:
Off topic question:
I noticed that some bikes, like this one, have what appears to be a choke on each of the three phase conductors.....

I guess the manufacture wanted to stop noise from traveling down the line. Why? I am not sure. Maybe it was cheaper then replacing a noisy controller with a better, more expensive one. Just a guess though.

:D :bolt:

OK, that actually, and sadly, makes sense. They must pay those accountants an extra ten cents an hour, in order to think outside the box of ways to shave those costs down.
:lol:
 
E-driver_ said:

Also, look around on the controller to see if it has a voltage output connector. (small red and black wires) to see if your voltage drops while depressing the throttle.

:D :bolt:
 
e-beach said:
E-driver_ said:

Also, look around on the controller to see if it has a voltage output connector. (small red and black wires) to see if your voltage drops while depressing the throttle.

:D :bolt:

Could it be some of these cables below?
 

Attachments

  • Skärmavbild 2022-08-21 kl. 19.31.07.png
    Skärmavbild 2022-08-21 kl. 19.31.07.png
    314.3 KB · Views: 382
  • Skärmavbild 2022-08-21 kl. 19.31.00.png
    Skärmavbild 2022-08-21 kl. 19.31.00.png
    1.4 MB · Views: 382
I tried to charge it up a lot and turn on the gas throttle. But it still did not work.

I have been thinking though. I think it definitely has to be something to do with the controller. Probably the mosfets that you wrote about, right?

Because I have now tried several different controllers on the 20K OHM-setting. And when I switch between black probe and red probe in all the holes on those other controllers they still show continuity. So despite having red in red and black in color. Or red in black and black in color. Or the other way around. They all show continuity.

But.. When I have the black probe, in the black cable, in the gone-bad-controller and the red in color. Then there is no continuity. But If I do red probe in black cable and black probe in color it shows continuity.

Any idea why this scenario arises? Shouldn't they all show continuity despite which probe is where? I guess it probably indicates something is wrong with the continuity in the controller, but perhaps not completely off? Or what do you think?
 
Can you uses one of the other contorllers to test your bike? Do the voltages match? (36v to 36v or 48v to 48v)?
 
Allow me to offer some suggestions,

>How do you solve a blown mosfet? Is it possible to fix the mosfet in the controller?

https://youtu.be/lTssCn5YyTw (find & replace blown motor controller mosfets)

>Or best to just change controller if that is the case?

It depends on your comfort level at repairing component-level stuff, assuming that the controller is bad. (If you need to ask, the answer is usually 'no'.) But even if you're up to it, having known-good parts to swap stuff out is SOP for troubleshooting.

>Any idea why this scenario arises? Shouldn't they all show continuity despite which probe is where?

Your present practice of "poking probe into holes" is unreliable, which I think contributes to your "sometimes continuity" issue. You need a more certain way to make connections.

For JST connector, remove the pins from the connector, using a paperclip https://goo.gl/search?remove+pin+jst+connector

Also suggest using alligator clip wires for hands-free reading https://walmart.com/c/kp/alligator-clips-with-wire

Secondly, if you want to actually test the motor, motor controller, and associated wiring, you'll need to open them up, rather than putzing around on the outside. Then you can check for continuity on both ends of the wiring harness, as vs poking probes into holes. You can also inspect the insides for any physical or mechanical damage.

Removing the controller from its cover is simple, just a few screws. Opening up the rear hub motor cover is likewise simple, but will first require removing the freewheel or cassette. You need a FR 1.3 freewheel remover, or (for popular makes) a FR 5.2 cassette remover. For stuck freewheel, this vid is helpful (https://youtu.be/KVCOjZ4wCgA)
 
e-beach said:
Can you uses one of the other contorllers to test your bike? Do the voltages match? (36v to 36v or 48v to 48v)?

Yeah they are a bit different. Different rated maximum currents and different connectors. It could work I guess, but it would require either soldering or cutting of a lot of connectors.

(By the way what is you guy's preferred method for getting pins out of the connectors to reinsert them into different looking connectors? Some type of awl/scalpel?).

I have ordered a new controller that is very similar. So I will let you know when it has arrived and try it.
 
e.mote said:
Allow me to offer some suggestions,

>How do you solve a blown mosfet? Is it possible to fix the mosfet in the controller?

https://youtu.be/lTssCn5YyTw (find & replace blown motor controller mosfets)

>Or best to just change controller if that is the case?

It depends on your comfort level at repairing component-level stuff, assuming that the controller is bad. (If you need to ask, the answer is usually 'no'.) But even if you're up to it, having known-good parts to swap stuff out is SOP for troubleshooting.

>Any idea why this scenario arises? Shouldn't they all show continuity despite which probe is where?

Your present practice of "poking probe into holes" is unreliable, which I think contributes to your "sometimes continuity" issue. You need a more certain way to make connections.

For JST connector, remove the pins from the connector, using a paperclip https://goo.gl/search?remove+pin+jst+connector

Also suggest using alligator clip wires for hands-free reading https://walmart.com/c/kp/alligator-clips-with-wire

Secondly, if you want to actually test the motor, motor controller, and associated wiring, you'll need to open them up, rather than putzing around on the outside. Then you can check for continuity on both ends of the wiring harness, as vs poking probes into holes. You can also inspect the insides for any physical or mechanical damage.

Removing the controller from its cover is simple, just a few screws. Opening up the rear hub motor cover is likewise simple, but will first require removing the freewheel or cassette. You need a FR 1.3 freewheel remover, or (for popular makes) a FR 5.2 cassette remover. For stuck freewheel, this vid is helpful (https://youtu.be/KVCOjZ4wCgA)

Aha ok I will order some of those. I am also thinking about opening up the controller in time and try to fix the mosfets which seems to be a probable problem in this case.

But the opening of the controller and learning to fix mosfets will have to wait for a while, but I want to learn that stuff in time.

But first I will see if something happens when I change out the controller.
 
E-driver_ said:
(By the way what is you guy's preferred method for getting pins out of the connectors to reinsert them into different looking connectors? Some type of awl/scalpel?).
If they're different connectors they'll need different pins to match. You'd have to cut the wires and crimp the new correct pins to the wires.
 
E-HP said:
Off topic question:
I noticed that some bikes, like this one, have what appears to be a choke on each of the three phase conductors. My assumption is that the manufacturers wouldn't invest in any components that aren't absolutely necessary, to cut costs. So, are those necessary in certain applications (to control electrical noise, etc.), and why in this case?

A choke, correctly installed (often with at least a loop of the wire it's on around it) will suppress sudden changes in current, like a capacitor does for voltage.

If they have a poor enough controller design to require this, they've really cheaped out on it. Or perhaps they have a motor with such low inductance that it blows controllers up, so they added some by using the chokes instead of using a good enough controller to handle the motor.
 
E-driver_ said:
......
(By the way what is you guy's preferred method for getting pins out of the connectors to reinsert them into different looking connectors? Some type of awl/scalpel?).

I use a flat blade jewelers screwdriver. (precision screw driver)

:D :bolt:
 
e-beach said:
E-driver_ said:
......
(By the way what is you guy's preferred method for getting pins out of the connectors to reinsert them into different looking connectors? Some type of awl/scalpel?).

I use a flat blade jewelers screwdriver. (precision screw driver)

:D :bolt:

Aha

After changing the controller the bike now works. So that was a success.

Only thing that is strange now is that the pedal-assist works really well. But the gas-throttle is very weak.

Any idea why this is? On other bikes the gas-throttle is normally able to drive the bike forward as good as the pedal-assist.

I have tried connecting a different gas throttle, down where it connects to the controller, but I got the same result then. So it is probably not the wire from the gas throttle that is bad.

The connection between controller and gas-throttle looks like the pictures below.
 

Attachments

  • Skärmavbild 2022-08-24 kl. 15.46.12.png
    Skärmavbild 2022-08-24 kl. 15.46.12.png
    1.2 MB · Views: 299
  • Skärmavbild 2022-08-24 kl. 15.46.07.png
    Skärmavbild 2022-08-24 kl. 15.46.07.png
    2 MB · Views: 299
E-driver_ said:
e-beach said:
E-driver_ said:
......
(By the way what is you guy's preferred method for getting pins out of the connectors to reinsert them into different looking connectors? Some type of awl/scalpel?).

I use a flat blade jewelers screwdriver. (precision screw driver)

:D :bolt:

Aha

After changing the controller the bike now works. So that was a success.

Only thing that is strange now is that the pedal-assist works really well. But the gas-throttle is very weak.

Any idea why this is? On other bikes the gas-throttle is normally able to drive the bike forward as good as the pedal-assist.

I have tried connecting a different gas throttle, down where it connects to the controller, but I got the same result then. So it is probably not the wire from the gas throttle that is bad.

The connection between controller and gas-throttle looks like the pictures below.

Never mind this comment. Apparantly this was something that was programmed into the controller that it was only going to give 5 km/h support. I talked to the manufacturer
 
The programing was going to be my next question..

However, like the good news.

:D :bolt:
 
e-beach said:
When measuring the motor for short, make sure the red probe is going to the motor, not the controller.

Also, if your controller's blue phase wire is 0 then while the other's are 9.... your controller may be blown. (bad mosfet)

The question is how did that happen? (how were you riding it at the time?)

I have encountered this on another bike as well. And thanks to this thread I think I know what the problem of that one is as well.

Because I was riding it really hard one time, up a steep hill(with a motorcycle battery of 13 kilos on my back), just because I wanted to check if the bike could take it, like a dumbass.

Then I thought the motor broke down. But that controller also has a reading on one of the mosfets which is really low(close to zero but not dead on the yellow one). I did these tests again on the axle and phase wires and I think they still work.

So most likely the controller right? Now, to the next subject I have a hard time understanding regarding controllers.

And that is the new controller I am going to try on that bike, which has a rated current of 15. While the old one had 13 in rated current. Now, how do I know if this is going to work well? Or hurt the battery? Is there a way to test the battery cells or something?
 
What kills lithium batteries is heat and low voltage.

In other words, if you push your battery pack hard and over heat your battery pack then you have degraded your battery's. Do that enough times and you will shorten the lifespan of your battery pack.

Also, if you let your batteries voltage drop below the manufactures minim low voltage, it will degrade your cells to the point that they may no longer be serviceable.

As for the answer to your question.... To know what your battery pack can handle requires one of two things.

1: Make an inquiry with the manufacture to see if they will tell you maximum amperage draw allowable to that battery pack.

2. Opening it up and seeing what cells are in the pack. If they are known cells, then you might be able to calculate the maximum amp output by understanding the battery type compounded by the number of cells in each cell group.

If they are unknown batteries made by an unknown manufacture then their is no way to decern the specs required for your question.

Simple answer: Don't push your battery pack to the point it gets hot to your touch.

:D :bolt:
 
e-beach said:
Simple answer: Don't push your battery pack to the point it gets hot to your touch.

:D :bolt:

Hmm ok. So just use common sense and don't ride the slopes too freaking hard perhaps?

By the way why is it usually the mosfets that go when going up steep hills? Does it occur some kind of burning in there or do they just melt or give up or what happens physically in there?

Also, is a higher amp controller less likely to burn/blow in the mosfets going up a steep hill, assuming the motor and the battery is the same, or have I got that wrong?
 
E-driver_ said:
By the way why is it usually the mosfets that go when going up steep hills? Does it occur some kind of burning in there or do they just melt or give up or what happens physically in there?
In most cases when FETs fail in high load situations, the silicon in the FETs overheats in a rapid resistance-change / heating cycle once temperature reaches a certain point under load. Sometimes it turns into plasma and explodes the casing of the FET, leaving "burn marks" around the inside of the controller. Sometimes it just turns into a nonfunctional mess inside the FET casing, leaving no visible external sign, usually creating a short across the FET that can "lock up" the motor while they're connected together.


Also, is a higher amp controller less likely to burn/blow in the mosfets going up a steep hill, assuming the motor and the battery is the same, or have I got that wrong?
A controller designed for the actual load your system experiences in a particular situation should survive that situation.

But the motor must be able to handle this load as well, and the battery must be able to supply all that current. If they can't, they'll be damaged or destroyed instead.


You can use the simulator at http://ebikes.ca/tools/simulator.html to play with different setups and scenarios to find out how much power / battery current it really takes to go up your particular hills, after you measure the slopes of the hills, and determine the speed you want to go up them.

Then once you know what you need to do the job, you can buy a motor, controller, and battery that can all handle that kind of load for as long as necessary to do the job you need them to do.
 
Back
Top