
I need some help building a battery. I am trying to find the best way to get a 20s10p pack in this triangle. Look at the picture below. The picture is missing a couple of batteries. Overall there should be 200 batteries
You are using an out of date browser. It may not display this or other websites correctly.
You should upgrade or use an alternative browser.
You should upgrade or use an alternative browser.
Help building battery triangle 20s10p
- Thread starter adam125r4
- Start date
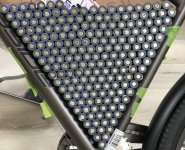
adam125r4 said:I need some help building a battery. I am trying to find the best way to get a 20s10p pack in this triangle. Look at the picture below. The picture is missing a couple of batteries. Overall there should be 200 batteries
is it missing batteries because they wont' fit? or for some other reason? if they won't fit, then it's a worse problem than it looks:
remember that you will need to fit the battery housing itself, including cell holders (or other insulation between different parallel groups so they cant' ever short against each other regardless of conditions), so you can't just put the cells against the frame to figure out layouts and stuff. you would need to include the thickness of the housing and any padding, and you would need to include the thickness of the cell holders or insulation.
next...if you're going to use a bms, you'll need to leave room for that, too, and all the wiring from it to the cells, such that there is no way for the wiring to get crushed or pinched or otherwise damaged.
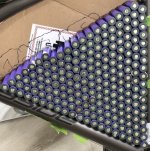
next...these cells have marks from previous welds. that usually means they are used recycled cells, which may mean they are not suitable for an ebike, depending on their condition and type and what's happened to them previously. (you can't necessarily trust what a seller says about such cells, either--their job is to make money, not to be fair to buyers). there are a lot of threads here on using recycled cells for packs, and how to test and sort them and make packs from them; i'd recommend looking for and reading as many of those as you can.
there are quite a lot of battery threads around here for designing and laying out packs, too, as well as types of interconnect, and matching the cells and interconnects to the intended usage of the pack (makign sure everything is designed for the currents to be used, for instance, so you don't end up with hot cells or interconnects, wasting power you could've used in the motor, and damaging cells over time).
what other specific help do you need, other than fitting that many cells into the triangle? (your post doesn't give us much to go on)
Thanks for the reply
The cells that are missing were just being tested. there is more than enough room for the bms and motor controller. and i bought honey comb battery holders they just haven't came yet. the cells were used but they are in great condition they are almost like new i have tested most of them, i am still testing the rest.
what i need help with is the best way to lay out the connections so there wont be any hot cells or interconnections.
Thanks
since we don't know how much current you need the pack to supply, then the only advice i could offer would be to use extremely thick copper plates for all interconnects, for maximum electrical and thermal conductivity. ")
so we need complete specific details about components you have and will have, usage, etc., before we can offer specific advice.
the less information you give us, the less help we can be to you.
without that, the best we can tell you is to read all of the many many threads about pack design and building, and see which ones match your usage scenario, and copy the ones that reported success and reported no problems.
don't follow the ones that didnt' specifically report success, and didn't specifically report no problems, because those are useless as they have no results to know whether their methods worked or not.
Hwy89
10 kW
I put together a 14s 12p triangle pack a couple of seasons ago and think I know what you are asking for.
First if all decide what you will use to cover and contain the pack. I used a large Ibera triangle bag which fit the bike perfectly but it had a horizontal zippered opening that wouldn’t allow the battrey to be inserted in one piece. The solution was to make two 7s packs that fit together and each half would fit through the opening one at a time.
The design parameters now involved arranging 168 cells into two sections with each group of 12 cells having at least 3 surfaces adjacent to the next series group. My low tech solution was to get a couple of rolls of dimes and some big sheets of paper. I traced the shape of the bag onto the paper leaving room around the perimeter for coroplast packing. I then set about arranging dimes on the paper triangle (heads positive and tails negative) to figure out a workable pattern. Once that was done I drew the pattern on the paper and used it as a template to follow as I welded the groups together. You are using cell separators so you may not need all those coins but the point is to get it all worked out on a full size paper diagram before you start putting cells together.
Hwy89
10 kW
OK, cool. Now do you have a specific question?
afaict, his question is
from a few posts up.
what i need help with is the best way to lay out the connections so there wont be any hot cells or interconnections.
from a few posts up.
speedmd
10 MW
A bit costly, but something along the lines of these sticky backed thermal pads would be a consideration to separate strings-voltage steps if they don't take up too much room. A bit of extra space between the inner strings possibly if room allows?
https://www.digikey.com/product-detail/en/panasonic-electronic-components/EYG-S060910/P11440-ND/372856
https://www.digikey.com/product-detail/en/3m/5549S-05/3M156076-ND/6139557?utm_adgroup=Thermal%20-%20Pads%2C%20Sheets&utm_source=google&utm_medium=cpc&utm_campaign=Shopping_Fans%2C%20Thermal%20Management_NEW&utm_term=&utm_content=Thermal%20-%20Pads%2C%20Sheets&gclid=EAIaIQobChMIuNq096zK6AIV5f7jBx1elQalEAQYCCABEgJ1efD_BwE
thundercamel
10 kW
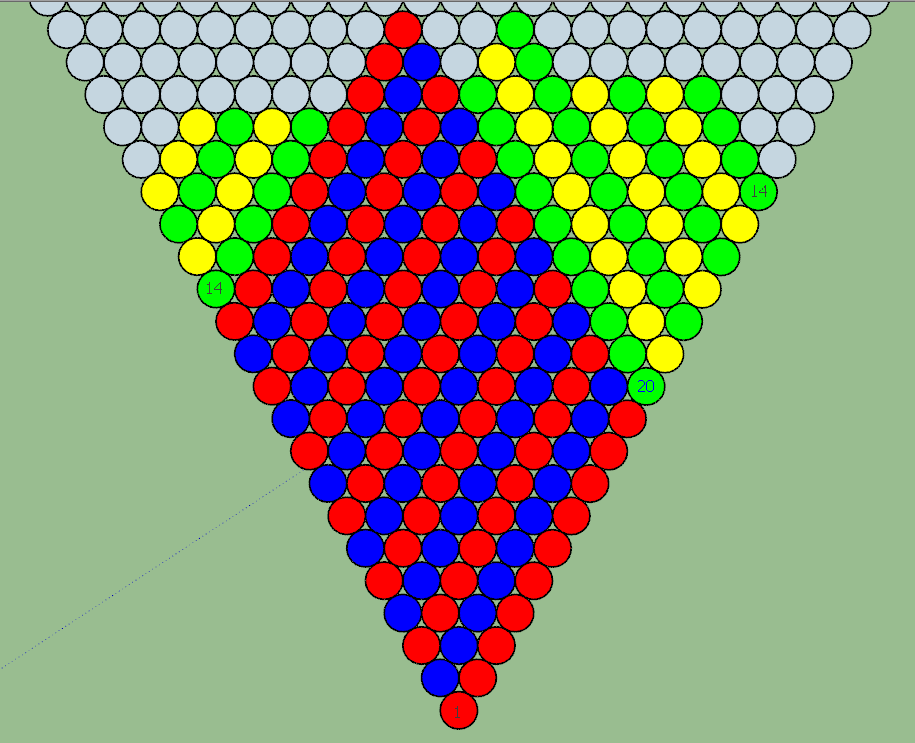
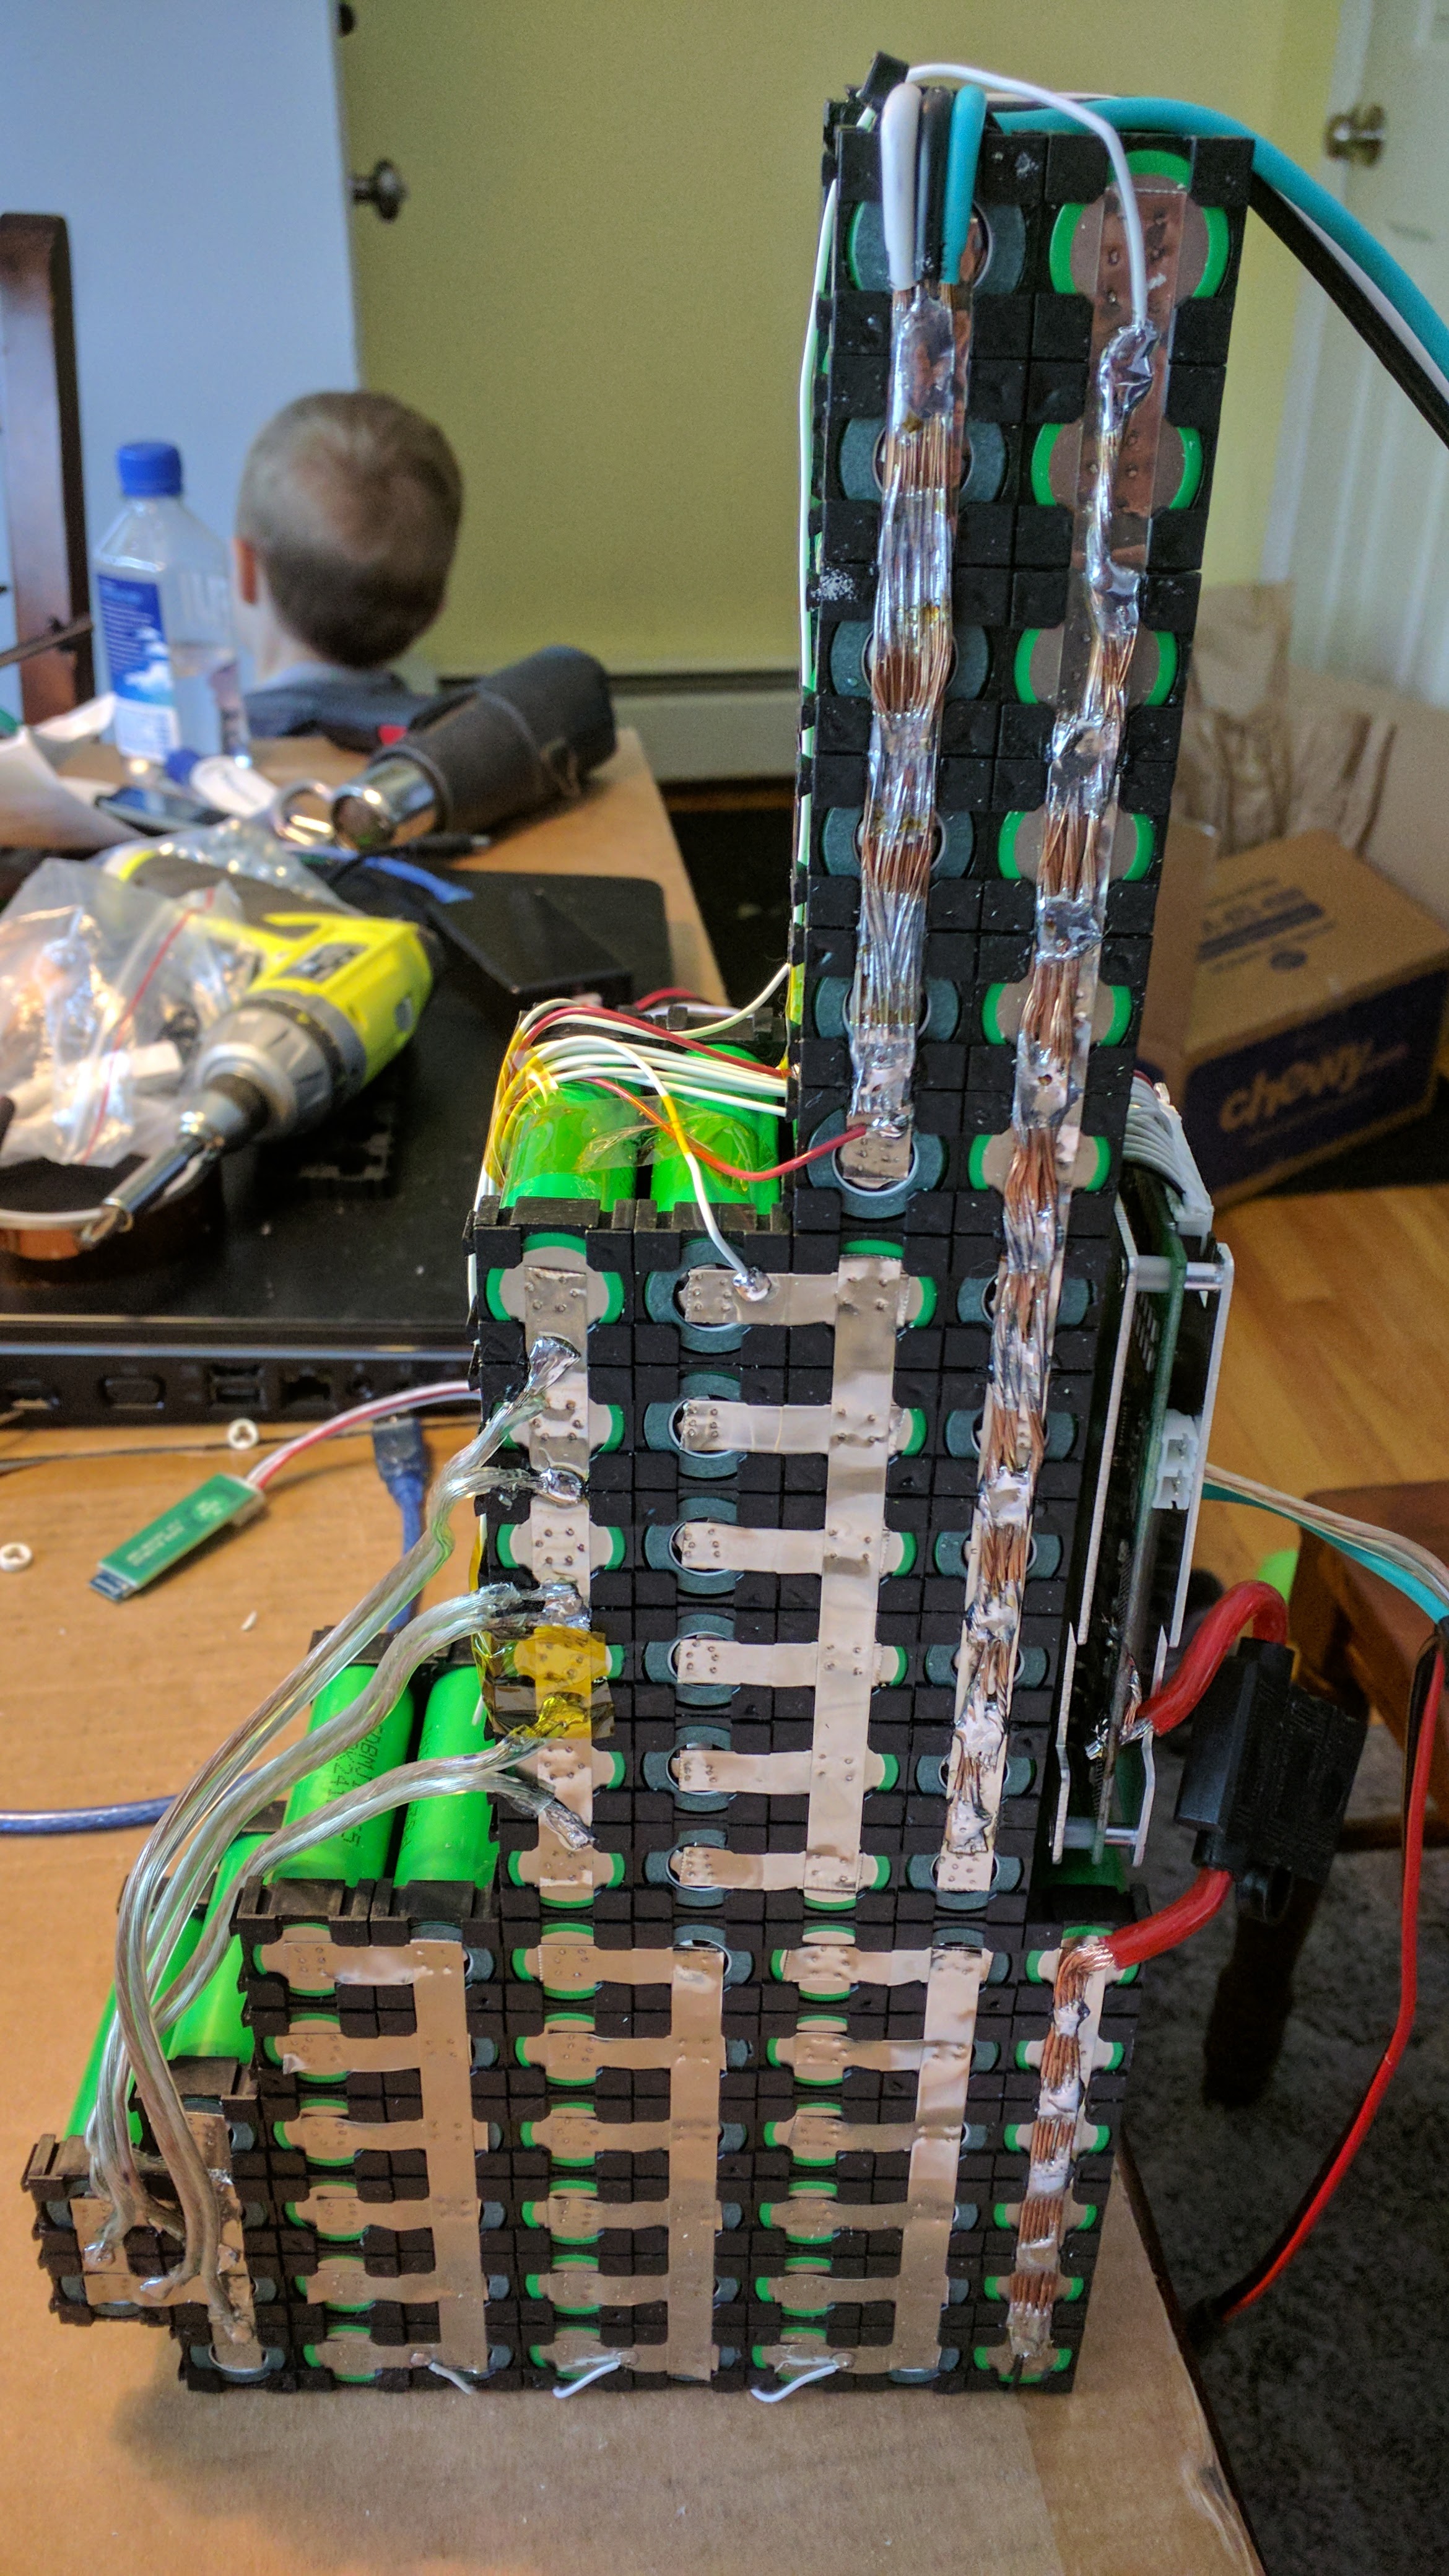
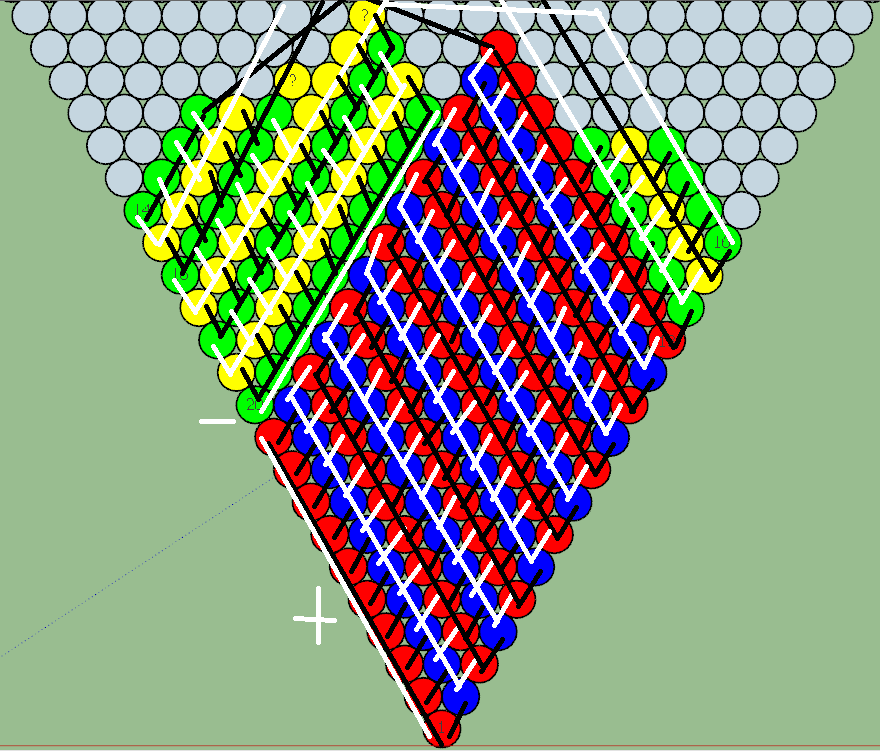
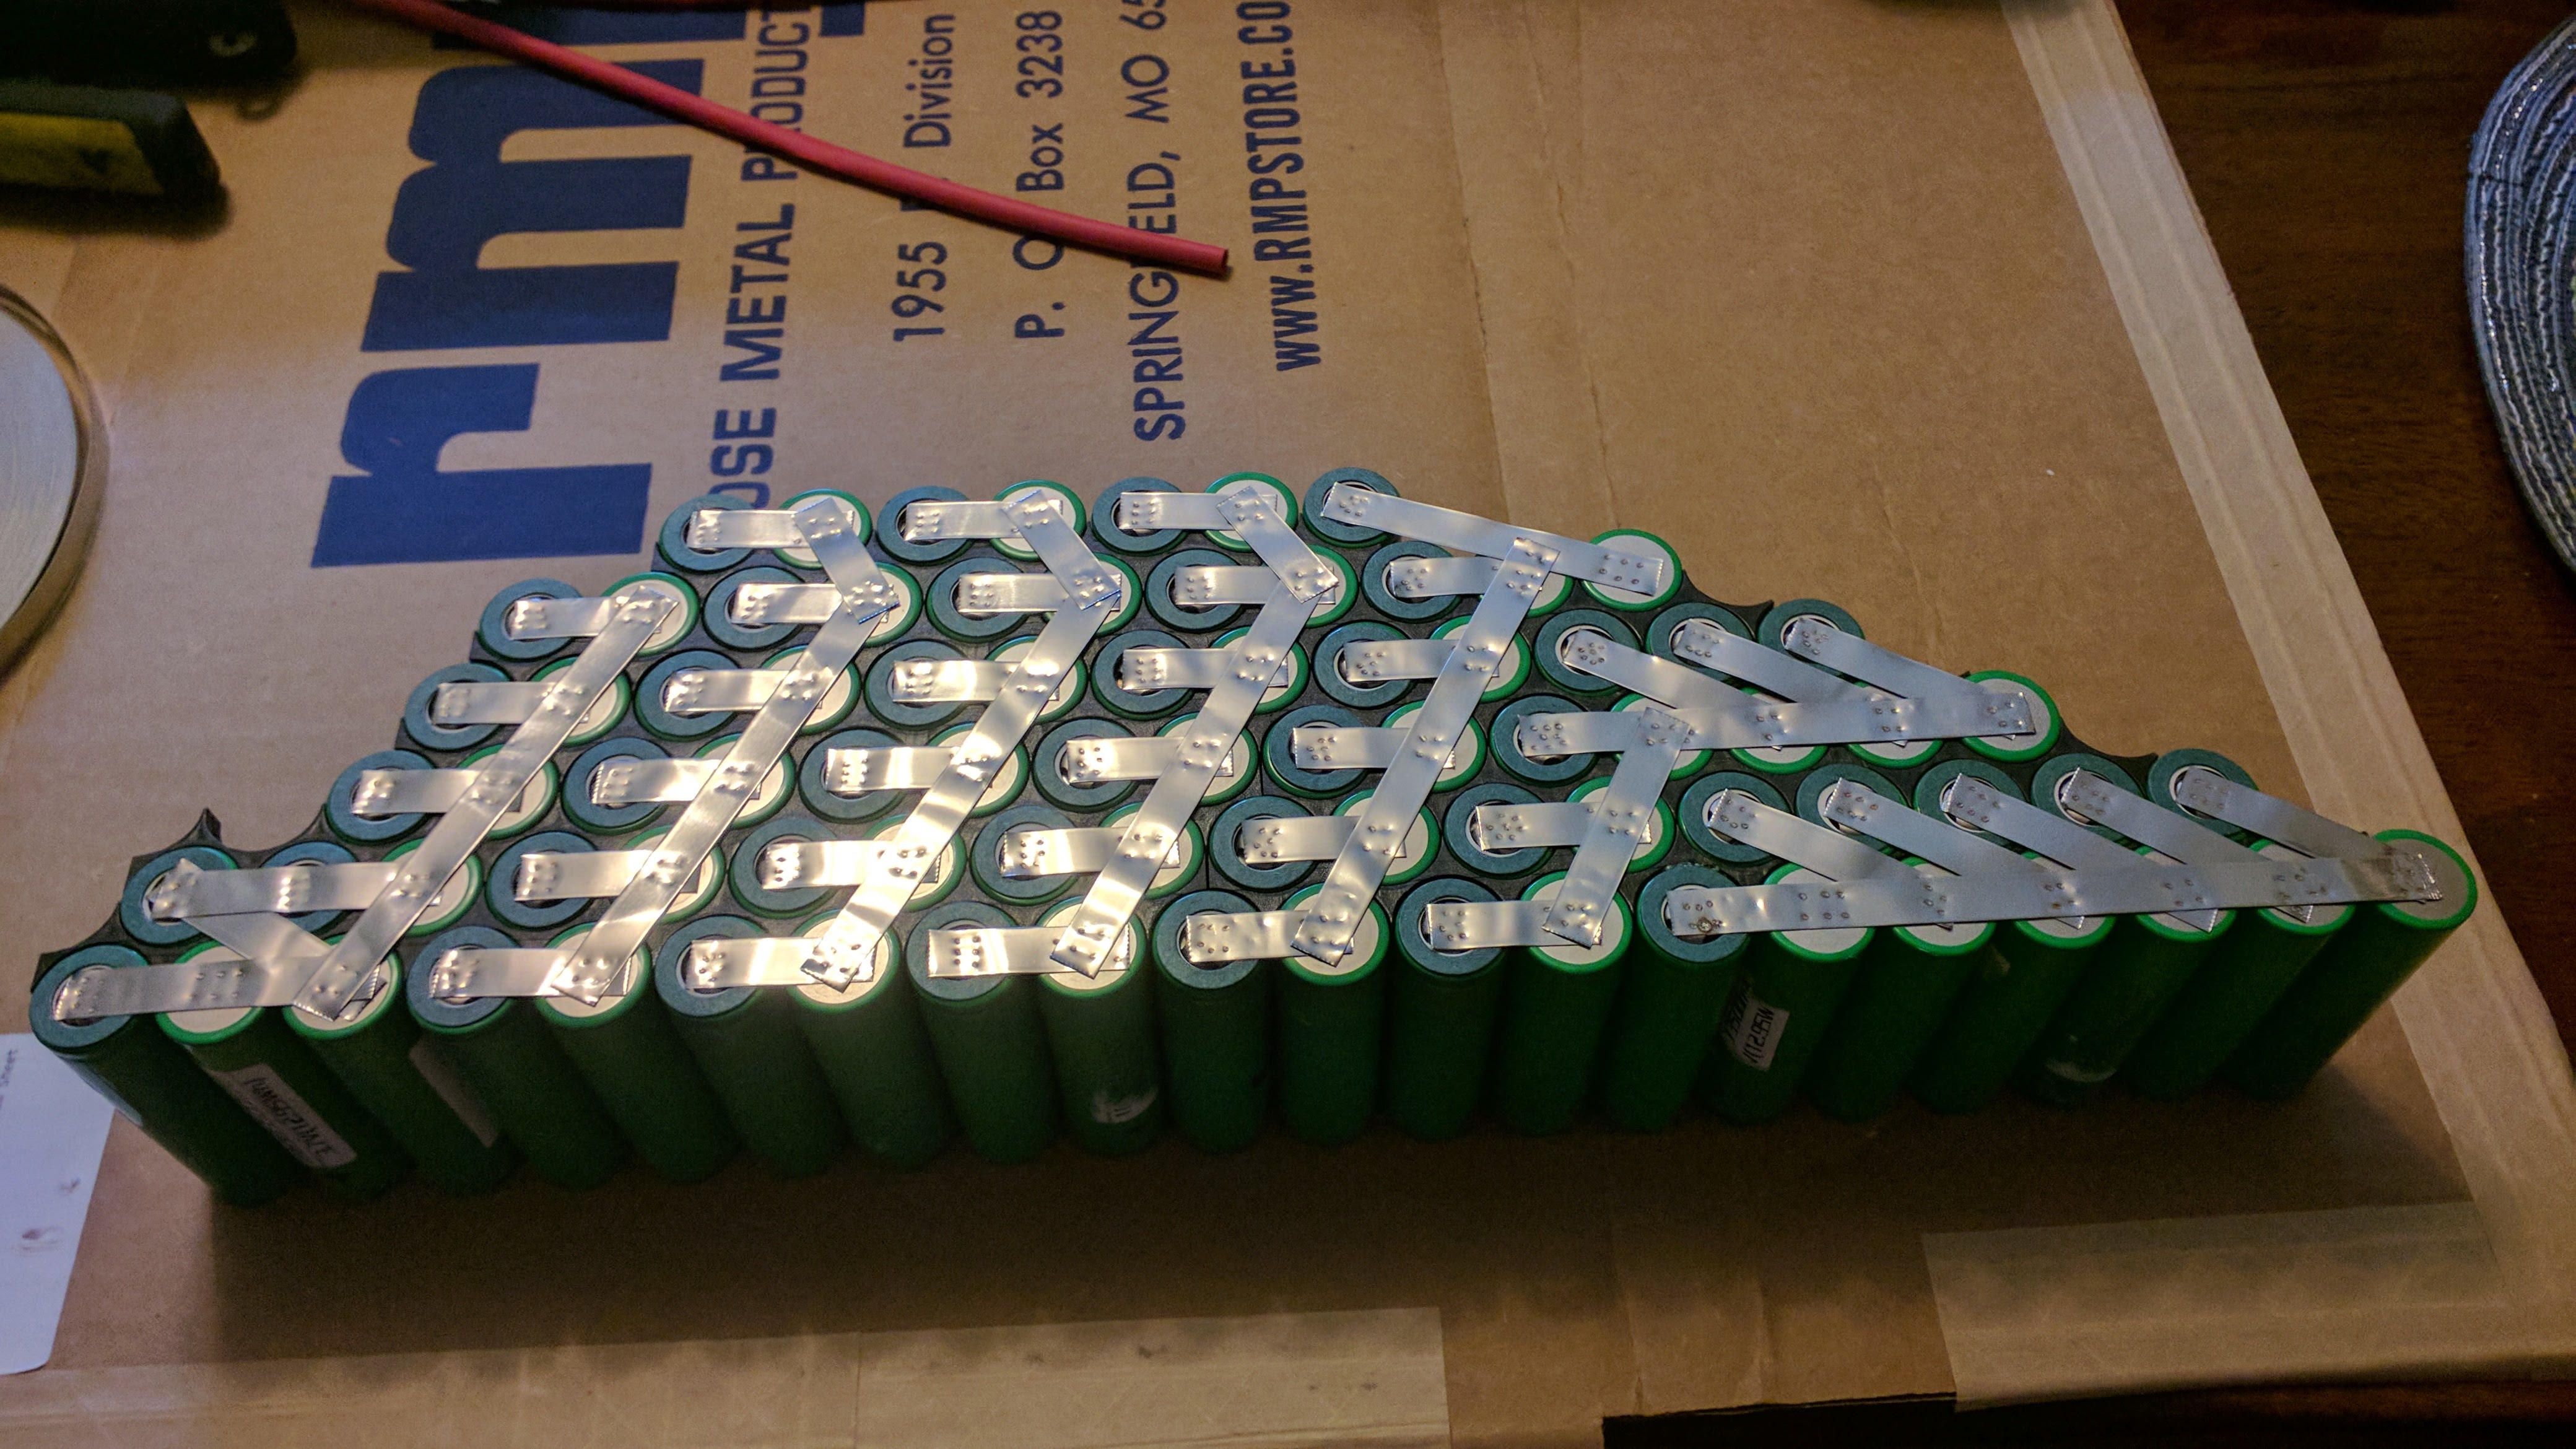
This was actually my favorite part of designing my batteries. Looks like your frame is very close to 60 degrees between those tubes. Building an enclosure will take up some space, but won't change that 60 degrees. If you're using cell spacers like the ones I used, they at least state a distance of 19.1 mm between cells/center to center. I used that to draw up come circles in SketchUp, which is a free program. Since you're going for all 100 amps, the goal is to maximize the number of parallel connections. One strip of 0.15x8mm nickel according to the chart below can do 4.9 amps, so you'll need two layers for all 10 parallel connections. Using just the nickel for most of the parallel connections though means that there's no getting around having to split some of the groups up, which will require wiring outside of the nickel strips to distribute current between the groups. I've included a picture of one of my batteries to show an example.

Open as a new tab for full resolution:
Open as a new tab for full resolution:
thank you soooo much this really helps.
could you change it so that the battery's with the x move over to the left side because there isn't much room on the right side. (i want to add foam and it might get in the way)
Also could you help me out and tell me what gauge wire i need to connect the left and right side batteries
and what would be the best way to lay out the nickle strip on the batterys

goatman
10 MW
I had a 4p of m26 run at 20 amp, awfull battery. you want 100amps from 10p of m26 so 10amps/cell. its 500 lifecycle at standard 0.5amp discharge, it lost 70% capacity. me running at 5amp max per cell, I didn't even get 200 cycles out of it.
heres a test of the m26
https://lygte-info.dk/review/batteries2012/LG%2018650%20M26%202600mAh%20(Purple)%20UK.html
heres a test of the m26
https://lygte-info.dk/review/batteries2012/LG%2018650%20M26%202600mAh%20(Purple)%20UK.html
goatman
10 MW
adam125r4 said:thanks for the info on the battery. i don't have money right now to buy new cells so i will just have to deal with it and once they break ill upgrade to some better cells.
I know what that's like, my first e bike had the m26 battery and it almost turned me off ebikes. heres a link to rg12 experience with 8p of m26. its the volt sag/high resistance, itll trip the lvc of controller. so go easy on the throttle.
https://endless-sphere.com/forums/viewtopic.php?f=2&t=85772
thundercamel said:This was actually my favorite part of designing my batteries. Looks like your frame is very close to 60 degrees between those tubes. Building an enclosure will take up some space, but won't change that 60 degrees. If you're using cell spacers like the ones I used, they at least state a distance of 19.1 mm between cells/center to center. I used that to draw up come circles in SketchUp, which is a free program. Since you're going for all 100 amps, the goal is to maximize the number of parallel connections. One strip of 0.15x8mm nickel according to the chart below can do 4.9 amps, so you'll need two layers for all 10 parallel connections. Using just the nickel for most of the parallel connections though means that there's no getting around having to split some of the groups up, which will require wiring outside of the nickel strips to distribute current between the groups. I've included a picture of one of my batteries to show an example.
Open as a new tab for full resolution:
thank you soooo much this really helps.
could you change it so that the battery's with the x move over to the left side because there isn't much room on the right side. (i want to add foam and it might get in the way)
Also could you help me out and tell me what gauge wire i need to connect the left and right side batteries
and what would be the best way to lay out the nickle strip on the batterys
Attachments

thundercamel
10 kW
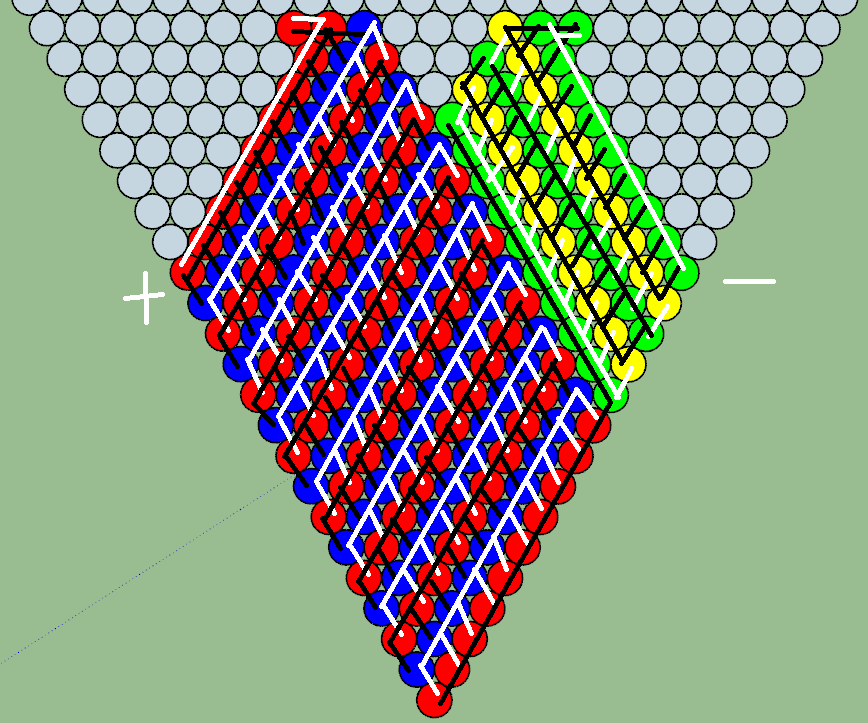
This was my first idea, to just flip the design around, and remove one row. That yellow group with the question mark could move that cell to either location, depending on how pointy you'd want the top. The black lines represent all of the connections (nickel strips and wires) on one side of the battery, and the white lines are for the other side. The two single white lines at groups 1 and 20 will be the positive and negative terminals.adam125r4 said:thank you soooo much this really helps.
could you change it so that the battery's with the x move over to the left side because there isn't much room on the right side. (i want to add foam and it might get in the way)
Also could you help me out and tell me what gauge wire i need to connect the left and right side batteries
and what would be the best way to lay out the nickle strip on the batterys
For bridging one part of the battery to the other in this design, the black wire between groups 13 and 14 and the white wire between groups 16 and 17 need to handle 40 amps each, since there are already 6 pairs of nickel strips in play on each. Two runs of 10 gauge copper should be fine.
The white wire between 14 and 15 and the black wire between 15 and 16 only need to handle 10 amps each, since there are already 9 pairs of nickel strips in play on each. 16 gauge copper wire should be fine.
If you don't mind the battery being even taller, this design would simplify the wiring:
There's just the big connection between groups 15 and 16 represented by that single black line. I'd split that 100 amps up with 4 runs of 10 gauge, or a couple runs of 8 gauge copper. The picture of my battery that I previously shared shows how I like to make my connections from the nickel strips out to copper wires, by soldering between the cells to keep them from getting hot. There are other ways though.
Be careful affixing the batteries together with nothing more than the insulation wrap between them. That stuff is not terribly durable and an eventual short can burn your whole pack up. Bikes are subject to a lot of vibration, especially ebikes running at higher speed. It doesn't take too much imagination to see that this can be a serious problem when the batteries perform significant structural work supporting all the other batteries. At very least, it's a good idea to isolate adjacent series groups since case shorts on parallel cells won't matter.
thundercamel
10 kW

thundercamel said:This was my first idea, to just flip the design around, and remove one row. That yellow group with the question mark could move that cell to either location, depending on how pointy you'd want the top. The black lines represent all of the connections (nickel strips and wires) on one side of the battery, and the white lines are for the other side. The two single white lines at groups 1 and 20 will be the positive and negative terminals.adam125r4 said:thank you soooo much this really helps.
could you change it so that the battery's with the x move over to the left side because there isn't much room on the right side. (i want to add foam and it might get in the way)
Also could you help me out and tell me what gauge wire i need to connect the left and right side batteries
and what would be the best way to lay out the nickle strip on the batterys
For bridging one part of the battery to the other in this design, the black wire between groups 13 and 14 and the white wire between groups 16 and 17 need to handle 40 amps each, since there are already 6 pairs of nickel strips in play on each. Two runs of 10 gauge copper should be fine.
The white wire between 14 and 15 and the black wire between 15 and 16 only need to handle 10 amps each, since there are already 9 pairs of nickel strips in play on each. 16 gauge copper wire should be fine.
If you don't mind the battery being even taller, this design would simplify the wiring:
There's just the big connection between groups 15 and 16 represented by that single black line. I'd split that 100 amps up with 4 runs of 10 gauge, or a couple runs of 8 gauge copper. The picture of my battery that I previously shared shows how I like to make my connections from the nickel strips out to copper wires, by soldering between the cells to keep them from getting hot. There are other ways though.
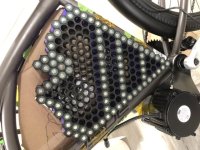
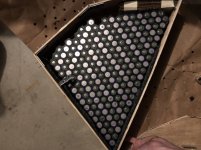
Here is where I’m at right now. The empty slots will contain battery’s but they were charging and I didn’t want to disrupt them.
There should be just enough room for the bms and motor controller but I don’t have the bms yet it is still in shipping so I can’t test fit it yet.
I want to add some foam padding on the outside and a 1/4 inch enclosure that I will make out of wood.
Attachments
thundercamel
10 kW
I'm impressed that you can place cells all the way down to the bottom bracket :thumb:
thundercamel
10 kW
Also just to make sure you know in case you're assembling that battery already, every other 10p group of cells has to be flipped around.
goatman
10 MW
I play with used cells and it looks like youre using batteries with punctured cans at the spotwelds. there is no frign way id be using those but maybe its just my eyes seeing something else like shadows?
Similar threads
- Replies
- 22
- Views
- 501
- Replies
- 35
- Views
- 1,528
- Replies
- 8
- Views
- 203
- Replies
- 54
- Views
- 1,163