jonescg's battery builds (historical reference - image heavy)

Interesting to see how you're getting the pouch cells to work- I'm honestly scared deathless of them, which is funny to say when cylindrical cells aren't much different!
Any other tips you could share about building with them?
 
Treat a pouch cell like an unpeeled banana. Very fragile, and needs to be well supported in a robust, movement-free compressive arrangement. Physical trauma is a really common source of fail, along with water ingress which causes the foils to corrode and the cells to eventually short and drain. Be careful of the tabs, and make sure there's little chance of the tab fretting against another cell, or something which can cause a short. Also, try not to put the tabs under any kind of tension - they rip out easy enough.

I never put much effort into ensuring consistent pressure was applied - something that would make the battery live a very long life, because these aren't expected to be in service for more than 3 or 4 years generally speaking. I mean, it is RC LiPo :lol:
 
jonescg said:
I used aluminium and had them nickel plated using an electrolytic process. Not cheap, but it appeared to work. It leaves a dull grey metallic look, and if you put it under a microscope it probably looks like a stack of spheres. In any case, the layer of nickel meant there was enough resistance to generate heat during spot-welding to take a 0.07 mm nickel tab.
[youtube]jumFyhtjylM[/youtube]

Multiply that about 10,000 times...
[youtube]N6nKPmhSE5g[/youtube]

In the end, the poor spotwelder had done so much work those long electrodes were worn down to a nub, my hands were sore and burned, but I made 4 complete double-sided modules.

more welds.jpg
Nickel plated aly sucks.jpg
20210118_201035.jpg
20210201_174648.jpg
top side welded.jpg

The next step was to coat the welded faces with a thermally conductive epoxy resin and glue a sheet of G10FR4 to it on either side.
thermal epoxy going on.jpg
Module glued up.jpg

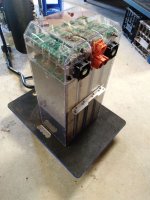
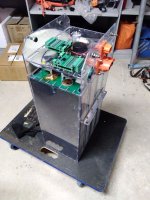
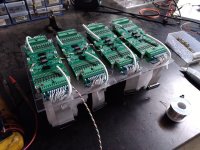
End result - a pretty much sealed, waterproof, rigid, robust battery module. The BMS wiring went to a pair of ZEVA BMS modules as 12s units plus four thermistors per module.

" thermally conductive epoxy resin " what brand name you recommend for dielectric one ?
 
Hi Art,
I used a filled resin from a firm in China. Its a two part mix with a thermal conductivity of around 1.4 W/mK which is typical for these non-conducting resins. I'll look it up.

Edit: The thermally conductive epoxy resin is from a company called U-sheen www.sheenthermal.com And it's product ID is epoxy S8960.
 
jonescg said:
Hi Art,
I used a filled resin from a firm in China. Its a two part mix with a thermal conductivity of around 1.4 W/mK which is typical for these non-conducting resins. I'll look it up.

Edit: The thermally conductive epoxy resin is from a company called U-sheen www.sheenthermal.com And it's product ID is epoxy S8960.

Thank you for sharing this ! Admire your built and youtube vids :bigthumb:
 
These are some images of the new race bike battery pack I've built. Only difference between this one and the e-bike battery you see a few posts back, it the nickel-copper-cell sandwich. The Sunkko transformer based spot-welder does a great job. Nickel is 0.15 mm thick, and copper is 0.07 mm thick. Images of the polycarbonate enclosure and air cooling concepts to follow in the next post.
Copper in.jpg 4 modules assembly.jpg 4 modules on their way.jpg 20231028_160427.jpg 20231028_165729.jpg 20231029_114626.jpg 4 modules complete iso.jpg
This is 12 kWh (each module is 3 kWh, and weighs 17.2 kg. The port holes were for adding polyurethane potting compound, however I only really potted the base and just used crazy expanding foam to keep the balance wires secure. Much lighter that way.
 
This is the rest of the battery build in pictures:
 

Attachments

  • The bike complete.jpg
    The bike complete.jpg
    328.1 KB · Views: 15
  • Main negative link.jpg
    Main negative link.jpg
    197 KB · Views: 19
  • Pack almost done2.jpg
    Pack almost done2.jpg
    273.6 KB · Views: 18
  • 20231220_170257.jpg
    20231220_170257.jpg
    277.8 KB · Views: 18
  • 20231228_202722.jpg
    20231228_202722.jpg
    190 KB · Views: 18
Stuart Jameson asked me to build a special battery for a unique project - salt lake racer at Lake Gardiner.
View attachment 318615
View attachment 318616
View attachment 318617
One problem with these LiPo cell packs, is that you don't know the exact dimensions of the battery until its built. The cell supplier might assure me they are 7.8 mm thick, but they are more like 8.0 mm thick, and after stacking 40 of them together you have an enclosure which is a wee bit too small...
View attachment 318618

He specifically asked me not to glue the cells in place as he wanted the option of taking them apart. I advised against it, but the idea was it would so a handful of runs on the salt and then not get used for ages, so it was worth the risk.
Very nice battery building,
i am building a 24 s 1p lipo kokam cells 67ah would like to know how you figure out the compression needed, I want to build like you, with polycarbonate,
do you fold the side and bottom seam flat against pouch ?
How do you manage the difference between aluminum and copper?
Thanks
 
Back
Top